Role Management
Overview
Roles in Sugar® determine which users can access modules as well as which operations the users are allowed to perform within those modules. When configuring role settings in Sugar, an administrator may choose to enforce restrictions for entire modules or for selected fields on the records in a module, as explained in the following sections. To fully leverage Sugar's security model, both permission types can be used together for a given role and should be considered in conjunction with the Team Management settings used by your organization.
Administrators have the ability to create different roles and assign regular users to the roles. A user can be related to any number of roles, and when multiple roles or role settings are applied, Sugar adheres to a most-restrictive policy to determine the user's appropriate access levels. Administrators can be related to roles, but it does not affect their access as their administrative rights supersede any restrictions imposed by Role Management. However, the roles may still be used to apply role-based views to an admin. For more information on System Administrator users, please review the User Management documentation.
Roles control multiple layers of actions and access for users within Sugar:
- Module-Level Permissions
- Record-Level Permissions (i.e., Team-Based Permissions)
- Field-Level Permissions
Exceptions
The following modules respond uniquely to role settings in Sugar:
- Forecasts Module: For the Forecasts module, roles will allow or deny access at the module level with no further layers of access. Because the Forecasts module uses data from the Opportunities, Products, Quotas, Worksheet, and Time Period modules, the Forecasts module does not respect the module- or field-level ACLs for those modules. For example, the opportunity data that is shown in the Forecasts module worksheets will be displayed and editable regardless of whether or not the user has access to the Opportunities module or has field-level restrictions in that module.
- Reports Module: If a user's role restricts their access to a field that is used in a report, the user will not be allowed to see any information on the report.
Roles Module Tab
Click the Roles module tab in the navigation bar, shown after selecting Role Management in the Admin page, to access the Roles list view. You may also click the three-dots menu in the Roles module tab to display the Actions and Recently Viewed menus. The Actions menu allows you to perform important actions within the module. The Recently Viewed menu displays the list of roles you last viewed in the module.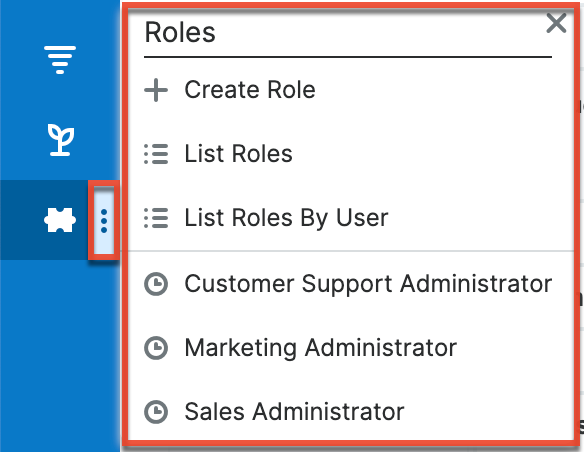
The Actions menu allows you to perform the following operations:
| Menu Item | Description |
| Create Role | Opens the edit view to create a new role. |
| List Roles | Opens the list view layout to search and display roles. |
| List Roles By User | Opens a page for viewing each user's access according to their combined roles. |
System-Generated Roles
The following roles in Sugar are automatically generated by the system and should not be deleted or have the access controls modified to avoid unknown and unpredictable system behavior.
Customer Self-Service Portal Role
The Customer Self-Service Portal Role is a system-generated role created during the Sugar Portal activation process. Use the access controls within this role to enable and/or disable Bugs, Cases or Knowledge Base modules in Sugar Portal. But please do not delete this role or modify any other access controls for this role to avoid unknown and unpredictable system behavior. If this role is accidentally deleted, you can recreate it by disabling and enabling the Sugar Portal again.
SugarIdentity User Management Role
For instances that use SugarIdentity, the administrator can grant regular users "Admin & Developer" access to Users, Teams, and Roles in Sugar as well as access to SugarIdentity to manage certain user data by assigning them to the SugarIdentity User Management Role. This is a system-generated role that appears when the administrator enables the SugarIdentity User Management Role setting in SugarIdentity. This role is only configured with Access Type set to "Admin & Developer" for Users/Teams/Roles. Please do not delete this role or modify the default Access Type setting for the Users/Teams/Roles modules on the role chart. If this role is deleted accidentally, you can recreate it by disabling and enabling the SugarIdentity User Management Role setting in SugarIdentity.
When regular users are assigned to this role, they will be granted "Admin & Developer" access to Users, Teams, and Roles in Sugar and be able to access SugarIdentity as well to manage certain user data (e.g., name, email address) and perform certain actions without having full system administrator access. For more information on assigning users to this role, refer to the SugarIdentity User Management documentation.
Creating Roles
Sugar's roles specify which users can access modules, as well as which operations the users are allowed to perform within those modules. When configuring role settings in Sugar, an administrator may choose to enforce restrictions for entire modules or for selected fields on the records in a module, as explained in the following sections. To fully leverage Sugar's security model, both permission types can be used together for a given role and should be considered in conjunction with the team access settings used by your organization.
Creating Roles via Role Management
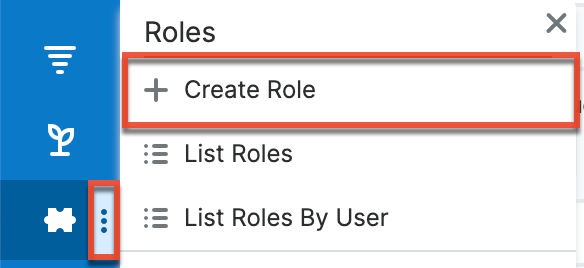
The most common way to create a role is via the Create Role option in the Role Management module tab. This opens up the edit view layout which allows you to enter in all the relevant information for the role.
Use the following steps to create a role via Role Management:
- Navigate to Admin > Role Management.
- Note: The Roles list view will open displaying all existing roles that are currently available.
- Click the three-dots menu in the Roles module tab and select "Create Role".
- Enter the appropriate values for fields in the edit view layout. All required fields will indicate "Required" in the field and must be completed prior to saving.
- On the Role Chart screen, configure the module and field permissions, and assign users to the role.
Creating Roles via Duplication
You can also create a new role by duplicating an existing role. The duplicate option is useful if the role you are creating has similar information to an existing role.
Use the following steps to create a role by duplicating an existing record:
- Navigate to a role record's detail view.
- Click the Actions menu and select "Duplicate".
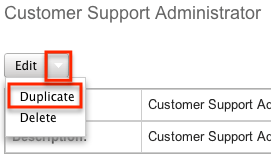
- The displayed edit view is pre-populated with the original role's values. Update the necessary fields, then click "Save".
- On the Role Chart screen, update the module and field permissions, and assign users to the role.
Setting Module-Level Permissions
Sugar's Role Chart contains ten columns and has a row for each module down the left-hand side. The columns represent an access level or a type of operation within Sugar, and the corresponding points between the columns and module rows define the role's permission setting for the operation within the given module.
To configure or make changes to a role, follow the steps below:
- On the Role Chart, find the intersection of the operation and the module that you would like to adjust and click inside the corresponding table cell.
- A dropdown list displays the options available for that configuration. Select the appropriate security option based on the access and operation definitions explained later on this page.
- Repeat steps 1 and 2 for any other fields you would like to change in this module for the current role.
- When complete, click "Save" to secure the changes.
Note: The most restrictive role setting always takes precedence when Sugar has to choose between two or more settings.
The following table explains the Role Chart's components in detail. Please scroll beyond this table for descriptions of each configuration option.
| Role Chart Column Header |
Configuration Options | Description | Additional Comments |
| Module (blank header row) |
N/A | Identifies which module the row's settings will affect. | |
| Access | • Enabled • Not Set • Disabled |
Controls access to the entire module for users in this role. | When access to a module is disabled, the user is prohibited from viewing any records in this module. They cannot see a tab for the module in the navigation bar, and other module records do not reveal this module's subpanel to the user. For more information, please refer to the Module Access definitions below this table. |
| Access Type |
• Normal |
For enabled modules, Access Type determines how much control users in this role have over the module. | Please refer to the Module Access Type definitions below this table. |
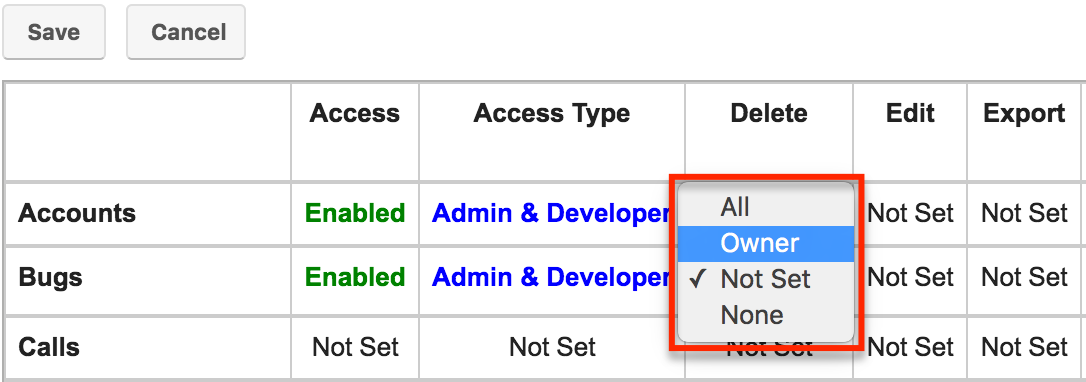
| Delete | • All • Owner • Owner & Selected Teams* • Not Set • None |
Restricts users from deleting or merging records in this module. | Restricting a user's ability to delete records also restricts a user's ability to merge records in the module since merging results in deleting one or more records. |
| Edit | • All • Owner • Owner & Selected Teams* • Not Set • None |
Restricts users from editing, creating, or merging records in this module. | Although it is labeled "Edit", this role setting also affects the Create functionality because the process of creating a record functions the same way as editing. It also restricts the merge functionality in Sugar, which modifies existing records. |
| Export | • All • Owner • Owner & Selected Teams* • Not Set • None |
Restricts users from exporting data from this module to their local computers. |
This role setting affects usage of the Sugar API, which is the framework used for external connections. For more information on exporting, please refer to the Export documentation in the Application Guide. |
| Import | • All • Not Set • None |
Restricts users from importing data into this module. | This role setting affects usage of the Sugar API, which is the framework used for external connections. For more information on importing, please refer to the Import documentation in the Application Guide. |
| List | • All • Owner • Owner & Selected Teams* • Not Set • None |
Restricts a user's ability to see records in a list view or subpanel. | A module's list view is not visible to users where "List" is set to "None". |
| Mass Update | • All • Not Set • None |
Restricts users from using the Mass Update functionality in this module's list view. | The Mass Update option is not visible on the list view's Actions menu when "Mass Update" is set to "None". If "List" is set to "None", the Mass Update configuration is inconsequential. To entirely prohibit users in a role from updating many records at once, set "Import" to "None" as well to prevent mass updates via import. |
| Record View | • All • Owner • Owner & Selected Teams* • Not Set • None |
Restrict access to the record view which displays an individual record's details. | When "Record View" is set to "None", the module's list view displays record's names, but the names are not hyperlinked to their corresponding record views like they are for users with the View permission enabled. When a module's Record View setting is "None" or "Owner", the access level for "Edit" and "List" must be set to the same value to ensure desired functionality for the SugarCRM mobile app and other API-based applications. |
*The Owner & Selected Teams option only appears for modules using team-based permissions. For more information, please refer to the Enabling Team-Based Permissions section of this page.
The following sections explain the various configuration options available in the Role Chart.
Module Access Definitions
The Access column provides the following options:
- Enabled: The user can access this module in Sugar.
- Not Set: The user is neither restricted nor granted access to this module. When permission is "Not Set", the users within this role default to "Enabled" access.
- Disabled: The user cannot access this module, view any of its records, or see any trace of its existence in Sugar.
Note: To ensure proper functionality, a user's access to the Revenue Line Items and Opportunities modules should be consistently configured. The user should not have access to one module without access to the other.
Module Access Type Definitions
The Access Type column provides the following options:
- Normal: The user can perform standard functions in this module barring restrictions from other roles or team settings. The user cannot access the Administration functions for this module.
- Not Set: The user is neither restricted nor granted access to this module. When permission is "Not Set", users within this role default to "Normal" access.
- Admin: The user is not subject to any Teams restrictions for this module and can view all records, barring other role restrictions. Admin access also forces "All" access for that module's action-related columns (e.g., Edit, Delete, etc.) if the row's operation-related columns remain "Not Set". However, any more restrictive options you may choose will supersede the Admin access. Please note that the module-level Admin access type does not grant access to the Administration functions for this module.
- Developer: The user has access to the module-specific sections of Studio, SugarBPM, Workflow Management, Dropdown Editor, and any other Administration functions that are specific to the module. The user's access to Sugar records is not affected; access remains subject to Teams restrictions and action-related role restrictions for this module. For more information on developer tools, please refer to the Developer Tools documentation.
- Admin & Developer: The user is not subject to any Teams restrictions for this module and can access Administration functions for this module. For more information, please refer to the descriptions for the "Admin" and the "Developer" access types above.
For more information on Admin, Developer, and Admin & Developer roles, please refer to the article Understanding Admin and Developer Access in Roles.
Record Operation Definitions
The operation columns (e.g., Edit, Delete, etc.) provide the following configuration options:
- All: The user can perform this action on any and all records that they can access in Sugar per their team memberships.
- Owner: The user can perform this action only if they are the "Assigned To" user on the record.
- Owner & Selected Teams: The user can perform this action if they are the "Assigned To" user on the record or if they belong to a team that is designated as having extra access on the record. This option is only visible if an administrator has enabled team-based permissions for the module.
- Not Set: The user is neither restricted nor granted access to this function. When permission is "Not Set", users within this role default to "All" access.
- None: The user cannot perform this action on any records within this Sugar module.
Note: When using the Owner & Selected Teams setting, any user with permission to edit the Teams field can extend role permissions to other users. To maintain a tighter security model, we recommend using this setting in conjunction with field-level access control on the Teams field to regulate who can edit the teams on a record.
Setting Record-Level Permissions
In Sugar, teams are typically used to control which groups of users can access a record. Using the record-level, team-based permissions, however, an administrator may choose to extend the purpose of teams to control who can perform certain operations on the record (e.g., edit, delete, etc.). When enabled, regular users can use a record's Teams field to grant access such as viewing, editing, exporting, importing, and deleting permission to specific users or user groups.
For more information on teams, please refer to the Team Management documentation.
Enabling Team-Based Permissions
An administrator may decide to enable record-level, team-based permissions for none, some, or all of the modules in a Sugar instance. Once enabled, the administrator can build roles that utilize the new access option (Owner & Selected Teams).
Follow these steps to enable the team-based permission capability:
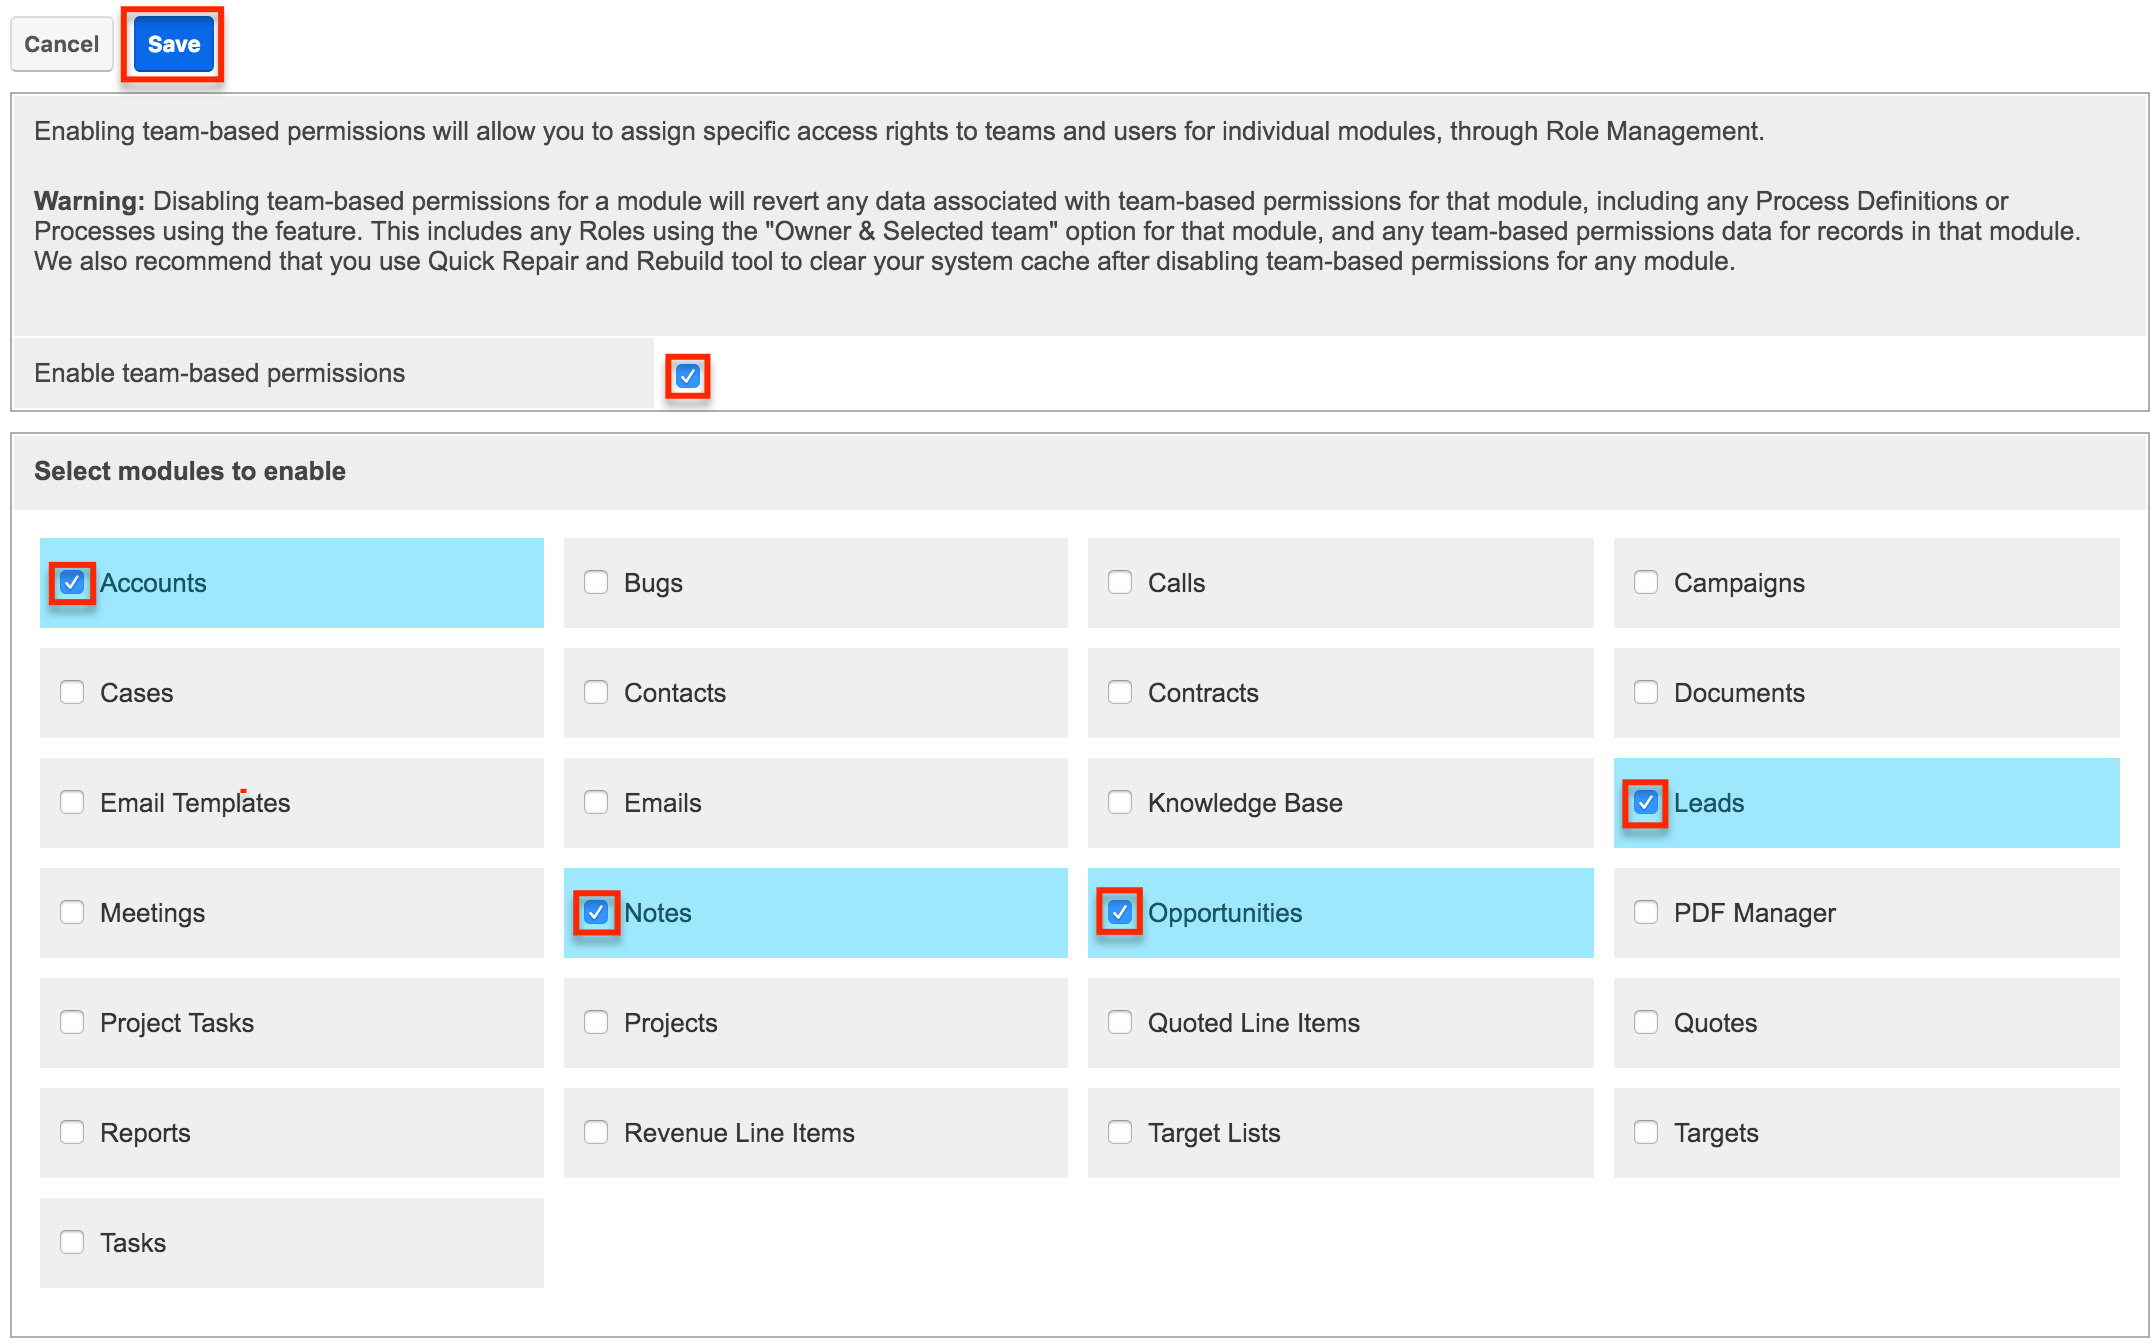
- Navigate to Admin > Team-based Permissions.

- If an administrator has never enabled team-based permissions for this instance, the configuration page will open and display a warning message above a disabled checkbox. Click on the checkbox labeled "Enable team-based permissions" to select the modules you want to enable. If the checkbox is already selected, you will see the modules listed prominently on the configuration page.
- Place a checkmark in the boxes next to modules that should support team-based permissions. The square behind the module name changes from gray (disabled) to blue (enabled) upon selecting the checkbox. Once you are satisfied with your selections, click "Save" to preserve the changes.
After saving, you can confirm that a module has been enabled for team-based permissions by clicking "Edit" on any record within the module and viewing the Teams field. Each team's name in the widget should include a Lock button, defaulted to a disabled (white) state. 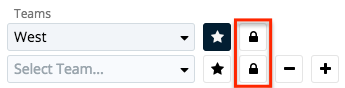
If the Teams widget does not show the Lock buttons, confirm that you properly saved the admin settings in step 3, perform a Quick Repair and Rebuild, and try refreshing your browser's cache.
You may now create roles that utilize the "Owner & Selected Teams" access type for actions in the enabled modules. Please note that team-based permissions have no effect on Sugar until users have been assigned to roles that are configured with "Owner & Selected Teams" access. For more information, please refer to the Record Operation Definitions section of this page. For information on using team-based permissions on a record, please refer to the User Interface documentation.
Disabling Team-Based Permissions
Disabling team-based permissions for a module permanently removes any data associated with team-based permissions for that module. Any role definitions using the "Owner & Selected Team" option for field-access settings or operations in that module revert to the more restrictive setting, "Owner". All record-level, team-based permissions data for that module are also permanently deleted. Sugar will not remember a record's role-related team settings if you ever wish to re-enable the module for team-based permissions.
To disable team-based permissions for a module, navigate to Admin > Team-based Permissions, uncheck the box next to the appropriate module's name, and click "Save". To disable the functionality for the entire instance, simply uncheck the box labeled "Enable team-based permissions" and click "Save". After disabling team-based permissions for any module, please use the Quick Repair and Rebuild tool to clear your system's cache.
Setting Field-Level Permissions
Role Management also provides the option to set permissions and restrictions on specific fields within modules. To change the field-level permissions for a role, follow these steps:
- Navigate to Admin > Role Management.
- Create and save a new role or select an existing role to edit.
- On the left side of the screen, click on the name of the module that contains the field(s) you would like to restrict.
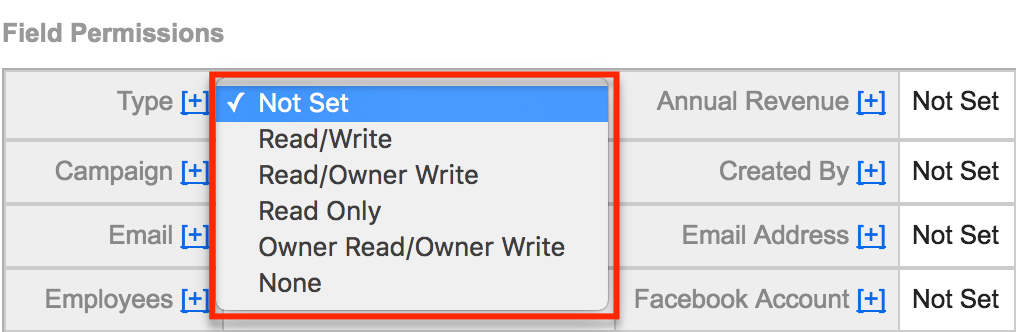
- On the next screen, find the field that you would like to restrict and then click inside the table cell to the right of that field name. In this example, click on the words "Not Set" next to the word "Type" to edit access to the Type field.
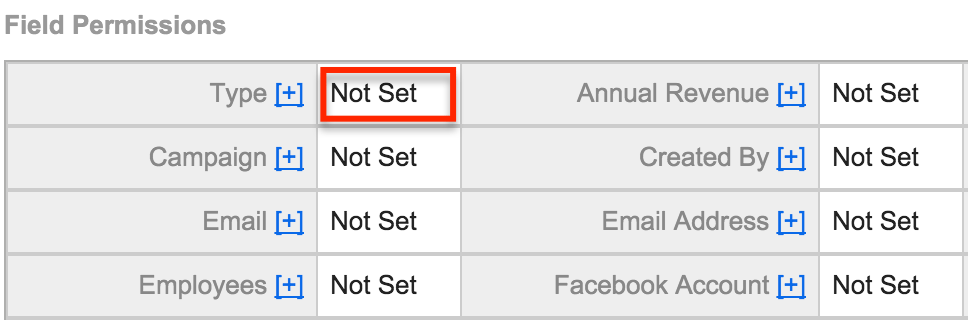
Note: Some fields may be part of a group and the access setting will affect all of the fields in the group. To see which fields, if any, are in a group with the field you are editing, click the Plus (+) sign next to the field's name. Any fields listed as part of a group will also be restricted at the level you choose. Grouped fields cannot be controlled independently. If you cannot find the field that you would like to restrict in the fields table, it may be grouped within another field. Try expanding fields that are likely to be grouped with the field you are looking for (e.g., the Billing City field for Accounts is grouped under the Billing Street field as part of the billing address group). - From the dropdown list, select a level of field access for this role's members based on the field-access definitions explained below.
- Repeat steps 4 and 5 for any other fields you would like to change in this module for the current role.
- When complete, click "Save" to secure the changes.
Field Access Definitions
- Not Set: The user is neither restricted nor granted access to this field. When permission is "Not Set", users within this role default to "Read/Write" access.
- Read/Write: The user can see the value of this field and can edit it.
- Read/Owner Write: The user can see the value of this field but can only edit the field's value if they are the "Assigned To" user on the record.
- Read/(Owner & Selected Teams) Write: The user can see the value of this field but can only edit the field's value if they are the "Assigned To" user on the record or if they belong to a team that is designated as having extra access on the record. This option is only visible if an administrator has enabled team-based permissions for the module.
- Read Only: The user can see the value of this field but cannot change its value.
- Owner Read/Owner Write: The user can only see and edit this field if they are the "Assigned To" user on the record.
- (Owner & Selected Teams) Read/Owner Write: The user can only see the value of this field if they are the "Assigned To" user on the record or if they belong to a team that is designated as having extra access on the record, but they can edit the field only if they are the "Assigned To" user on the record. This option is only visible if an administrator has enabled team-based permissions for the module.
- (Owner & Selected Teams) Read/(Owner & Selected Teams) Write: The user can only see the field and edit the field's value if they are the "Assigned To" user on the record or if they belong to a team that is designated as having extra access on the record. This option is only visible if an administrator has enabled team-based permissions for the module.
- None: For Sidecar modules, the user can see this field on layouts (e.g., Record View) but cannot see its value. Instead, Sugar displays "No Access" as the field's value. For Legacy modules (e.g., Projects), the user cannot see the field on any layout. Instead, Sugar displays a blank space on the edit and detail views.
Assigning Users to Roles
A user must be associated with a role to take on the role's permission settings. Assigning a role is much like any other many-to-many relationship in Sugar, where many users can be associated with any particular role, and one user can also be assigned to multiple roles.
If a user is assigned to multiple roles, the most restrictive option for each setting is respected. For example, if a user is assigned to two roles, one which restricts Edit access for the Accounts module to "Owner" and the second which restricts it to "Owner & Selected Teams", the "Owner" setting will be respected. View the Access tab on each user's profile to see the cumulative effect of all of their assigned roles.
Note: For instances that use SugarIdentity, administrators have the ability to log in as other users in their organization using the "Impersonate (Log in as)" option in SugarIdentity. So, once you assign users to roles, you can preview the user's account via impersonation to ensure that the proper permissions and restrictions are in place. For more information on impersonating a user, refer to the SugarIdentity Guide.
Assigning Roles via Role Management
From Role Management, a user can be related to a role via the Users subpanel at the bottom of the detail view. To relate users to a role, use the following steps:
- Navigate to Admin > Role Management.
- From the Roles list view, select the desired role.
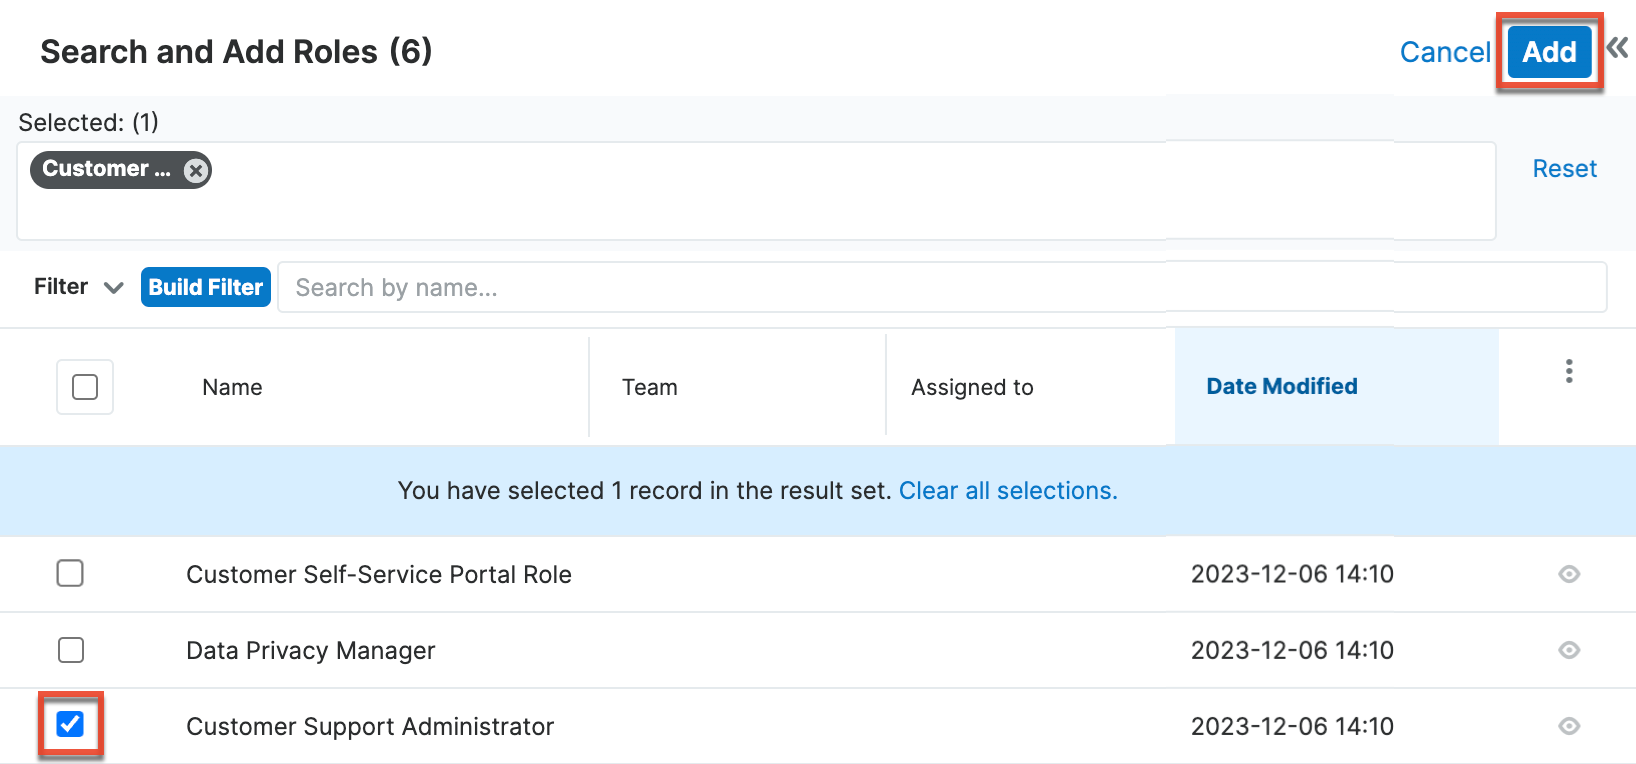
- At the bottom of the page, click "Select User" from the Users subpanel.
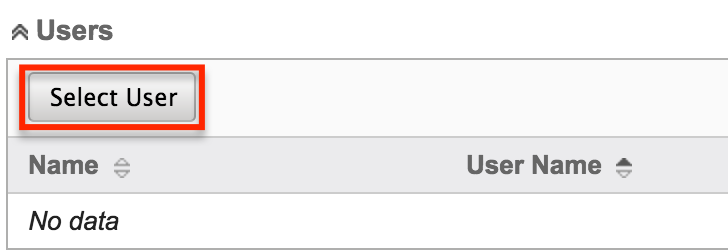
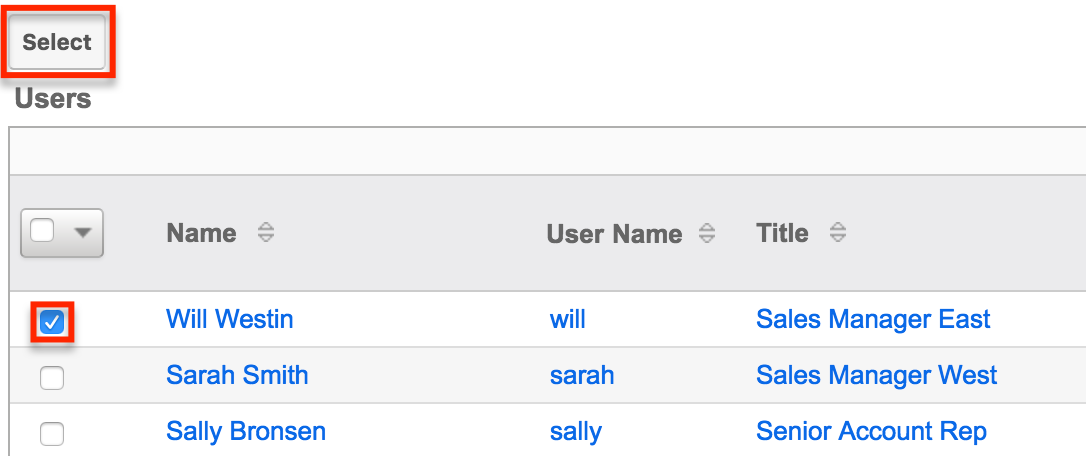
- Use the pop-up search menu to search for and select the user(s) you would like to add to this role where you can either click on the user's name or, if selecting multiple users, click their corresponding checkbox and then click "Select".
After selecting the user(s), the pop-up search box will close and the user(s) will now be displayed in the Users subpanel for the role to complete the relationship.
Assigning Roles via User Management
From User Management, a user can be related to a role via the user's detail view. For more information on User Management, please refer to the User Management documentation. To relate a role to a user via User Management, follow the following steps:
- Navigate to Admin > User Management.
- From the Users list view, open the user record that you would like to edit.
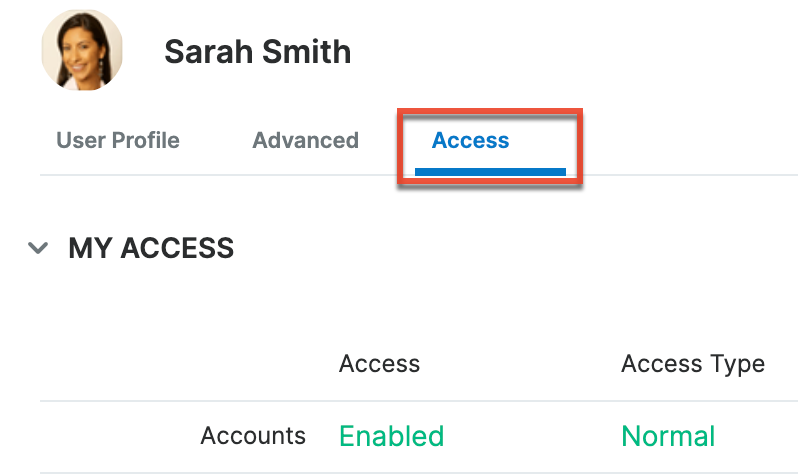
- From the user's detail view, click on the "Access" tab.
- Scroll past the Role Chart to the Roles subpanel, click the triangle to the right of the Add button, then select "Link Existing Record".
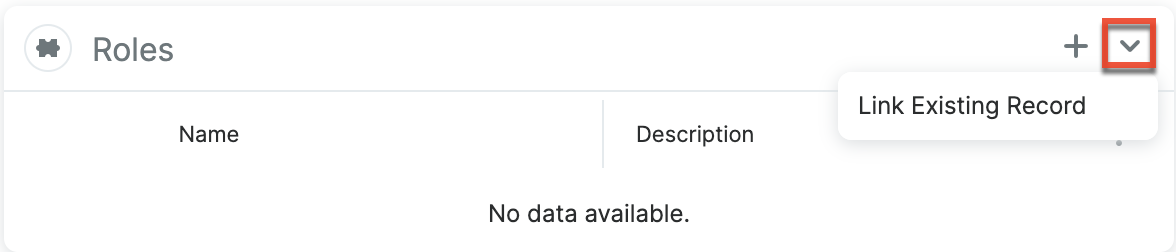
- Use the pop-up search menu to search for and select the role(s) you would like to add to this user and click on the role's name or the corresponding checkbox.
- After selecting the applicable role(s) click "Add".
After selecting the role(s), the pop-up search box will close and the role(s) will now be displayed in the Roles subpanel for the user to complete the relationship.
Viewing Roles
There are various options available for viewing role records in Sugar including via the Roles list view, Roles detail view, Roles Recently Viewed menu, the List Roles by User function, and from the Users module.
Viewing via List View
The Roles list view displays all role records meeting the current search criteria. To access the list view, simply navigate Admin > Role Management. Alternately, if you are looking at a role's detail view, you can click the Roles module tab to return to the list view. You can click the role's name to open the record in detail view. For more information on viewing roles via list view, please refer to the Roles List View section of this documentation.
Viewing via Detail View
The Roles detail view is where all of the modifications to the role settings can be made. This page includes the name and description of the role, the chart where module settings can be manipulated, links to the field-level action settings, and the Users subpanel where users can be added to the role. For more information on viewing roles via detail view, please refer to the Roles Detail View section of this documentation.
Viewing via Recently Viewed
As you access different roles, Sugar will keep track of which roles you have recently viewed. Click the three-dots menu in the Roles module tab to see a list of the 3 roles you most recently viewed in the module. Clicking the role's name within the list will open it in detail view.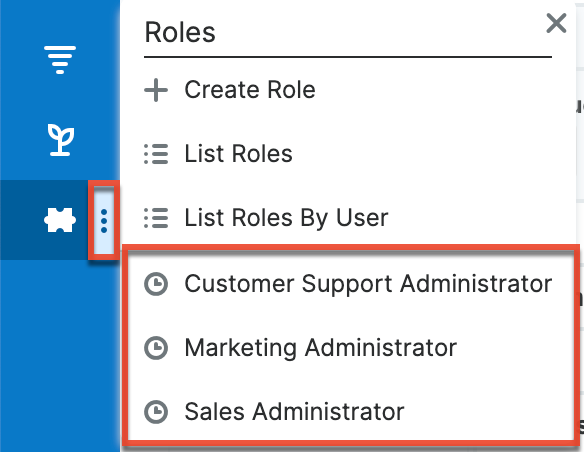
Viewing Roles by User
Role Management offers the option to view all roles assigned to specific users. Click the three-dots menu in the Roles module tab and select "List Roles By User" to view these roles.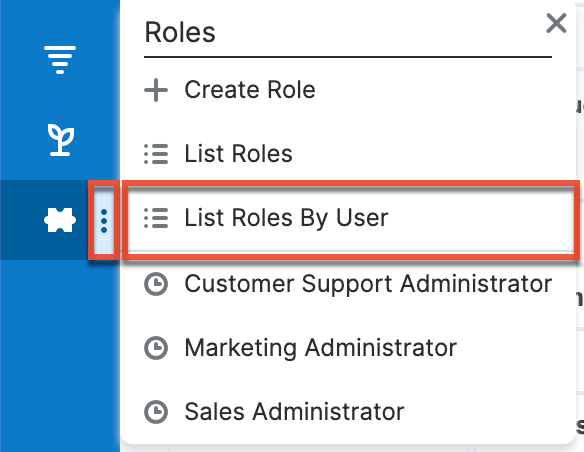
You will be redirected to the Users module and a screen will appear with a dropdown list with all users' names included. Select the user you would like to view and a chart will show which is a compilation of all of the roles listed for the user in the Roles subpanel, at the bottom of the page.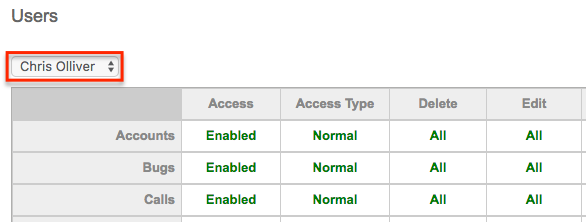
Viewing via Users Module
User profiles show which roles the user is related to and how the user's roles work together. When viewing a user profile, all role information can be found by navigating to the Access tab. For information about accessing the Users module, please refer to the Users documentation. The access tab contains a chart showing all of the modules and actions available in Role Management. This chart is a compilation of all of the roles listed for the user in the Roles subpanel at the bottom of the page.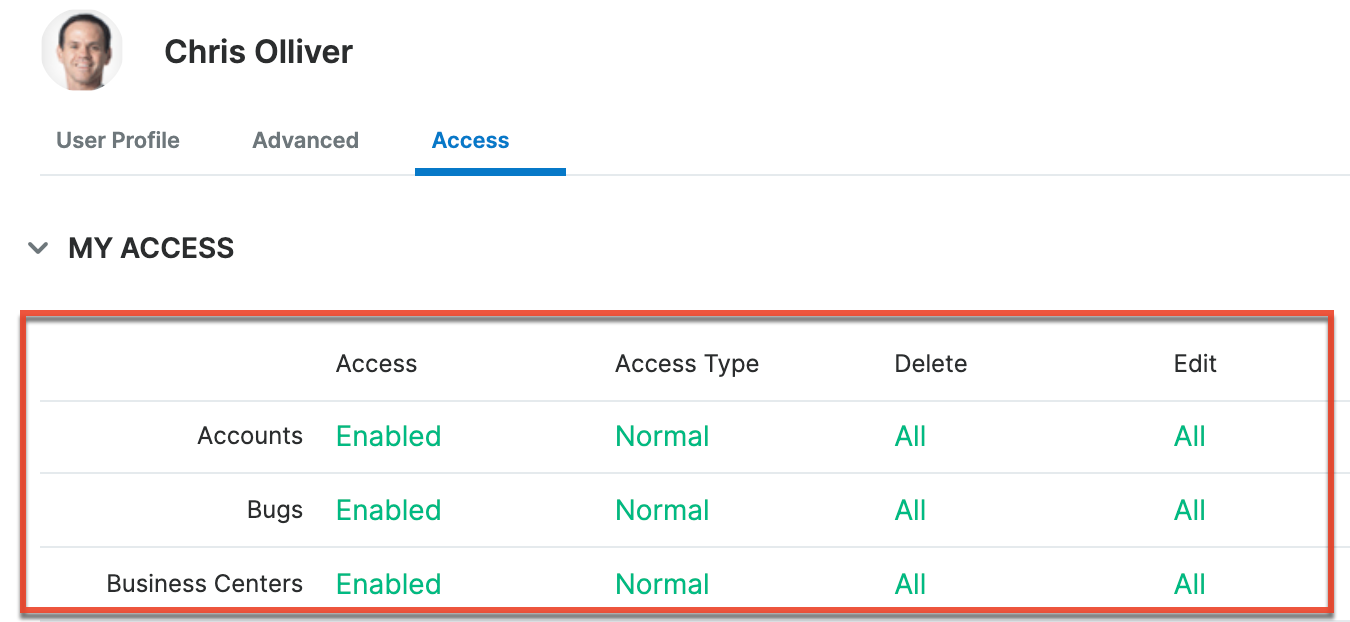
When viewing the chart, the most restrictive setting for the specific intersection will take precedence, and will represent the option for the user. Therefore, if the user has two roles assigned, one of which allows him or her to delete a record and another which does not, Sugar will enforce the option where the user cannot delete the record. The table shown in User Management cannot be edited. Instead, the role itself must be edited which will change the setting for any other users related to the role.
To view the role settings from User Management and make any necessary changes, simply click the role's name from the Roles subpanel, which will take you to the role's detail view.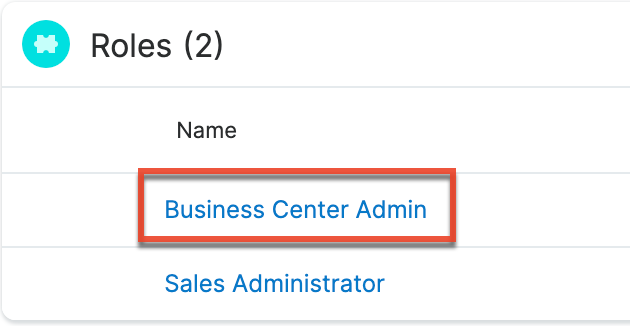
Searching Roles
The Roles list view search function allows you to search for the name of the role to help you locate records easily and effectively. Once the search is performed, the relevant results will be displayed in the Roles list view below.
The buttons in the search panel have the following functions:
- Search: Click the Search button or press your Return/Enter key to perform the search.
- Clear: Click the Clear button to clear all criteria from the searchable fields.
To see all Role records, simply click "Clear" and then "Search" to perform a blank search with no name filter.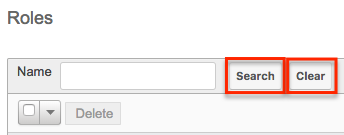
Please note that Sugar automatically appends the wildcard character (%) to the end of your search phrase. This allows the system to retrieve all records that start with the keyword entered in the search. If you would like to broaden the search, you can use the wildcard at the beginning of your text as well (e.g., %Administrator). This will pull up any record that has the word "administrator" in the name, regardless of how it starts or ends.
For more information on using the various search methods as well as how wildcards are used, please refer to the Search documentation.
Roles List View
The Roles list view displays all roles that meet the current search criteria (if any). You can view the name and description of each role within the field columns. Click on the name of the role to access the detail view for the role and review the settings further.
Pagination
List view displays the current search results broken into pages that you can scroll through rather than displaying potentially thousands of rows at once. To the right just below the search panel, you can see which records of the total results set are currently being displayed. The two single-arrow Next and Previous buttons can be used to scroll through the records page-by-page. The two double-arrow First Page and Last Page buttons allow you to skip to the beginning or the end of your current results.
By default, Sugar displays 20 records per list view page, but administrators can change the number of records displayed via the System menu in Admin. For more information on changing the number of displayed records, please refer to the System documentation in the Administration Guide.
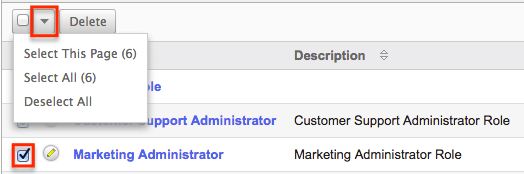
Checkbox Selection
Roles can be deleted in a mass-delete fashion via the list view by selecting all of the role records. To select individual role records on the Roles list view, mark the checkbox on the left of each row. To select or deselect multiple roles on the list view, use the options in the checkbox dropdown menu:
- Select This Page: Selects all records shown on the current page of results.
- Select All: Selects all records in the current search results across all pages of results.
- Deselect All: Deselects all records that are currently selected.
For more information on deleting roles, please refer to the Mass Deleting via List View section of this documentation.
Column Sorting
List view provides the ability to sort all of the current search results by a field column in either ascending or descending order. To sort by a field or switch the sort direction, click the column header for either "Name" or "Description". The list view may be sorted by only one column at a time.
Roles Detail View
The Roles detail view displays thorough information about the role, as well as the ability to perform most actions related to role management. It comprises of a chart showing all modules in Sugar and actions that the user can have access to or be restricted from. The detail view also provides links that, when clicked, drill down into each module to make field-level permission changes. Finally, the detail view includes a Users subpanel where users can be related to the role and will, therefore, take on the role's properties.
Actions Menu
The Actions menu on the top left of each role's detail view allows you to perform various actions on the current record. Administrator users can change the action items to be displayed as separate buttons instead of a dropdown menu via Admin > System Settings. For more information on configuring the actions menu, please refer to the System documentation in the Administration Guide.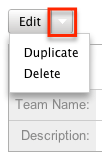
The options in the Actions menu allow you to perform the following operations:
| Menu Item | Description |
| Edit | Edit the name and description of this role. |
| Duplicate | Duplicate this role to create a new role. |
| Delete | Delete this role. |
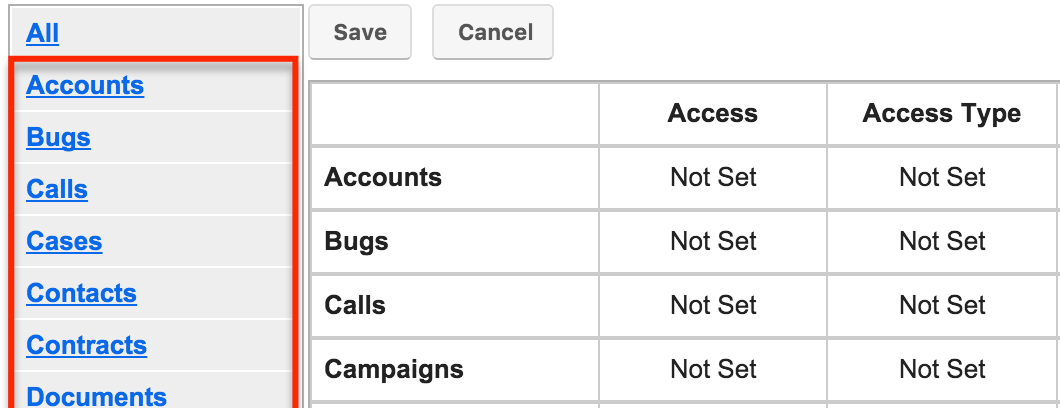
Role Chart
The Role Chart comprises of ten columns and a row for each module down the left-hand side. The columns each represent a type of action within Sugar, and the corresponding point between the columns and module roles defines the role's permissions. The role permissions can be updated from the detail view of each role. For an explanation of each action and how to update roles, please review the Setting Module-Level Permissions section of this documentation.
Field Permissions
To the left of the Role Chart is a list of hyperlinked Sugar module names: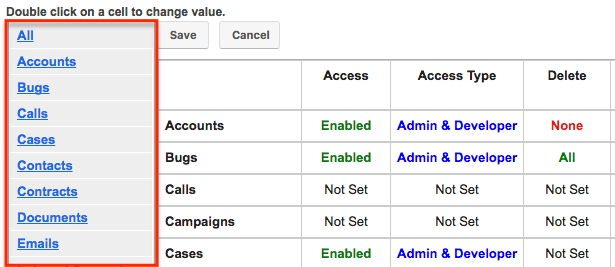
Click on a module name to access the Field Permissions view for the module. For an explanation of each action and how to update field-level permissions, please review the Setting Field-Level Permissions section of this page. 
Users Subpanel
Beneath the Role Chart, the Users subpanel is available for the Administrator to relate one or more users to the current role. A user must be related to a role to take on the role's permission settings. One user can be related to multiple roles. If a user is related to multiple roles, the most restrictive option for each setting is respected.
To relate users to a role, use the following steps:
- Navigate to the detail view of the role that you would like to edit.
- At the bottom of the page, click "Select User" from the Users subpanel.
- Use the pop-up search menu to search for and select the user(s) you would like to add to this role. You can either click on the user's name or, if selecting multiple users, click their corresponding checkbox and then click "Select".
After selecting the user(s), the pop-up search box will close and the user(s) will now be displayed in the Users subpanel for the role to complete the relationship.
Editing Roles
Roles may be edited at any time to update or add information to the record or to edit the role restrictions. You can make changes to existing role records via the Roles detail view and edit view, depending on the change being made. Changes via the detail view are made directly on the role permission chart. Edit view is available within the Roles module and includes the Name and Detail fields.
Editing via Detail View
You can edit roles via the detail view by clicking the Edit button on the upper left of the page. Once the edit view layout is open, update either the Name or Description fields, then click "Save" to preserve the changes made.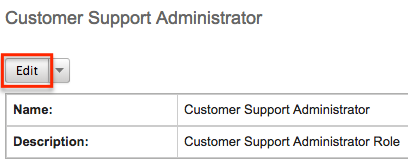
Edits to the settings on the role are also performed via the detail view. Below the Name and Description fields, is where you will find the role permission chart. This chart is made up of rows representing the different modules in Sugar, and columns representing each of the action types Sugar users can perform. Edits to this table are made by clicking the box at the intersection of a row and column, which produces a dropdown list of available options. For more information on module permission changes, please review the information in the Setting Module-Level Permissions section of this documentation.
Editing via List View
You can edit roles via the list view by clicking the Pencil icon to the left of each role's name. After clicking the pencil, the window will move to the edit view. Update the necessary fields, then click "Save" to preserve the changes. After saving from the edit view, you will be returned to the detail view for the record that you just updated. Because this method brings you to the edit view, only the Name and Description fields can be updated.
Editing via Users Module
The Users module allows you to see all of the roles related to a specific user in one place under the "Access" tab. The page will show a subpanel with a list of all of the roles related to the user. For more information about viewing the roles from the Users module, please review Viewing via Users Module.
In the Roles subpanel, click the Edit button to update the role's name then click "Save" to preserve the changes. Please note, only the Name field can be updated inline within the Roles subpanel. For more information on module permission changes, please review the information in the Setting Module-Level Permissions section of this documentation.
Deleting Roles
If a role record is invalid or is no longer being used in your organization's Sugar instance, it may be deleted from either the Roles detail view or list view. Deleting via the detail view allows you to delete a single record while the list view allows for mass deleting multiple records at once. Deleting role records will not delete the related user records and will only remove the relationship.
Deleting via Detail View
Use the following steps to delete a role via the detail view:
- Navigate to the role record's detail view.
- Select "Delete" from the Actions menu.
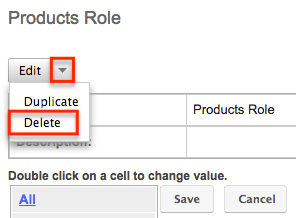
- A pop-up message will display asking for confirmation. Click "Ok" to proceed.
Mass Deleting via List View
Use the following steps to delete one or more roles via the list view:
- Navigate to Admin > Role Management.
- Use the search functionality to find the Role records you wish to delete.
- Select the desired role records individually or using the checkbox dropdown's options.
- Choose "Delete" from the Actions menu.
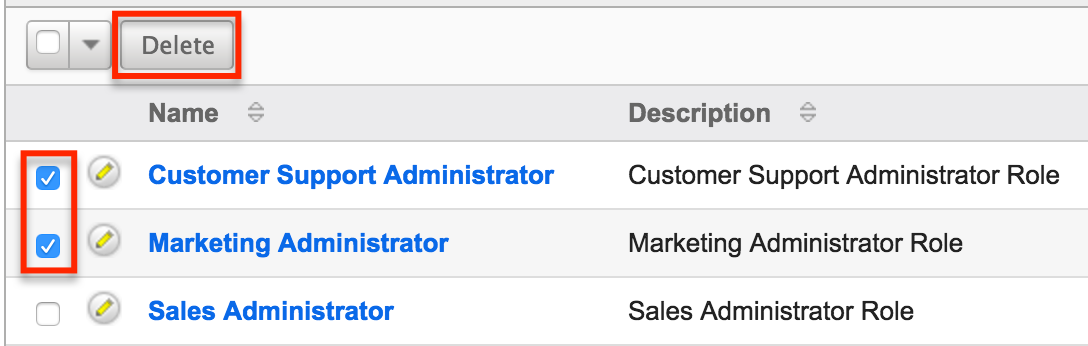
- A pop-up message will ask for confirmation. Click "Ok" to proceed.
Due to PHP memory limitations on the server, there may be occasions when the application times out while deleting a large number of role records. If you encounter an error when performing this action, we recommend selecting the records in smaller batches.