Modifying Layouts to Display Additional Columns
Overview
How to add additional columns to layouts.
By default, the editview, detailview, and quickcreate layouts for each module display two columns of fields. The number of columns to display can be customized on a per-module basis with the following steps.
Note: This customization is only applicable for modules in backward compatibility mode.
Resolution
SugarCloud
First, you will want to ensure your layouts are deployed in the custom directory. If you have not previously customized your layouts via Studio, go to Admin > Studio > {Module Name} > Layouts. From there, select each layout you wish to add additional columns to and click 'Save & Deploy'. This action will create a corresponding layout file under the ./custom/modules/{Module Name}/metadata/ directory. The files will be named editviewdefs.php, detailviewdefs.php, and quickcreatedefs.php depending on the layouts deployed.
To access your custom files, go to Admin > Diagnostic Tool, uncheck all the boxes except for "SugarCRM Custom directory" and then click "Execute Diagnostic". This will generate an archive of your instance's custom directory to download, and you will find the layout files in the above path. Open the custom layout file, locate the 'maxColumns' value, and change it to the number of columns you would like to have on screen:
'maxColumns' => '3',
Once that is updated, locate the 'widths' array to define the spacing for your new column(s). You should have a label and field entry for each column in your layout:
  'widths' => array (
    0 => array (
        'label' => '10',
        'field' => '30',
    ),
    1 => array (
        'label' => '10',
        'field' => '30',
    ),
    2 => array (
        'label' => '10',
        'field' => '30',
    ),
),
After this is completed, you will need to create a module-loadable package to install the changes on your SugarCloud instance. More information on creating this package can be found in Creating an Installable Package that Creates New Fields. To upload and install the package, go to Admin > Module Loader.
Note: Sugar Sell Essentials customers do not have the ability to upload custom file packages to Sugar using Module Loader.
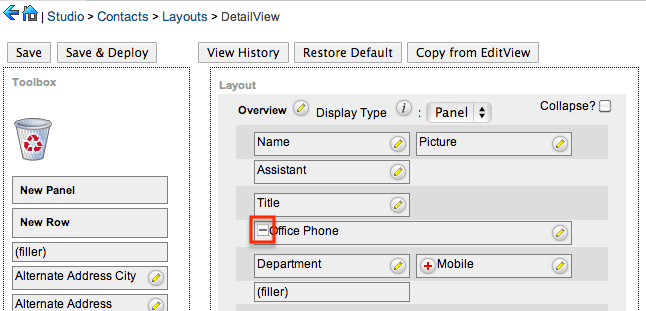
Once the installation completes, you can navigate to Studio and add fields to your new column in the layout. For any rows that already contain two fields, the second field will automatically span the second and third column. Simply click the minus (-) icon to contract the field to one column and expose the new column space:

After you have added the desired fields in Studio, click 'Save & Deploy', and you are ready to go!
On-Site
First, you will want to ensure your layouts are deployed in the custom directory. If you have not previously customized your layouts via Studio, go to Admin > Studio > {Module Name} > Layouts. From there, select each layout you wish to add additional columns to and click 'Save & Deploy'. This action will create a corresponding layout file under the ./custom/modules/{Module Name}/metadata/ directory. The files will be named editviewdefs.php, detailviewdefs.php, and quickcreatedefs.php depending on the layouts deployed.
Next, open the custom layout file, locate the 'maxColumns' value, and change it to the number of columns you would like to have on screen:
'maxColumns' => '3',
Once that is updated, locate the 'widths' array to define the spacing for your new column(s). You should have a label and field entry for each column in your layout:
  'widths' => array (
    0 => array (
        'label' => '10',
        'field' => '30',
    ),
    1 => array (
        'label' => '10',
        'field' => '30',
    ),
    2 => array (
        'label' => '10',
        'field' => '30',
    ),
),
Once this is completed, you can navigate to Studio and add fields to your new column in the layout. For any rows that already contain two fields, the second field will automatically span the second and third column. Simply click the minus (-) icon to contract the field to one column and expose the new column space:

After you have added the desired fields in Studio, click 'Save & Deploy', and you are ready to go!