Global Search
Overview
How to customize the global search results.
Configuring Search Results
The Search-List view, located in ./clients/base/views/search-list/, is responsible for the global search results page. By default, it contains the rowactions that are available for each result. The following sections will outline how to configure the primary and secondary fields.
Primary and Secondary Fields
Each row returned from the global search is split into two lines. The first line contains the primary fields and avatar. A primary field is a field considered to be important to the identification of a record and is usually composed of the records name value and a link to the record. The avatar is an icon specific to the module the results are coming from.
The second line contains the highlighted matches and any secondary fields specified. A highlight is a hit returned by elastic search. Highlights are driven from elastic and no definition is needed in the metadata to define them. Both primary and secondary fields can be highlighted. A secondary field is a field that has regularly accessed data. It is important to note that the initial type-ahead drop-down will not show specified secondary fields unless the user hits enter and is taken to the search results page. Different modules have different secondary fields. For example, an account's secondary fields are email and phone number, while cases' secondary fields are case ID number and related account.
To leverage the metadata manager, the global search view reuses the same metadata format as other views. You can add any indexed field in elastic search to the search list view. An example of the stock metadata is shown below.
./modules/{module}/clients/base/views/search-list/search-list.php
<?php

$viewdefs[$moduleName]['base']['view']['search-list'] = array(
    'panels' => array(
        array(
            'name' => 'primary', // This is mandatory and the word `primary` can not be changed.
            'fields' => array(
                /*
                 * Put here the list of primary fields.
                 * You can either define a field as a string and the metadata
                 * manager will load the field vardefs, or you can define as an
                 * array if you want to add properties or override vardefs
                 * properties just for the search results view.
                 *
                 * You most likely want to show the module icon on the left of the
                 * view. For this, you need to add the following picture field as
                 * a primary field.
                 */
                array(
                    'name' => 'picture',
                    'type' => 'avatar',
                    'size' => 'medium',
                    'css_class' => 'pull-left',
                ),
                array(
                    'name' => 'name',
                    'type' => 'name',
                    'link' => true,
                    'label' => 'LBL_SUBJECT',
                ),
            ),
        ),
        /*
         * If you don't want secondary fields, you can remove the following array.
         */
        array(
            'name' => 'secondary', // This is mandatory and the word `secondary` can not be changed.
            'fields' => array(
                /*
                 * Put here the list of secondary fields
                 */
                'status', // This field is defined as a string for example.
                array(
                    'name' => 'description',
                    'label' => 'LBL_SEARCH_DESCRIPTION',
                ),
            ),
        ),
    ),
);
Note: You can technically override the row actions for the results of a module, however, the view currently only supports the preview action so it is not recommended to customizes these actions.
Examples
The following examples demonstrate how to modify the primary and secondary rows of the global search.
Adding Fields to the Primary Row
This example will demonstrate how to add "Mobile" into the search-list view's primary row for Contact module results.
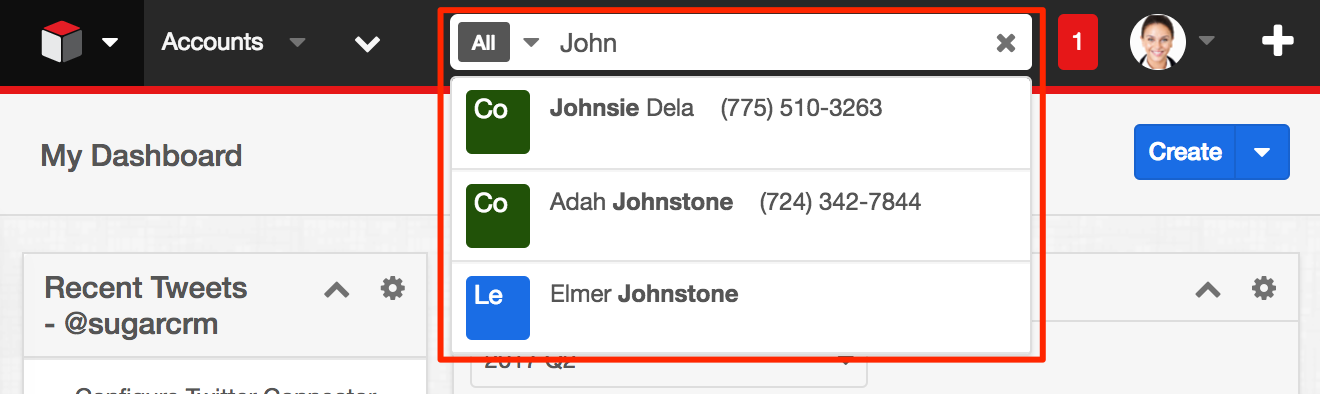
To accomplish this, you can duplicate ./modules/Contacts/clients/base/views/search-list/search-list.php to ./custom/modules/Contacts/clients/base/views/search-list/search-list.php if it doesn't exist. Once in place, add your phone_mobile definition to the $viewdefs['Contacts']['base']['view']['search-list']['panels'] array definition with the name attribute equal to "primary'. An example is shown below:
./custom/modules/Contacts/clients/base/views/search-list/search-list.php
<?php

$viewdefs['Contacts']['base']['view']['search-list'] = array(
    'panels' => array(
        array(
            'name' => 'primary',
            'fields' => array(
                array(
                    'name' => 'picture',
                    'type' => 'avatar',
                    'size' => 'medium',
                    'readonly' => true,
                    'css_class' => 'pull-left',
                ),
                array(
                    'name' => 'name',
                    'type' => 'name',
                    'link' => true,
                    'label' => 'LBL_SUBJECT',
                ),
                // Adding the mobile into first row of the results
                'phone_mobile',
            ),
        ),
        array(
            'name' => 'secondary',
            'fields' => array(
                array(
                    'name' => 'email',
                    'label' => 'LBL_PRIMARY_EMAIL',
                ),
            ),
        ),
    ),
);
Once in place, navigate to Admin > Repair > Quick Repair and Rebuild. Your changes will then be reflected in the system.
Adding Fields to the Secondary Row
This example will demonstrate how to add "Mobile" into the search-list view's secondary row for Contact module results. It is important to note that the initial type-ahead drop-down will not show specified secondary fields unless the user hits enter and is taken to the search results page.
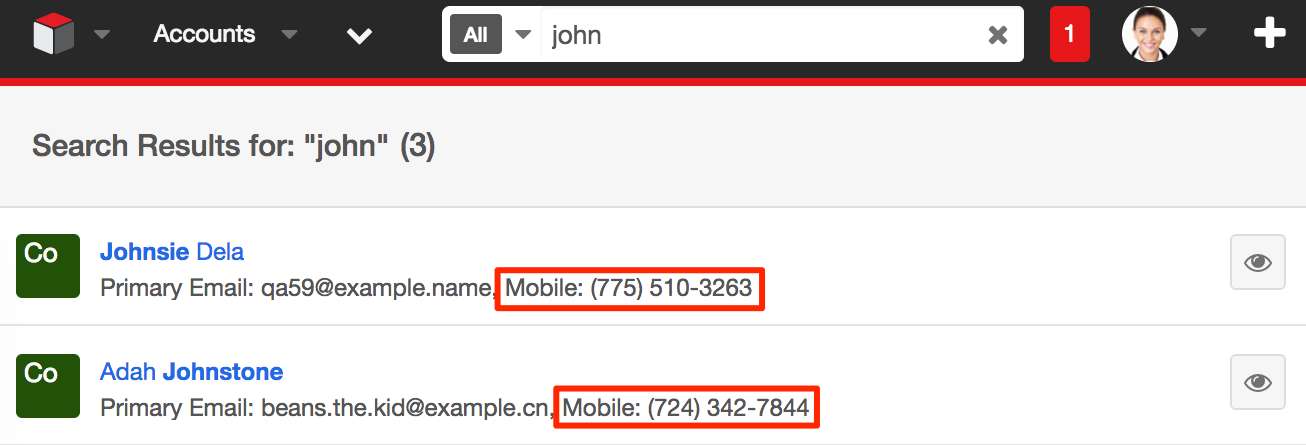
In this example, we are going to add Portal Name into search-list for Contact module results.
To accomplish this, you can duplicate ./modules/Contacts/clients/base/views/search-list/search-list.php to ./custom/modules/Contacts/clients/base/views/search-list/search-list.php if it doesn't exist. Once in place, add your phone_mobile definition to the $viewdefs['Contacts']['base']['view']['search-list']['panels'] array definition with the name attribute equal to "secondary'. An example is shown below:
<?php

$viewdefs['Contacts']['base']['view']['search-list'] = array(
    'panels' => array(
        array(
            'name' => 'primary',
            'fields' => array(
                array(
                    'name' => 'picture',
                    'type' => 'avatar',
                    'size' => 'medium',
                    'readonly' => true,
                    'css_class' => 'pull-left',
                ),
                array(
                    'name' => 'name',
                    'type' => 'name',
                    'link' => true,
                    'label' => 'LBL_SUBJECT',
                ),
            ),
        ),
        array(
            'name' => 'secondary',
            'fields' => array(
                array(
                    'name' => 'email',
                    'label' => 'LBL_PRIMARY_EMAIL',
                ),
                // Adding mobile to second row for search results in globalsearch
                'phone_mobile'
            ),
        ),
    ),
);
Once in place, navigate to Admin > Repair > Quick Repair and Rebuild. Your changes will then be reflected in the system.