System Settings
Overview
Users with the Administrator role can manage and configure a wide range of system settings for your sales-i instance, accessible through the Admin page.
To access the Admin page, click the gear icon in the top toolbar and then click “Settings” from the dropdown.
The Admin page is organized by sections and cards so you can quickly find the settings you need.
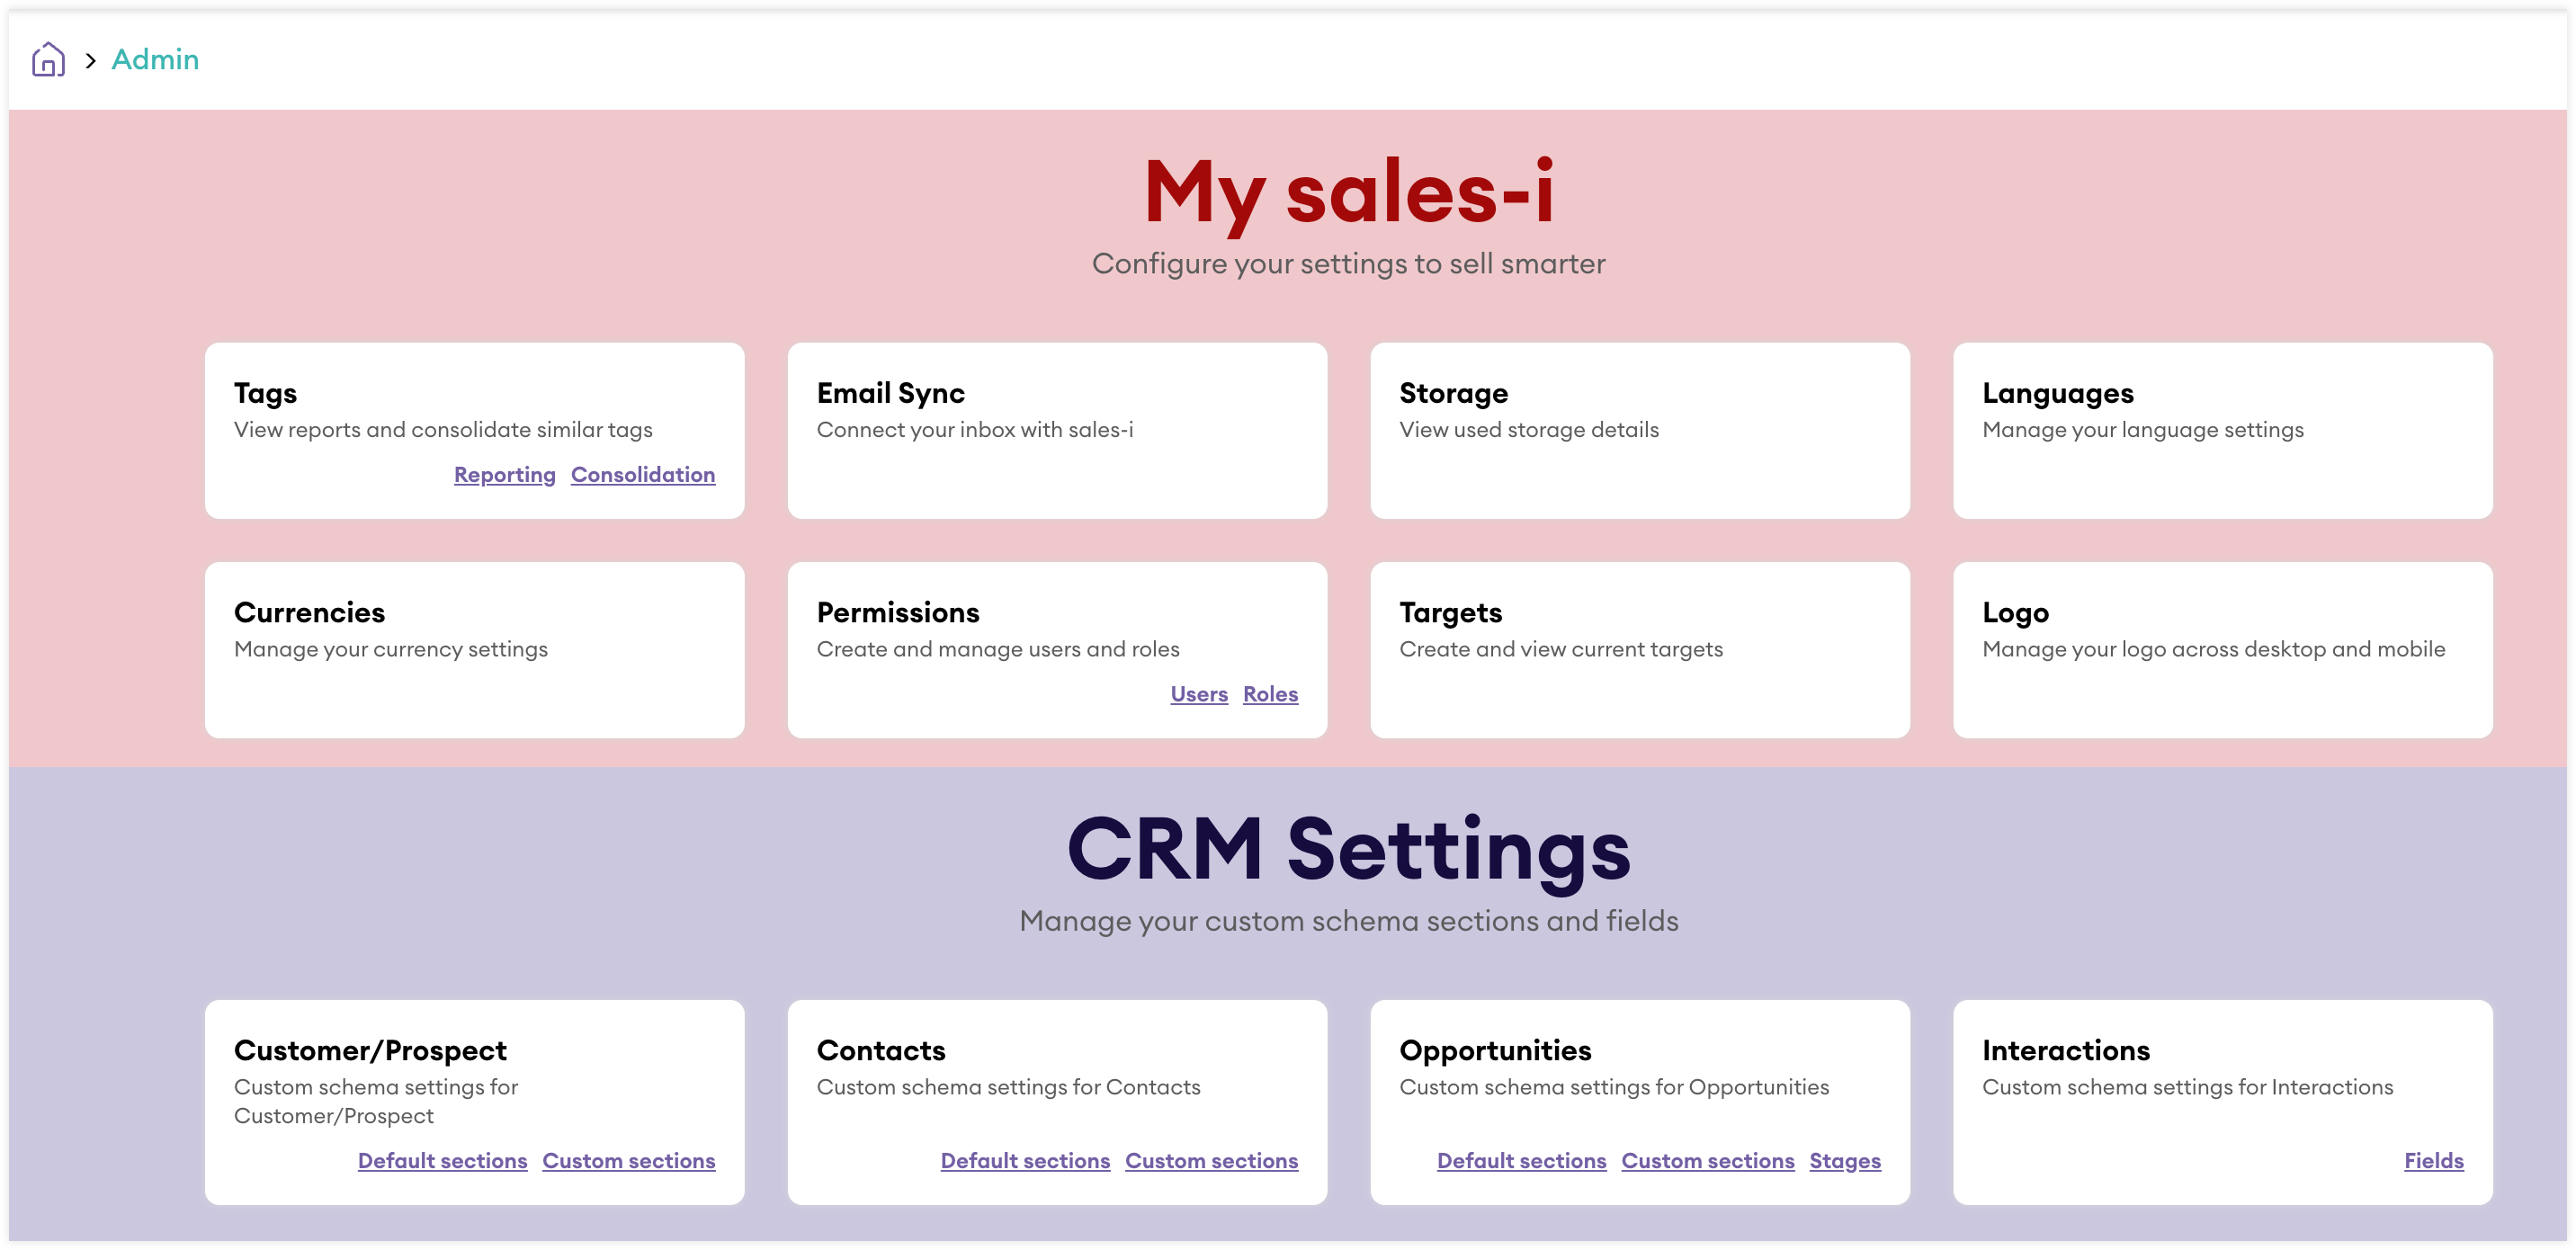
My sales-i
The My sales-i section contains the following settings:
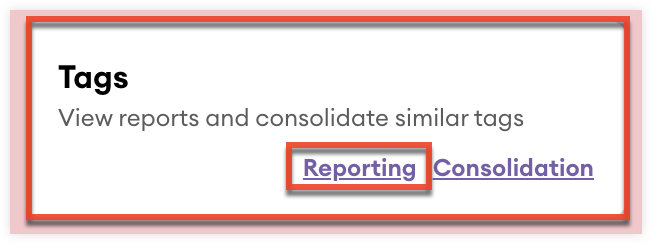
Tags
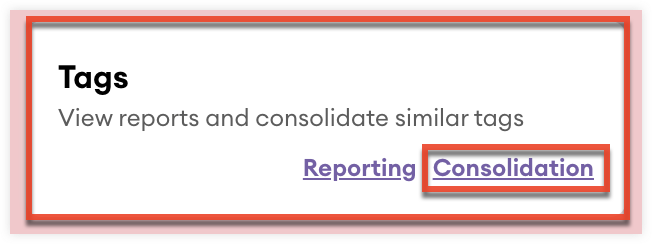
From the Tags settings you can create a report based on specific tags and consolidate tags.
Reporting on Tags
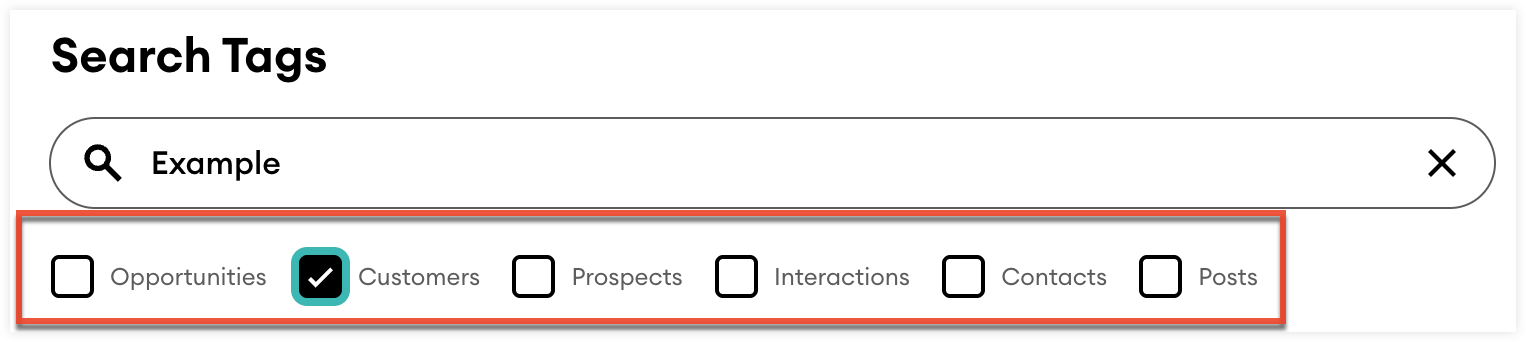
With tag reporting you can generate a list of records that are associated with specific tags. To create a tag report:
- From the Admin Page, click “Reporting” in the Tags card or click the Tags card; “Tag reporting” will be select by default.
- Using the search field, search for specific tags by name.

- Tags that meet the search will be displayed as pills in alphabetical order.
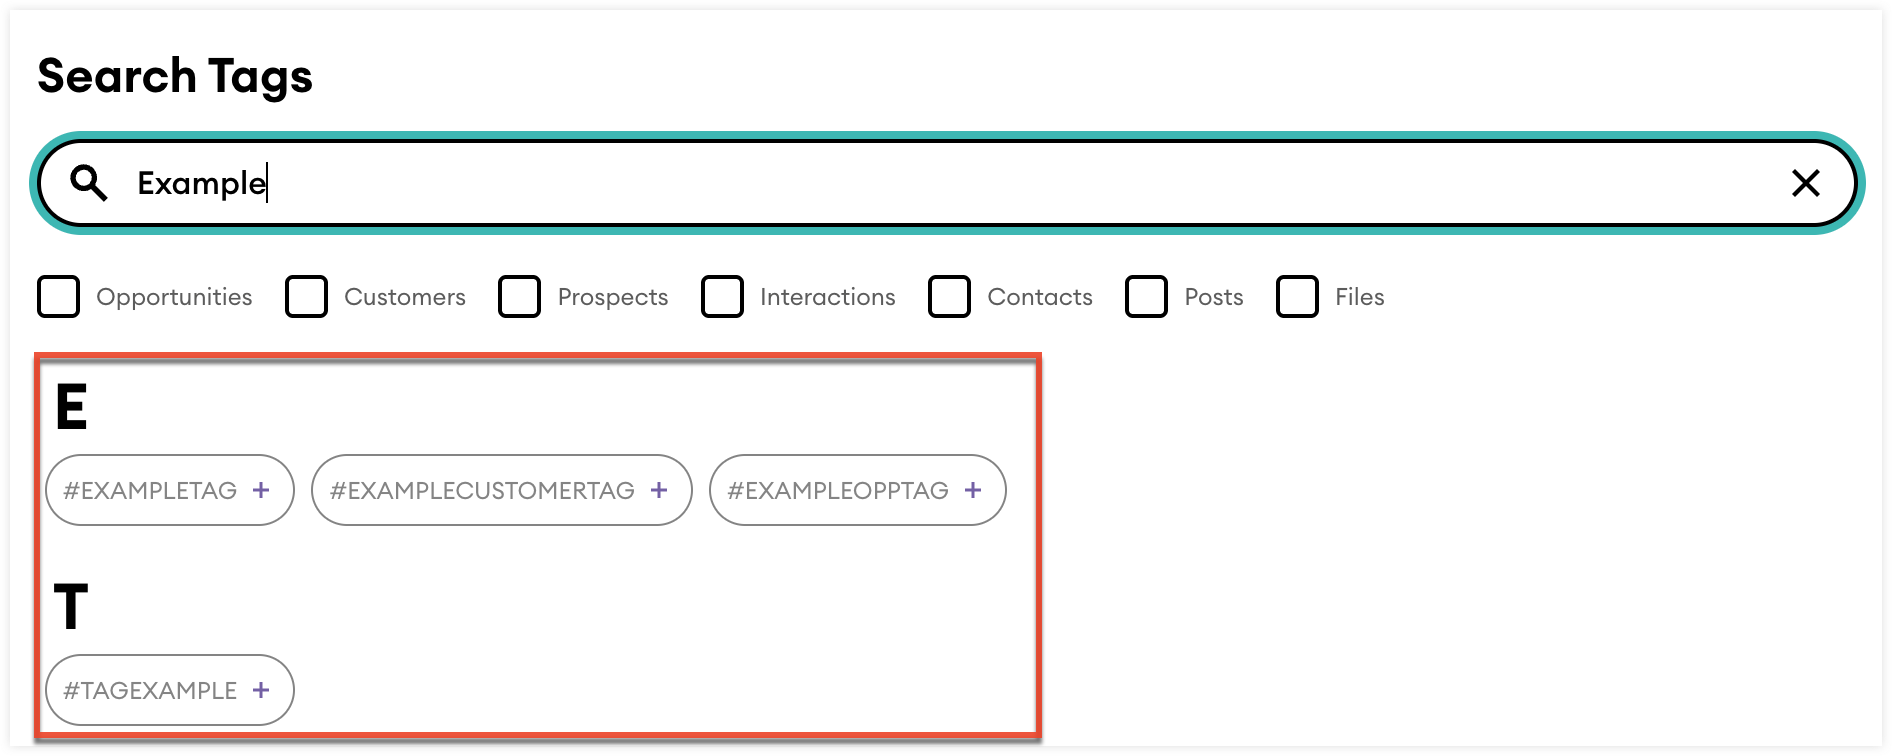
- If needed you can filter the displayed tags by record type using the available checkbox fields. Any tags that are not associated with one or more of the selected record types will not be displayed.
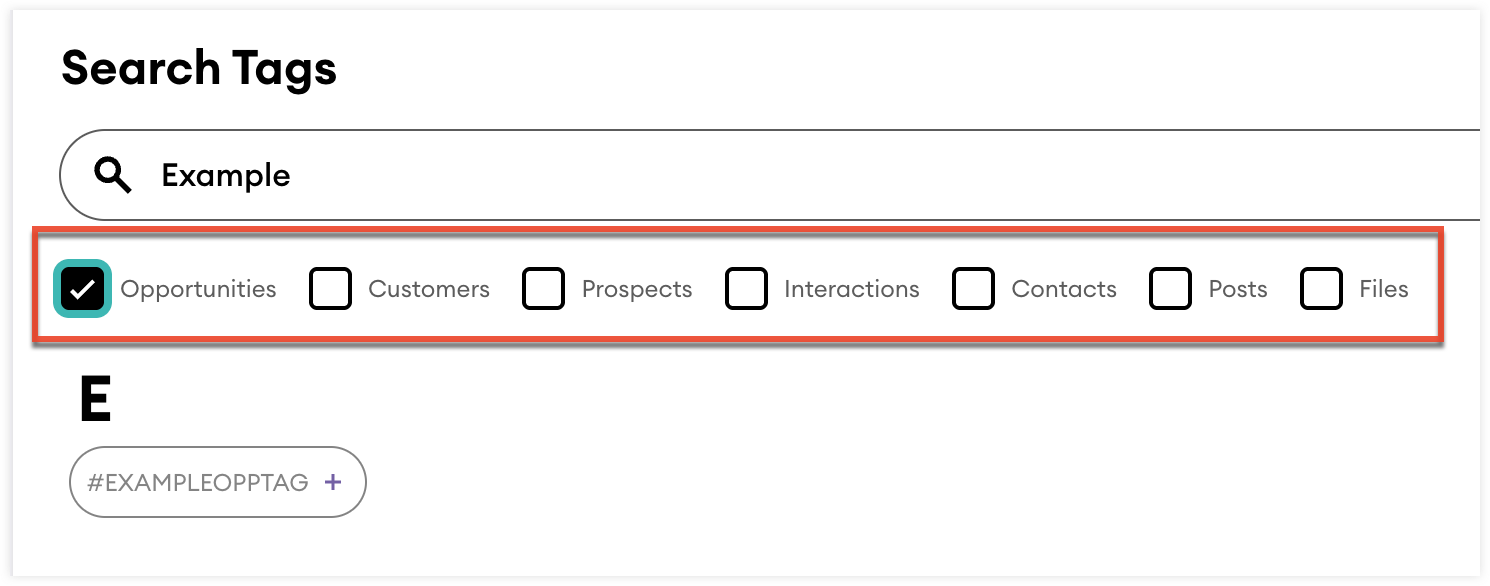
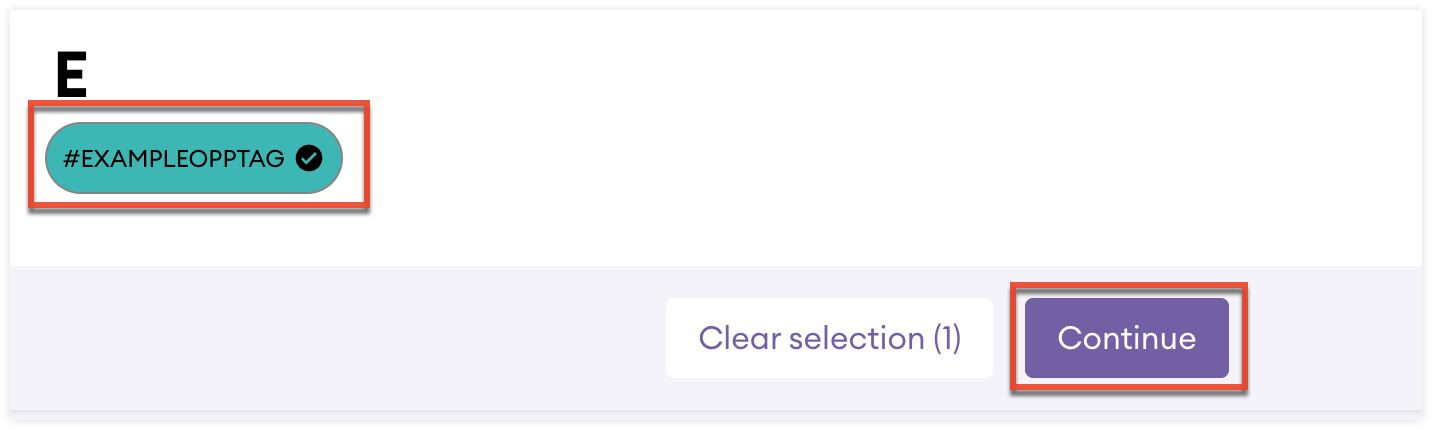
- Click the tags you would like to use for the report.
- Once you have selected your tags, click “Continue” to display the report.
Consolidating Tags
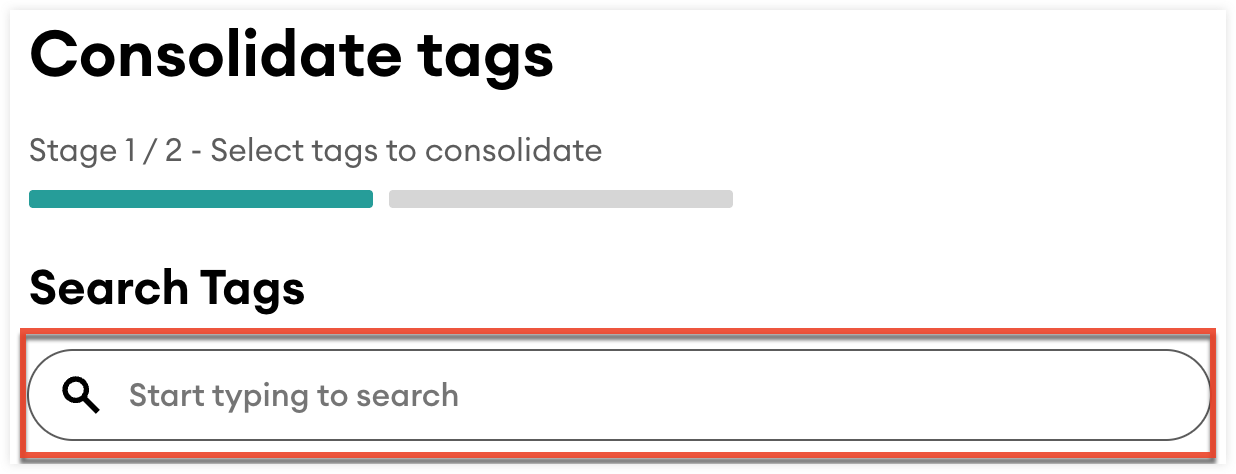
With tag consolidation you can combine tags into a single tag. To consolidate tags:
- From the Admin Page, click “Consolidation” in the Tags card or click the Tags card and select “Tag consolidation”.
- Using the search field, search by name for the tags you would like to consolidate.
- If needed you can filter the displayed tags by record type using the available checkbox fields. Any tags that are not associated with one or more of the selected record types will not be displayed.
- Click the tags you would like to consolidate.
- Once you have selected your tags, click “Continue”.
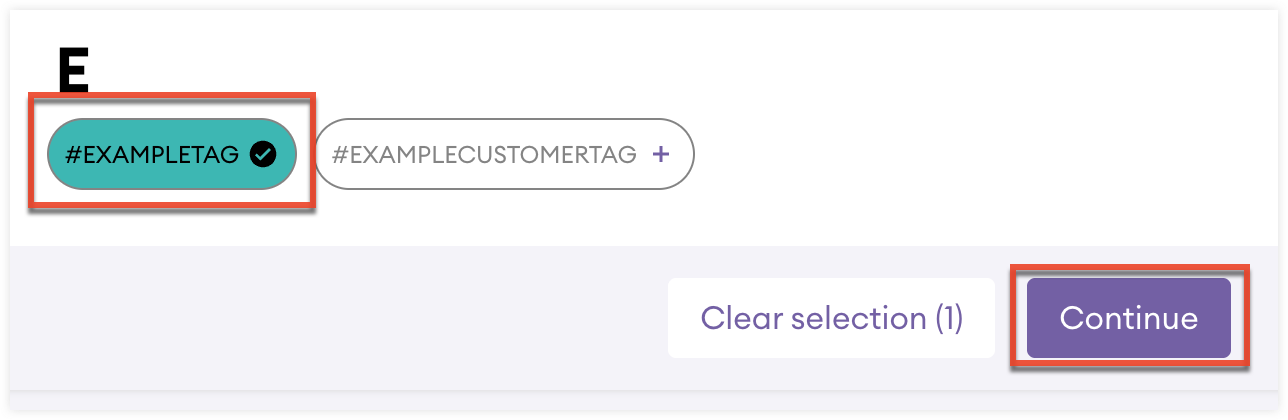
- Using the search field, search by name for the tag you would like to consolidate the previously selected tags into.
- Click the tag and then press “Continue”.
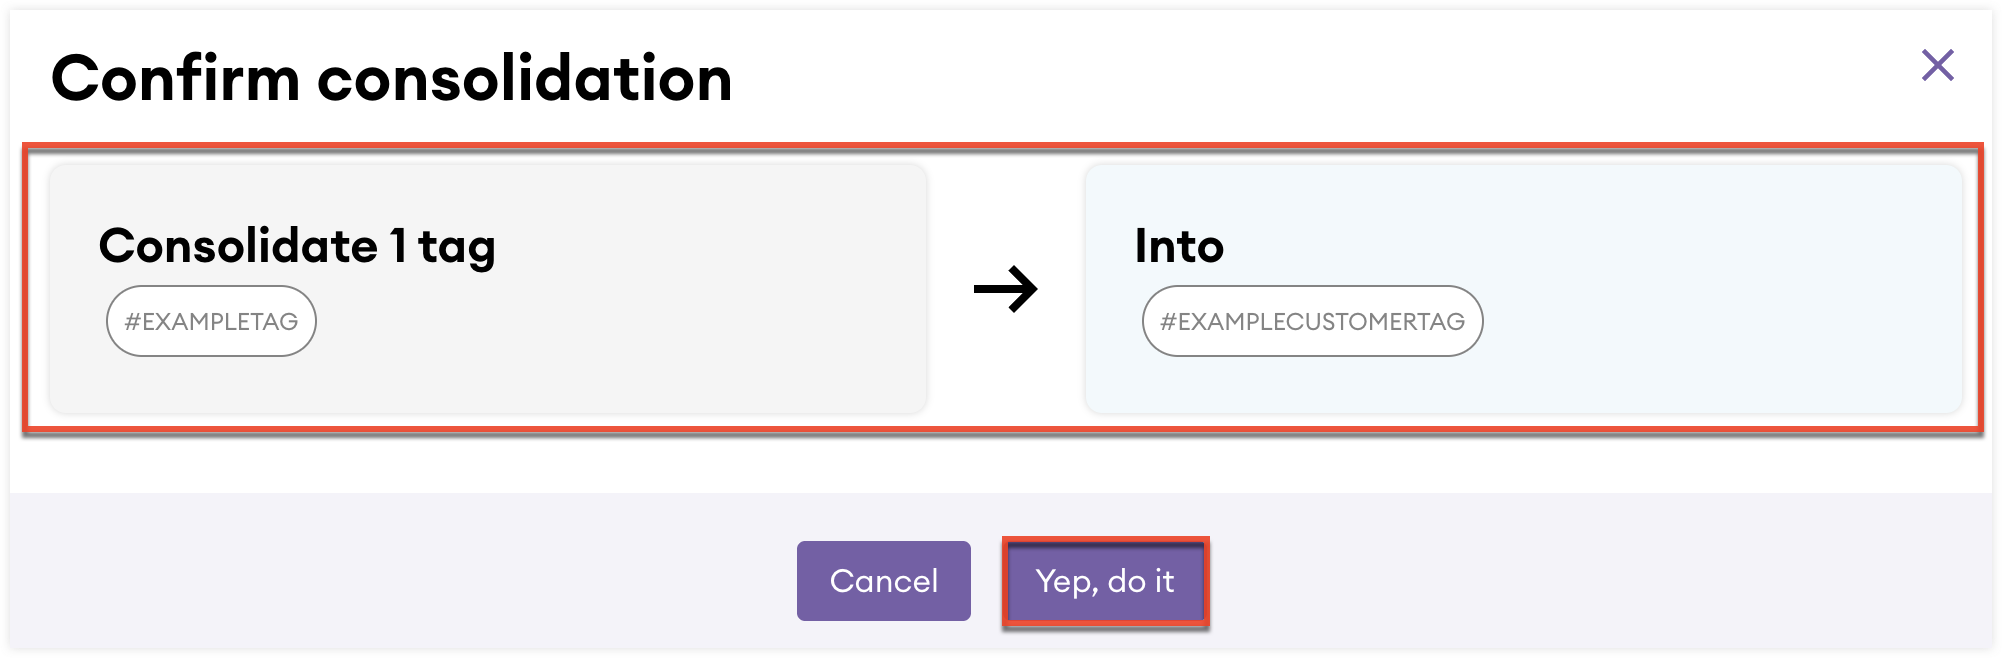
- For your review, a summary of the tags you have selected to consolidate and what tag they are being consolidated into is displayed.
- Click “Yep, do it” to complete the tag consolidation and update the tags on all associated records.
Email and Calendar Sync
From the email sync settings, you can connect your Microsoft Outlook account. Once your account is connected:
- Emails sent from Outlook are pushed to sales-i.
- Emails sent from sales-i are pushed to Outlook.
- Calendar events created in Outlook are pushed to sales-i.
Connecting Your Microsoft Outlook Account
To connect your Outlook account to sales-i:
- From the Admin Page, click the “Email Sync” card.
- Click the Connect Account button and follow the instructions to connect your account.
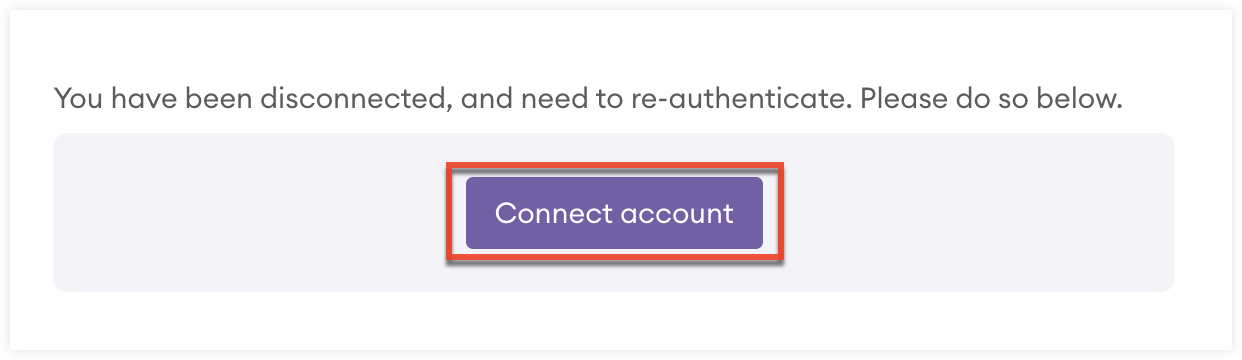
- Once your account is connected, data will begin flowing between sales-i and Outlook. Only emails and calendar events created after your account is connected will be synced.
Understanding What Data is Synced Between Outlook and sales-i
It is important to understand what data is shared and the expected behaviour between Outlook and sales-i once your account is connected. See the tables below for details:
Data Synced from Outlook to sales-i
| Outlook | sales-i |
| An email is sent from Outlook | An interaction record is created and is associated to the related contact record |
| A calendar event is created in Outlook | A interaction record is created and is associated to the related contact record |
| A calendar event is updated in Outlook | The related interaction record in sales-i is updated |
| A calendar event is deleted in Outlook | The related interaction record in sales-i is deleted |
Data Synced from sales-i to Outlook
| sales-i | Outlook |
| An email is sent from sales-i | The email is pushed to connected Outlook inbox |
Note: Only you can see emails and calendar interactions in sales-i from your connected Outlook account. Other users, including admins, cannot access these interactions.
Storage
From the Storage settings, you can view how much of your allocated file storage is being used broken down by file type.

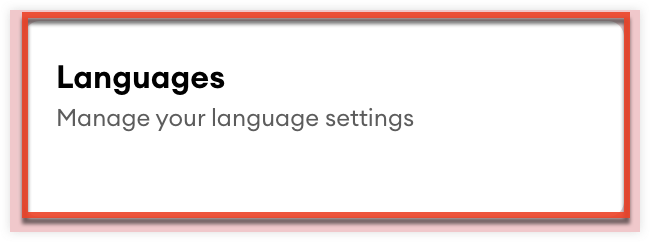
Languages
From the Languages settings you can configure which display languages are available for your users and view your default language.
sales-i supports the following languages: Chinese (Simplified), Chinese (Traditional), Dutch, French, German, Italian, Japanese, Polish, Portuguese, Portuguese Brazilian, Spanish, and US English.
Configuring Available Languages
From the Languages settings, you can control which display languages are available to your users. To configure the available languages:
- From the Admin Page, click the “Languages” card.
- Click a language from the list to set it as available or click "Select All" to set all languages as available.
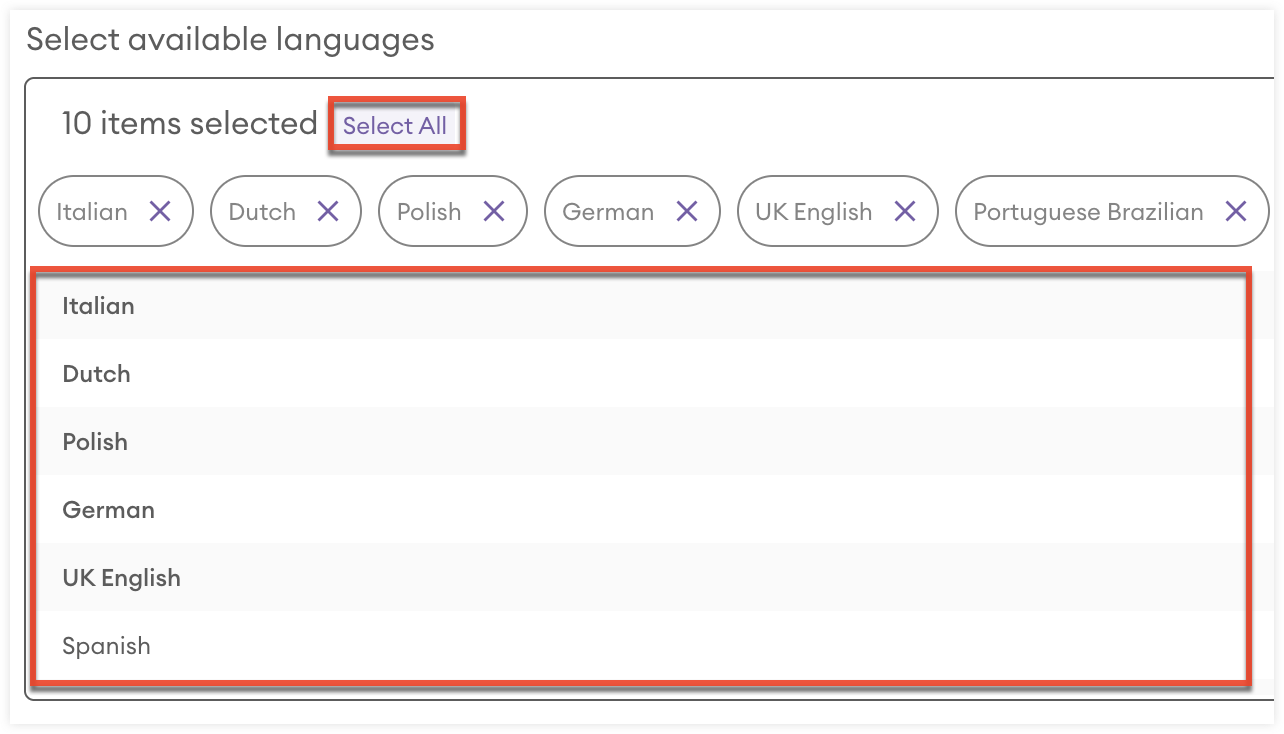
- Available languages appear as a pill above the list.
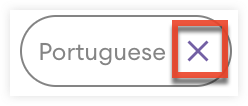
- To make a language unavailable, click the “X” in the pill.
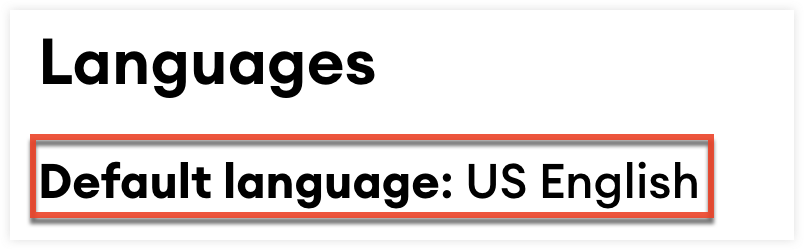
Viewing Default Language
From language settings you can view the default language set for your instance. This is set during onboarding and controls the display language users will see by default.
Currencies
From your Currencies settings, you can configure which display currencies are available to your users and how the exchange rates for non-default currencies are calculated.
sales-i supports the following currencies: US Dollars, British Pounds, Euros, Canadian Dollars, Indian Rupees, Polish Zlotys, Danish Kroner, Czech Korunas, Turkish Lira, Swiss Francs, Hungarian Forints, South African Rand, New Zealand Dollars, Mexican Pesos, Chinese Yuan, Japanese Yen, South Korean Won, Indonesian Rupiah, Malaysian Ringgit, Singapore Dollars, Hong Kong Dollars, Thai Baht, New Taiwan Dollars, and Australian Dollars.
Configuring Available Currencies
To configure which display currencies are available to your users:
- From the Admin Page, click the Currencies card in the My sales-i section to navigate to the Currencies settings page.
- To make a display currency available to users, set it as "Active" using the dropdown field in the Status column.
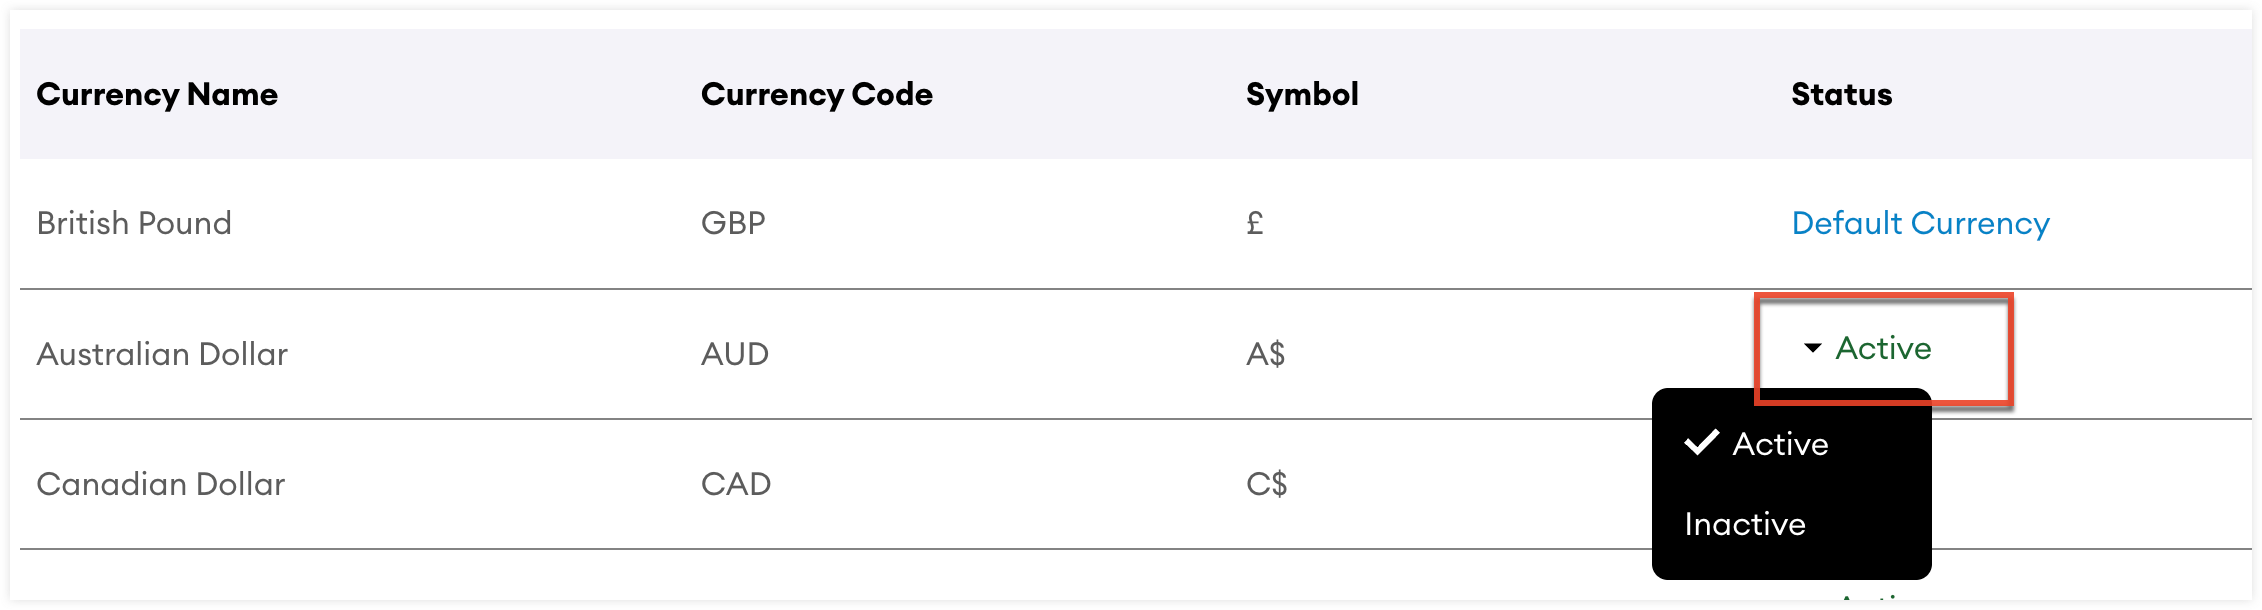
- To make a display currency unavailable to users, set it as "Inactive" using the dropdown field in the Status column.
Configuring Exchange Rates
The exchange rate for non-default currencies can be set automatically using current exchange rate data or manually. To configure the exchange rate source of your non-default currencies:
- From the Admin Page, click the Currencies card in the My sales-i section to navigate to the Currencies settings page.
- To automatically set the exchange rate source for all active currencies, select “Automatic” in the Exchange Rate Source section.
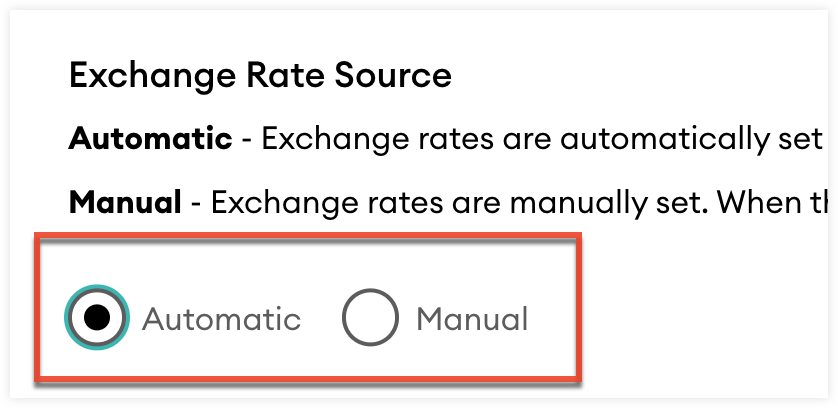
- To manually set the exchange rate source for all active currencies, select “Manual” in the Exchange Rate Source section.
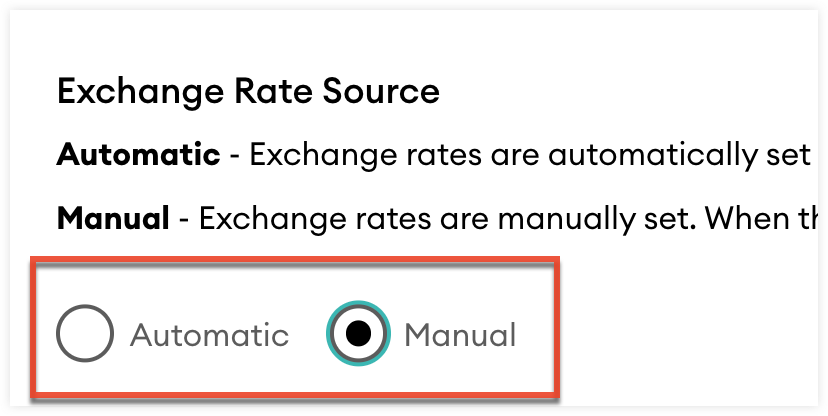
- Click the pencil icon in the Exchange Rate column to manually enter the exchange rate for each active currency.
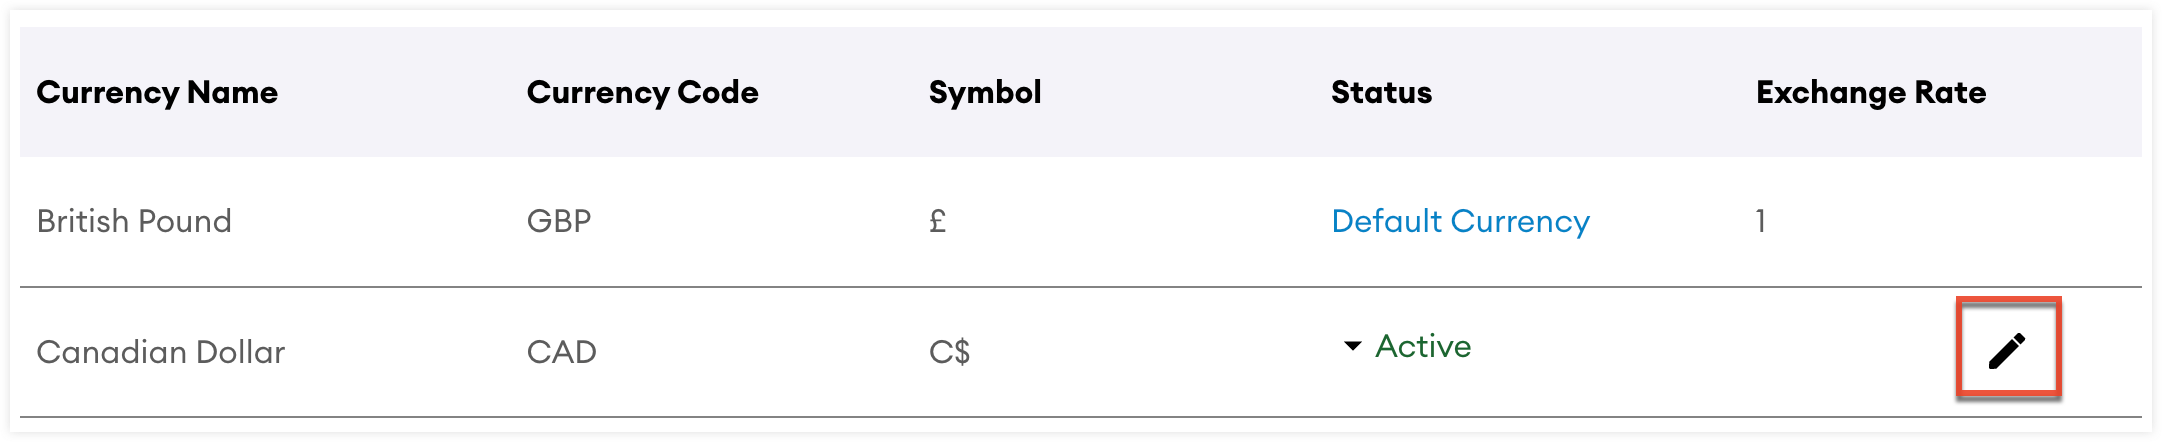
- Enter the exchange rate and click "Save". If an active currency does not have a manual exchange rate set, it will default to the automatic exchange rate.

Viewing Default Currency
Your default currency is set during onboarding and determines the display currency users see by default. To view the default currency set for your instance:
- From the Admin Page, click the Currencies card in the My sales-i section to navigate to the Currencies settings page.
- In the Status column, your default currency is displayed as “Default Currency.”

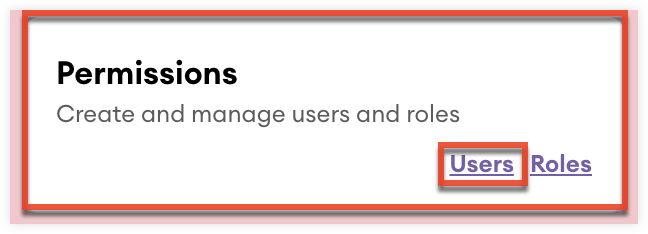
Permissions
From the Permissions settings you can manage your users including their access.
Creating Users
Follow these steps to create a sales-i user:
- From the Admin page, click “Users” in the Permissions card or click the Permissions card; “Users” will be select by default.
- Click "Add a user".
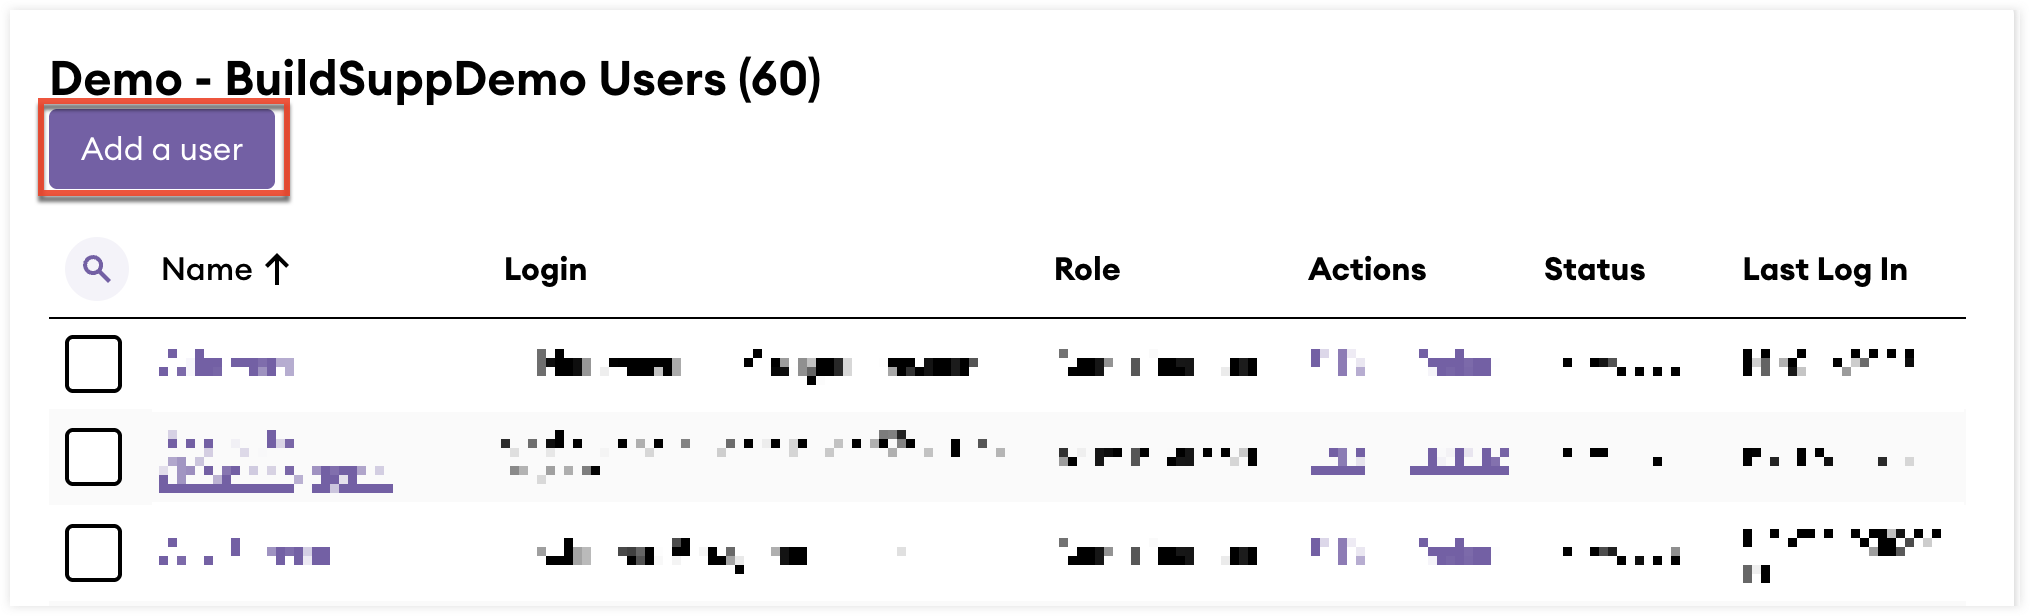
- On the User details stage, complete the required fields and then click "Continue".
- On the Role stage, select which roles you want to apply to the user.
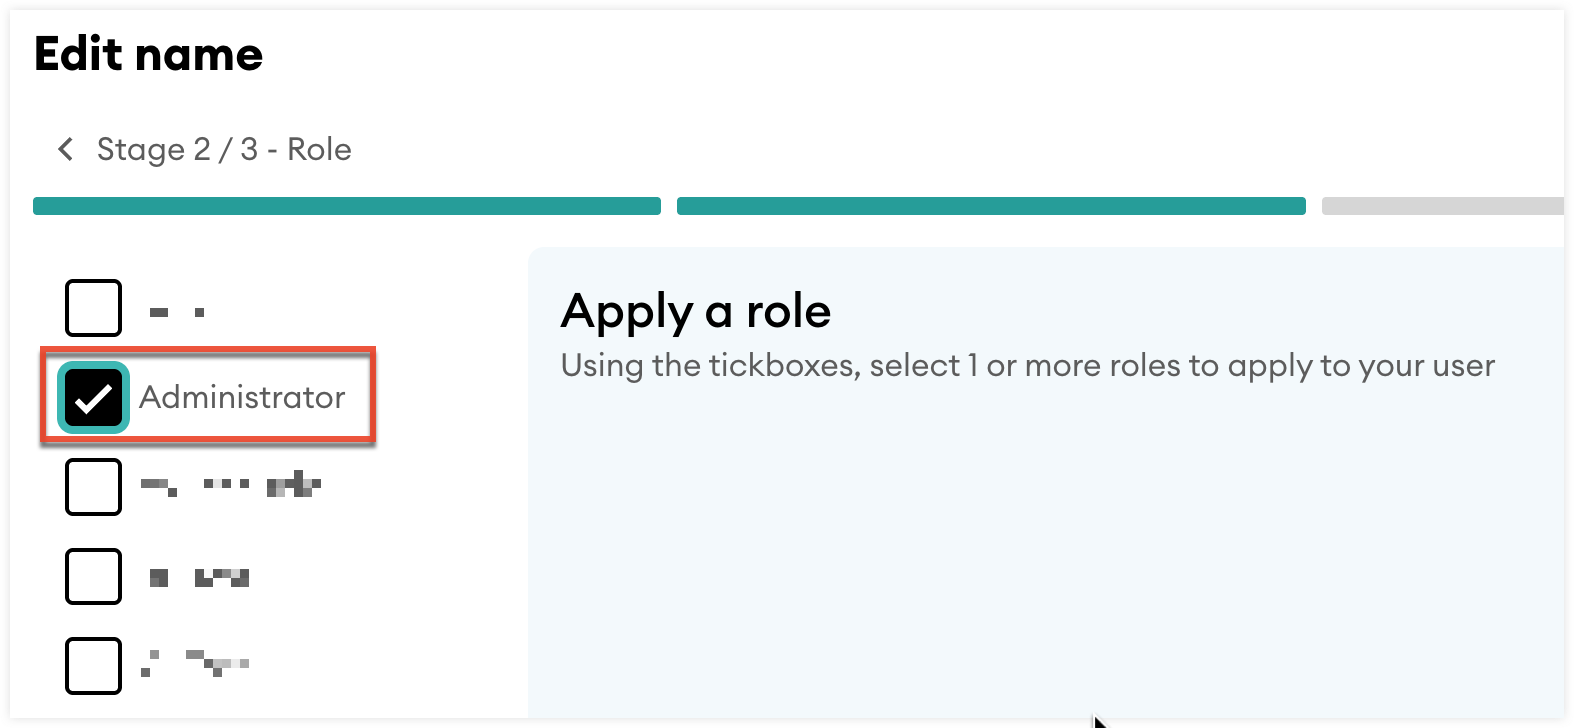
- If you also want to apply custom data restrictions rules to the user, click "Update data restrictions" at the bottom of the Role stage page.
- If you only need to apply roles, click "Complete" to create the user.
Grant Permission to View All Users Interactions
You can grant a user the permission to view all user interactions in the My Interactions page. Follow these steps to enable the permission:
- From the Admin page, click “Users” in the Permissions card or click the Permissions card; “Users” will be select by default.
- In the Users list view, select the “Read All Sales Users Calendars” checkbox for the user you want to grant permission to.
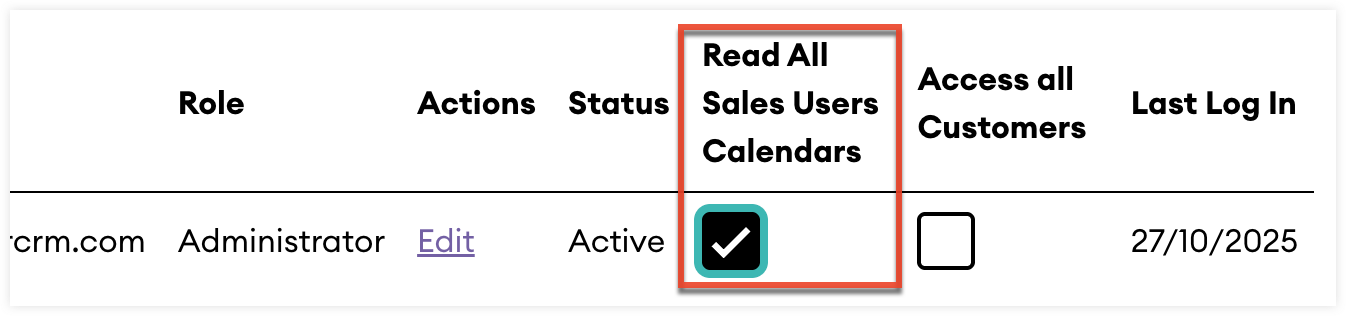
- This user will now be able select and view all users interactions from the My interactions page using the Users dropdown field.

Grant Access to View and Edit CRM Data For All Customer Records
You can grant a user the permission to view and edit CRM data for all customer records. Follow these steps to enable the permission:
- From the Admin page, click “Users” in the Permissions card or click the Permissions card; “Users” will be select by default.
- In the Users list view, select the “Access all Customers” checkbox for the user you want to grant permission to.
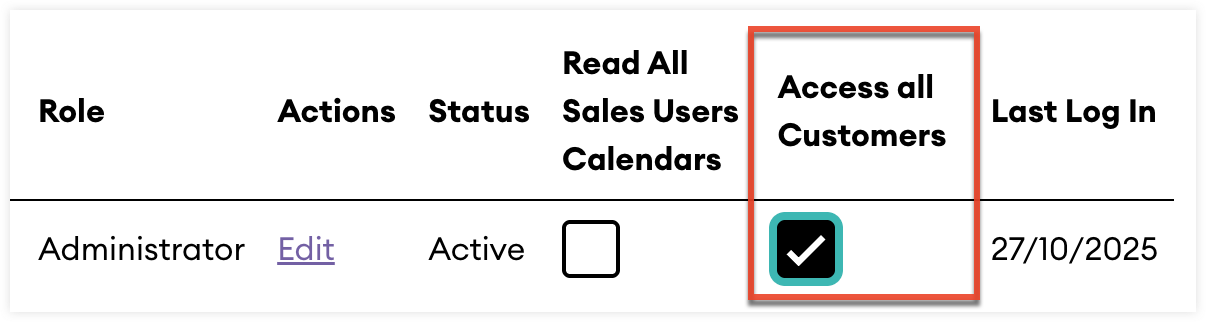
- This user can now view and edit all CRM data for all customer records. Transactional data for records the user cannot access will be hidden.
Roles
Roles are collection of granular feature restrictions that can be applied to a user. This lets you quickly configure the complex access configurations for a user with only a few clicks. There are five default roles available based on common user types. Default roles cannot be edited or deleted but you can create custom roles to fit your specific needs.
| Role Name | Description |
| Administrator | Has full system access, capable of configuring settings, managing user roles, and overseeing all data across the platform. |
| Manager | Oversees a specific group or department, with permissions to view and manage data relevant to their area, including reports and team performance. |
| Team Leader | Leads a smaller team within a department, with access to monitor and manage the teams activities and performance metrics. |
| Sales User | Focuses on customer interactions and sales processes, with access to leads, opportunities, customer data, and sales tools. |
| CRM User | Has restricted access exclusively to CRM functionalities, typically for viewing and managing customer relationships and interactions without access to broader business data or administrative settings. |
Data Restriction Rules
Data Restriction Rules limit user access to features based on specific field values meeting defined conditions. Users can only access features that satisfy all conditions within the applied rules and rule groupings. For example, you can restrict a user’s access to Customer records from a specific area by applying rule conditions based on fields such as town or county.
Rules are created using the following conditions:
- Field type: is the field an Analysis field or a CRM field
- Field category: what category does the field belong to
- Field name: what is the field’s name
- Operator: what logic does the rule use against the field value
- Field value: the field value to be used against the logic set in the Operator field
Creating a Rule
Follow these steps to create a rule:
- From the Admin page, click “Users” in the Permissions card or click the Permissions card; “Users” will be select by default.
- Locate the user you want to apply the rule to and from the Actions column click “Edit”.
- Click the Continue button and then the “Update data restrictions” button.
- Click “+ Add a rule / rule group”
- From the Rule tab, use the dropdowns from left to right to build out the logic for the rule.
- For example, if you wanted to restrict a user to only have access to Customer records based in a specific area you could create a rule similar to the one displayed below.
- Once you have completed the configuration of your rule, click “Add Rule”.
- To save the Rule and apply the data restriction to the user, click “Complete”.
Creating a Rule Grouping
Follow these steps to create a rule grouping:
- From the Admin page, click “Users” in the Permissions card or click the Permissions card; “Users” will be select by default.
- Locate the user you want to apply the rule to and from the Actions column click “Edit”.
- Click the Continue button and then the “Update data restrictions” button.
- Click “+ Add a rule / rule group”
- Click the Rule group tab, and use the dropdowns from left to right to build out the logic for the first rule of the grouping.
- Rule groupings must have a minimum of two rules. To create the second rule, first select the logic that will connect the two rules using the AND and OR buttons.
- Use the dropdowns from left to right to build out the logic for the second rule of the grouping.
- For example, if you wanted to restrict a user to only have access to Customer records based in a specific area AND branch you could create a rule group similar to the one displayed below.
- You can continue to add additional rules to the grouping by clicking the + button.
- Once you have completed the configuration of your rule group, click “Add Rule”.
- To save the Rule group and apply the data restriction to the user, click “Complete”.
Managing Rules
Once rules and rule groupings are saved to a user they can be edited or deleted as needed. The title of saved rules is the Field name, Operator, and Field value.
Targets
From the Targets settings you can create targeted sales goals for your users.
Logo
From the Logo settings you can upload your logo to replace the sales-i branding displayed in your desktop and mobile instance and branded exported files. To upload your logo:
- Click the “Browse” button for desktop or mobile.
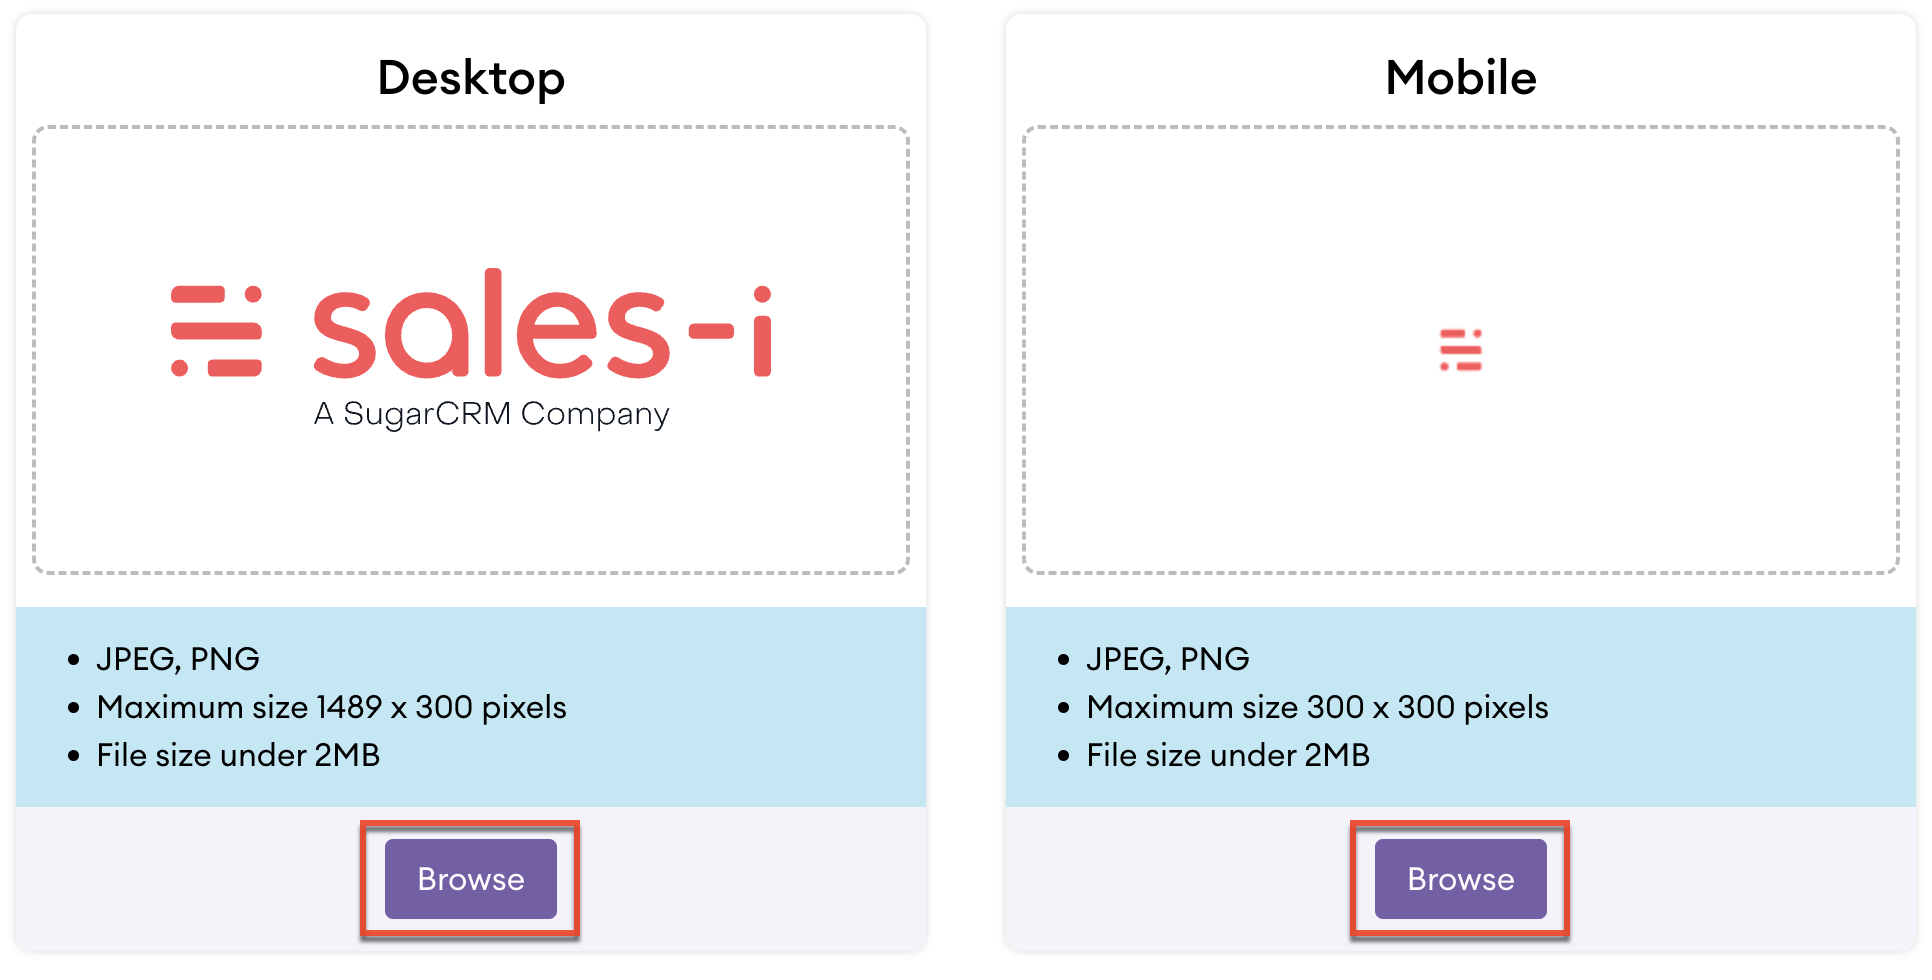
- Ensure your image file meets the specified requirements.
- For both desktop and mobile the image file must be JPEG or PNG and the file size must be under 2MB.
- The maximum image size for Desktop is 1489x300px.
- The maximum image size for Mobile is 300x300px.
CRM Settings
The CRM Settings section contains the following settings:
Customer/Prospect
With the Customer/Prospect settings you can customize the fields and sections of the Customer and Prospect record types.
Contacts
With the Contacts settings you can customize the fields and sections of Contact records.
Opportunties
With the Opportunties settings you can customize the fields and sections of Opportunties records.
Interactions
With the Interactions settings you can customize the fields of Interactions.
CRM Export
The CRM Export allows you to export data from sales-i. An export file can include up to 100 columns and 100,000 rows.
Exporting Data
Follow these steps to export data:
- From the Admin page, click “Interactions” in the CRM Settings card.
- Use the checkbox fields to select which record types you want to export.
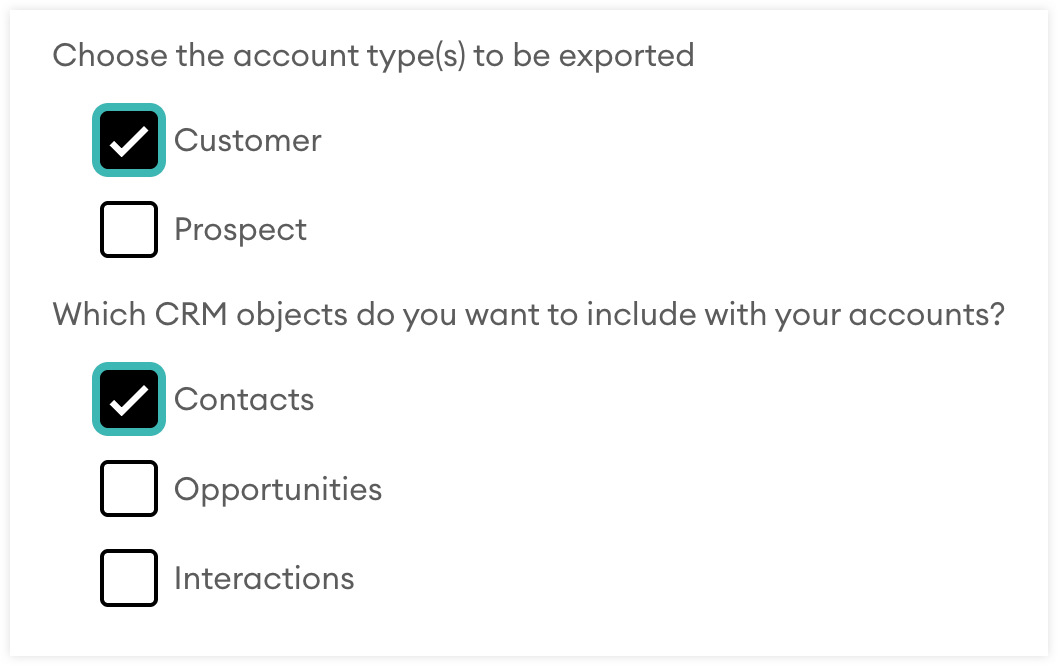
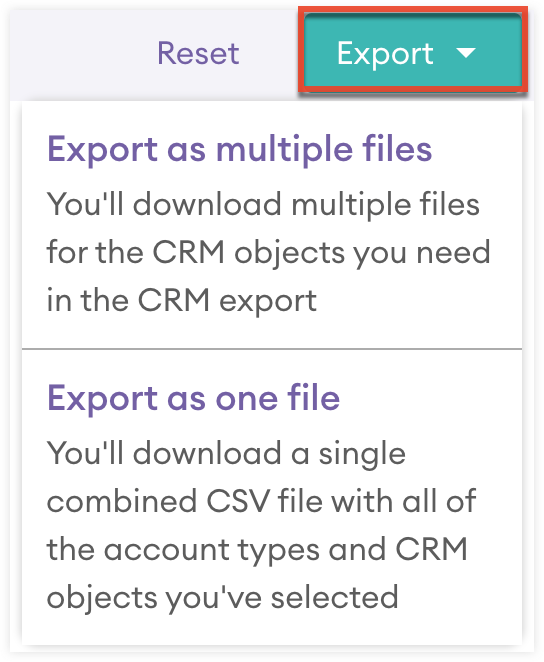
- Click the Export button and confirm if you want to export your data as a single file or multiple files divided by record type.
Filter Exports by Analysis Fields
You can also filter your export file using analysis fields. Only records that meet the conditions of the set filters will be export. You can create filters for your exports by following these steps:
- From the Admin page, click “Interactions” in the CRM Settings card.
- Select "Analysis fields" under the filter options.
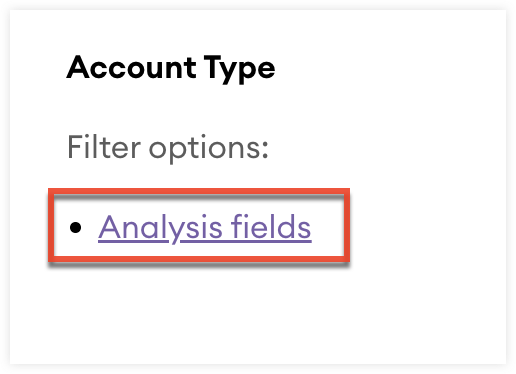
- Select "Create filter" and select an analysis field and the value for that field.

- Click "Create" to create the filter.

- Repeat these steps as needed to add additional filters connected by "AND" logic.
Intelligence
The Intelligence section contains the following settings:
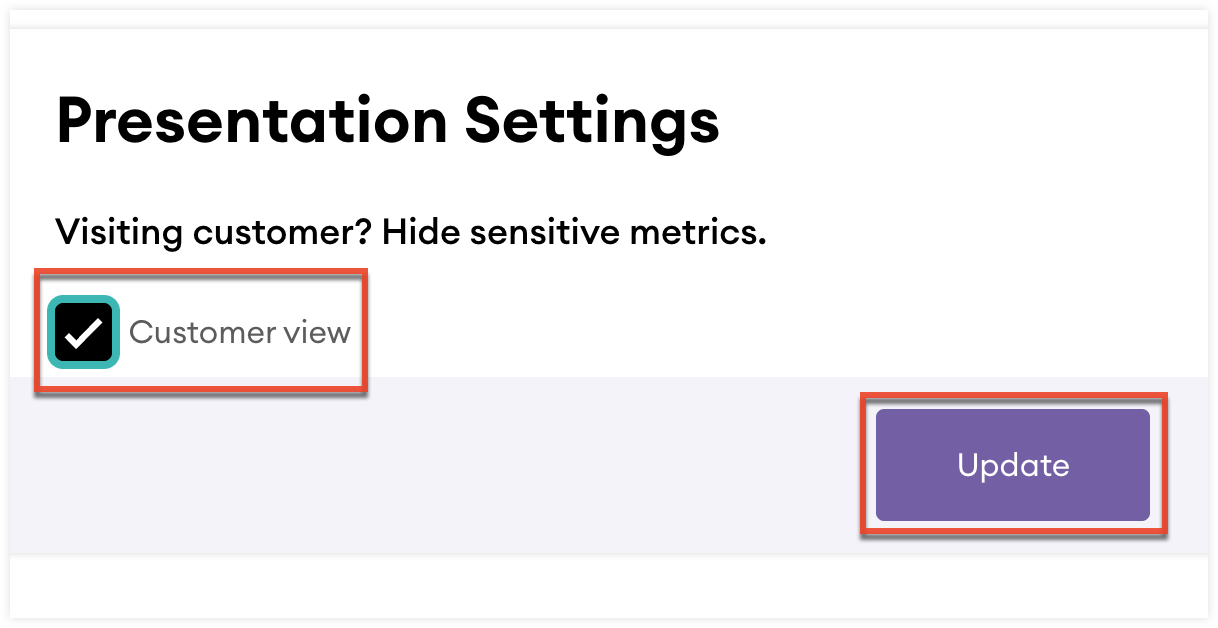
Inquiries
From the inquiries settings you can check the Customer view check box and then select "Update" to hide all profit values across sales-i.
Associations
Product associations are generated by an AI machine learning model. The model predicts how likely on a 1-100% range that a product or product group will be purchased if a customer has already purchased another product or product group. This prediction is based on your historical sales data. Associations are used to create AI generated opportunities in sales-i.
The Associations Products page lets you view these generated associations and if needed, dismiss them so they are no longer used to create AI generated opportunties.
The Associations Exception page lets you exclude certain products and groups from being included in generated associations.
Communities
Product communities let you view products identified by the AI machine learning model as often purchased together. You can also dismiss and create product communities to further influence the output of the model.
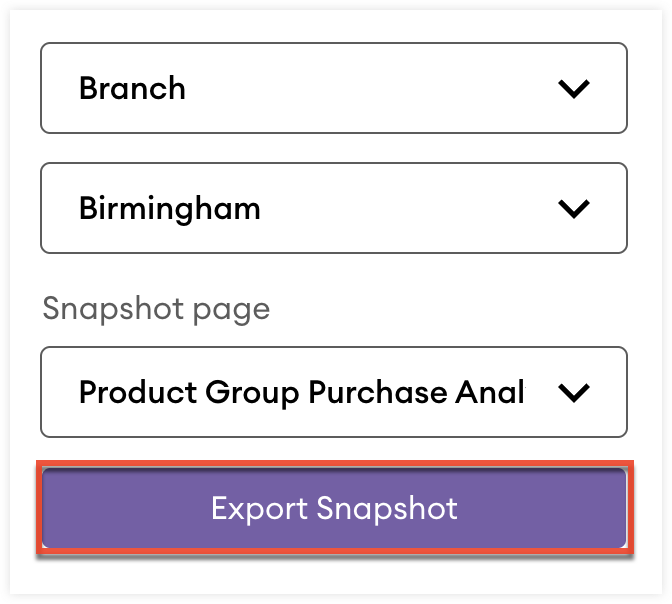
Snapshot by Analysis Field
The Snapshot by Analysis Field report lets you create snapshot reports based on a select analysis fields. Follow these steps to create a snapshot report based on an analysis field:
- From the Admin page, click the "Snapshot by Analysis Field" card.
- Using the drop down fields select an analysis field and the value for that field.
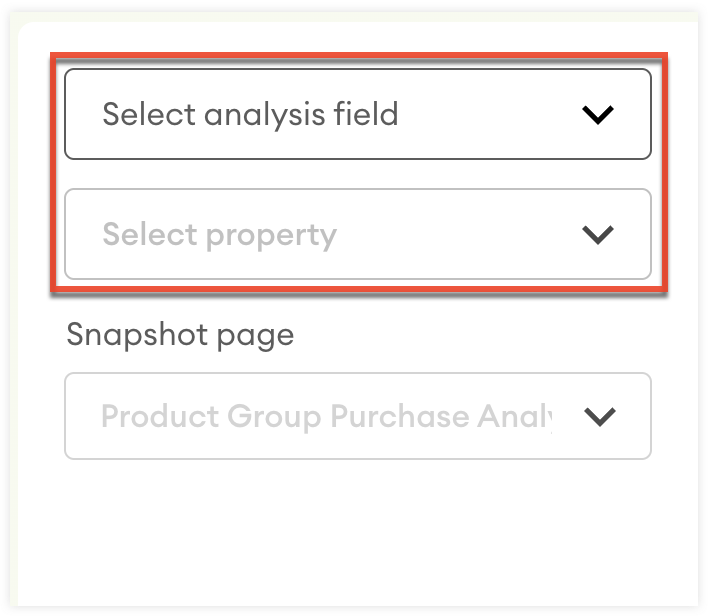
- Use the Snapshot page field to select the snapshot report you want to generate.

- Click "Export Snapshot" to export the entire set of snapshot reports.