Sugar Connect User Installation Guide
Overview
Sugar Connect is an email client add-in that lets you work with your Sugar data without navigating away from Outlook or Gmail. This guide walks through the steps that individual users should take to install and activate Sugar Connect.
Before users can start installing Sugar Connect, administrators should refer to the Sugar Connect Deployment and Administration Guide to find information on configuring Sugar Connect.
Prerequisites
- As of May 2023, Sugar Connect is included with new purchases of Sugar Sell Premier, Sell Advanced, and Enterprise+, and it enables the mail and calendar integration capability. Sugar Connect can also be purchased as an add-on for Sugar Serve and Enterprise. Please contact your Sugar partner or representative to learn more.
- Sugar Connect must be purchased and configured for your Sugar instance by an administrator. Please refer to the Sugar Connect Deployment and Administration Guide for more details.
- An administrator must enable you as a user of the connector. For more information on adding users, please refer to the Sugar Connect Deployment and Administration Guide.
- To use Sugar Connect, each user will need an email account and a Sugar user account, and both accounts should use the same email address.
- Please ensure that you have upgraded your Sugar instance to at least the minimum supported version of Sugar. For more information, refer to the Plug-Ins Supported Platforms.
- Users must allow third-party cookies in order to use the Sugar Connect sidebar.
- Some third-party browser extensions or Office add-ins may interfere with your installation of Sugar Connect. If you are having trouble launching or installing Sugar Connect, confirm that you have disabled any connectors listed in the Known Incompatibilities section of this page.
User Installation
An administrator must first set up your organization's Sugar Connect account and add you as a user. Upon doing so, you will receive an email invitation to set up and install Sugar Connect on your computer. You can use Sugar Connect on multiple devices (e.g., on your personal computer and your work laptop), but you must install it on each device you plan to use. Simply follow the same installation instructions and log in using the same email address each time. Your single user account can be used for multiple installations.
Follow the steps for the appropriate email client to install Sugar Connect once you have been invited:
- For Office 365 users: Installing Sugar Connect for Outlook
- For Google Workspace (formerly G Suite) users: Installing Sugar Connect for Gmail
Note: If you authenticate using a Google Workspace account, you must install and use Sugar Connect for Google Workspace in a Chrome browser with Gmail, Google Contacts, and Google Calendar. If you authenticate using an Office 365 account, you must install and use Sugar Connect with an approved version of Microsoft Outlook.
Your Sugar Connect administrator must send you an invitation to install Sugar Connect as a member of your organization's Sugar Connect account. To avoid conflicts, do not attempt to install Sugar Connect without the invitation. For information on purchasing Sugar Connect for your organization and inviting users, please refer to the Sugar Connect Deployment and Administration Guide.
Installing Sugar Connect for Outlook
The steps in this section describe the installation of Sugar Connect used with an Office 365 subscription and Outlook on the Web, Outlook for Desktop (Windows), and Outlook for Desktop (macOS).
Outlook for Web and Desktop (Windows)
- Open Outlook on your Windows desktop or log in to your Office 365 account online.
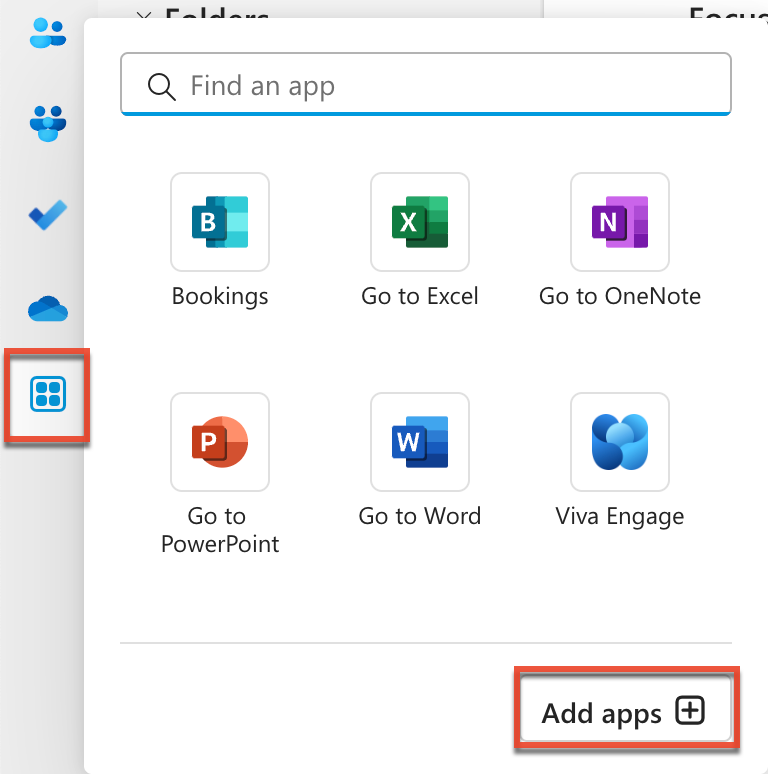
- Click the More apps icon on the Outlook toolbar, then click the Add apps button in the popup window.
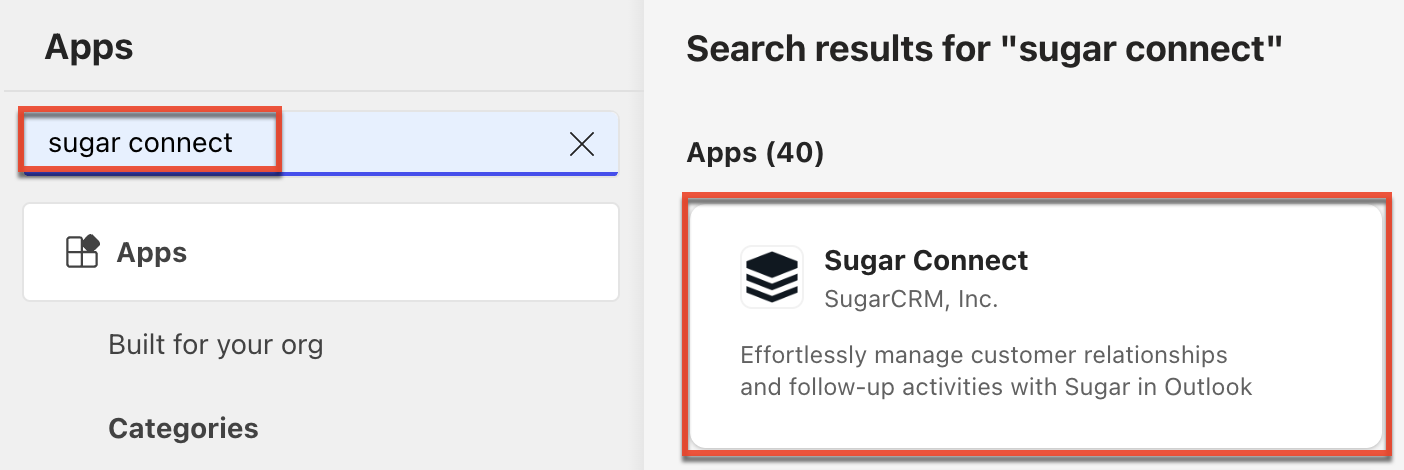
- In the App Store, search for "Sugar Connect", click the Sugar Connect tile in the results, and click "Add" in the popup window.
- If prompted, agree to the privacy policy, terms of use, and permissions.
- After Sugar Connect is installed, navigate back to your Outlook Inbox.
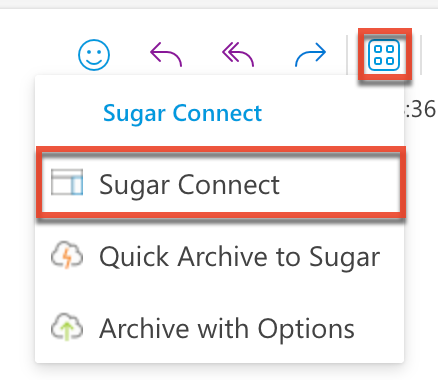
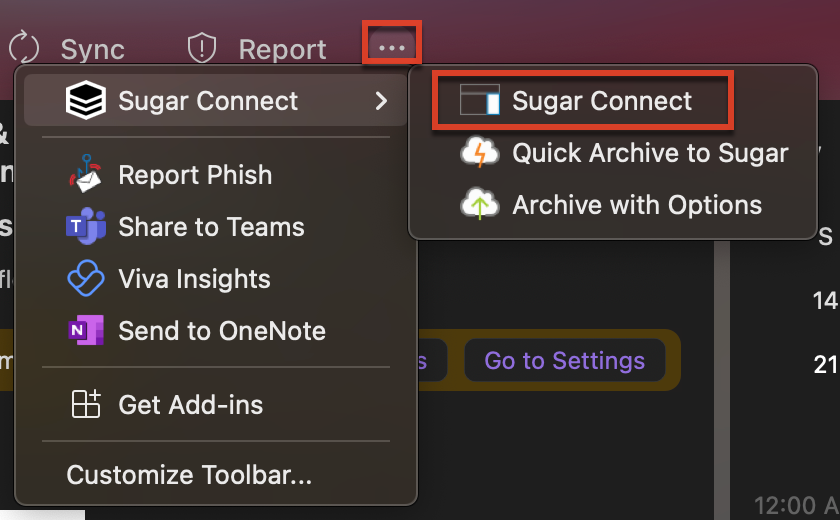
- Click on any email message to open it, click on the More apps icon inside the message, select the Sugar Connect app, and then select "Sugar Connect" in the list of options in order to open the Sugar Connect sidebar.
Note: Once you open the sidebar, you may want to pin it open for ease of access later. - Once Sugar Connect is installed, you may use the sidebar in either the web or desktop version of Outlook and proceed to Logging In.
Outlook for Desktop (macOS)
- Open Outlook on your Mac desktop.
- Open the Tools menu and select "Get Add-ins" (or click the Get Add-ins button on the toolbar in Legacy Outlook) to open Microsoft AppSource in your browser.

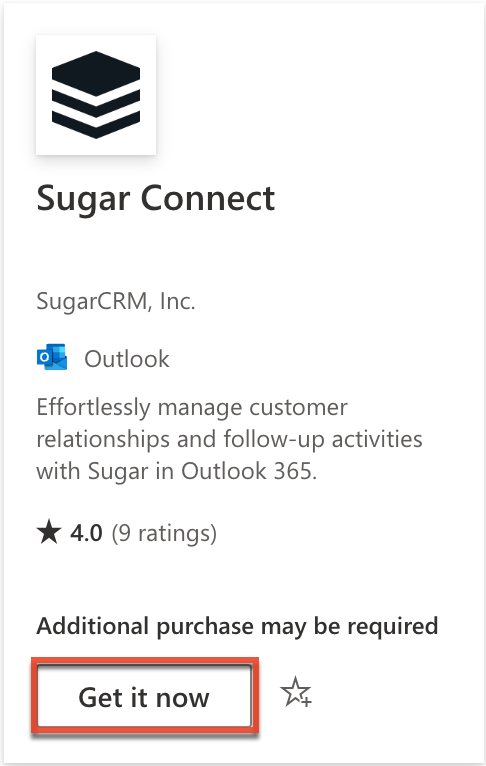
- In the Microsoft AppSource website, search for "Sugar Connect".
- Click "Get it now" and follow the steps to continue the installation.
- If prompted, agree to the privacy policy, terms of use, and permissions.
- After Sugar Connect is installed, navigate back to your Outlook Inbox.
Note: You may need to restart Outlook if you do not see Sugar Connect in the following step. - Click on any email message to open it, click on the three dots icon at the top of your mailbox, select the Sugar Connect app, and then select "Sugar Connect" in the list of options in order to open the Sugar Connect sidebar.
Note: Once you open the sidebar, you may want to pin it open for ease of access later. - Once Sugar Connect is installed, you may use the sidebar in either the web or desktop version of Outlook and proceed to Logging In.
Installing Sugar Connect for Gmail
The steps in this section describe the installation of Sugar Connect used with a Google Workspace subscription and Gmail. You must install Sugar Connect for Google Workspace on a Google Chrome browser. Once you have installed the extension, you can sync your browser settings to make it available on any computer where you access the browser profile to which it was installed. For more information on Chrome's browser sync, please refer to the Google Help article Turn Sync On or Off in Chrome.
- Open your Chrome browser and navigate to https://mail.google.com.
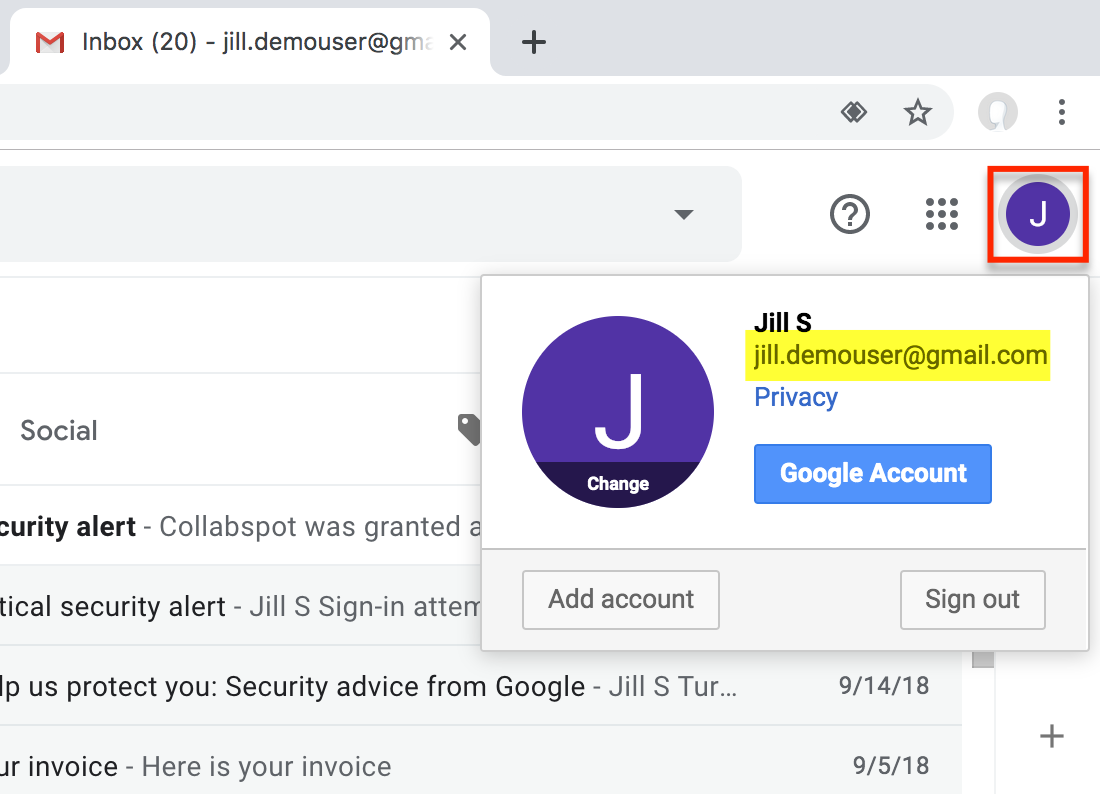
- Confirm that you are logged in to both Gmail and Chrome using the email address that you use to access Sugar. Please note that logging in to Gmail is different from logging in to Chrome.
- To confirm your active Gmail account, click on the account icon or profile image at the top of the Gmail interface, just under your browser's toolbar:
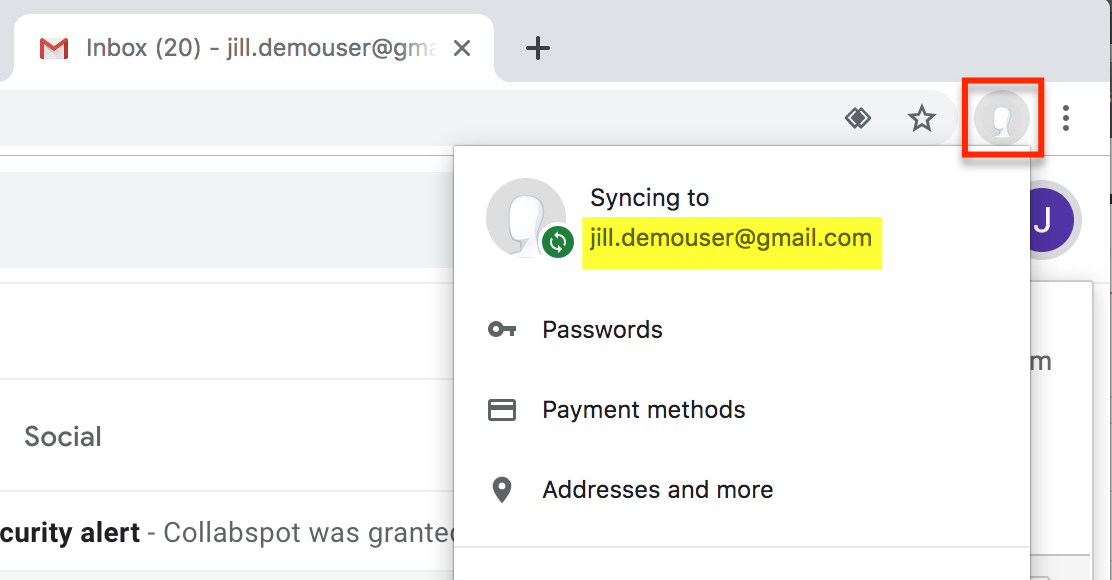
- To find your active Chrome profile, click on the avatar or profile image in Chrome's toolbar:
- To confirm your active Gmail account, click on the account icon or profile image at the top of the Gmail interface, just under your browser's toolbar:
- Locate the Sugar Connect extension in the Chrome Web Store and click on "Add to Chrome" to install the extension.
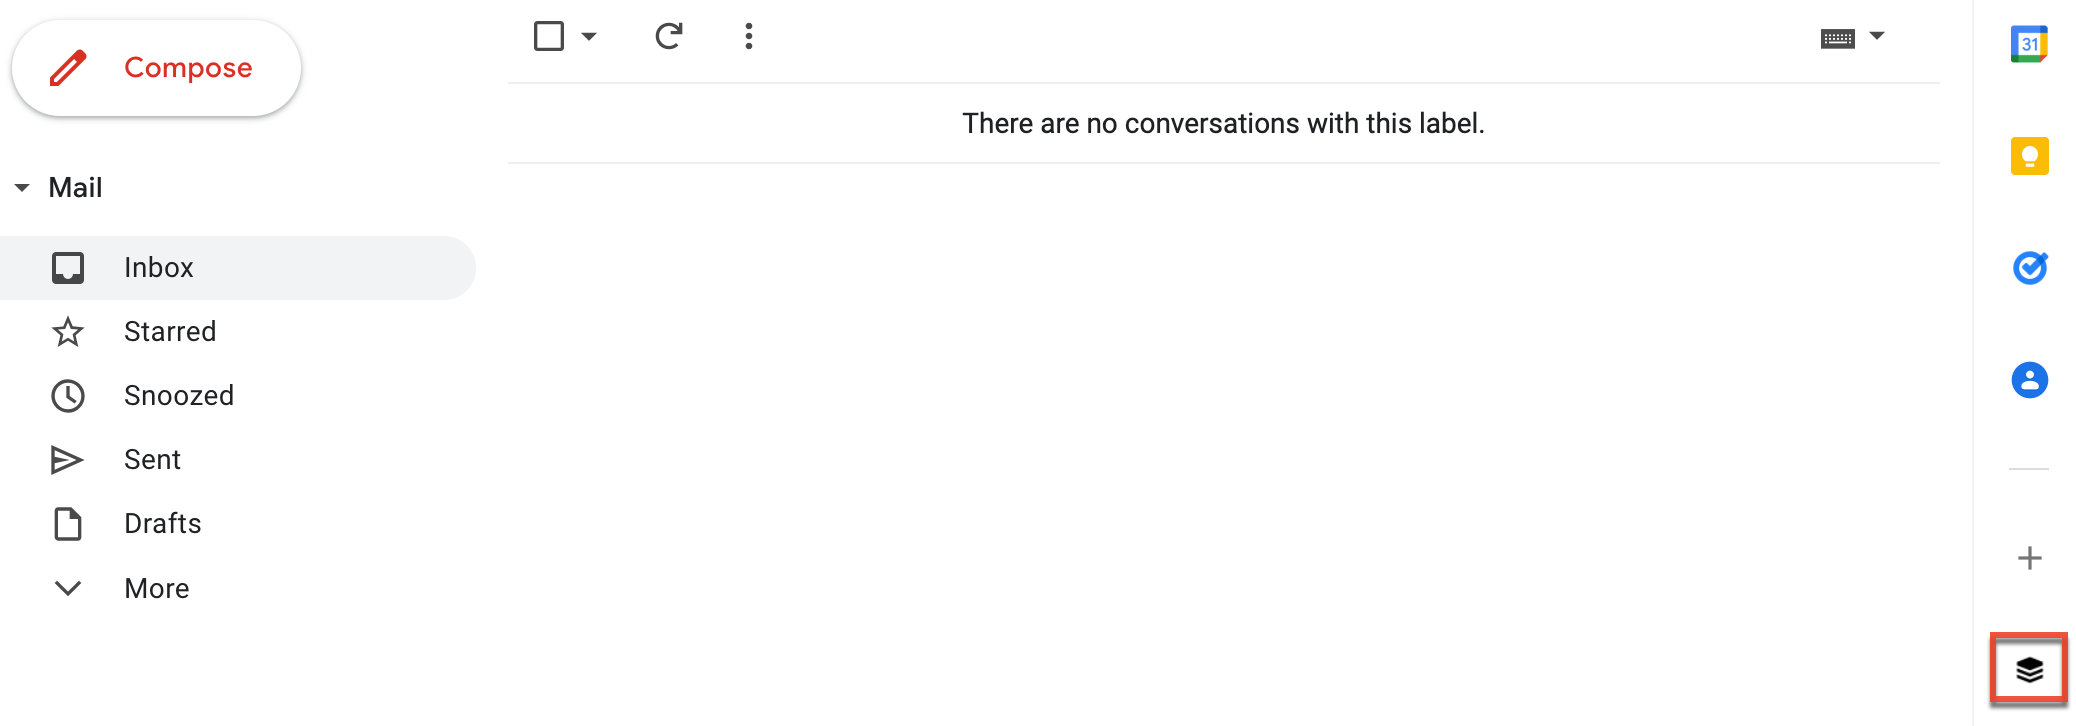
- After installing, reload Gmail and find the Sugar Connect icon on the right side of your Gmail inbox. Click on the icon to expand the Sugar Connect sidebar and connect to your Sugar user account.
- Proceed to log in steps in the next section.
Logging In
The sections below outline the steps to log in to your Sugar Connect Sidebar based on the authentication type used by your Sugar instance which is either Standard Login or using SugarIdentity.
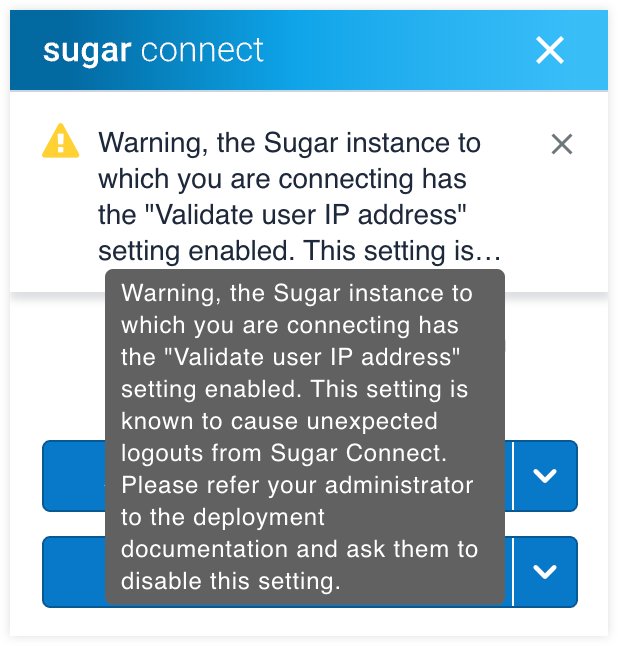
Note: Make sure that you or your admin have already registered a Sugar Connect account to avoid conflicts when you log in. If your Sugar instance does not have a valid TLS/SSL certificate chain, you will see a warning and will not be able to log in. If your Sugar instance has the "Validate user IP address" setting enabled, you will see a warning message after logging in. For more information on Sugar Connect prerequisites and recommended setup, please refer to the Sugar Connect Deployment and Administration Guide.
Standard Login
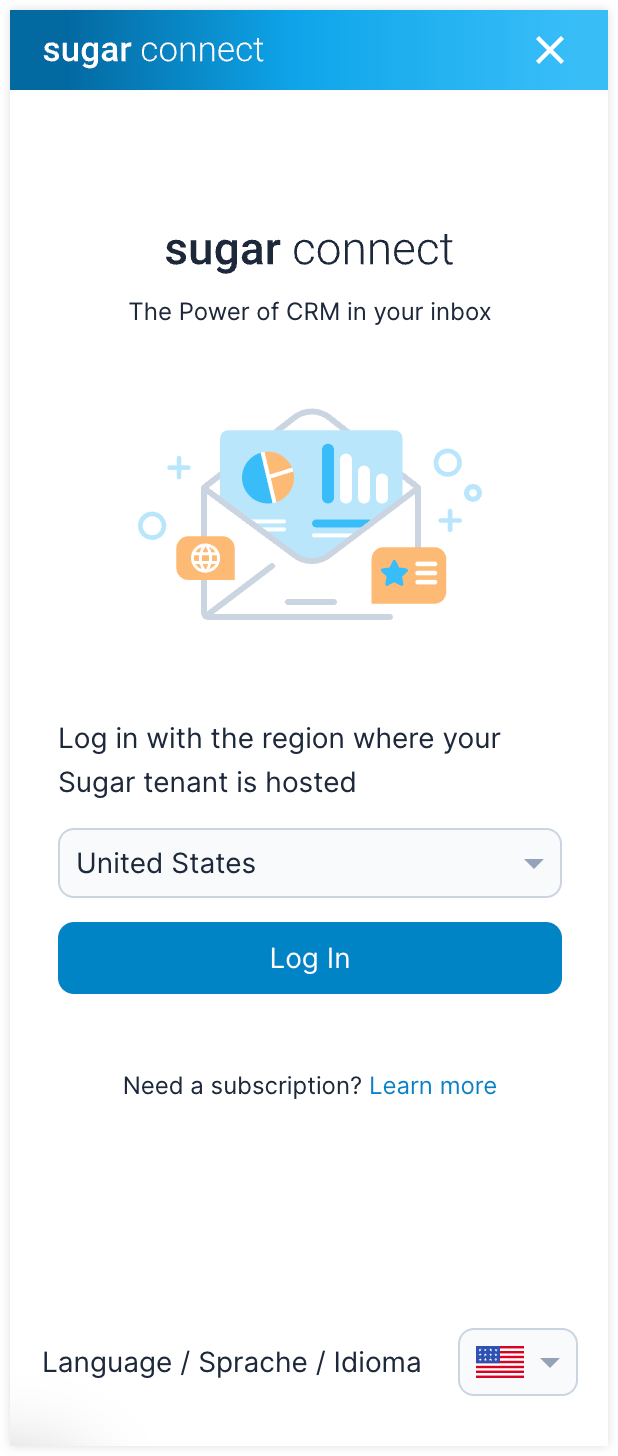
- In the Sugar Connect sidebar, select the region your Sugar Connect instance is hosted. Please note this may be different than your physical location. If you are unsure, please check with your administrator.
- Click "Log in" to get started configuring your connection.
- In the pop-up window, select the appropriate option. If using the G-suite extension, you must sign in with Google and if you are using the Office 365 Add-in, you must sign in with Microsoft.
- Enter your email credentials that are also associated with the Sugar Connect Portal. Please note, your organization may have SSO configured for this part of the login process and you should follow the steps you normally would when using SSO. If your email address or domain is associated with multiple organizations (tenants), you may be prompted to select one prior to logging in.
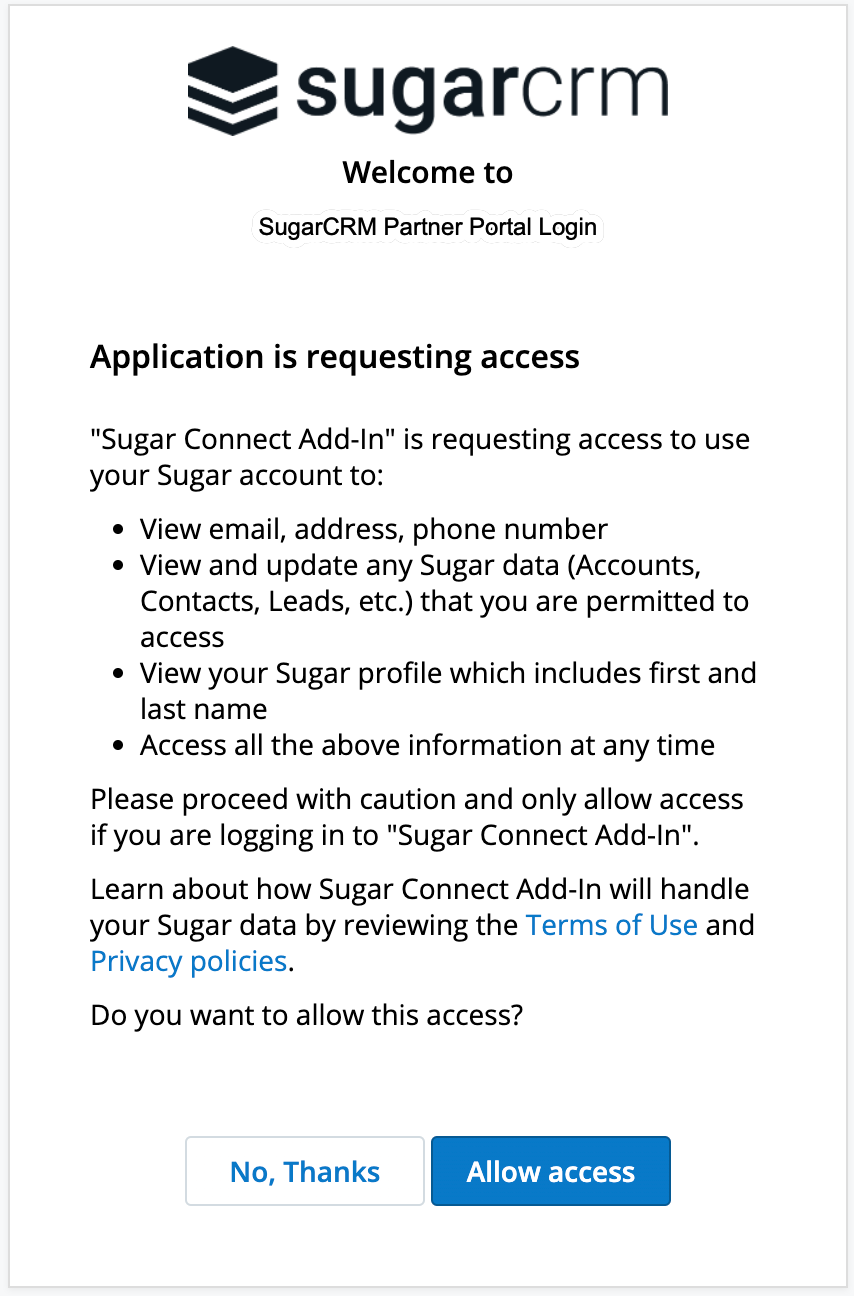
- You must click "Allow" to grant permission for the connector to access your data when prompted.
- When prompted, enter your Sugar instance credentials to authenticate and start using Sugar Connect to work with your Sugar data.
After successfully authenticating the sidebar, you can start using Sugar Connect. For more information, please refer to the Sugar Connect User Guide.
Log in with SugarIdentity
- In the Sugar Connect sidebar, select the region your Sugar Connect instance is hosted. Please note this may be different than your physical location. If you are unsure, please check with your administrator.
- Click "Log in" to get started configuring your connection.
- In the pop-up window, select the appropriate option. If using the G-suite extension, you must sign in with Google and if you are using the Office 365 Add-in, you must sign in with Microsoft. If prompted, log in with your professional email account (i.e., not a personal email account created by you).
- Enter your email credentials that are also associated with the Sugar Connect Portal. Please note, your organization may have Single Sign On (SSO) configured for this part of the login process and you should follow the steps you normally would when using SSO. If your email address or domain is associated with multiple organizations (tenants), you may be prompted to select one prior to logging in.
- You must click "Allow" to grant permission for the connector to access your data when prompted.
- If prompted, enter your Sugar instance credentials to authenticate and start using Sugar Connect to work with your Sugar data.
After successfully authenticating the sidebar, you can start using Sugar Connect. For more information, please refer to the Sugar Connect User Guide.
Note: If you experience trouble during the log-in process and are using Google Workspace or Outlook on the web, please clear your browser cache. If you are using the desktop Outlook application follow these steps.
Logging in With SugarIdentity Using Multi-Factor Authentication
SugarIdentity supports multi-factor authentication, which provides an added layer of security for Sugar to prevent unauthorized users from gaining access to your account. When multi-factor authentication is enabled for your Sugar instance, you will need to use a mobile authenticator app (e.g., Authy, Google Authenticator, Microsoft Authenticator) when logging in to your Sugar account and enter the 6-digit code generated from the app to verify your identity.
The following steps cover logging in to your Sugar Connect Sidebar using SugarIdentity with multi-factor authentication:
- Follow steps 1-6 in the Log in With SugarIdentity section above.
- If this is your first time logging in after multi-factor authentication has been enabled for Sugar, a QR code will appear on the screen. Scan the QR code using your authenticator app (e.g., Google Authenticator), then click "Continue". If you cannot scan the QR code using your mobile device, skip to step 3.
Note: If you have already paired an authenticator app with Sugar, then skip to step 4.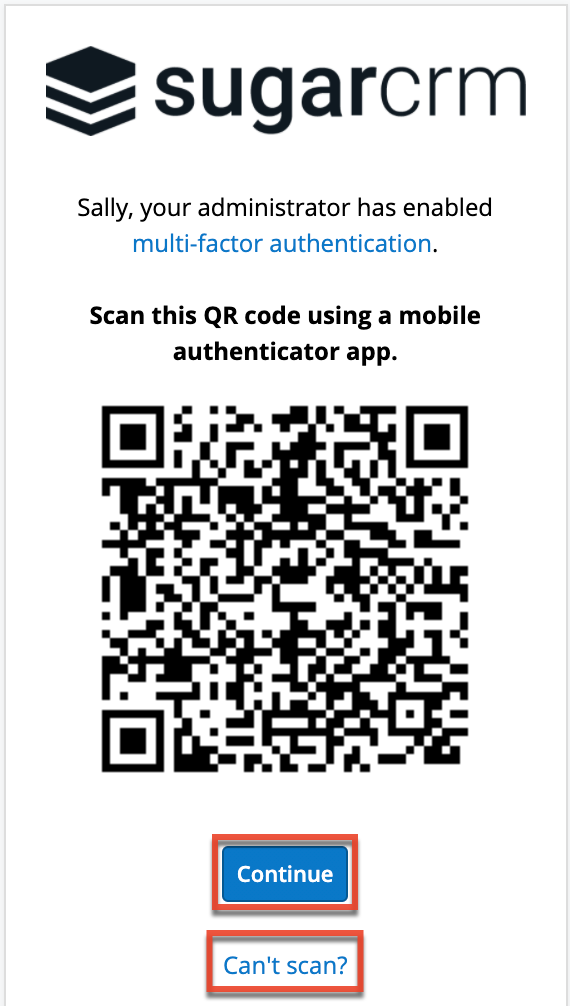
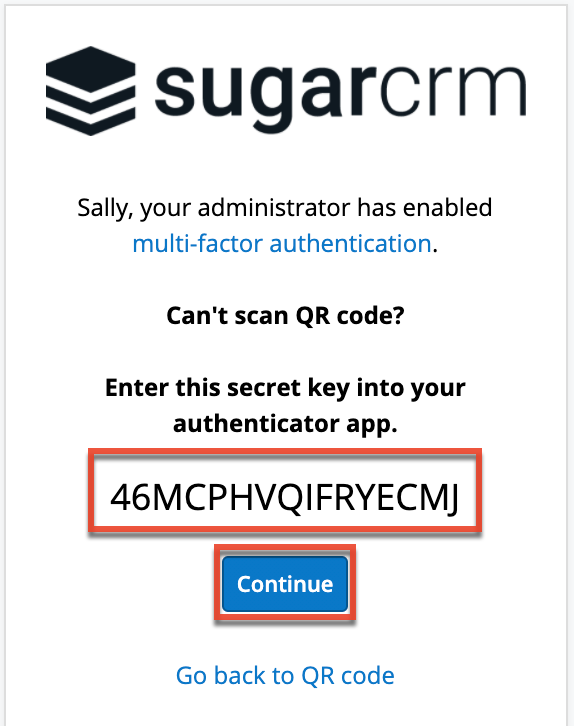
- If you cannot scan the QR code on step 2 using your mobile device, click the "Can't scan?" link and enter the secret key that appears on the screen into your authenticator app. Click "Continue".
- On the next step, enter the 6-digit code generated from your authenticator app, then click "Log In".
Note: Once your authenticator app is paired with Sugar, for future logins, you will just be required to enter a new 6-digit code on this screen after entering your Sugar login credentials.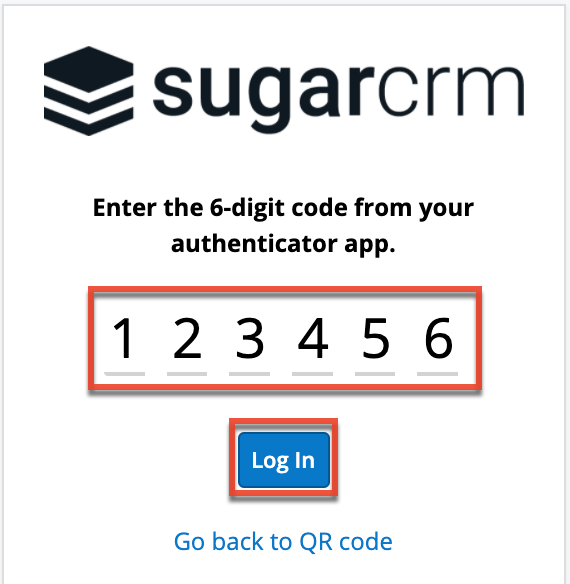
- A user consent window will appear requesting access to your Sugar account. Click "Allow access" to grant permission for the connector to access your data.
After successfully authenticating the sidebar, you can start using Sugar Connect. For more information, please refer to the Sugar Connect User Guide.
If you experience trouble during the log-in process and are using Google Workspace or Outlook on the web, please clear your browser cache. If you are using the desktop Outlook application follow these steps.
Note: SugarIdentity multi-factor authentication is only used to authenticate from Sugar Connect to your CRM. For enhanced security, it is recommended that users enable multi-factor authentication in their Google or Microsoft accounts.
Known Incompatibilities
Outlook add-ins and Chrome extensions that occupy the same area of the user interface as the Sugar Connect sidebar will likely cause conflicts and be incompatible with Sugar Connect. Please disable or uninstall any products that may compete with Sugar Connect for the right side of your email client's window.
The following Chrome extensions are known to be incompatible with Sugar Connect. Please disable or uninstall any of these extensions that you may be running if you plan to use Sugar Connect in Gmail:
- AdBlock
- Assistant.to (or similar extensions)
- Boomerang (Calendar Events) and its features in Compose Form
- Gmelius
- Hubspot
- LinkedIn Sales Navigator for Gmail extension
- Loom for Chrome
- MailTracker
- Marketo Sales Connect (formerly ToutApp)
- MixMax
- Reply for Gmail
- Yesware
Disabling Sugar Connect
Use the steps in this section to disable Sugar Connect without deleting it or its data. To fully uninstall Sugar Connect and all of its data, refer to the Uninstalling Sugar Connect section instead.
Note: If you have paid for a subscription to Sugar Connect, disabling it will not cancel your subscription.
To disable the extension in Outlook, follow these steps:
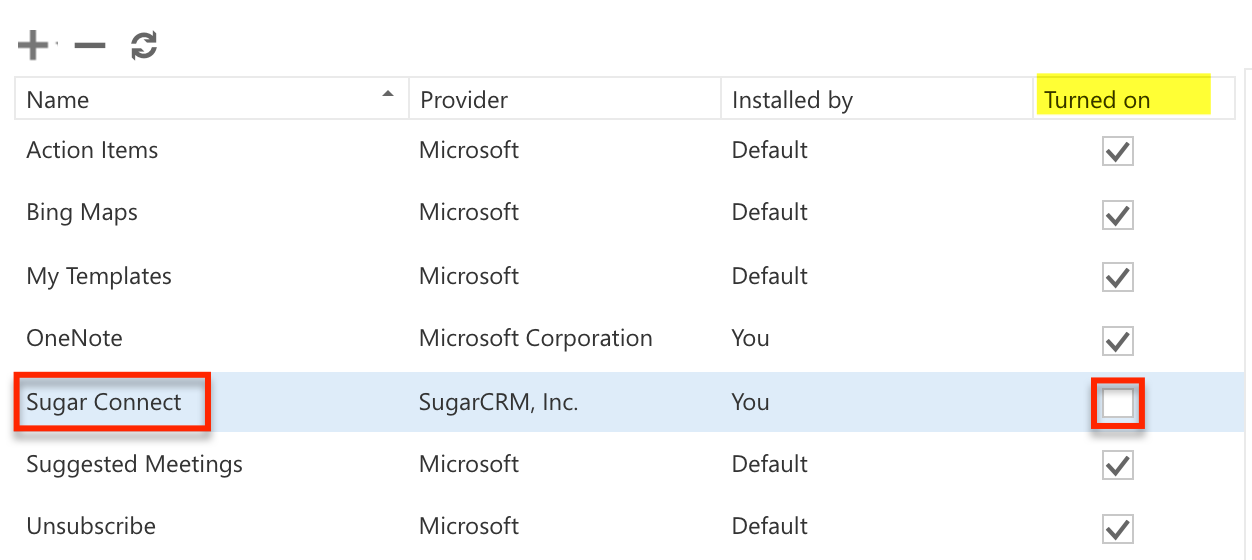
- Log in to your Office 365 account and navigate to your Add-ins Management page at https://outlook.office.com/owa/?path=/options/manageapps.
- Under the column labeled "Turned on", uncheck the box for the Sugar Connect row to disable the add-in for the online and desktop version of Outlook.
To disable the extension in Gmail (Chrome), follow these steps:
- Click the menu icon in the top-right corner of the Chrome browser window.
- In the drop-down menu that appears, select "More tools", and then "Extensions".
- In the Extensions tab, find Sugar Connect and click the toggle switch at the bottom-right of its extension box. This should turn it gray to indicate that it is disabled. You can revert the extension to its enabled (blue) state by clicking the switch again.
Uninstalling Sugar Connect
Use the steps in this section to uninstall Sugar Connect and delete all of its data. To simply disable Sugar Connect without fully uninstalling it, please refer to the Disabling Sugar Connect section.
Note: If you have paid for a subscription to Sugar Connect, uninstalling it will not cancel your subscription.
To uninstall the add-in from Outlook, follow these steps:
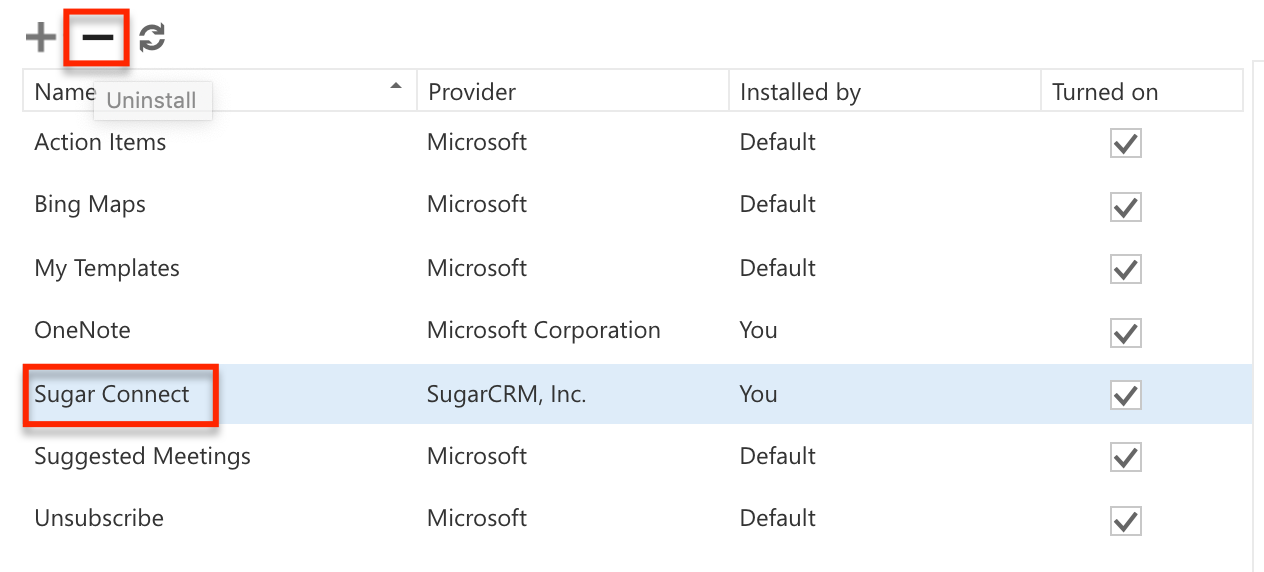
- Log in to your Office 365 account and navigate to your Add-ins Management page at https://outlook.office.com/owa/?path=/options/manageapps.
- Click on the row for Sugar Connect.
- At the top of the list of add-ins, click on the Uninstall (-) icon to delete the add-in for the online and desktop version of Outlook.
To remove the extension from Gmail (Chrome), follow these steps:
- Look for the extension's icon in the Chrome toolbar.
- Right-click the icon and select "Remove from Chrome".

If you do not see the Sugar Connect icon in your toolbar, refer to Google's instructions on how to uninstall an extension via the extensions page.
Troubleshooting Sugar Connect
In order to understand why you may see a notification in your Sugar Connect sidebar, portal, or via email, please refer to the following:
- Debug Mode Notification: If your administrator reported an issue to SugarCRM, you may see debugging mode enabled in your Sugar Connect sidebar. When enabled, an orange notification appears saying "Sidebar debug enabled" followed by a green notification that says "Sidebar debug disabled".
- Action Required Email: For Office 365 users, if you need to re-authenticate into the Sugar Connect portal, you will receive an email with the subject: "Action Required: Sugar Connect login expired" with instructions on how to re-establish the authorization necessary for Sugar Connect to access your email account.