Sugar Connect Deployment and Administration Guide
Overview
The Sugar Connect administrator performs required deployment operations and can access admin-only areas of the Sugar Connect Portal in order to add and invite users, organize the users into teams, and set some high-level user permissions. This guide will walk you through deploying and administering Sugar Connect.
For information on installing Sugar Connect as an individual user and using Sugar Connect's general features, please refer to the Sugar Connect User Installation Guide and the Sugar Connect User Guide.
Note: If you have Sugar Sell Premier, Connect powers the mail and calendar integration capability. You must still deploy Connect as described on this page.
Supported Regions
Sugar Connect is supported in the following regions:
- North America
- EU
- APAC
- United Kingdom
Prerequisites
- As of May 2023, Sugar Connect is included with new purchases of Sugar Sell Premier, Sell Advanced, and Enterprise+, and it enables the mail and calendar integration capability. Sugar Connect can also be purchased as an add-on for Sugar Serve and Enterprise. Please contact your Sugar partner or representative to learn more.
- Your Sugar instance's hosting environment must meet one of the following criteria:
- Your Sugar instance is hosted on SugarCloud.
- Your Sugar instance is hosted on an internet-accessible platform such as AWS, Google Cloud Platform, Azure, etc.
- Your Sugar instance is hosted on a platform that has a FQDN that can be resolved via public DNS infrastructure to a public (non-RFC 1918) IP, and accepts connections from the IPs listed in the Sugar Connect Outbound IP Addresses section of this page.
- The site that hosts your Sugar instance must have a trusted TLS/SSL certificate chain for Sugar Connect to function and must be using port 443 for communication.
- Your Sugar instance must have the "Validate user IP address" setting disabled under Admin > System Settings > Advanced.
- Sugar Connect users must have the following access to the Calls, Emails, Meetings, and Tasks modules in Sugar:
- "Access" set to "Enabled" or "Not Set".
- "Delete" set to either "Not Set", "All", or "Owner"
- "Edit" set to either "Not Set", "All", or "Owner".
- "List" set to either "Not Set", "All", or "Owner".
- Sugar Connect does not support Sugar instances using single sign-on (SSO) unless the instance uses SugarIdentity.
- For on-site instances using Sugar Connect that would like to use SSO with SugarIdentity, the Sugar administrator will need to activate SugarIdentity for their instance.
- Your organization must use a paid version of Office 365 or Google Workspace. If using Office 365, your account must be set up to use a hosted exchange server in order to access the Sugar Connect add-in. For more information, please refer to the Plug-ins Supported Platforms.
- Your organization's email domain must be your organization-specific domain issued with your Office 365 or Google Workspace account. It cannot be a generic one such as @gmail.com, @microsoft.com, @live.com, @hotmail.com, or @outlook.com.
- If your organization uses both Office 365 and Google Workspace, you will create a tenant for each. You can then link each tenant to the same Sugar instance.
- Group Policy (for Office 365) or Google Apps Console (for Google Workspace) may be used to deploy Sugar Connect to users as required by your organization. Otherwise, please follow the steps in this guide to set up and add users to Sugar Connect and then allow them to install Sugar Connect locally as explained in the Sugar Connect User Installation Guide. You may need to contact your organization's IT department or work directly with Microsoft or Google support to troubleshoot issues with the installation process.
- The minimum recommended screen resolution for viewing Sugar Connect is 1440 x 900. Smaller screen resolutions may experience difficulties viewing some areas of the product.
Getting Started With Sugar Connect
The initial installation of Sugar Connect requires an administrator to perform important setup steps:
- Step 1: Set up your Sugar Connect tenant
- Step 2: Invite users to your Sugar Connect account
- Step 3: Map Connect users to your Sugar instance
Do not proceed to Step 2 until your users have logged in to and set up their passwords in your Sugar Sell, Serve, or Enterprise CRM instance.
Once these steps are completed, users can install and start using Sugar Connect, as described in the Sugar Connect User Installation Guide.
Setting up Your Sugar Connect Tenant
Your Sugar Connect tenant is your organization's instance of Sugar Connect. After purchasing Sugar Connect, you must decide who will set up and administer the software for use with Sugar in your organization. This person, the Sugar Connect administrator, must also be a Sugar administrator. The Sugar Connect administrator should then follow these steps to register your company and create a unique tenant with Sugar Connect:
- You should have received an email from Sugar with a link to create a Sugar Connect tenant. Click the link to begin the process. You can also click the following links to create a Sugar Connect tenant that will be hosted in the applicable region:
- Complete the following fields on the signup form:
- Company name: Enter the name of your company.
- Tenant name: Enter the desired name of your tenant, which must begin with a letter. It must also be unique as this will become part of the URL where your users will log in to the Sugar Connect Portal.
- SugarCRM License Key: Enter your Sugar License Key that was provided to you or can be found within your Sugar instance via Admin > License Management.
- Email provider: Select which email provider, either Google Workspace or Office 365, your email domain (i.e., *@yourcompany.com) is purchased from.
Note: A tenant is configured to work with only a single email provider (Google or Office 365). If your organization uses Google and Office 365, you must create a separate tenant for each. You can use the same Sugar license key to create both tenants, but keep in mind that you will need enough Sugar Connect user licenses in each tenant if your company has purchased Sugar Connect as an add-on. You can then link both tenants to the same Sugar instance in Step 8 below.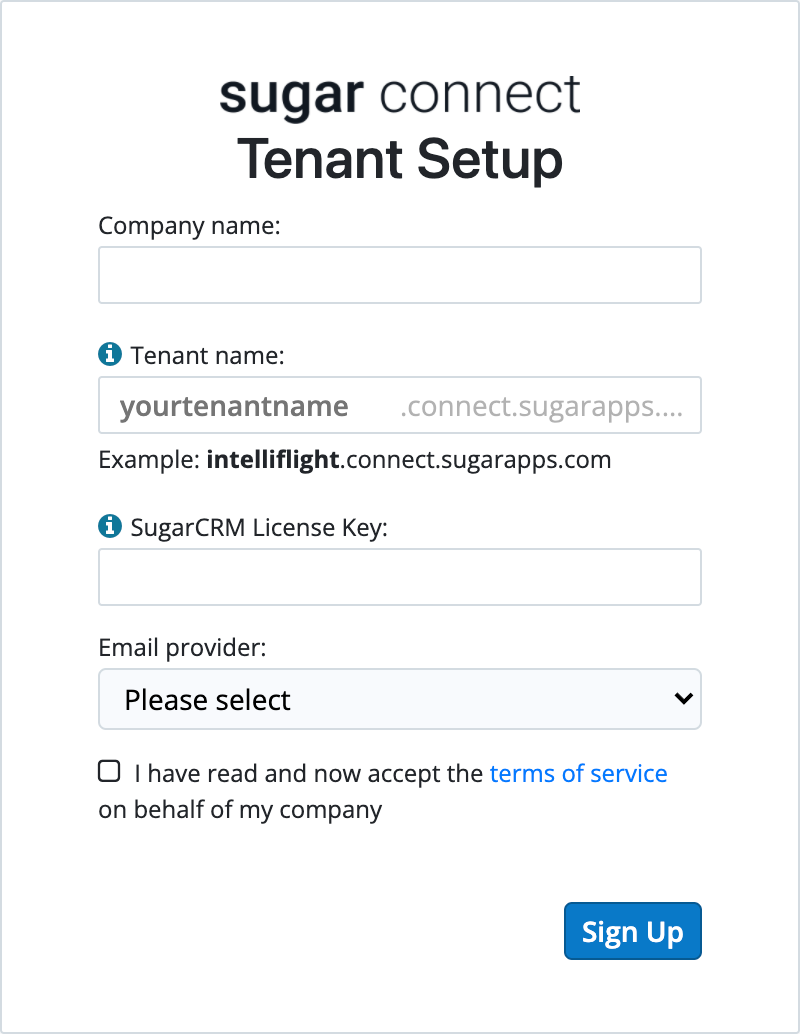
- Read and click to accept the terms of service.
- Click on "Sign up" to continue the registration process.
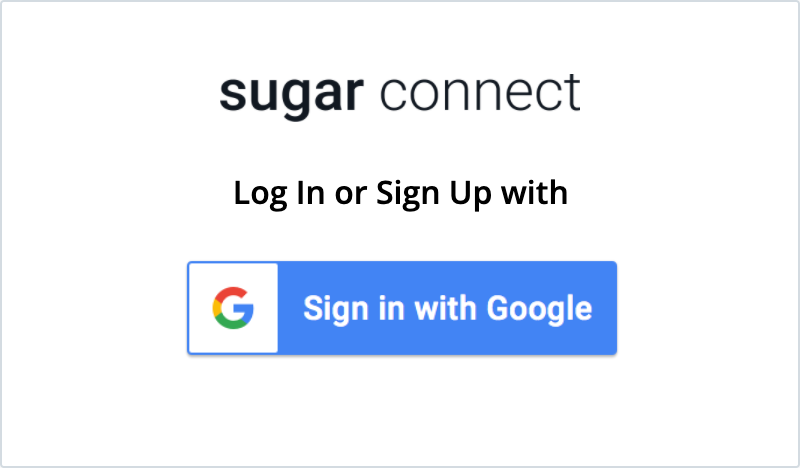
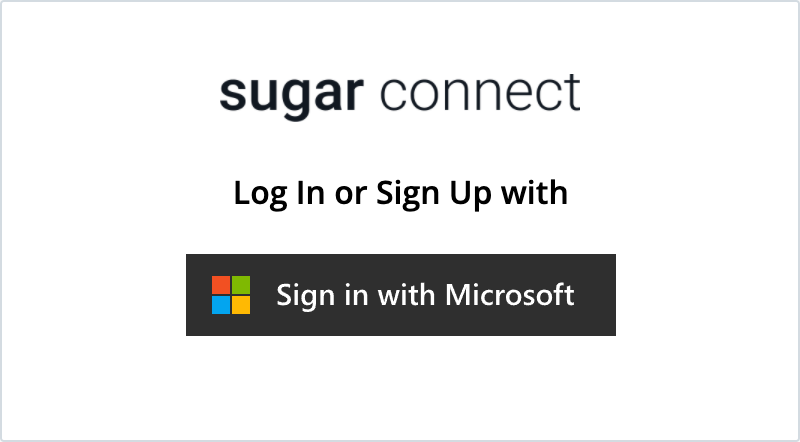
- Click on "Sign in with Google" or "Sign in with Microsoft" to authenticate your Google Workspace or Office 365 account.
- If you authenticate using a Google Workspace account, your users must install and use Sugar Connect for Google Workspace in a Chrome browser with Gmail, Google Contacts, and Google Calendar.
- If you authenticate using an Office 365 account, your users must install and use Sugar Connect with an approved version of Microsoft Outlook.
- If you authenticate using a Google Workspace account, your users must install and use Sugar Connect for Google Workspace in a Chrome browser with Gmail, Google Contacts, and Google Calendar.
- Click on "Create New" to complete the registration process. This can take a few minutes to finish.
- Upon authenticating as the first user from your domain, you will automatically be assigned "Admin" portal user status and will be redirected to the Sugar Connect Portal, where you must enter your Sugar admin credentials to continue. Click on the CRM Data Source tab located in the navigation bar on the left side of the page.
Note: If you have started adding users already, you will see an alert icon warning you that users have been invited without having a data source (i.e., your Sugar instance) set up.
- Enter your Sugar instance URL. A Sugar Connect tenant can be linked to only one Sugar instance.
Note: Multiple Sugar Connect tenants can be linked to the same Sugar instance. - Click the Verify button and enter your Sugar admin credentials in the CRM Data Source form and then click "Save". Please note, this is required whether your instance is SugarIdentity enabled or not.
Once your admin credentials have been accepted, you can start adding more users to your Sugar Connect account. The Sugar admin credentials can also be updated at any time from CRM Data Source > Sugar Administrator Credentials. You will receive a notification if the credentials were entered successfully or not. When your Sugar credentials change or expire, you will receive an email notification with a link to the Sugar Connect Portal where you will be asked to log in to Sugar with your updated credentials.
Note: With SugarIdentity, the Sugar administrator credentials used to link your Sugar Connect Portal to your Sugar instance are managed automatically.
Do not add users to Sugar Connect until your users have logged in to and set up their passwords in your Sugar Sell, Serve, or Enterprise CRM instance.
Sugar Connect User Management
Once you have become a Sugar Connect admin via registration or configuration, you can start setting up users via the Sugar Connect Portal. Within the Users and the CRM Data Source sections of the Portal, you will find the options to add, map, and manage your Sugar Connect users
Note: Sugar Connect can be deployed to users via Group Policy or Google Apps Console. However, these deployment methods are not supported by Sugar. Instead, please follow the steps below to add users to Sugar Connect and then allow them to install Sugar Connect locally as explained in the Sugar Connect User Installation Guide.
Adding Users to Sugar Connect
There are two ways to add users, manually or via auto-add. Please refer to the sections below for details on both ways to add Sugar Connect users.
Manually Adding Users to Sugar Connect
When manually adding users, you should be prepared for users to receive a welcome email the moment you add them to Sugar Connect as a user. The welcome email will direct them to the Sugar Connect Portal to get started using Sugar Connect. If you do not wish for a welcome email to be automatically sent to your users, you may want to consider using auto-add for your Sugar Connect users.
Note: Once you have added users, those users will auto-map to their Sugar user accounts by default unless you disable the "Auto-Link" option. Sugar Connect users must be mapped to Sugar CRM user accounts either automatically or manually to ensure that calendar sync and contact sync behave as expected for users.
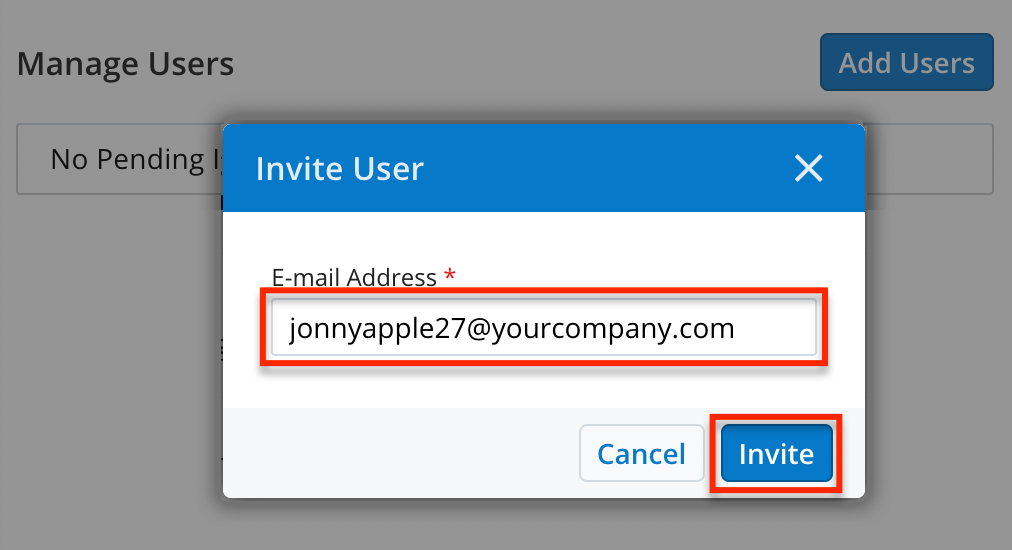
Use the following steps to create a new Sugar Connect user:
- Navigate to the Sugar Connect Portal.
- Click on the Users tab in the navigation bar.

- Click on the Add User button, enter the email address for the user, and then click "Invite". The user will receive an email message with a link to accept the invitation and the Users page will show the user's invitation is pending.
- While the invitation is pending, you may choose to resend the invite or cancel the invitation by clicking the appropriate button adjacent to the invited user's name.
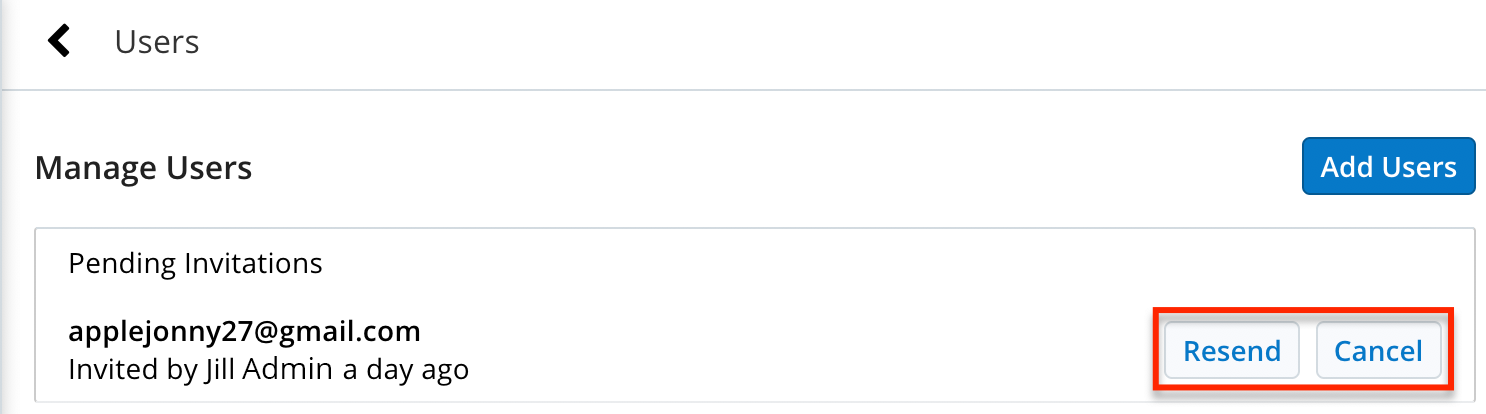
Note: If the user has an email address in your organization's domain and you have enabled the "Auto-add new users" option for your Sugar Connect account, then canceling the invitation will not prevent the user from clicking through their invitation email and registering as a user on your subscription. - The new user can now click on the Accept button in their invitation and log in to the Sugar Connect Portal with their Google Workspace or Office 365 account.
Once the user has accepted the invitation, their name will be moved from the Pending Invitations section and into its alphabetical position in the Users list. The User Actions menu will also become available for the user record at this time, which allows you to perform actions such as removing or disabling the user account or making the user an administrator.
Invitation Failures Due to AWS Suppression
Invitation emails sent from the Connect portal may fail if the recipient’s email address is on an AWS suppression list. An address may be added to this list if a recent delivery attempt failed or if the recipient flagged an email from the sending domain as spam. In most cases, this suppression is temporary. When this occurs, the Connect portal displays an error message explaining the delivery failure and indicates when you can try sending the invitation again.
Note: The Sugar Connect portal's invitation emails are courtesy and not strictly required for a user to log in to their Connect tenant. In the event of a suppressed email, users may try to log in to their Connect tenant via direct URL, at which point they may then log in to the Connect Sidebar in the user's email application.
Auto-Adding New Users From Your Domain
Use the auto-add new users feature if you do not want a welcome email sent prior to your users logging into the portal, as it does when manually adding new users. When auto-add is enabled, Sugar Connect will also allow users to join your tenant automatically by simply authenticating through the Sugar Connect Portal or the installed Sugar Connect sidebar from an email address at your organization's domain. For example, if you signed up for Sugar Connect using the email address admin@yourcompany.com, then any person who logs in to the portal with an email address ending in "@yourcompany.com" will automatically be added as a user to your account. Users who have an email address with a different domain can be manually added.
Note: Once you have added users, those users will auto-map to their Sugar user accounts by default unless you disable the "Auto-Link" option. Sugar Connect users must be mapped to Sugar CRM user accounts either automatically or manually to ensure that calendar sync and contact sync behave as expected for users.
This option is disabled by default but can be enabled via the setting at the bottom of the Users page:
Mapping Users to Their CRM Accounts
In order for Sugar data to properly sync, the users must be mapped by connecting their Sugar Connect user to their Sugar user within the Sugar Connect Portal via the CRM Data Source page.
Refer to the following sections to understand how Sugar Connect users can be automatically or manually mapped to their corresponding Sugar user.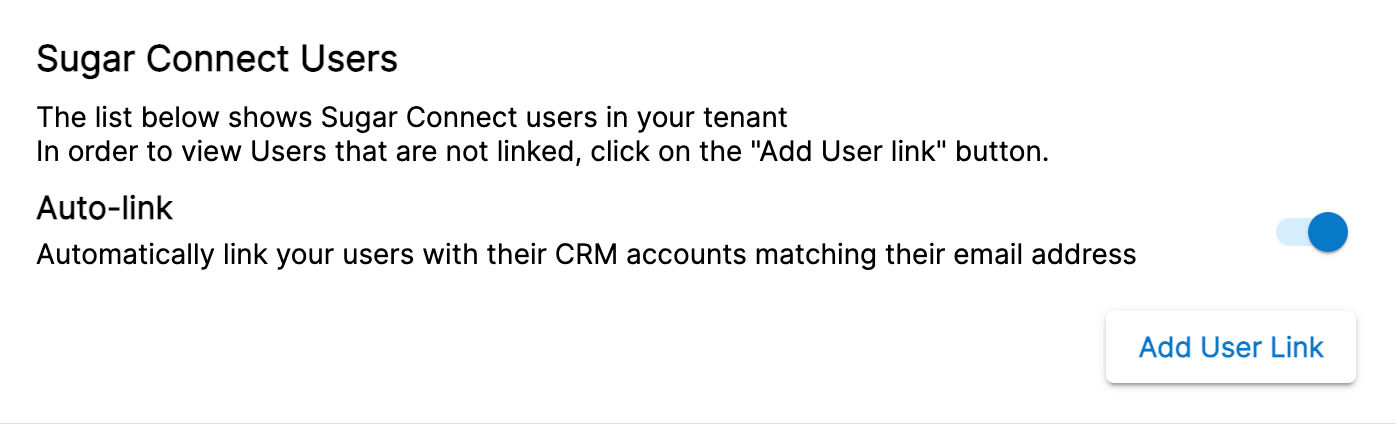
Automatically Mapping
When users install the Sugar Connect sidebar in their email client they will be prompted to enter their Sugar credentials, which automatically maps their Sugar Connect account to their correct Sugar user account. The mapping process may also be automated via Auto-Link for users. This option is recommended and enabled by default. It can be toggled on or off in the CRM Data Source page in the Sugar Connect Portal. Auto-Link runs hourly to link unmapped Sugar Connect users with Sugar users based on a matching email address and makes the association automatically. Administrators can manually trigger the auto-link to run when they click "Add User Link" and if matching email addresses are not found, can also use this to manually map users.
Manually Mapping
Administrators can map Sugar Connect users to their Sugar user accounts through the Sugar Connect Portal by clicking "Add User Link", selecting an unmapped Sugar Connect user, and selecting the appropriate Sugar user. Properly mapping user accounts will ensure that calendar sync and contact sync behave as expected for users. Portal admin users can use the list which is synced from the CRM Data source to link Connect Portal users to Sugar users. If a user is deleted in the Sugar instance, the user will be unlinked and will no longer appear as an option within the Sugar Connect Portal.
Note: Changing a user's Sugar mapping will stop any active calendar or contact sync activities for the user.
User Actions Menu
Click on the Users tab in the navigation bar to view and manage your list of Sugar Connect users. The User Actions menu to the right of each user's name allows you to perform actions on the individual user directly from the list view. The options available will vary based on the admin and enabled status of the adjacent user.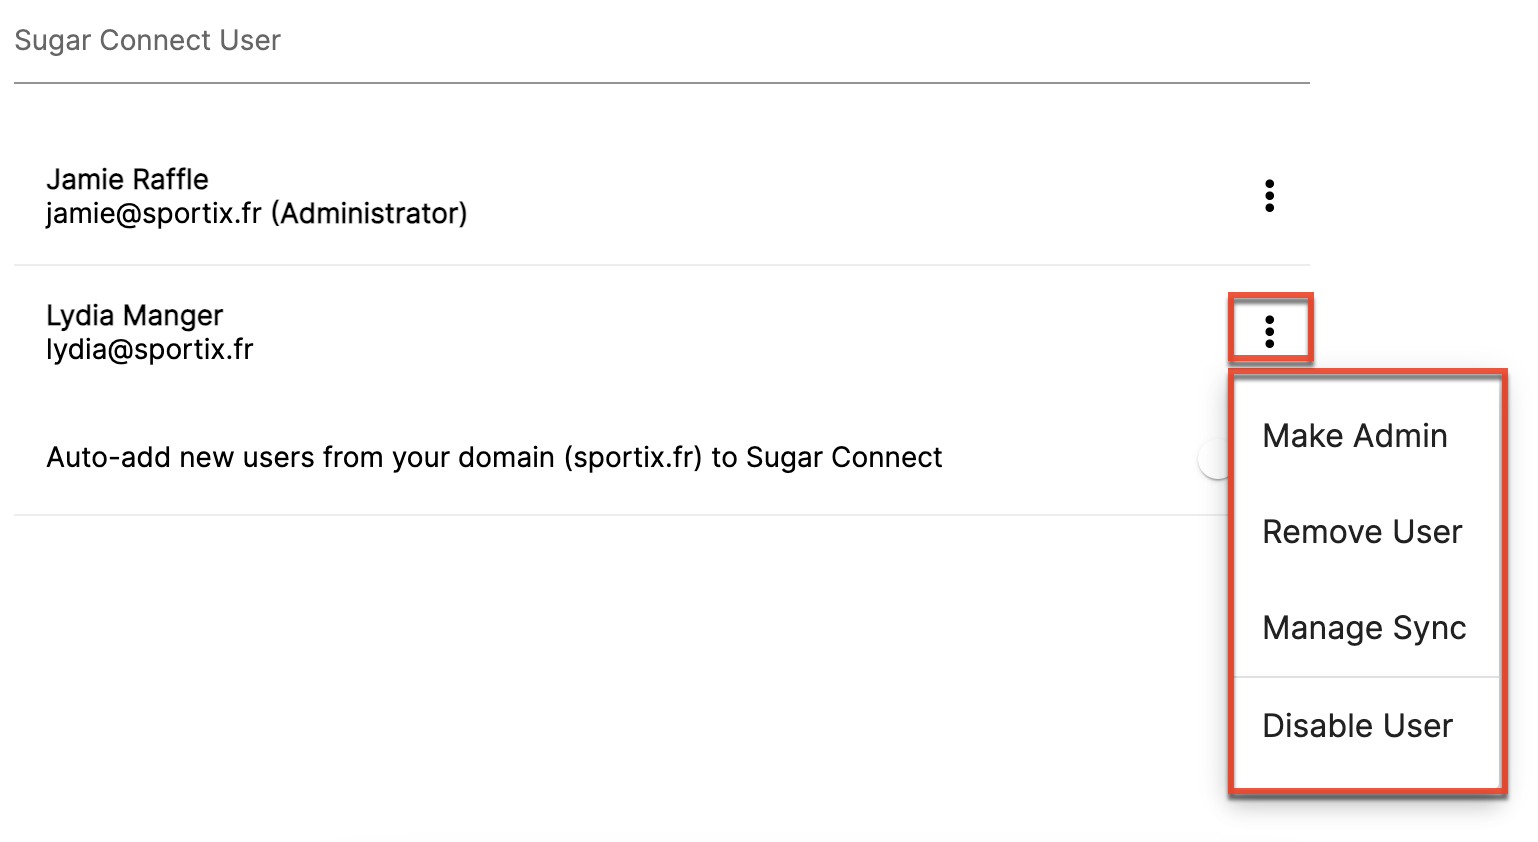
The User Actions menu allows you to perform the following operations:
| Menu Item | Description |
| Make Admin / Revoke Admin Rights | Assign or revoke Sugar Connect admin status for the user. |
| Remove User |
Removing a user will revoke their ability to log in as a Sugar Connect user but will not prevent them from re-registering as a user on your account if you have enabled the "Auto-add new users" option for your Sugar Connect account. |
| Manage Sync | Manage the Calendar and Contact Synchronization for individual users. |
| Disable / Enable User | Enabling and disabling users controls whether the user will be able to authenticate as a Sugar Connect user. |
Creating Administrator Users
Any Sugar Connect administrator can assign or revoke admin status for a user via the User Actions Menu once the user has accepted their new-user invitation. To grant admin rights to a Sugar Connect user, navigate to the Sugar Connect Portal and click on the Users tab in the navigation bar, open the User Actions Menu next to the user's name, and select "Make Admin". To remove admin access from a user, select "Revoke Admin Rights" from the User Actions Menu next to their name.
Manage Sync
Selecting this option allows you to manage the Synchronization settings for individual users. Additional information regarding the options available for Calendar and Contact sync can be found in the Sugar Connect Portal User Guide.
Disabling and Removing Users
The Sugar Connect administrator can remove, enable, and disable users via the User Actions Menu in order to control whether those users can authenticate with Sugar Connect. The expected behavior will vary depending on whether the "Auto-add new users" option is enabled for your Sugar Connect account.
| Action | Auto-add new users: enabled | Auto-add new users: disabled (default) |
| Disable User | The user will not be able to log in and will be prohibited from creating a new user account | The user will not be able to log in |
| Remove User | The user will not be able to log in but will be able to create a new user account | The user will not be able to log in |
| Cancel Invite | Canceling the invite will have no effect; The invitee will be able to accept the canceled invitation and join as a new user | Canceling the invite will succeed; The invitee will be prohibited from accepting the canceled invitation |
Subscription Details
Sugar Connect administrators can view and edit the Sugar License Key from the Subscription Details page in the Sugar Connect Portal. The page will display the details of your subscription(s) including the product, number of licenses, and the expiration date of your subscription. When your subscription is nearing its expiration date, you will see an alert icon next to "Subscription Details" and a corresponding message. Additionally, should your subscription key change in Sugar you will need to update it here.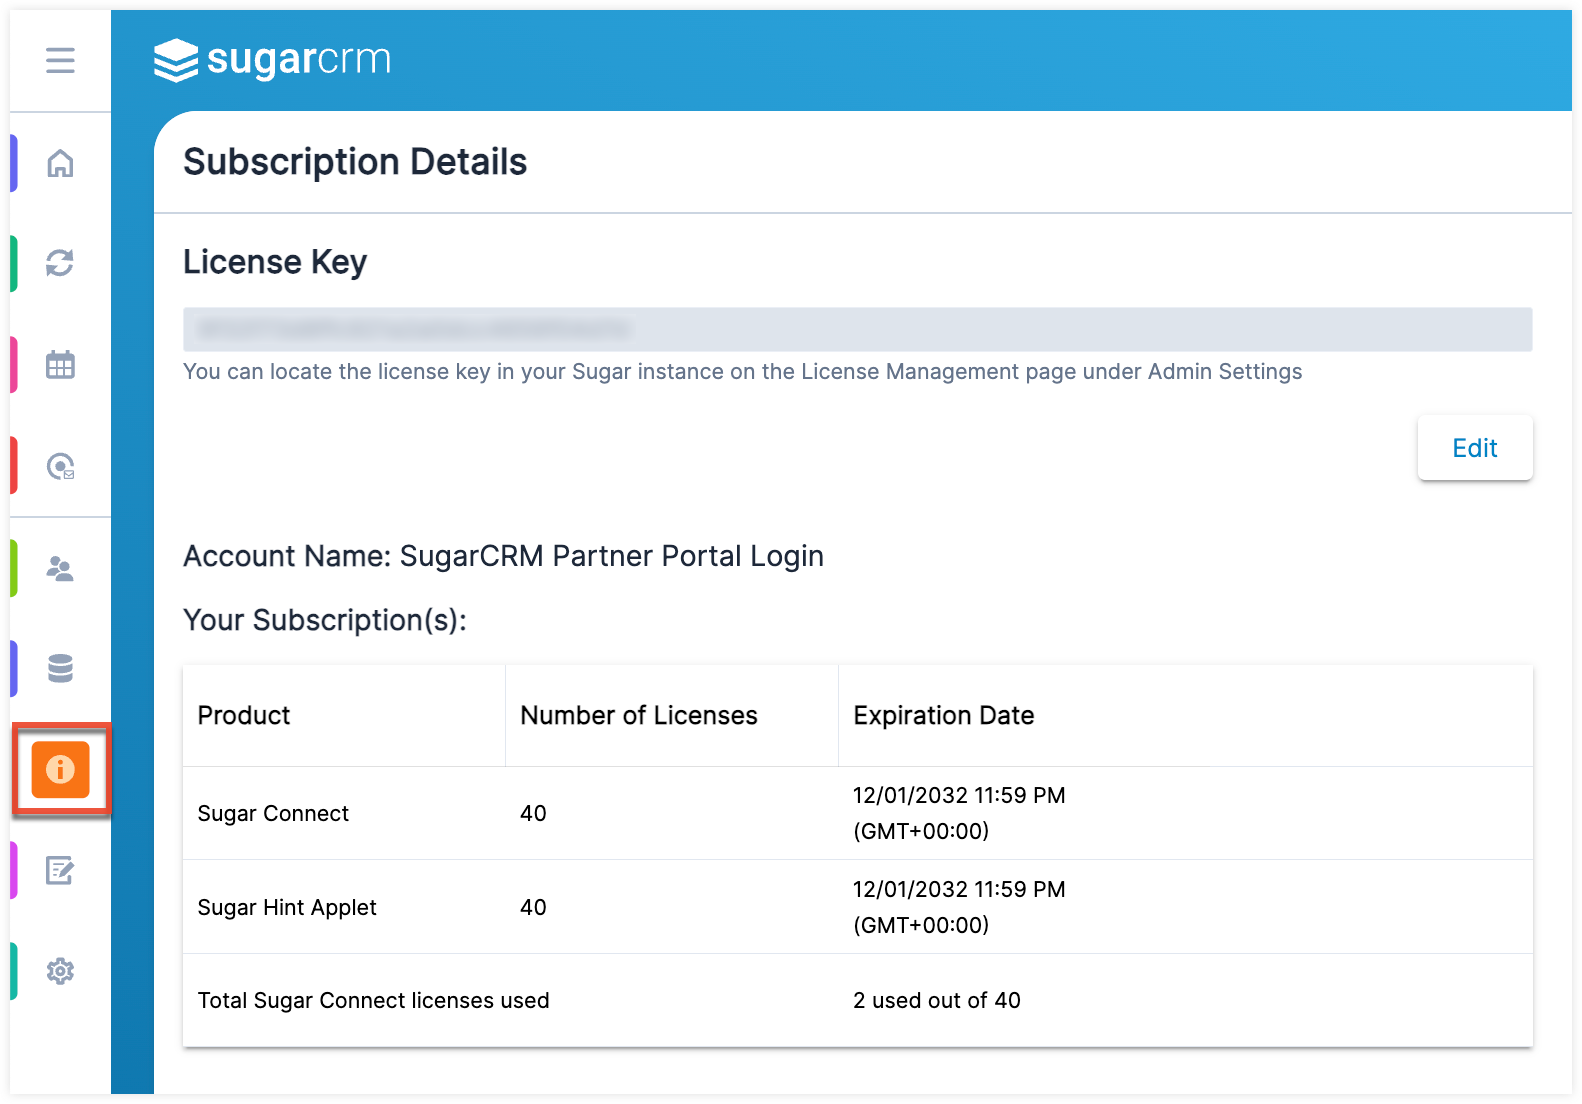
Customization
Sugar Connect administrators can view and modify which modules, fields, and subpanels appear in the Sugar Connect sidebar within the Customization page in the Sugar Connect Portal. The Customization page displays the available modules, fields and subpanels via the module dropdown and the fields or subpanels tabs. The following sections provide additional details on customizing these elements in your Sugar Connect sidebar.
Modules
You can modify which modules are visible in the Sugar Connect sidebar Home View by selecting the module from the dropdown at the top of the page and enabling or disabling the Show Module field. The list of modules in the dropdown is determined by the available modules configured in Sugar. For additional information, refer to the Developer Tools documentation in Sugar's Administration Guide. 
Fields
To make changes to your Sugar Connect sidebar record view, begin by selecting the module from the dropdown field, ensure the Show Module field is enabled, and click the Fields tab. The list of available fields are shown below where you can enable or disable each field as appropriate. Use the search bar at the top of the Fields tab to narrow the field list. Be sure to click the Save button at the bottom of the field list to successfully update the record view in your sidebar.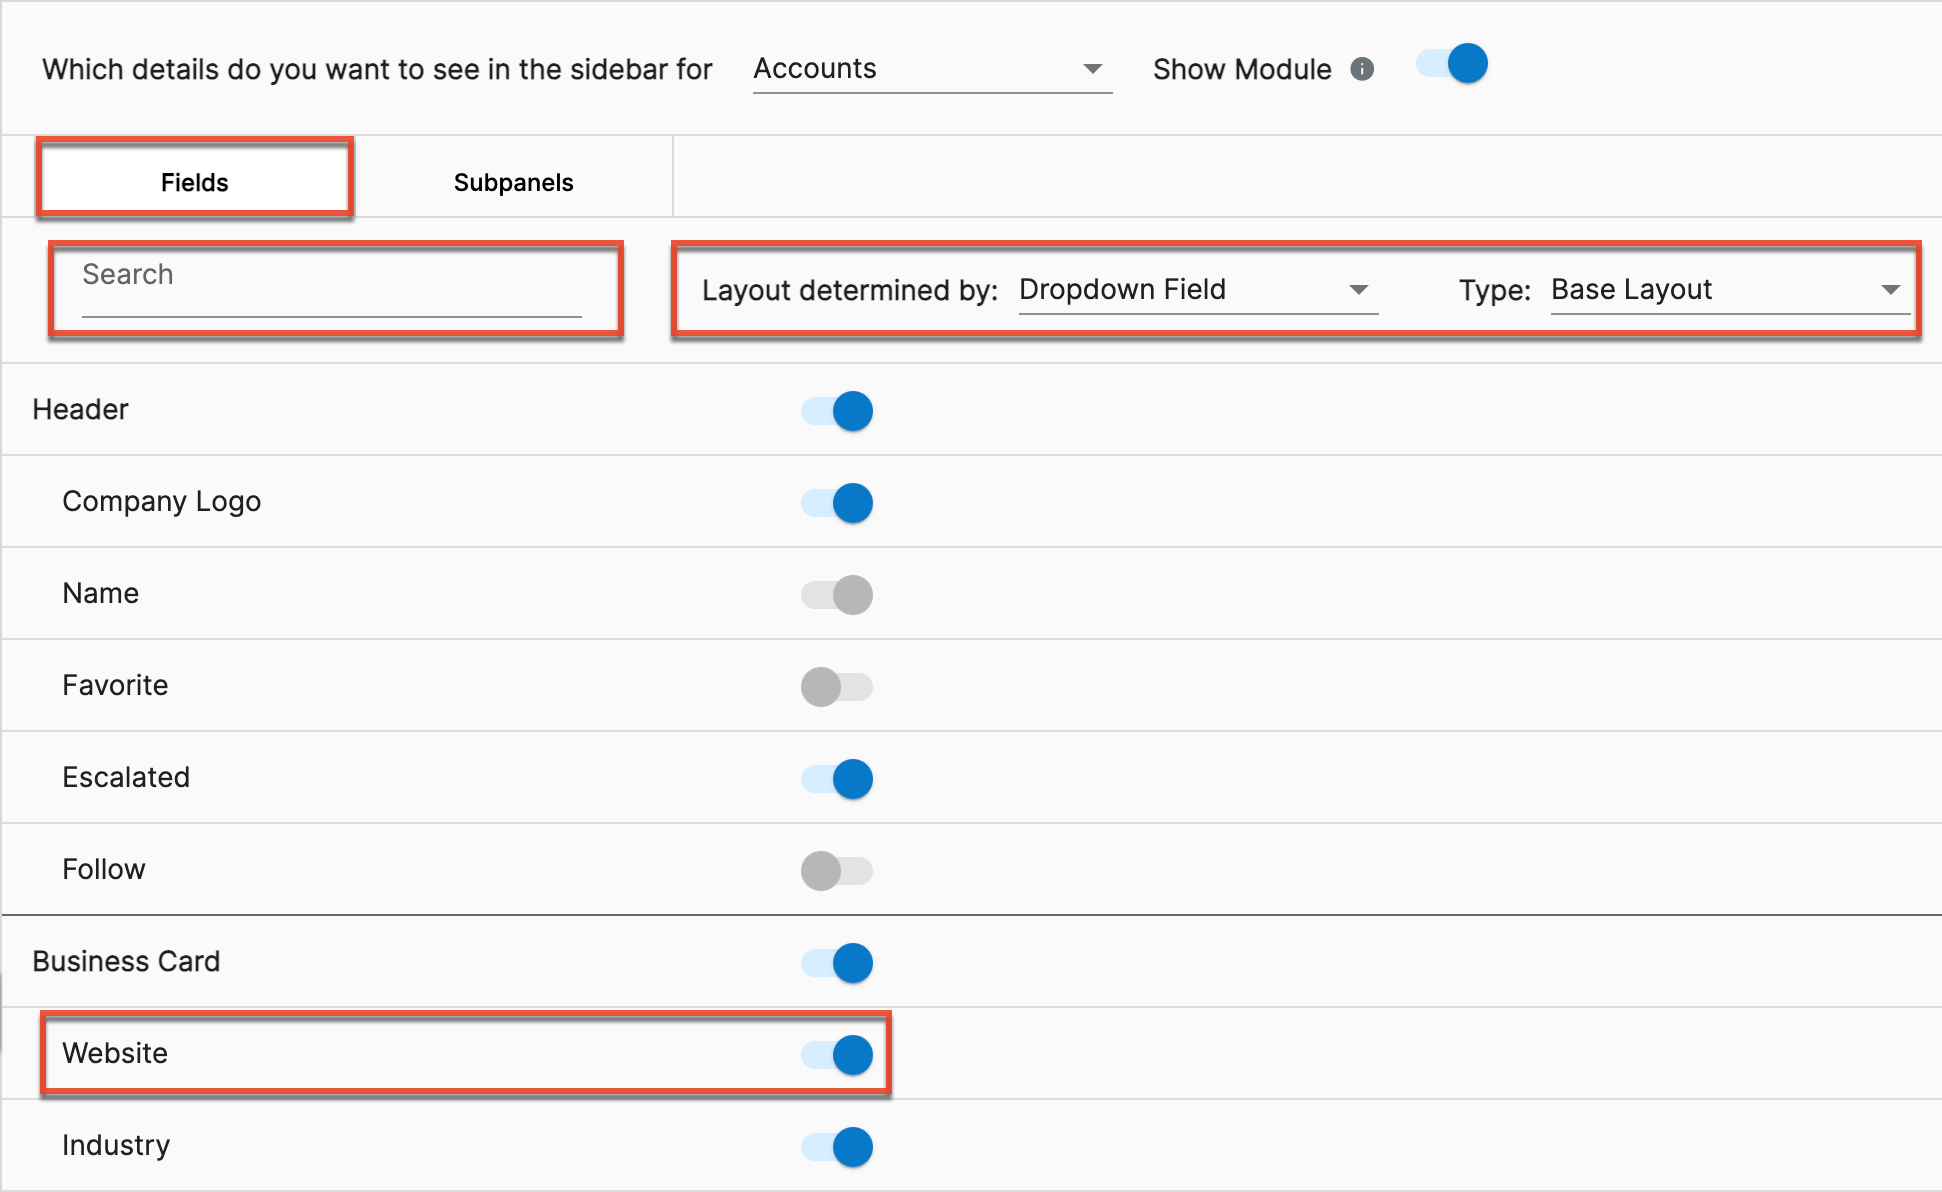
Please note the following rules when viewing your list of available fields:
- Required fields appear as enabled and you will not be able to disable them.
- If your record view in Sugar is configured to use a dropdown-field-based layout, that dropdown field will appear as enabled and you will not be able to disable it.
- Fields that are unsupported by Sugar Connect appear as disabled and you will not be able to enable them.
- Custom field types that do not exist in Sugar's out-of-the-box field types list are not supported. For more information, refer to the Fields documentation in Sugar's Administration Guide.
Dropdown-Field-Based Layouts
When a module's record view layout is configured as a dropdown-field-based layout, you will still be able to show or hide fields within that module. The dropdown on the far right of the Configuration page displays a list of layouts for the configured field. For example, in the screenshot below, the Type field in the Accounts module is the field that drives different layouts depending on the value selected. "Base Layout" can be selected here, fields can be enabled or disabled, and that layout will apply to all values that do not have a custom layout. The other options shown (e.g., Analyst) are values in the Type field who have a custom layout configured. In the Sugar Connect sidebar this means that whenever one of those values is selected in the Type field, the other fields in the edit record view will display differently (i.e., hidden, shown, rearranged). When you select "Analyst" and enable or disable fields, that will only apply to the custom layout that displays when "Analyst" is selected in the Sugar Connect sidebar. For more information on configuring dropdown-field-based layouts in Sugar, refer to the Layout documentation in Sugar's Administration Guide.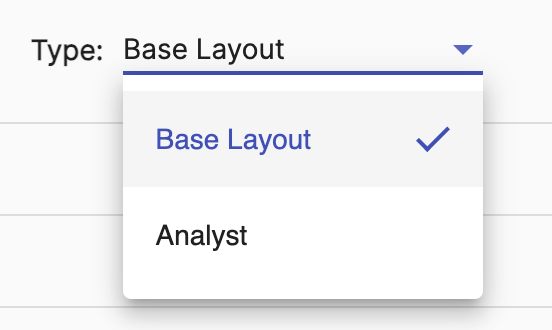
Subpanels
You can limit which subpanels are visible on a specific module's record view by first selecting the module from the dropdown, then selecting the Subpanels tab. Toggle the different subpanels on or off to suit your needs. Please note that if you have "Show Module" disabled, that module is automatically disabled as a subpanel on other related modules. However, you can enable the hidden module as a subpanel while viewing the list of subpanels in the related modules. For example, if the Calls module is not shown, the Calls subpanel will be hidden by default but can be enabled when viewing the list of subpanels that appear for the Accounts module. Be sure to click the Save button at the bottom of the screen to successfully update the sidebar.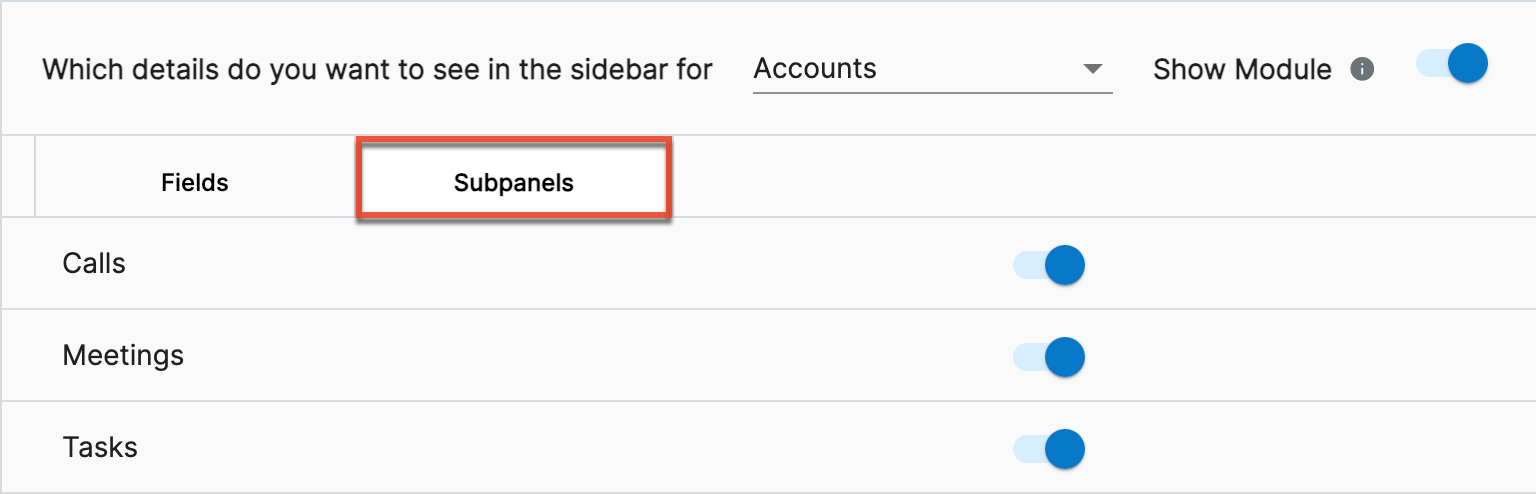
Settings
Sugar Connect administrators can set the default general, calendar and contact sync, and email archival settings for users from the Settings page in the Sugar Connect Portal.
General
After clicking the Settings tab in the left-hand navigation in the Sugar Connect Portal, click the General tab across the top to access the general settings. You must click "Save" for the settings to be applied to your users.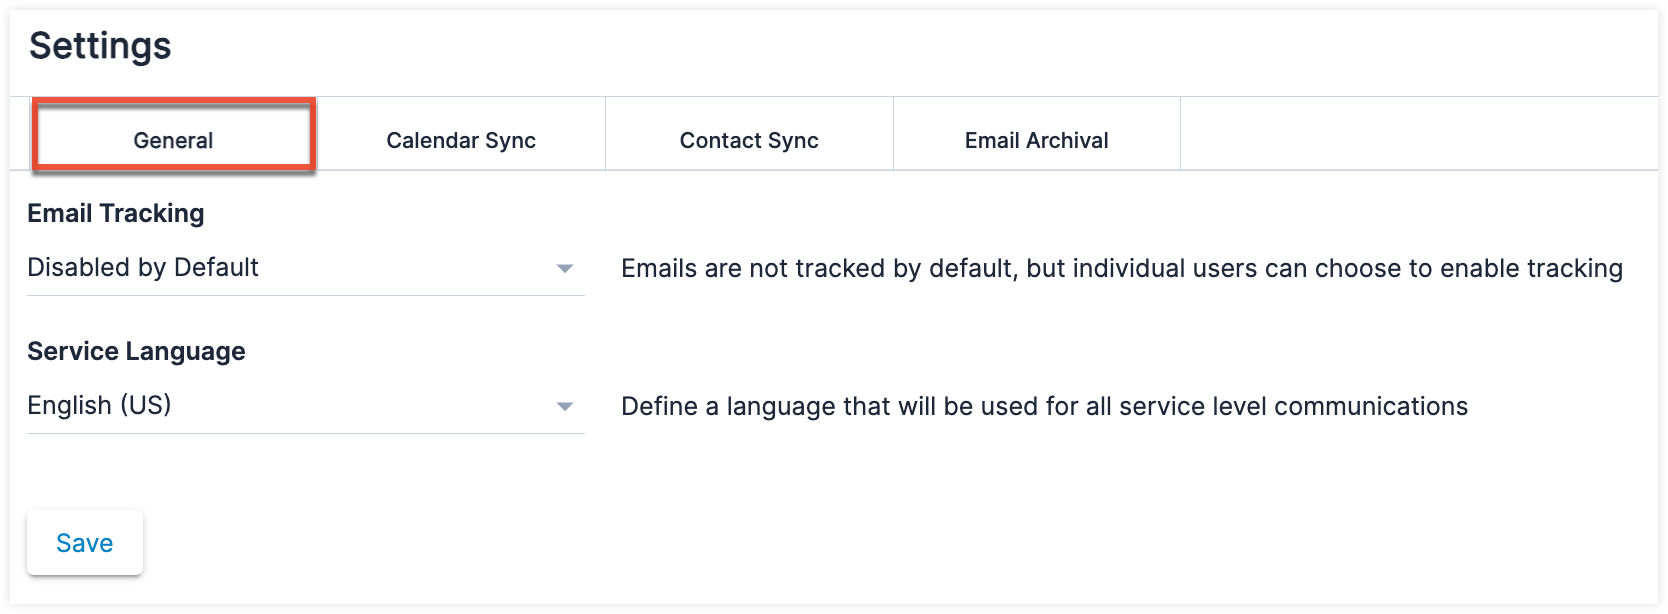
The following sections describe each setting and how the various options affect the users in your Sugar Connect tenant.
Email Tracking
- Always Enabled: Emails are always tracked and individual users are unable to override this setting. This option is only available for Google Workspace.
- Always Disabled: Users in this tenant are not allowed to enable email tracking. Events will no longer be collected for any emails previously marked to be tracked.
- Disabled by Default: Emails are not tracked by default, but individual users can choose to enable tracking.
- Enabled by Default: Email tracking is enabled by default, but individual users can choose to disable tracking. This option is only available for Google Workspace.
For information on Email Tracking statistics in the portal, please refer to the Sugar Connect Portal User Guide. For information on Email Tracking within your email client, please refer to the Sugar Connect User Guide.
Service Language
Setting a service language allows administrators to define the language used for all outgoing Sugar Connect communications, including invitations, confirmation screens, and system-generated messages.
Calendar Sync
After clicking the Settings tab in the left-hand navigation in the Sugar Connect Portal, click the Calendar Sync tab across the top to access the calendar sync settings. You must click "Save" for the settings on this tab to be applied to your users.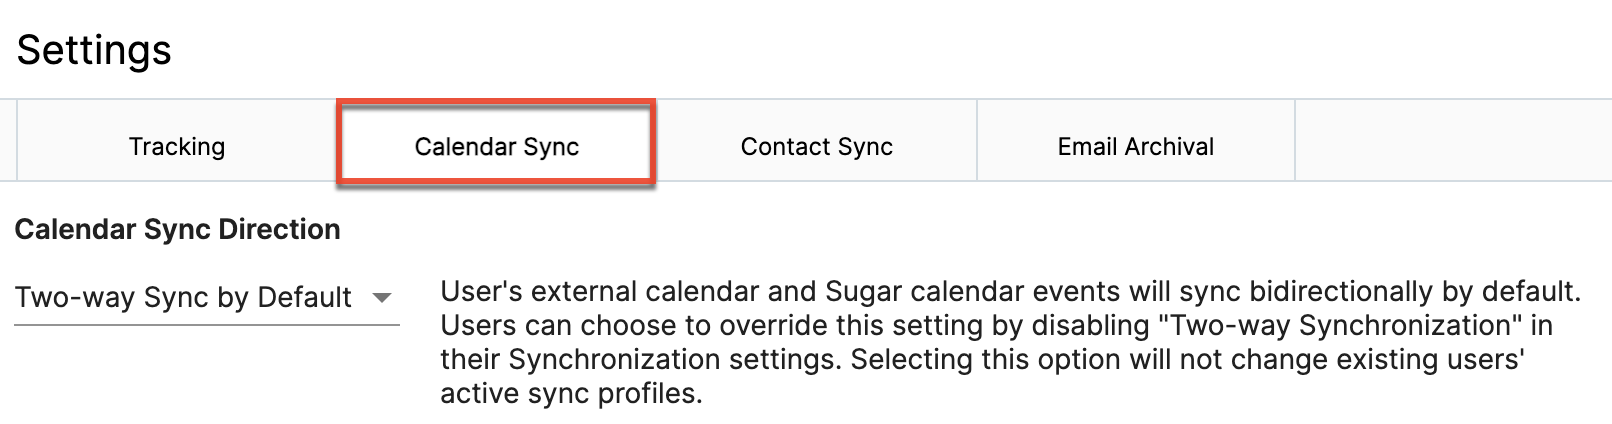
The following sections describe each setting and how the various options affect the users in your Sugar Connect tenant. For information on using calendar sync in the portal for individual users, please refer to the Calendar Sync section in the Sugar Connect Portal User Guide.
Calendar Sync Mode
The Calendar Sync Mode field contains four options:
- Manual by Default: Users' external calendar and Sugar calendar events will sync when manually selected by default. Users can choose to override this setting by enabling "Automatic Synchronization" in their Synchronization settings. Selecting this option will not change existing users' active sync profiles.
- Manual Always Enabled: Users' external calendar and Sugar calendar events will sync when manually selected. Users cannot override this setting. Selecting this option will change all users' sync profiles including those with an active sync.
- Automatic by Default: Users' external calendar and Sugar calendar events will sync automatically by default. Users can choose to override this setting by disabling "Automatic Synchronization" in their Synchronization settings. Selecting this option will not change existing users' active sync profiles.
- Automatic Always Enabled: Users' external calendar and Sugar calendar events will sync automatically. Users cannot override this setting. Selecting this option will change all users' sync profiles including those with an active sync.
Calendar Sync Direction
The Calendar Sync Direction field contains four options:
- Two-way Sync by Default: Users' external calendar and Sugar calendar events will sync bidirectionally by default. Users can choose to override this setting by disabling "Two-way Synchronization" in their Synchronization settings. Selecting this option will not change existing users' active sync profiles.
- Two-way Sync Always Enabled: Users' external calendar and Sugar calendar events will sync bidirectionally. Users cannot override this setting. Selecting this option will change all users' sync profiles including those with an active sync.
- One-way Sync to Sugar by Default: Users' external calendar events will sync to their Sugar calendar in a single direction by default. Users can choose to override this setting by enabling "Two-way Synchronization" in their Synchronization settings. Selecting this option will not change existing users' active sync profiles.
- One-way Sync to Sugar Always Enabled: User's external calendar events will sync to their Sugar calendar in a single direction. Users cannot override this setting. Selecting this option will change all users' sync profiles including those with an active sync.
- One-way Sync from Sugar by Default: Users' Sugar calendar events will sync to their external calendar in a single direction by default. Users can choose to override this setting by enabling "Two-way Synchronization" in their Synchronization settings. Selecting this option will not change existing users' active sync profiles.
- One-way Sync from Sugar Always Enabled: Users' Sugar calendar events will sync to their external calendar in a single direction. Users cannot override this setting. Selecting this option will change all users' sync profiles including those with an active sync.
Event Type and Status Sync
The Event Type and Status Sync field displays only when either "Two-way Sync by Default" or "Two-way Sync Always Enabled" is selected in the Calendar Sync Direction field. The Event Type and Status Sync field contains two options:
- Defined Settings by Default: When two-way synchronization is enabled, define which event types and statuses sync from Sugar to the external calendar by default. Users can choose to override these settings in their Synchronization settings. Selecting this option will not change existing users' active sync profiles.
- Always Use Defined Settings: When two-way synchronization is enabled, define which event types and statuses sync from Sugar to the external calendar. Users cannot override these settings. Selecting this option will change all users' sync profiles including those with an active sync.
Use Primary Calendar
The Use Primary Calendar field contains four options:
- Always Use Primary: Connect will sync events to and from the primary external calendar and an individual user cannot override this when creating a new sync profile. However, this will not change existing users' active sync profiles.
- Primary by Default: Connect will sync events to and from the primary external calendar but an individual user can override this setting by disabling "Use Primary Calendar" in their Synchronization settings.
- Always Use Sugar Calendar: Connect will sync events to and from a custom calendar called "Sugar" in the email client and an individual user cannot override this when creating a new sync profile. However, this will not change existing users' active sync profiles.
- Sugar Calendar by Default: Connect will sync events to and from a custom calendar called "Sugar" in the email client but an individual user can override the setting be enabling "Use Primary Calendar" in their Synchronization settings.
Sync Private Events
The Sync Private Events field contains four options:
- Always Enabled: Sync private events is always turned on and an individual user cannot override this setting.
- Enabled by Default: Sync private events is turned on but an individual user can override it and turn it off.
- Always Disabled: Sync private events is always turned off and an individual user cannot override this setting.
- Disabled by Default: Sync private events is always turned off but an individual user can override it and turn it on.
Sync Non-organized Events
The Sync Non-organized Events field contains four options:
- Always Enabled: Sync non-organized events is always turned on and an individual user cannot override this setting.
- Enabled by Default: Sync non-organized events is turned on but an individual user can override it and turn it off.
- Always Disabled: Sync non-organized events is always turned off and an individual user cannot override this setting.
- Disabled by Default: Sync non-organized events is always turned off but an individual user can override it and turn it on.
Auto relate to Account
The Auto relate to Account field contains four options:
- Always Enabled: When a calendar event is synced from the external calendar to Sugar, the Related To field on the meeting in Sugar will be populated by the account associated with the contacts attending the meeting. Users cannot override this setting. Please note, if the meeting attendees are associated with more than one account, the Related To field will not be populated.
- Enabled by Default: When a calendar event is synced from the external calendar to Sugar, the Related To field on the meeting in Sugar will be populated by the account associated with the contacts attending the meeting. Users can choose to override this setting in their individual sync profiles. Please note, if the meeting attendees are associated with more than one account, the Related To field will not be populated.
- Always Disabled: When a calendar event is synced from the external calendar to Sugar, the Related To field on the meeting in Sugar will not be populated. Users cannot override this setting.
- Disabled by Default: When a calendar event is synced from the external calendar to Sugar, the Related To field on the meeting in Sugar will not be populated. Users can choose to override this setting in their individual sync profile.
Sync Guests
The Sync Guests field contains four options:
- Always Enabled: Sync events' guests when synchronizing events from Sugar to the external calendar. Users cannot override this setting.
- Enabled by Default: Sync events' guests when synchronizing events from Sugar to the external calendar. Users can choose to override this setting in their individual sync profiles.
- Always Disabled: Don't sync events' guests when synchronizing events from Sugar to the external calendar. Users cannot override this setting.
- Disabled by Default: Don't sync events' guests when synchronizing events from Sugar to the external calendar. Users can choose to override this setting in their individual sync profile.
Note: This option is not available when "One-way Sync Always Enabled" is selected in the Calendar Sync Direction field.
Delete Canceled Events
The Delete Canceled Events field contains four options:
- Always Enabled: When a synchronized calendar event is canceled in the external calendar, the meeting will be deleted in Sugar. Users cannot override this setting.
- Enabled by Default: When a synchronized calendar event is canceled in the external calendar, the meeting will be deleted in Sugar. Users can choose to override this setting in their individual sync profiles.
- Always Disabled: When a synchronized calendar event is canceled in the external calendar, the meeting will not be deleted in Sugar. Users cannot override this setting.
- Disabled by Default: When a synchronized calendar event is canceled in the external calendar, the meeting will not be deleted in Sugar. Users can choose to override this setting in their individual sync profile.
Sync Recurring Meetings
The Sync Recurring Meetings field, available for Sugar versions 14.2 and higher, contains four options:
- Always Enabled: Recurring events will always sync between the external and Sugar calendars. Users cannot override this setting.
- Enabled by Default: Recurring events will sync by default between the external and Sugar calendars. Users can choose to override this setting in their individual sync profiles.
- Always Disabled: Recurring events will not sync between the external and Sugar calendars. Users cannot override this setting.
- Disabled by Default: Recurring events will not sync by default, between the external and Sugar calendars. Users can choose to override this setting in their individual sync profile.
Exclude Existing Events
The Exclude Existing Events field contains four options:
Always Enabled: Previously created events are always excluded from synchronization. Users cannot override this setting. Selecting this option will change all users' sync profiles including those with an active sync.
Enabled by Default: Previously created events are excluded from synchronization. Users can choose to override this setting by disabling "Exclude Existing Events" in their Synchronization settings. Selecting this option will not change existing users' active sync profiles.
Always Disabled: All events, regardless of when they were created, will sync to the calendar, subject to other sync settings. Users cannot override this setting. Selecting this option will change all users' sync profiles including those with an active sync.
Disabled by Default: All events, regardless of when they were created, will sync to the calendar, subject to other sync settings. Users can choose to override this setting by enabling "Exclude Existing Events" in their Synchronization settings. Selecting this option will not change existing users' active sync profiles.
Sync Only Tasks with Start or Due Date
The Sync only tasks with Start or Due Date field contains four options:
Always Enabled: Only tasks with a start date or due date will sync to the external calendar. Users cannot override this setting. Selecting this option will change all users' sync profiles including those with an active sync.
Enabled by Default: Only tasks with a start date or due date will sync to the external calendar. Users can choose to override this setting in their individual sync profile. Selecting this option will not change existing users' active sync profiles.
Always Disabled: All tasks will sync to the external calendar. Tasks created without a start date and due date will sync using the date created as the event date in the external calendar. Users cannot override this setting. Selecting this option will change all users' sync profiles including those with an active sync.
Disabled by Default: All tasks will sync to the external calendar. Tasks created without a start date and due date will sync using the date created as the event date in the external calendar. Users can choose to override this setting in their individual sync profile. Selecting this option will not change existing users' active sync profiles.
Show Indicator for Synced Events
The Show Indicator for Synced Events field contains two options:
Enabled: When enabled, synced events will appear in the external calendar with a default color.
- For Google tenants, the default color can be selected in the dependent field that appears below. Users may update individual events to the color of their choosing.
- For Outlook tenants, the default color (#9ad39a) is set automatically and cannot be changed.
Disabled: When disabled, synced events will appear with the default color used by Google/Outlook.
Include Link
Use the "Include link to the Sugar record in synced events" toggle to set whether you want events that are synced from Sugar to Outlook or Gmail to include a link to the related Sugar record.
Contact Sync
After clicking the Settings tab in the left-hand navigation in the Sugar Connect Portal, click the Contact Sync tab across the top to access the contact sync settings. From here you can set the contact sync direction, conflict resolution behavior, and whether external contacts are added to the Contacts or Leads module in Sugar. You must click "Save" for the settings on this tab to be applied to your users.
Note: While syncing contacts to Sugar, Connect will automatically check for duplicate contacts based on the first name, last name, and email address of the contact. If a duplicate is detected based on this criteria, the original contact and the new contact will be merged.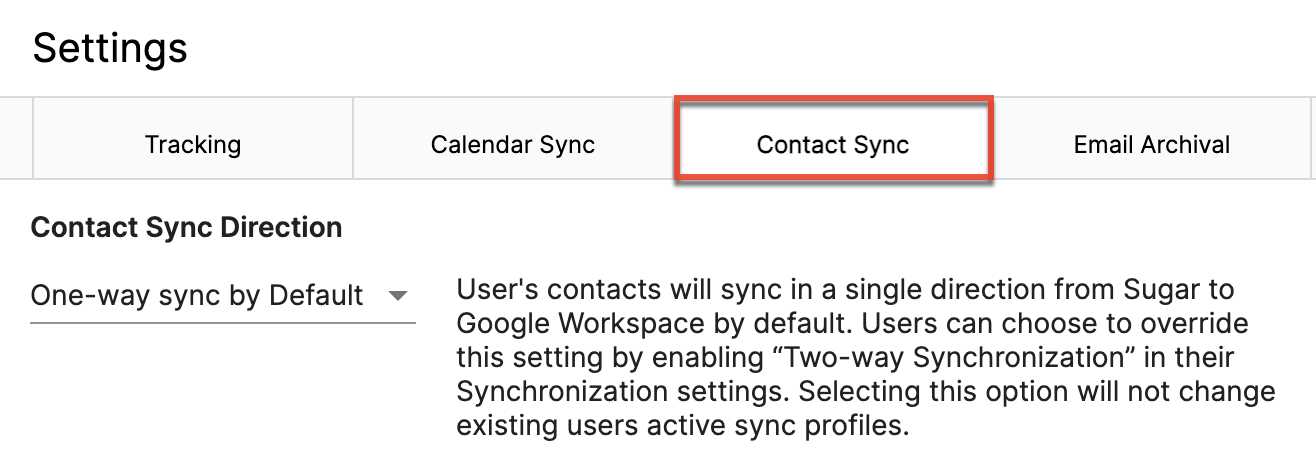
The following sections describe each setting and how the various options affect the users in your Sugar Connect tenant. For information on contacts sync in the portal, please refer to the Contact Sync section in the Sugar Connect Portal User Guide.
Contact Sync Direction
The Contact Sync Direction field contains four options:
- Two-way Sync by Default: Users' Sugar and Office 365/Google Workspace contacts will sync bidirectionally by default. Users can choose to override this setting by disabling "Two-way Synchronization" in their Synchronization settings. Selecting this option will not change existing users' active sync profiles.
- Two-way Sync Always Enabled: Users' Sugar and Office 365/Google Workspace contacts will sync bidirectionally. Users cannot override this setting. Selecting this option will change all users' sync profiles including those with an active sync.
- One-way Sync by Default: Users' contacts will sync in a single direction from Sugar to Office 365/Google Workspace by default. Users can choose to override this setting by enabling "Two-way Synchronization" in their Synchronization settings. Selecting this option will not change existing users' active sync profiles.
- One-way Sync Always Enabled: Users' contacts will always sync in a single direction from Sugar to Office 365/Google Workspace. Users cannot override this setting. Selecting this option will change all users' sync profiles including those with an active sync.
Conflict Resolution
The Conflict Resolution field contains four options:
- Use Sugar by Default: When the same contact is updated in both systems, the information found in Sugar will be used by default. Users can choose to override this setting by choosing to use the information in Office 365/Google Workspace in their Synchronization settings. Selecting this option will not change existing users' active sync profiles.
- Always use Sugar: When the same contact is updated in both systems, the information found in Sugar will always be used. Users cannot override this setting. Selecting this option will change all users' sync profiles including those with an active sync.
- Use Office 365/Google Workspace by Default: When the same contact is updated in both systems, the information found in Office 365/Google Workspace will be used by default. Users can choose to override this setting by choosing to use the information in Sugar in their Synchronization settings. Selecting this option will not change existing users' active sync profiles.
- Always use Office 365/Google Workspace: When the same contact is updated in both systems, the information found in Google Workspace will always be used. Users cannot override this setting. Selecting this option will change all users' sync profiles including those with an active sync.
Synchronize Office 365/Google Workspace contacts to Sugar
The Synchronize Office 365/Google Workspace contacts to Sugar field contains four options:
- Contact by Default: Contacts synchronized from Office 365/Google Workspace will always be created as Contacts in Sugar by default. Users can choose to override this setting by choosing to create them as Leads in Sugar from their Synchronization settings. Selecting this option will not change existing users' active sync profiles.
- Always Contact: Contacts synchronized from Office 365/Google Workspace will always be created as Contacts in Sugar. Users cannot override this setting. Selecting this option will change all users' sync profiles including those with an active sync.
- Lead by Default: Contacts synchronized from Office 365/Google Workspace will always be created as Leads in Sugar by default. Users can choose to override this setting by choosing to create them as Contacts in Sugar from their Synchronization settings. Selecting this option will not change existing users' active sync profiles.
- Always Lead: Contacts synchronized from Office 365/Google Workspace will always be created as Leads in Sugar. Users cannot override this setting. Selecting this option will change all users' sync profiles including those with an active sync.
Email Archival
After clicking the Settings tab in the left-hand navigation in the Sugar Connect Portal, click the Email Archival tab across the top. From here, Sugar Connect administrators can establish the auto-archive behavior for inbound and outbound emails, as well as exclude certain emails from automatically archiving to Sugar based on the email addresses contained in the To, CC, and BCC fields. You must click "Save" for the settings on this tab to be applied to your users.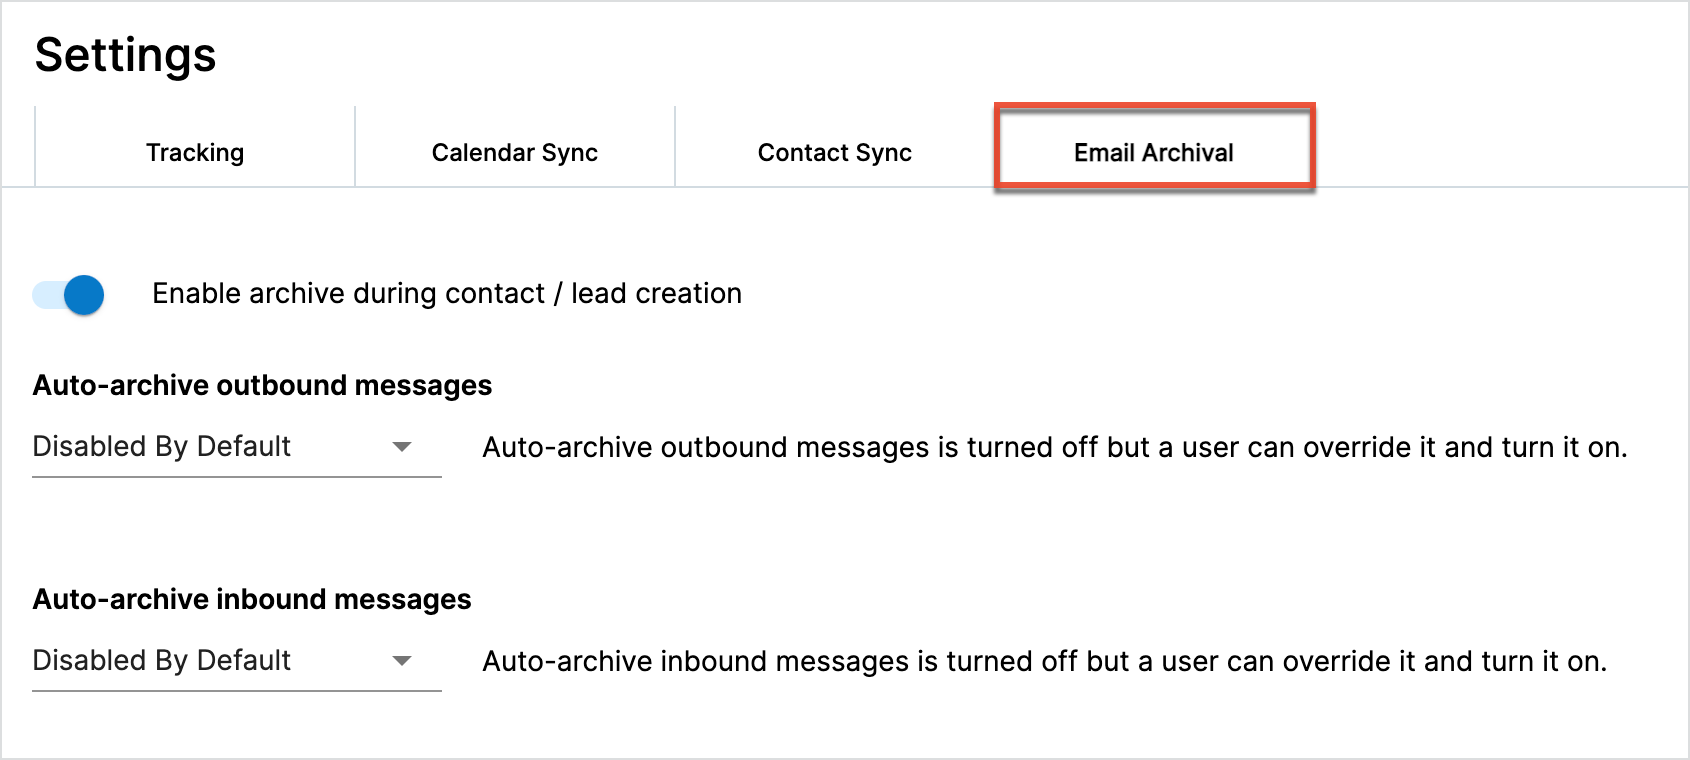
The following sections describe each setting and how the various options affect the users in your Sugar Connect tenant.
Enable Archive
When viewing an email where no related entries are found and the user can create a contact or lead record, the Sugar Connect administrator can use the "Enable archive during contact/lead creation" toggle to set whether the user can also archive the email at the same time.
Auto-Archive Outbound Messages
The Auto-archive outbound messages field contains four options:
- Always Enabled: Outbound messages are always auto-archived. Emails are related to the contacts or leads whose email is in the To, From, CC, or BCC field. Users cannot override this setting. Existing users' settings will be updated.
- Enabled by Default: Auto-archive outbound messages is turned on by default. Emails are related to the contacts or leads whose email is in the To, From, CC, or BCC field. Users can choose to override this setting in the Sugar Connect sidebar for Google Workspace and Office 365.
- Always Disabled: Outbound messages are never auto-archived. Users cannot override this setting. Existing users' settings will be updated.
- Disabled by Default: Auto-archive outbound messages is turned off by default. Users can choose to override this setting in the Sugar Connect sidebar for Google Workspace and Office 365.
Note that your changes will be effective as soon as you click "Save" at the bottom of the page. Although the changes will be applied, existing users will not see the change in the Sugar Connect sidebar until they log out of the sidebar and then log back in.
Auto-Archive Inbound Messages
The Auto-archive inbound messages field contains four options:
- Always Enabled: Inbound messages are always auto-archived. Emails are related to the contact or lead whose email is in the From field of the email. Users cannot override this setting. Existing users' settings will be updated.
- Enabled by Default: Auto-archive inbound messages is turned on by default. Emails are related to the contact or lead whose email is in the From field of the email. Users can choose to override this setting in the Sugar Connect sidebar for Google Workspace and Office 365.
- Always Disabled: Inbound messages are never auto-archived. Users cannot override this setting. Existing users' settings will be updated.
- Disabled by Default: Auto-archive inbound messages is turned off by default. Users can choose to override this setting in the Sugar Connect sidebar for Google Workspace and Office 365.
Note that your changes will be effective as soon as you click "Save" at the bottom of the page. Although the changes will be applied, existing users will not see the change in the Sugar Connect sidebar until they log out of the sidebar and then log back in.
Exclude Email Addresses
Use the Addresses list to establish the email addresses to be excluded. Emails that only contain excluded email addresses will not be automatically archived. For example, you can use this exclude list to prevent internal communications from being archived to Sugar.
Please note the following wildcards to help build your auto-archive email exclude list:
- An asterisk ( * ) represents one or more characters. For example, "*@sugarcrm.com" would consider anything from the sugarcrm.com domain (e.g., test@sugarcrm.com) as excluded.
- A question mark ( ? ) represents only one character. For example, "test?@sugarcrm.com" would consider test1@sugarcrm.com, test2@sugarcrm.com, etc as excluded.
To add more items to the exclude list, click the plus icon. To remove an item, click the minus icon.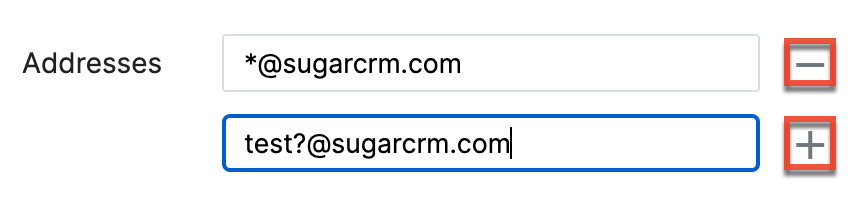
Notifications Settings
The Notifications Settings tab allows administrators to control who is notified in the event that a user's calendar synchronization is broken for any reason.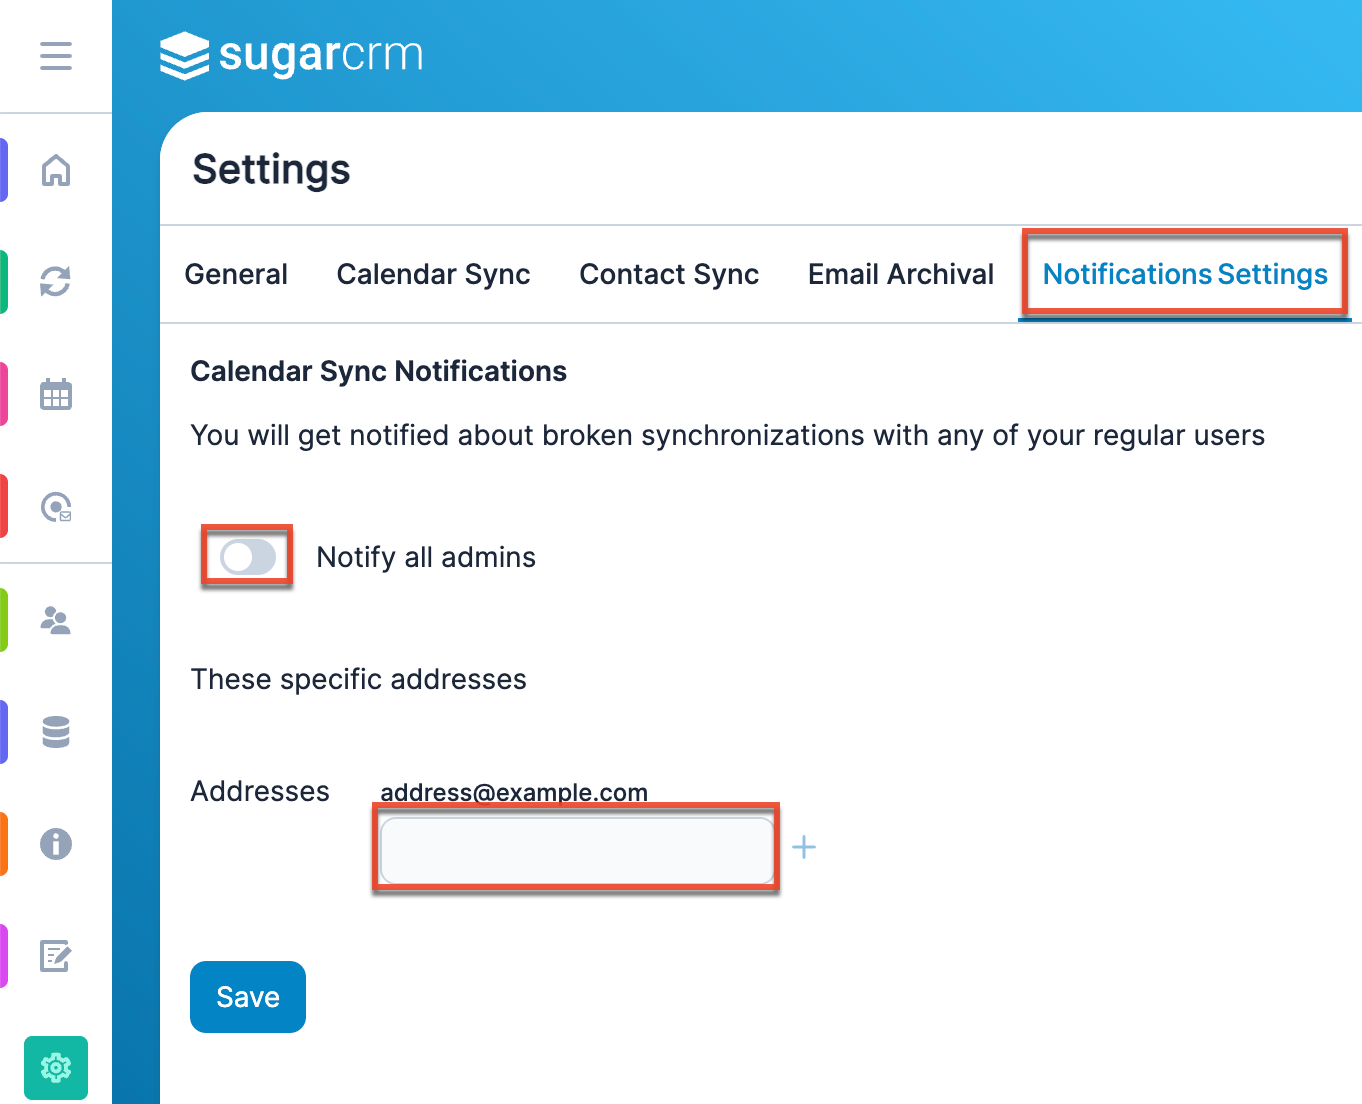
Notify all admins
Enable the "Notify all admins" toggle to ensure that every user designated as an administrator in your Sugar instance is sent a broken synchronization alert email in the event that a user's calendar synchronization is broken.
Specific Addresses
Administrators may also designate specific email addresses to receive broken synchronization alert emails instead of, or in addition to, all administrator users. To add specific email addresses to the list of alert recipients, type an email in the "Addresses" field, select the "plus" icon to the right of the field, then select save.
Enabling and Disabling Assignment Notifications
By default, users will receive assignment notifications when new records are created from Sugar Connect. If you would like to disable these notifications, navigate to the API Platforms configuration panel in your Sugar instance via Admin > Configure API Platforms. The client ID for Sugar Connect's API platform is labeled "collabspot" (this was the previous name for Sugar Connect). Deselect the checkbox under "Enable Notifications" for collabspot to disable notifications for Sugar Connect.
Sugar Connect's Outbound IP Addresses
Please see the Configuring IP Addresses, Ports, and Domains article for outbound IP addresses used by Sugar Connect. SugarCloud instances will automatically accept the IP addresses.
Adding Sugar Connect to Your Google Workspace Account's Trusted List
If your users will authenticate using a Google Workspace account, you may need to tell Google that Sugar Connect is a trusted third-party application that has permission to access your Google Workspace data.
To add Sugar Connect to the trusted list, ask your Google Workspace administrator to follow Google's instructions under "Add or remove an app from the trusted list" on this Google Workspace Admin Help page. To search for and add the Sugar Connect app, they may need the following Sugar Connect Client ID:
830549683689-3d8sk3jeufed8bptrmv1feppfbsksls7.apps.googleusercontent.com
Working with Sandbox Instances
If your Sugar subscription comes with a sandbox instance, you may choose to use a sandbox Sugar Connect tenant with your test instance. In this case, it is recommended to use an email account that is not an active Sugar Connect user (i.e., a test email account) as the user in your sandbox environments. If you do choose to use an active Sugar/Sugar Connect user's email address in both sandbox and production environments, it is then recommended to only have calendar and contact sync enabled in one of these environments. Please note that using an active Sugar/Sugar Connect user's email address in both a sandbox and production Sugar Connect tenant and Sugar instance will result in calendar/contact sync and email archival discrepancies. Please note, you must have separate Sugar Connect tenants for sandbox and production instances of Sugar.