MS Excel Plug-in User Guide
Overview
Sugar's Plug-in for Microsoft Excel enables Sugar® users to create, delete, update, and view Sugar data using an Excel spreadsheet. Users of all supported versions of Sugar may download and install the plug-in on the same computer where Excel is being used. For more information on installing the plug-in, please refer to the Microsoft Excel Plug-in Installation Guide. For a complete list of platform requirements and supported environments, please refer to the Plug-ins Supported Platforms page.
Prerequisites
Version 3.0.0 of the plug-in requires SugarIdentity to be enabled. If your instance does not use SugarIdentity, you must use version 2.0.2 of the plug-in. Please see the SugarIdentity page for more information.
To use the plug-in, you must have the ability to export records in Sugar. If you have difficulty using the plug-in, check with your system administrator to see if a role is restricting your access. For more information on roles, please refer to the Role Management documentation.
Each user can run only one installation of the Sugar Plug-in for Microsoft Excel. We recommend that you uninstall any previous versions of Sugar Plug-in for Microsoft Excel before you upgrade to the latest version. For more information on uninstalling previous versions of the plug-in, please refer to the Microsoft Excel Plug-in Installation Guide.
Note: If SAML authentication is enabled in the Sugar application, Sugar Plug-in for Microsoft Excel cannot connect to Sugar.
Sugar Options in Ribbon
After installing the Sugar Plug-in for Microsoft Excel, open Excel and view the navigation ribbon's Home tab. The SugarCRM group will appear in the rightmost segment of the tab.
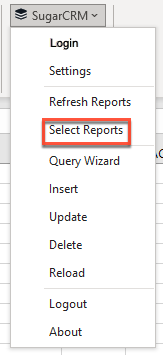
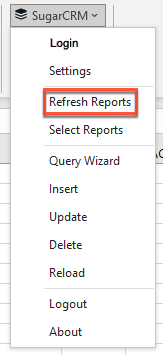
The following options are available in the SugarCRM menu:
| Menu Item | Description |
| Login | Connect to your Sugar instance. |
| Settings | Manage configuration options for the plug-in. |
| Refresh Reports | Sync to Sugar to retrieve the latest version of the current report. |
| Select Reports | Pull data from a Sugar report into Excel and display it in a spreadsheet. |
| Query Wizard | Pull data directly from Sugar's database into Excel and display it in a spreadsheet. |
| Insert | Add new records to Sugar from Excel. |
| Update | Make changes to existing Sugar records via Excel. |
| Delete | Permanently delete Sugar records via Excel. |
| Reload | Refresh data from Sugar to Excel. Requires row(s) to be selected first. |
| Logout | Disconnect the Excel plug-in from Sugar. |
| About | Access the version and build information for Sugar's Plug-in for Microsoft Excel. |
Login
When you click the "SugarCRM" menu item on Excel's ribbon, the first option is "Login". If the word "Login" is grayed out (and therefore not clickable), then you have already established a connection between the plug-in and the Sugar server and can move on to your tasks. If the "Login" option is enabled, simply click on the word "Login" to connect to your Sugar instance. 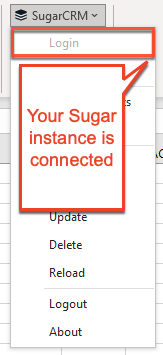
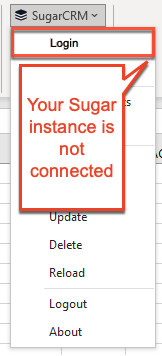
Note: If this is the first time you have configured the plug-in, you may receive a notification that your login has failed. Follow the steps in the Connection section below to enter your Sugar credentials and attempt to log in again.
Settings
When you select the Settings option, a dialog window opens and displays several tabs (i.e., Connection, Modules, Reports, Languages, Proxy Server, and Logging) where you can configure the Excel plug-in to connect to Sugar, select which modules you would like the Excel plug-in to read, set the default language for the plug-in, and more.
Connection
The Connection tab allows you to connect your Sugar Plug-in for Excel to Sugar as well as configure your basic preferences. The steps to connect the Excel Plug-in to a Sugar instance vary depending on whether your instance uses SugarIdenitity or not. For more information, refer to the Logging in WIthout SugarIdentity or Logging in With SugarIdentity section below depending on your situation. For more information on setting up the connection between the plug-in and your Sugar instance after installing the plug-in, refer to the Sugar Plug-in for Excel Installation Guide.
Note: The logged-in user will be associated with any changes (e.g., creating or editing records) made to the Sugar database via the plug-in.
Logging in Without SugarIdentity
Note: If your instance does not use SugarIdentity, you must use version 2.7.7 of the plug-in.
The following steps cover connecting the plug-in to a Sugar instance that does not use SugarIdentity:
- In the Connection section, enter your Sugar instance URL then click "Login".
Note: Be sure to begin the URL with "https://".
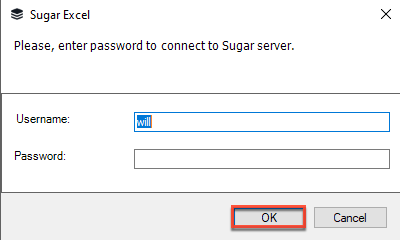
- If the connection is successfully made to your Sugar server, a login dialog box will appear. Enter your Sugar username and password then click "OK".
Note: The Sugar Plug-in for Excel is not supported for Sugar instances using single sign-on (SSO) unless the instance uses SugarIdentity.
Logging in With SugarIdentity
The Sugar Plug-in for Excel can connect to a Sugar instance that uses SugarIdentity via standard login and single sign-on. Please note that the plug-in supports single sign-on for instances that are SugarIdentity-enabled and use SAML or OIDC.
Logging in With SugarIdentity Using Standard Login
The following steps cover connecting the plug-in to a SugarIdentity-enabled instance that does not use SAML or OIDC:
- In the Connection section, enter your Sugar instance URL then click "Login".
Note: Be sure to begin the URL with "https://". - In the login window that appears, enter your Sugar username and password, then click "Log In".
- A user consent window will appear requesting access to your Sugar account. Click "Allow access" to grant access for the connection to occur.
If the connection is successful, you will see a success message.
Logging in With SugarIdentity Using Multi-Factor Authentication
SugarIdentity supports multi-factor authentication, which provides an added layer of security for Sugar to prevent unauthorized users from gaining access to your account. When multi-factor authentication is enabled for your Sugar instance, you will need to use a mobile authenticator app (e.g., Authy, Google Authenticator, Microsoft Authenticator) when logging in to Sugar, as covered in the steps below.
The following steps cover connecting the plug-in to a SugarIdentity-enabled instance that uses multi-factor authentication:
- In the Connection section, enter your Sugar instance URL, then click "Login".
Note: Be sure to begin the URL with "https://". - In the login window that appears, enter your Sugar username and password, then click "Log In".
- If this is your first time logging in after multi-factor authentication has been enabled for Sugar, a QR code will appear in the window. Scan the QR code using your authenticator app (e.g., Authy, Google Authenticator), then click "Continue". If you cannot scan the QR code using your mobile device, skip to step 4.
Note: If you have already paired an authenticator app with Sugar, then skip to step 5.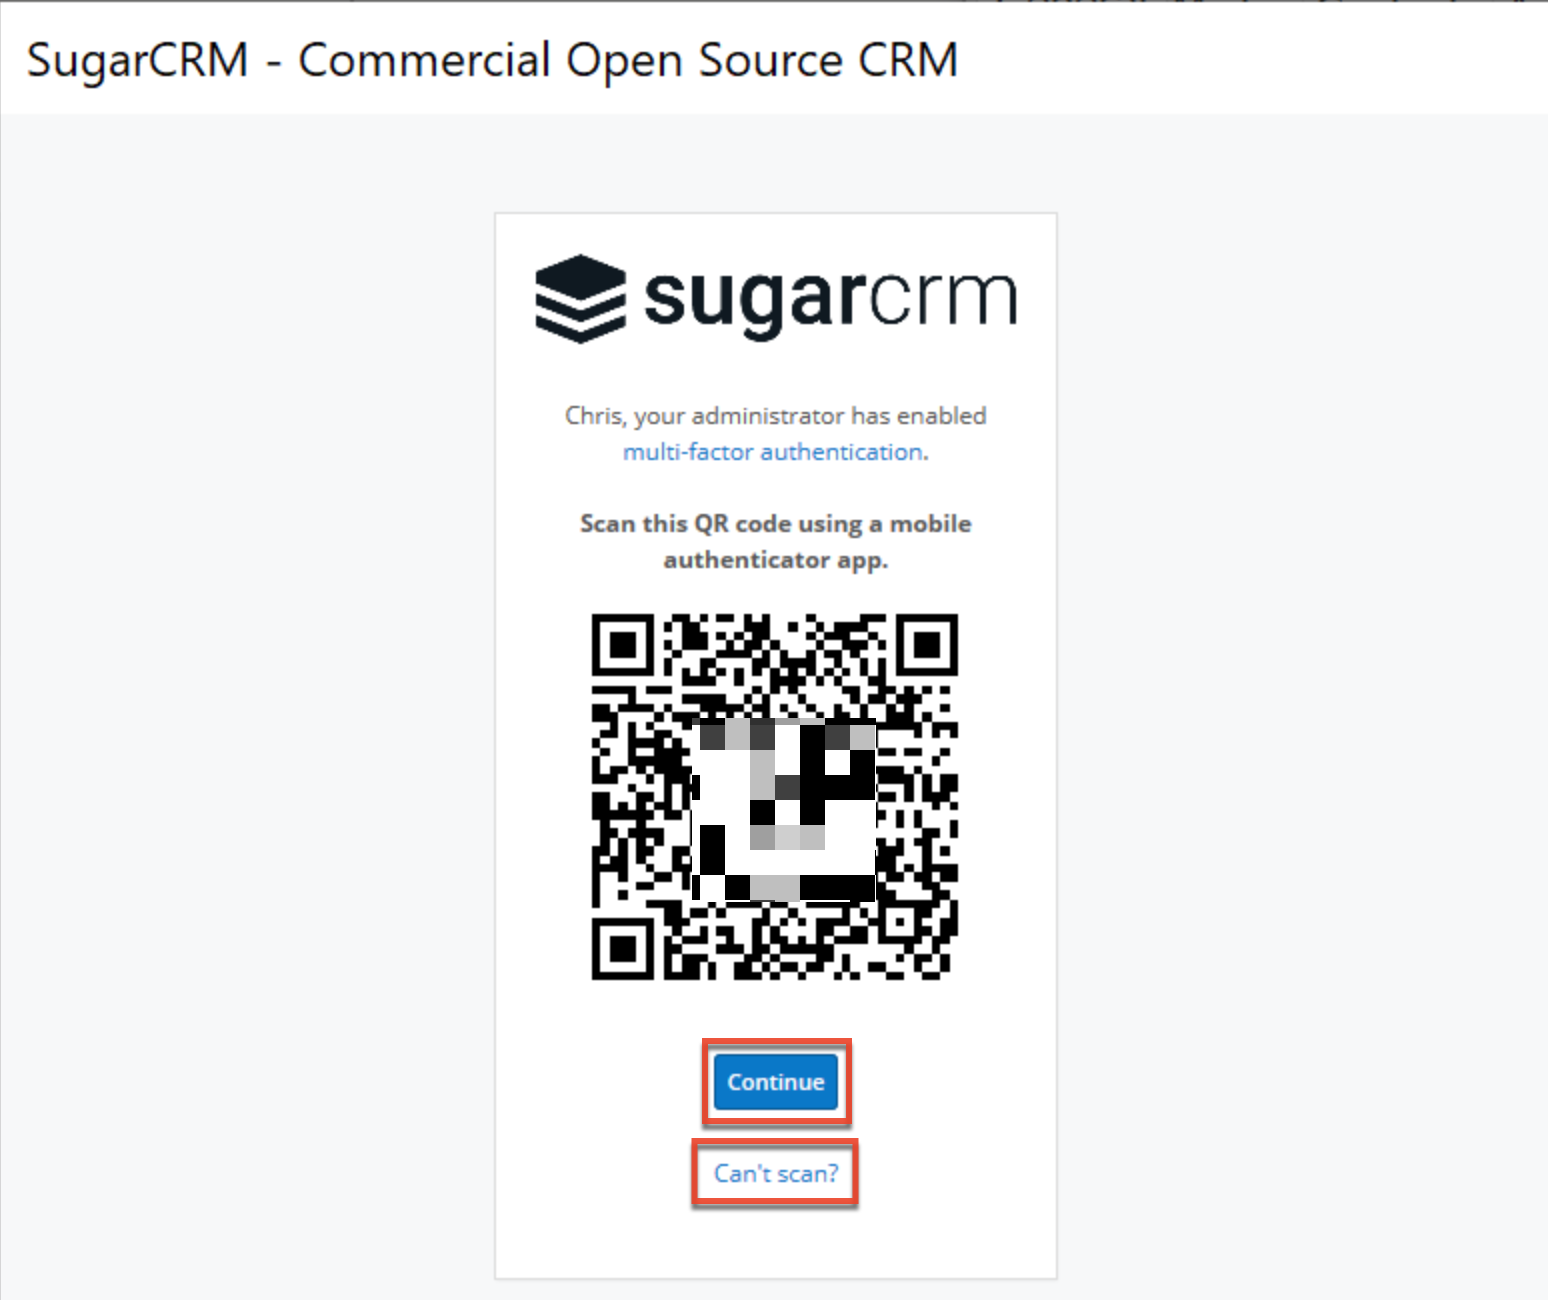
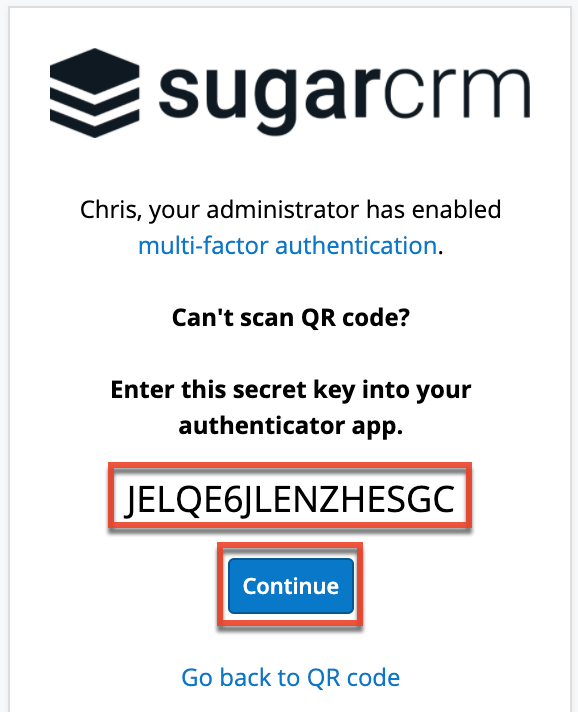
- If you cannot scan the QR code on step 3 using your mobile device, click the "Can't scan?" link and enter the secret key that appears in the window into your authenticator app. Click "Continue".
- In the next step, enter the 6-digit code generated from your authenticator app, then click "Log In".
Note: Once your authenticator app is paired with Sugar, for future logins, you will just be required to enter a new 6-digit code in this step after entering your Sugar login credentials in step 2.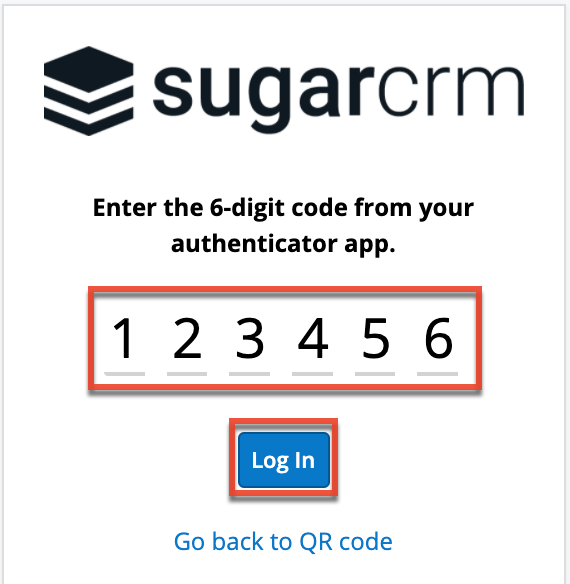
- A user consent window will appear requesting access to your Sugar account. Click "Allow access" to grant access for the connection to occur.
If the connection is successful, you will see a success message.
Logging in With SugarIdentity Using Single Sign-On Authentication
The following steps cover connecting the plug-in to a SugarIdentity-enabled instance that uses SAML or OIDC:
- In the Connection section, enter your Sugar instance URL then click "Connect".
Note: Be sure to begin the URL with "https://". - In the login window that appears, enter your LDAP or identity provider (e.g., Okta) login credentials then click "Log In" or "Sign In".
- A user consent window will appear requesting access to your Sugar account. Click "Allow access" to grant access for the connection to occur.
If the connection is successful, you will see a success message.
Additional SSL Options
Additional security and protocol options are listed on the Connection tab:
- Force security protocol for HTTPS connections: If you want to force Sugar Plug-in for Excel to connect to your instance using a particular security protocol for HTTPS connection, enable the "Force security protocol for HTTPS connections" checkbox and select your security protocol type (e.g., TLS 1.2, TLS 1.1, etc.).
- Authenticate using client certificate: Have the Sugar Plug-in for Excel connect to your Sugar instance with your own SSL certificate. Once enabled, click the "..." button in the SSL certificate field to select the certificate file.
Note: SugarCloud customers will not need to configure these additional SSL options.
Modules
Click on the Modules tab to define which modules you want the Excel plug-in to connect to in Sugar. By default, the following modules are selected: Accounts, Cases, Contacts, Leads, Opportunities, and Targets.
To enable or disable modules, mark or unmark the checkboxes adjacent to the modules. Custom modules are supported by the Excel plug-in and are available to be checked as well. The All and None buttons can be clicked to easily choose to include or exclude all modules. Click "OK" to preserve the changes. To revert to the default enabled module list, click the Refresh List button.
Note: If your ability to export records in a certain module (e.g., Accounts) is restricted by a role, the module name will not appear in the Modules list. Check with your system administrator if you do not see a particular module.
Reports
The Reports tab allows you to select how many reports are available. The Load All checkbox allows you to choose all reports, however, please note that if your instance has hundreds or thousands of reports, this will affect load times in the plug-in. If you choose to only load a certain number of reports, it will list reports from most recently modified to last modified. Therefore, if a report is not showing in the list of reports, modify the report. Then, click the Refresh Report List button on the SugarCRM Reports sidebar. The report will now be listed.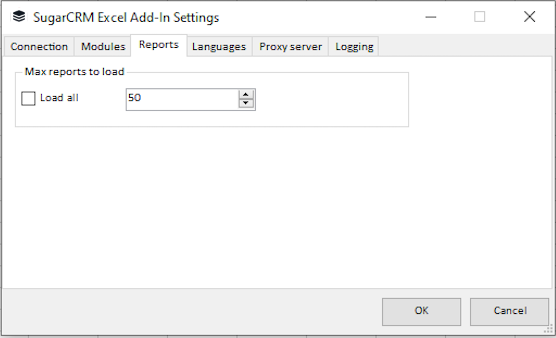
Languages
Click on the Languages tab to set the default language for the plug-in. Click the down arrow in the dropdown list to see the list of available languages. Click the button labeled "Set" to preserve your changes. This language setting will not affect your Sugar instance as it is solely used by the plug-in.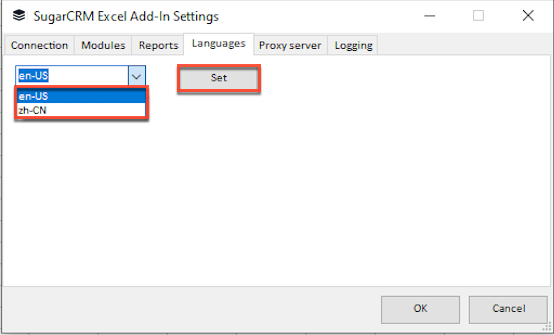
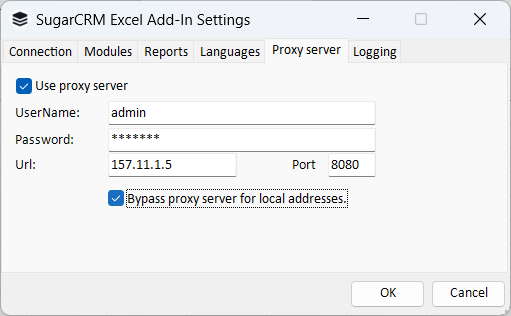
Proxy Server
Proxy servers redirect Internet traffic coming from and to the server that is running Sugar. If your Sugar instance uses a proxy server, you will need to enter proxy information into the Proxy Server sub-tab under Proxy/LDAP to allow your Sugar instance to communicate with the Excel plug-in by validating and updating the system license. For more information on system licenses, please refer to the System documentation.
Note: Proxy settings are not needed for instances hosted on Sugar's cloud service environment.
Complete the following fields to configure proxy settings:
- Use proxy server: Enable this checkbox to use a proxy server.
- UserName: The user name to authenticate to the proxy server.
- Password: The password to authenticate to the proxy server.
- URL: The hostname or IP address of the proxy server.
- Port: The communication port of the proxy server.
- Bypass proxy server for local addresses: Enable this checkbox to bypass the proxy server for known addresses.
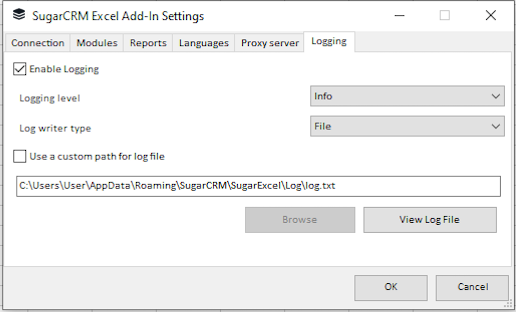
Logging
The Logging tab allows you to enable and configure error logging.
The following options are available to configure the log:
- Enable Logging: Enable logging to capture any errors in the Sugar plug-in.
- Logging level: Specify the logging level (e.g., Fatal, Error) you want to capture in the log.
- Log writer type: Select the log writer type (e.g., File, Windows event log) to capture the errors.
- Use a custom path for log file: There is a default path specified where the log file will be created and stored. If you want to specify a custom path for the log file, enable this option and select a valid path.
- View Log File: Once logging is enabled, you can click the View Log File button at any time to generate and access the log file.
Viewing Sugar Data in Excel via Sugar Reports
You can create a report in Sugar and then display its results as an Excel spreadsheet using the Sugar Plug-in for Excel. The plug-in allows you to refresh the report's results at any time to ensure that you are viewing the latest data in Excel.
Select Reports
Click on "Select Reports" to retrieve data via Sugar's Reports module and output that data into an Excel worksheet. This utility allows you to return data that has been filtered from one or more related modules, whereas the Query Wizard utility can only filter on data contained in a single module. For example, the Select Reports function can retrieve a list of contacts that are related to open opportunities because this requires information from both the Contacts module and the Opportunities module, which the Query Wizard cannot do.
Note: The Pipeline by Month: Forecast Include/Exclude report in Sugar is not supported by the Excel plug-in and cannot be viewed in Excel.
After you have established a successful connection to Sugar and properly configured the plug-in, follow these steps to view a Sugar report in Excel:
- If you have not already created the report that you would like to view in Excel, log into Sugar and navigate to the Reports module. Create and save a report with the information you would like to view as an Excel spreadsheet. For more information about creating reports in Sugar, please refer to the Reports documentation.
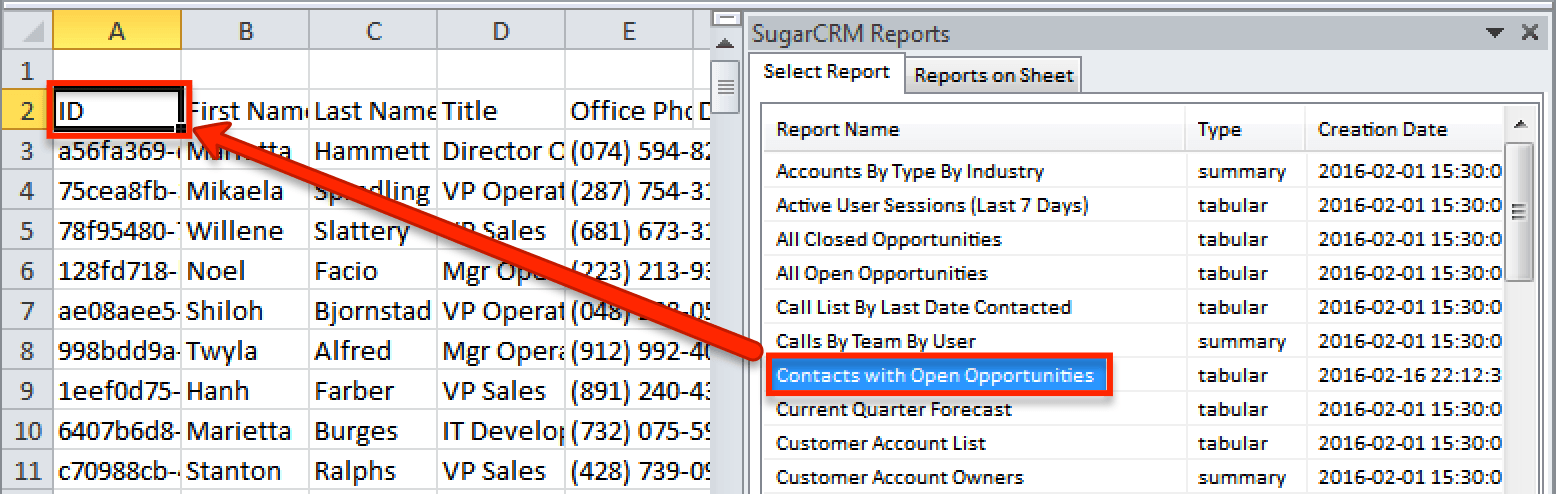
- After saving the report, launch Microsoft Excel and open a new, blank worksheet. Expand the SugarCRM menu on the Home tab of Excel's ribbon and then click on "Select Reports".
- This will open the SugarCRM Reports panel to the right of the worksheet area. The panel displays all Sugar reports that your user has permission to view in Sugar based on team and role settings. Scroll through the list of reports until you find the report that you created in step 1. Click and drag the name of the report to a cell on the current sheet where you want the report results to display.

The report's column headers will appear in the row to which you dragged the report, with the latest report results listed beneath each header row. Please note that these steps will display a snapshot of the report, so its results will not adjust in real-time in Excel when a change occurs to the data in Sugar. To see the most recent data from Sugar, refresh the report results.
For more information on how and which reports are available, please refer to the Reports section.
Report Layouts by Type
Sugar offers four types of reports. The following table describes what to expect each of these report types to look like when viewing their data in Excel via the Sugar plug-in.
| Report Type in Sugar | Report Type in Plug-in | Display Format in Excel |
| Rows and Columns Report | tabular | Displays the report's rows and columns as a standard table |
| Summation Report | summary | Displays the report's summary chart in table format |
| Summation Report With Details | detailed_summary | Displays the report's summary chart in table format but does not retrieve the record-level display columns |
| Matrix Report | summary | Displays the report's summary chart in table format |
Refresh Reports
The Select Reports functionality displays a snapshot of a Sugar report's data in an Excel worksheet. Once retrieved, the report results shown in Excel are static and will not adjust in real time when the data changes in Sugar. To see the most recent report data, periodically refresh the data from Sugar using one of the following methods:
- Refresh Reports menu item: Expand the SugarCRM menu in Excel's ribbon and click on "Refresh Reports" to retrieve the most recent data for all reports in the current workbook.
- Refresh Data button: Expand the SugarCRM menu in Excel's ribbon and click on "Select Reports" to reveal the SugarCRM Reports window. Click on the Refresh Data button to retrieve the most recent data for all reports in the current workbook.
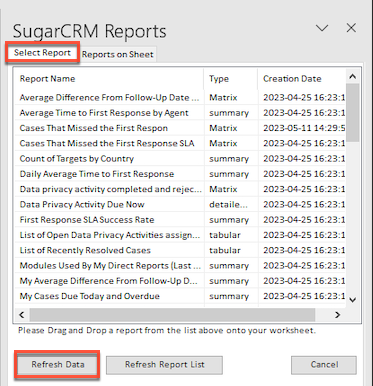
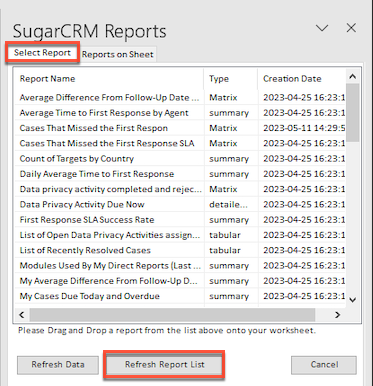
- Refresh Report List button: Expand the SugarCRM menu in Excel's ribbon and click on "Select Reports" to reveal the SugarCRM Reports window. Click on the Refresh Report List button to retrieve the most recent list of available reports in Sugar.
- Refresh Selected button: To refresh the data for only one or some of the reports in a workbook, expand the SugarCRM menu in Excel's ribbon and click on "Select Reports" to reveal the SugarCRM Reports window. Select the tab labeled "Reports on Sheet". Click on the name or names of the report(s), and then click on the Refresh Selected button to retrieve the most recent data for those reports only.
- Note: To select multiple report names, hold down the Shift or Command key.
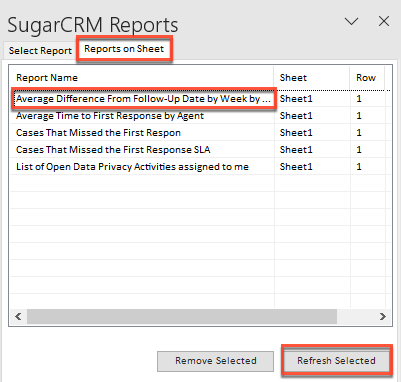
- Note: To select multiple report names, hold down the Shift or Command key.
Remove Reports
To disconnect an Excel worksheet from a Sugar report, expand the SugarCRM menu in Excel's ribbon and click on "Select Reports" to reveal the SugarCRM Reports window. Select the tab labeled "Reports on Sheet". Click on the name or names of the report(s), and then click on the Remove Selected button. This will remove the report's association to Sugar but the Excel worksheet will still retain the report's data.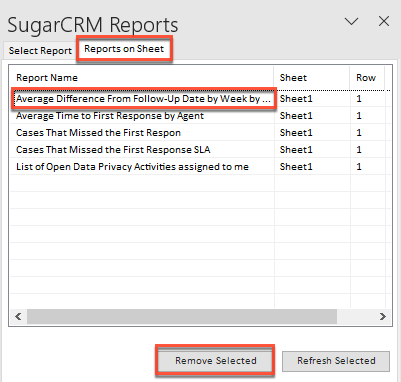
Viewing Sugar Data in Excel via the Query Wizard
The Excel plug-in's query wizard pulls data directly from the Sugar database. The query wizard makes it easy to specify filters that will narrow the displayed results. After pulling the data into Excel, you can read, edit, delete, or create new Sugar records directly via the Excel application.
To access the query wizard, open a new, blank worksheet in Excel. Expand the SugarCRM menu on the Home tab of Excel's ribbon and select "Query Wizard".
The SugarCRM Query Wizard panel will open to the right of the current worksheet. Specify your desired filter conditions in this window. The following fields must be completed in the query wizard window:
| Field Name | Description |
| Module | The Sugar module (e.g., Accounts, Contacts, etc.) that contains the data you want to display |
| Condition | The inclusive (AND) or exclusive (OR) operator to be used between multiple conditions in the query Note: This field will not be visible on single-condition filters or for the first condition of multiple-condition filters. |
| Field | The data field that this condition will evaluate within the specified module |
| Operator | The comparison operator (e.g., Equals, Contains, Starts With, etc.) that will evaluate the "Field" and "Value" of the current condition |
| Value | The value to compare with the value of the "Field" specified in the current condition |
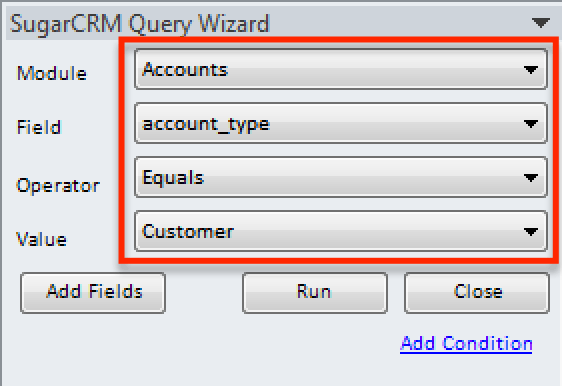
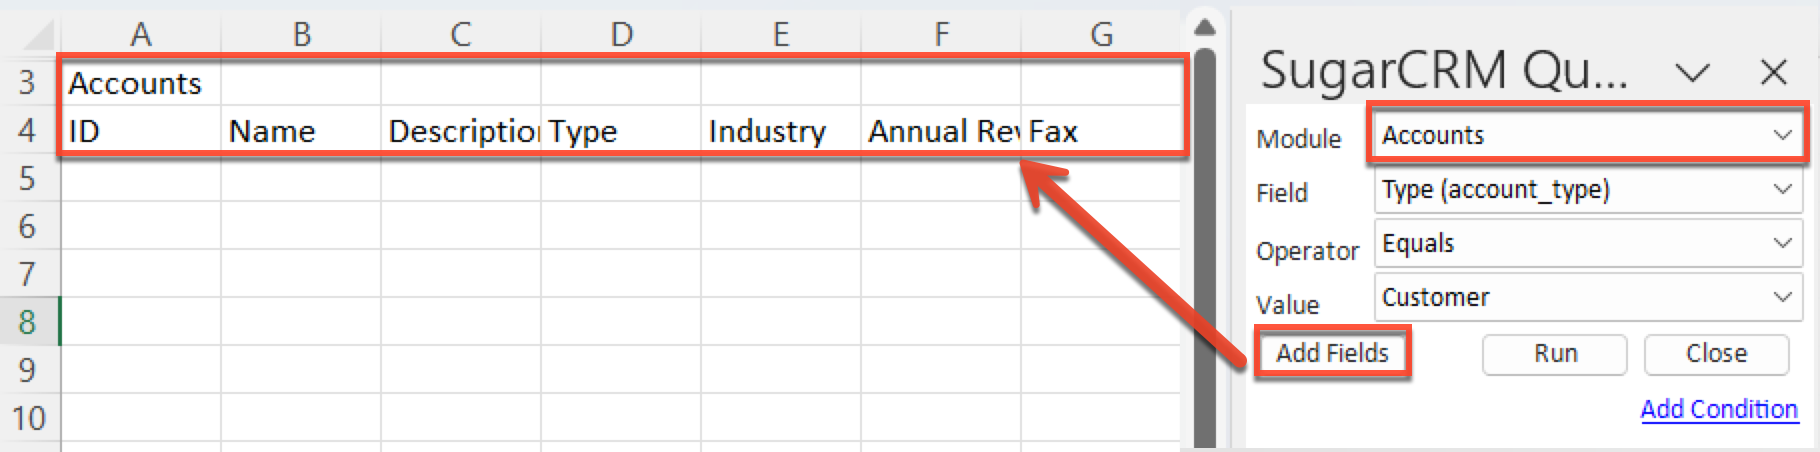
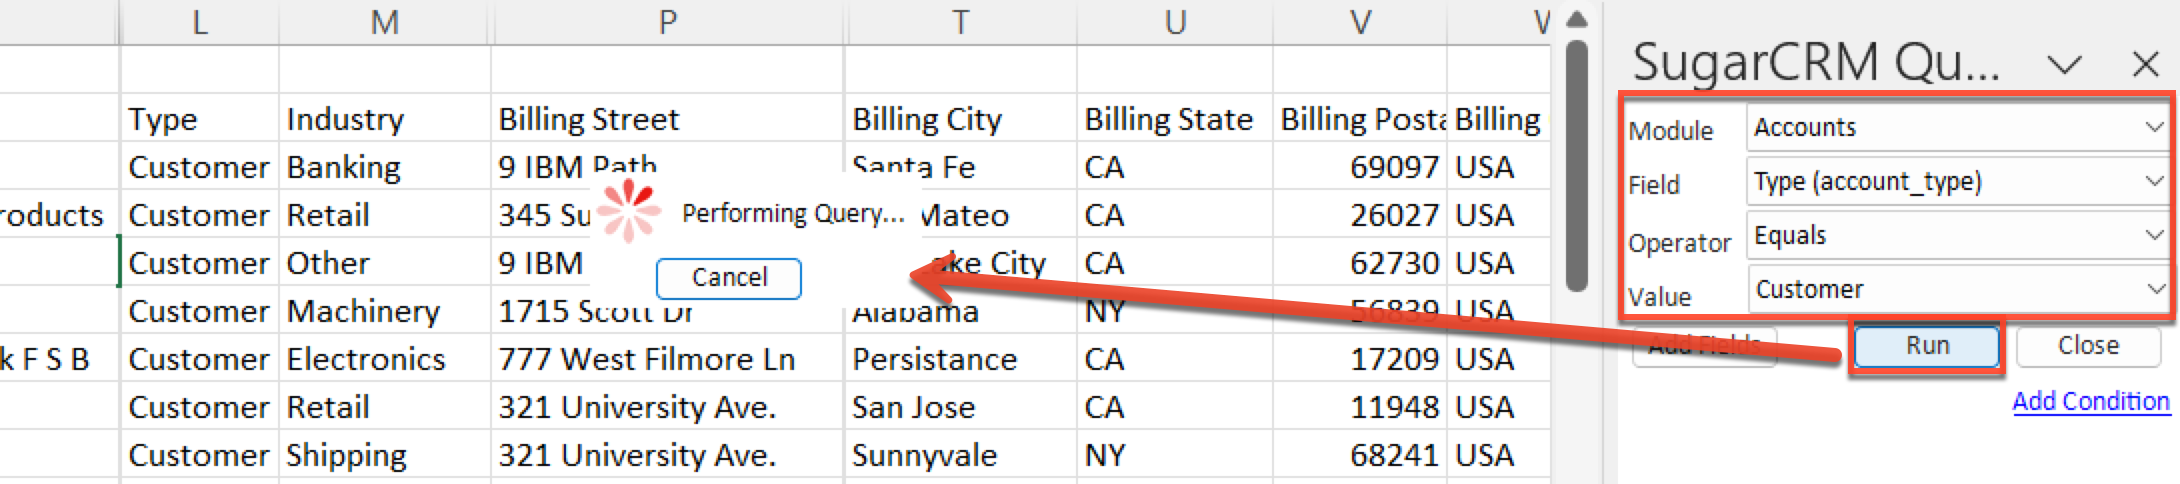
Query Wizard Example
Follow these steps to pull a list of USA-based, customer-type accounts into Excel as an example. Please note that the database value of a field is presented in rows 1 and 2 of the query results, with rows 3 and 4 showing a human-readable format.
- In the SugarCRM Query Wizard window, select the following options from the dropdown fields:
- Module: Accounts
- Field: account_type
- Operator: Equals
- Value: Customer
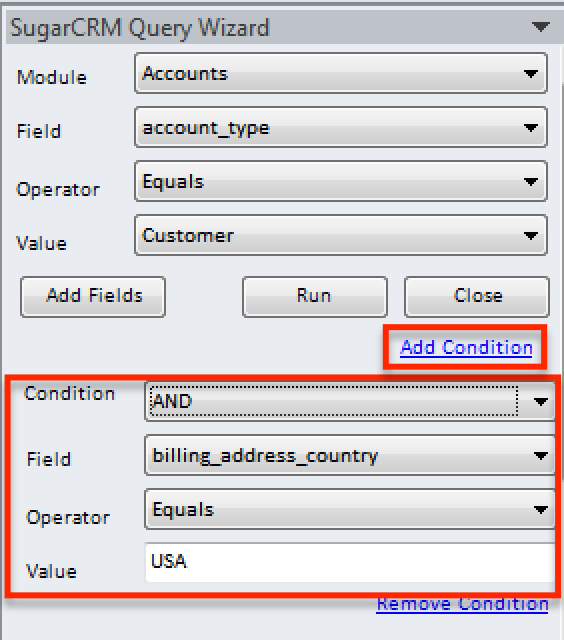
- Click "Add Condition" to enter the second criterion of the account's country being "USA". It is not necessary to specify the module again, but you do have to decide whether the condition will be combined with the first condition using AND or OR. The AND condition will only return records that meet both the first and second conditions in the filter. The OR condition will return records that meet either the first condition, the second condition, or both.
- Condition: AND
- Field: billing_address_country
- Operator: Equals
- Value: USA
- When satisfied with the conditions in the filter, click the Run button. If desired, you can add more conditions to this filter by clicking "Add Condition" again and completing the new set of form fields. To remove a condition, simply click the "Remove Condition" link. There is no limit to the number of conditions you may add to your query.
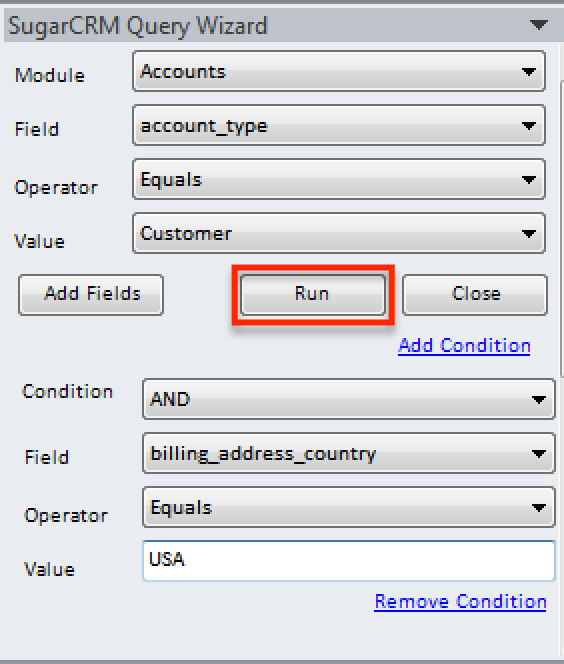
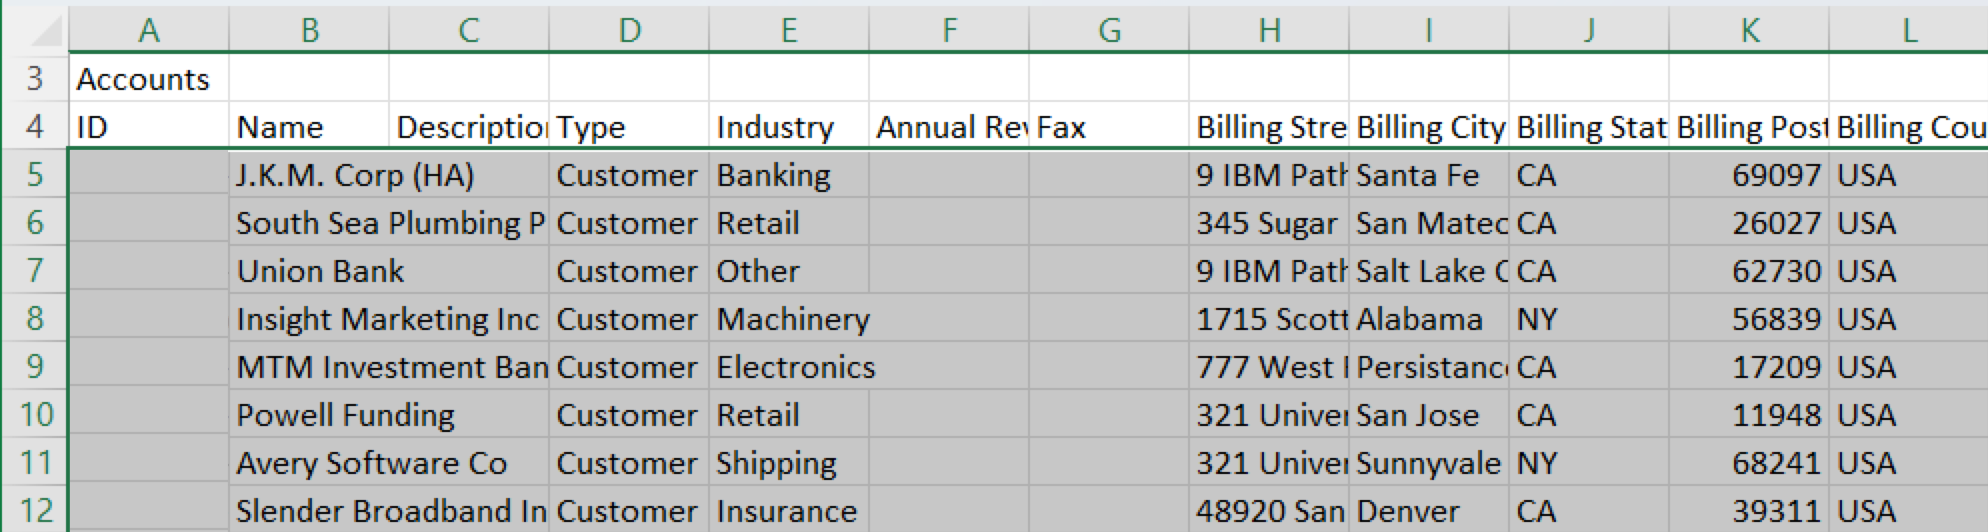
The Excel plug-in will query the Sugar module and display the filtered list of records on the current worksheet.
The Excel plug-in retrieves data in batches of 25 and displays its progress accordingly. A status message (e.g., "Retrieving Records: [1-25]...") in the foot of the Excel application will communicate the plug-in's progress. When the data transfer is complete, the status message will display "Query Complete". In the event that no records match the criteria specified in the Query Wizard, the plug-in will alert you via a pop-up notification.
Data Layout Characteristics
The list of Sugar records resulting from the Query Wizard will contain several notable elements. When retrieving, updating, or creating Sugar records via the Excel plug-in, the data must respect these layout rules:
- Cell A3: The name of the Sugar module that was queried
- Row 4: Column headers containing the database names of the Sugar module's fields
- Column A: The Sugar ID (labeled "id") for each module record

Please note that the Query Wizard will only filter and display records and fields from a single Sugar module. To filter by multiple modules (e.g., to display a list of contacts whose account's city is "Pittsburgh" requires a filter against both the Contacts module and the Accounts module) or display data columns from more than one module (e.g., display a list of contacts and their related case details), please refer to the Viewing Sugar Report Results in Excel section of this documentation.
When you are finished working with the Query Wizard, click on the "X" in the upper right corner of the wizard to remove it from view.
Viewing and Updating in Sugar
With query results, you may right-click on any row with a Sugar ID present. In the right-click menu there will be two actions specific to the Excel Plug-In: "View in Sugar" and "Update in Sugar". Clicking "View in Sugar" will take you to the record directly in Sugar, while clicking "Update in Sugar" will take you to the edit view in Sugar.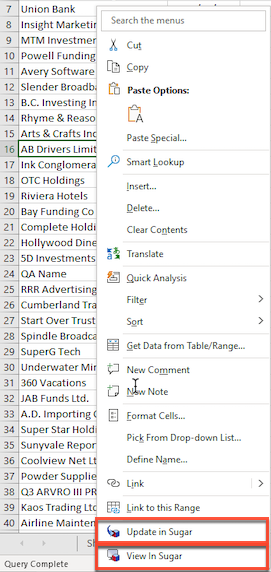
Creating, Updating, and Deleting Sugar Records
In addition to simply viewing Sugar data, the plug-in for Microsoft Excel enables Sugar users to create, update, and delete Sugar data. The following sections explain how to use the plug-in to manipulate data in your Sugar instance.
Creating Records
To create new records via the Sugar plug-in for Excel, you must follow strict formatting guidelines so that Sugar can read the information properly. The easiest way to respect this format is via the Add Fields button in the plug-in's Query Wizard.
Creating Records via the Plug-in's Query Wizard
The Query Wizard's "Add Fields" functionality does not receive any data associated with existing Sugar records, so the worksheet is ready to be populated with new records. As an example, use the following steps to create new account records in Sugar via the Sugar plug-in:
- Open a new, blank worksheet in Excel. Place your cursor in cell A1.
- Expand the SugarCRM menu on the Home tab of Excel's ribbon and select "Query Wizard".
- In the Query Wizard panel's Module field, select the Sugar module to which you would like to insert new records. For this example, select Accounts.
- Click on the Add Fields button. Rows 3 and 4 of the worksheet will populate with the module name (e.g., "Accounts") and the database labels for all of that module's fields in alphabetical order.
- Begin creating record data, one record per row, by filling in each row's cell with the value that corresponds with the column's header. Please refer to the Best Practices for Creating Records via the Sugar Plug-in for Excel section of this documentation for important data-entry notes.
- Once you have entered the appropriate data, delete all of the empty columns from the worksheet except for the "ID" column (column A). Columns should be considered empty if they contain a header value (e.g., "account_type") in row 4 but have no populated rows beneath the header.
- Click inside the first cell under the "id" column header. For this example, that is cell A5. With the mouse button still pressed, drag the cursor across and down the data set to highlight only the record data that the plug-in should create in Sugar. Do not highlight the column headers. The prepared sheet will look similar to this:
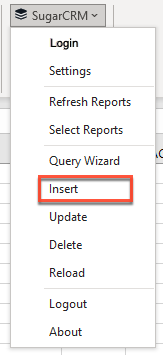
Note: To insert only one record or a portion of the data set into Sugar, select only the relevant row(s). - Expand the SugarCRM menu on the Home tab of Excel's ribbon and click on "Insert".
The plug-in will begin inserting the sheet's data into the Sugar database in real time. As it progresses, the plug-in will place each new Sugar record's ID value into the corresponding row's ID column.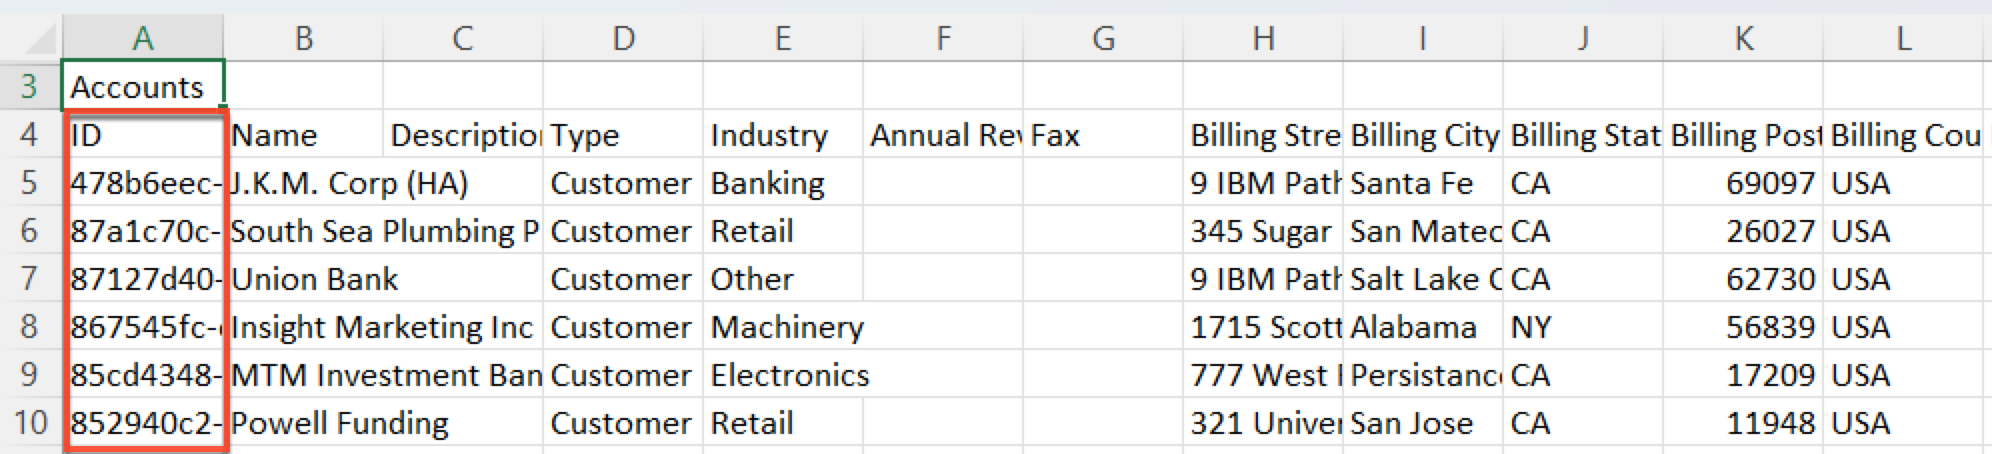
If any of the spreadsheet's data is invalid or incomplete, the plug-in will alert you with a pop-up message explaining the error. You must resolve all errors before the data will synchronize to Sugar. Occasionally, the plug-in may expect to find a value in a row that appears to contain no values. This is usually due to phantom (invisible) data artifacts residing in a cell or cells in that row. To resolve this error, highlight the entire empty row, right-click your mouse on the row number, and click on "Delete".
The footer's status message will display "Insert Complete" when the plug-in has finished creating the new records in Sugar. You can confirm that the data appears as expected in the proper module.
Best Practices for Creating Records via the Sugar Plug-In for Excel
- Module name: The data set's module name (e.g., Accounts) must be in cell A1.
- Field names: The column headers must be in row 2 and contain the database value of a field name (e.g., account_type) rather than the display label (e.g., Account Type).
- If you do not know the database name of a field, administrators can navigate to the respective module in Studio > Fields, where you can view a list of display labels adjacent to their corresponding database names. Regular users can export a record from the module in Sugar in order to see the database name in the exported file.
- Sugar ID column: The Sugar ID field must be in column A and labeled "id" or "ID". When creating records, leave the first cell of each row under the ID column empty.
- Required fields: It is not necessary to insert a value for every field, but you must provide values for those that are required for the module. Administrators can view which fields are required via Admin > Studio while regular users can edit a record of the module directly in Sugar to see which fields are marked as required.
- Special fields: Dropdown, multiselect, relate, and read-only field values require special consideration.
- Dropdown or multiselect field values must be entered exactly as the value exists in the Sugar database.
- Read-only fields such as date_entered and created_by should remain empty. If you enter a value for a read-only field, Sugar will ignore the value.
- For information on updating data for relationship fields or fields with multiple values, please refer to the Import documentation.
- Empty rows: Remove any blank rows from the sheet before syncing the data to Sugar. Blank rows may be detected by the plug-in and erroneously added to Sugar as new records.
- Empty columns: Remove columns that have no data from the sheet before syncing the data to Sugar. The exception to this is the ID column which must remain even if blank while creating records. This will reduce the impact on server performance during the synchronization.
- Additional documentation: Creating records via the plug-in for Excel is very similar to creating records via import. For more information on inserting data for relationship fields or fields with multiple values, please refer to the Import documentation.
Updating Records
To update existing records via the Sugar plug-in for Excel, you must populate a spreadsheet with the current Sugar records, edit them, and then synchronize the records back to Sugar. The plug-in expects the synced data to follow certain formatting guidelines so that Sugar can read the information properly. This is most easily done using the plug-in's Query Wizard, which will retrieve Sugar records from the database in the proper format, but can also be accomplished via the Select Reports option. The following sections explain how to update Sugar records via the Query Wizard and via Reports.
Updating Records via the Plug-in's Query Wizard
To update records via the Sugar plug-in for Excel, you must follow strict formatting guidelines so that Sugar can read the information properly. The easiest way to respect this format is to use the plug-in's Query Wizard. As an example, use the following steps to update customer account records in Sugar via the Excel plug-in:
- Open a new, blank worksheet in Excel. Place your cursor in cell A1.
- Expand the SugarCRM menu on the Home tab of Excel's ribbon and select "Query Wizard".
- In the Query Wizard panel, select the Accounts module and set the criteria to retrieve only customer accounts. For more information on setting criteria, please refer to the Viewing Sugar Data in Excel via the Query Wizard section of this page. Click "Run" to populate the sheet with the queried Sugar data.
- Make the desired changes to the record data following the guidelines highlighted under Best Practices for Updating Records via the Sugar Plug-in for Excel.
- Click inside the first cell under the "id" column header. For this example, that is cell A3. With the mouse button still pressed, drag the cursor across and down the data set to highlight only the record data that the plug-in should update in Sugar (do not highlight the column headers).
Note: To update only one record or a portion of the data set, select only the relevant row(s). - Expand the SugarCRM menu on the Home tab of Excel's ribbon and click on "Update".
If any of the spreadsheet's data is invalid or incomplete, the plug-in will alert you with a pop-up message explaining the error. You must resolve all errors before the data will synchronize to Sugar. Occasionally, the plug-in may expect to find a value in a row that appears to contain no values. This is usually due to phantom (invisible) data artifacts residing in a cell or cells in that row. To resolve this error, highlight the entire empty row, right-click your mouse on the row number, and click on "Delete".
If any records are missing IDs you will see a dialog box that says, "Some records are missing ids and cannot be updated. Do you want to skip them and continue?". If you click "Yes", all other records that can be updated will be updated. If you click "No", you may stop the process and review your data before proceeding.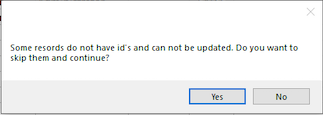
The footer's status message will display "Update Complete" when the plug-in has finished updating records in Sugar. You can navigate to Sugar and confirm that the data appears as expected in the proper module.
Updating Records via Reports
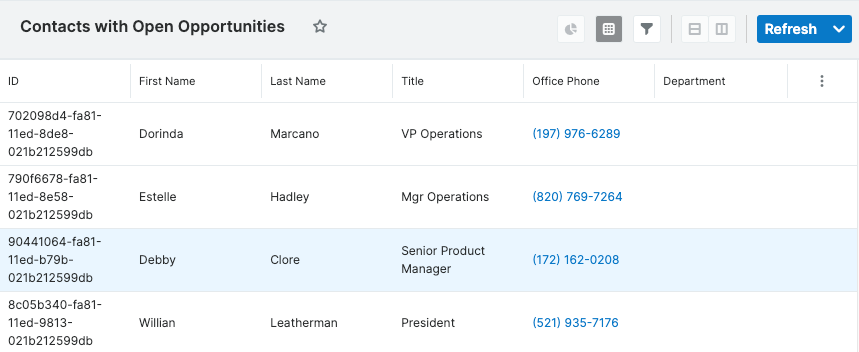
While the plug-in's Query Wizard is the most straightforward method for performing data updates, some filtering methods require complex filtering from one or more related modules. In these circumstances, create a report in Sugar and then display its results as an Excel spreadsheet. As an example, use the following steps to retrieve and then update a list of contacts that are related to open opportunities:
- Navigate to the Reports module in Sugar and click on "Create Report" in the module tab's menu, then select "Rows and Columns" for the report type and "Contacts" as the report's target module.
- Define a filter to return only contacts related to opportunities that are in a sales stage that is considered open. For more information about building report filters, please refer to the Reports documentation.

- For the display columns, place "Contacts > ID" first. This will ensure that the ID field appears in the leftmost column of the report's results.
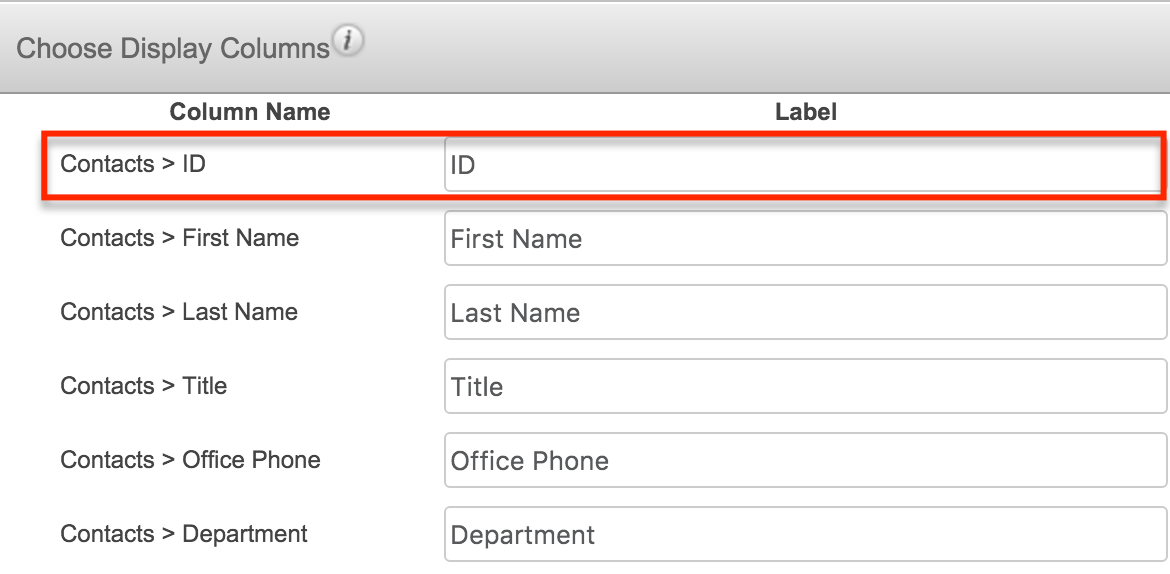
- For the remaining display columns, select the fields you wish to alter in addition to fields that will help identify the record in Excel. Take note of the following rules if you intend to display fields from a related module:
- Fields from modules related to the target module cannot be changed via the Excel plug-in. For this example, the target module is Contacts, so any fields chosen as a display column from the Opportunities module will be displayed but not updated via Excel.
- If you are displaying a field from a module that has a "many" relationship to the target module (e.g., many opportunities can be related to a contact), there is a high likelihood that the report results will display the same contact multiple times in a report. For example, if you choose to display the related opportunity's Sales Stage field on a Contacts report, a separate line item will appear for each opportunity related to the contact. You must eliminate these duplicate rows from Excel before syncing an update back to Sugar.
- Save and run the report in Sugar.
- After saving the report, launch Microsoft Excel and open a new, blank worksheet. Expand the SugarCRM menu on the Home tab of Excel's ribbon and then click on "Select Reports".
- This will open the SugarCRM Reports panel to the right of the worksheet area. The panel displays all Sugar reports that your user has permission to view in Sugar based on team and role settings. Scroll through the list of reports until you find the report that you created in steps 1-5. Click and drag the name of the report to cell A2, so that the top row remains empty.
- In cell A1, type the name of the module you are updating (for this example, Contacts).

- Make the desired changes to the record data following the guidelines highlighted under Best Practices for Updating Records via the Sugar Plug-in for Excel.
- Click inside the first cell under the "id" column header. For this example, that is cell A3. With the mouse button still pressed, drag the cursor across and down the data set to highlight only the record data that the plug-in should update in Sugar (do not highlight the column headers).
Note: To update only one record or a portion of the data set, select only the relevant row(s). - Expand the SugarCRM menu on the Home tab of Excel's ribbon and click on "Update".
If any of the spreadsheet's data is invalid or incomplete, the plug-in will alert you with a pop-up message explaining the error. You must resolve all errors before the data will synchronize to Sugar. Occasionally, the plug-in may expect to find a value in a row that appears to contain no values. This is usually due to phantom (invisible) data artifacts residing in a cell or cells in that row. To resolve this error, highlight the entire empty row, right-click your mouse on the row number, and click on "Delete".
The footer's status message will display "Update Complete" when the plug-in has finished updating records in Sugar. You can navigate to Sugar and confirm that the data appears as expected in the proper module.
Best Practices for Updating Records via the Sugar Plug-in for Excel
- Module name: The data set's module name (e.g., Accounts) must be in cell A1.
- Field names: The column headers must be in row 2 and contain the database value of a field name (e.g., account_type) rather than the display label (e.g., Account Type).
- If you do not know the database name of a field, administrators can navigate to the respective module in Studio > Fields, where you can view a list of display labels adjacent to their corresponding database names. Regular users can export a record from the module in Sugar in order to see the database name in the exported file.
- Sugar ID column: When updating records, column A must contain the Sugar ID ("id") for each row's record. Do not modify the ID field for any record in an update.
- Special fields: Dropdown, multiselect, relate, and read-only field values require special consideration.
- Updating dropdown and multiselect field values will overwrite any existing data in the field on the record.
- Dropdown or multiselect field values must be entered exactly as the value exists in the Sugar database.
- Read-only fields such as date_entered and created_by should remain empty. If you enter a value for a read-only field, Sugar will ignore the value.
- For information on updating data for relationship fields or fields with multiple values, please refer to the Import documentation.
- Empty rows: Remove any blank rows from the sheet before syncing the data back to Sugar. Blank rows may be detected by the plug-in and erroneously added to Sugar as new records.
- Unchanged rows: Remove rows that contain unchanged records from the sheet before syncing the data back to Sugar. This will prevent the plug-in from unnecessarily changing the "Date Modified" on records that did not change.
- Unchanged columns: Remove columns that have no changes (do not remove the ID column) from the sheet before syncing the data back to Sugar. This will reduce the impact on server performance during the synchronization.
- Timing: Consider the amount of time it takes from when you first export the Sugar data until you sync it back to the database. It is possible that the data in the database may have changed since you exported it and the update will thereby override the new database values. To prevent this potential loss of data, try to avoid working offline for long periods of time, and communicate with the record owners if you plan to make updates to their records.
- Additional documentation: Updating records via the plug-in for Excel is very similar to updating records via import. For more information on inserting data for relationship fields or fields with multiple values, please refer to the Import documentation.
Deleting Records
To delete Sugar records from a module, follow the instructions in either of the Updating Records sections and include a column labeled "Deleted". The Deleted field's value can either be "0" for not deleted or "1" for deleted. Set the cell value to 1 for any record that you would like to delete and then synchronize the updated data to Sugar.
Reloading Records
The Reload option in the SugarCRM ribbon allows you to refresh data for selected records. One example might be that several records were loaded into a worksheet and saved. Later, you can select the row(s) you wish to refresh, click "Reload", and then the plug-in will refresh the data from Sugar into your worksheet.