Creating Scoring Profiles
Overview
Lead scoring is managed through scoring profiles in Sugar Market. Scoring profiles identify the weight of importance for each activity and the actions to occur when a lead accumulates a defined number of points. You can create an unlimited number of scoring profiles and actions within each profile in Sugar Market, affording significant flexibility that can take your marketing efforts to the next level.
Note: For contact scoring to work, the contact must be cookied by Sugar Market. This can be done by completing a form or clicking on an email. See the Web Tracking documentation for more information.
Default Contact Scoring Profile
Your Sugar Market instance includes a Default Scoring Profile, which you can use as-is, or use as the basis for a new profile by copying this profile. The score associated with the Default Scoring Profile is displayed in the Leads and Contacts list view and in lead and contact records; however, you can easily change the selected scoring profile to view scores associated with other profiles.
Before You Begin
To push the scores associated with each scoring profile to your external CRM, you need to create integer fields in your CRM to which each score will be mapped and sync those fields to Sugar Market. Ensure you assign descriptive names to these fields to make it clear to which scoring profile each is mapped. You will select the CRM field to be mapped to the scoring profile when you define the scoring profile.
If you are unsure of your sync preferences, please refer to the Sugar Market CRM Integration Guide for your specific CRM type.
Creating Contact Scoring Profiles
Contact scoring looks at the activity of a specific individual and assigns a positive or negative number of points based on this activity. Sugar Market can track a lead's activity across your website, interactions with emails, events, and landing pages. Creating a contact scoring profile includes the following steps:
You can also create a scoring profile by copying an existing scoring profile.
Defining the Scoring Profile
The first part of creating a scoring profile is to define the framework for the profile, as described below.
- Click the open button at the top of the navigation bar to view all available modules.
- Click the Scoring module.

- On the Scoring page, click the Create button.
- Complete the fields in the Set-Up Profile section, as described below:

- Scoring Profile Name: Identify a descriptive name for the scoring profile.
- Description: Provide a brief description to further identify the scoring profile, such as the details of what is being scored or actions that will take place within the thresholds (e.g. engage with seasonal content).
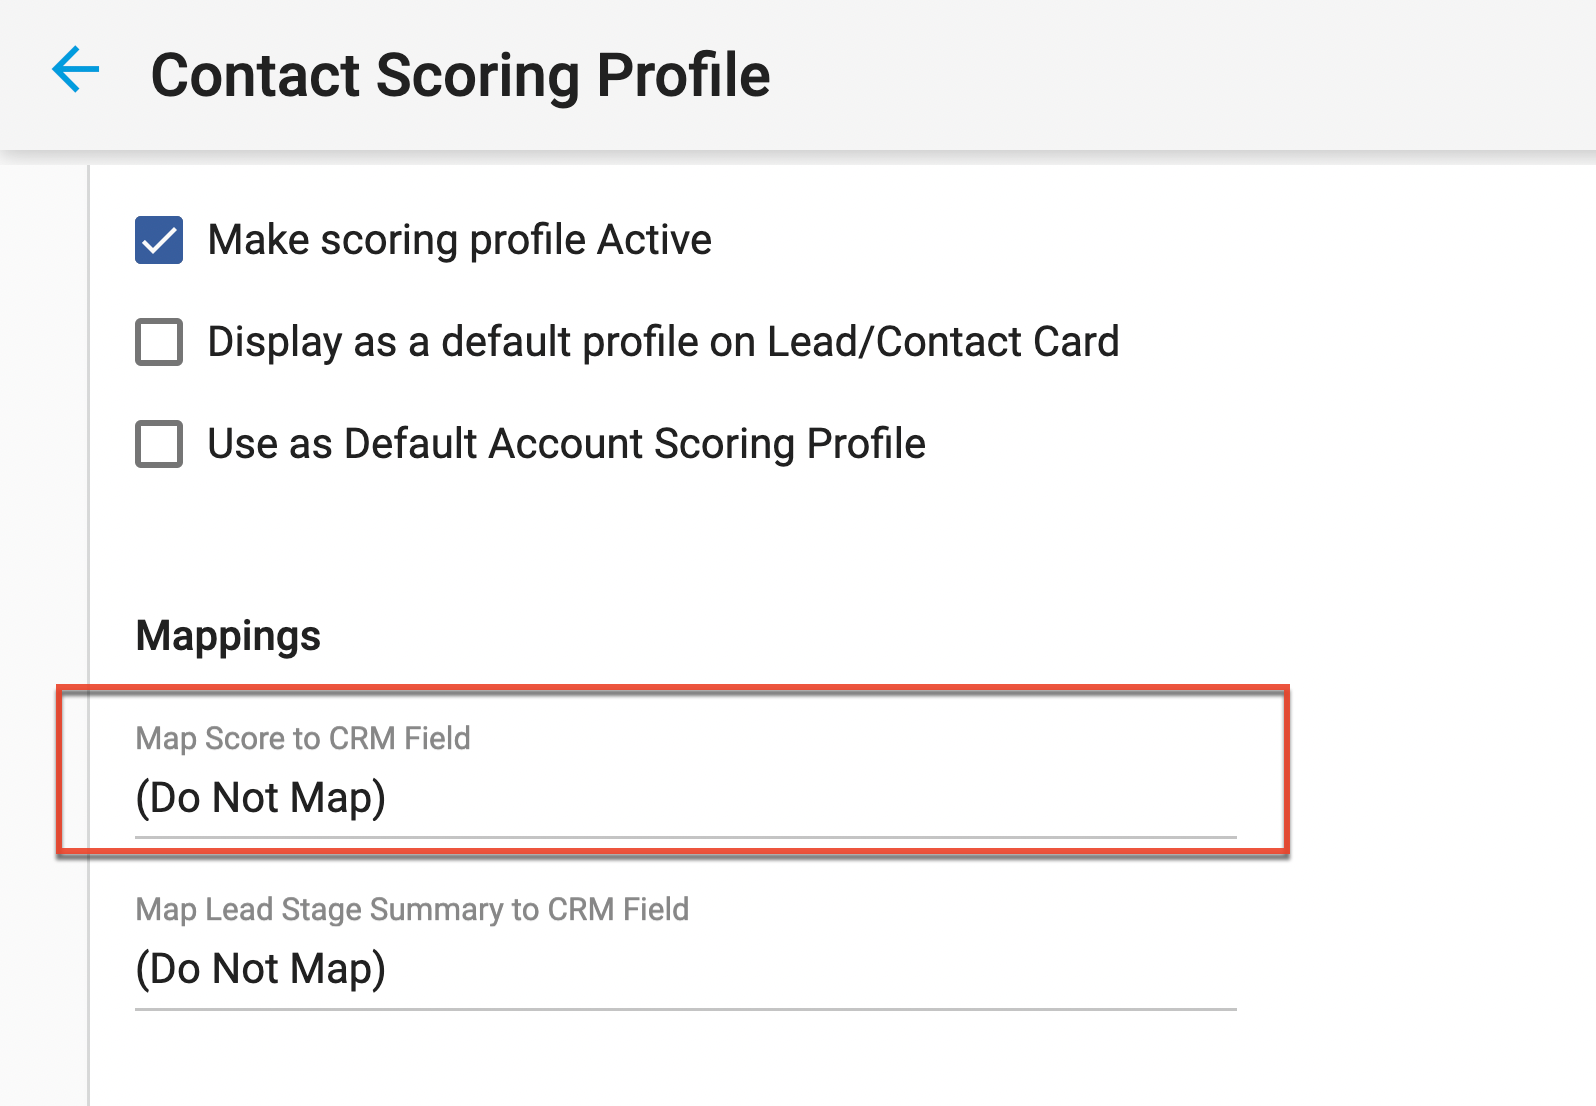
- Make scoring profile Active: Select this checkbox when you are ready to make the scoring profile active.
- Display as a default profile on a Lead/Contact card: Select this checkbox to make this profile the profile that is initially displayed on a Lead/Contact record, but still allows users to toggle between profiles to view the scoring summary within the record. This should be selected for your most generic profile.
- Use as Default Account Scoring Profile: Select this checkbox to roll up the individual lead or contact score to the Account with which they are associated. All individual scores are averaged to create an overall Account score. This can only be enabled for one active scoring profile.
- Complete the fields in the Mappings section, as described below. These fields can be displayed on Lead and Contact records, in the Marketing Qualified Accounts dashlet on the Global Dashboard, in reporting, or in dynamic list creation.
- Map Score to CRM Field: If you want to push the scores associated with this scoring profile to your external CRM, select the field in the Contacts/Leads table to which you want to push the score. All available integer fields are displayed in the dropdown list. If you have not already created a custom integer field on the Contact and Lead table in your CRM, create it now and then return to this scoring profile setup. If you do not want to map the score, select "Do Not Map" at the top of the list.
- Map Lead Stage Summary to CRM Field: If you want to push your lead stage thresholds to your external CRM, select the appropriate text field for your leads/contacts. All available text type fields are displayed in the dropdown list, this includes radio, text box area, picklist, and checkbox. If you have not already created a custom field on the Contact and Lead table in your CRM, create it now and then return to this scoring profile setup. If you do not want to map the lead stage summary, select "Do Not Map" at the top of the list.
- Optionally, complete the fields in the Additional Scoring Actions section, as described below, and then click the Save and Stay button at the top of the page.
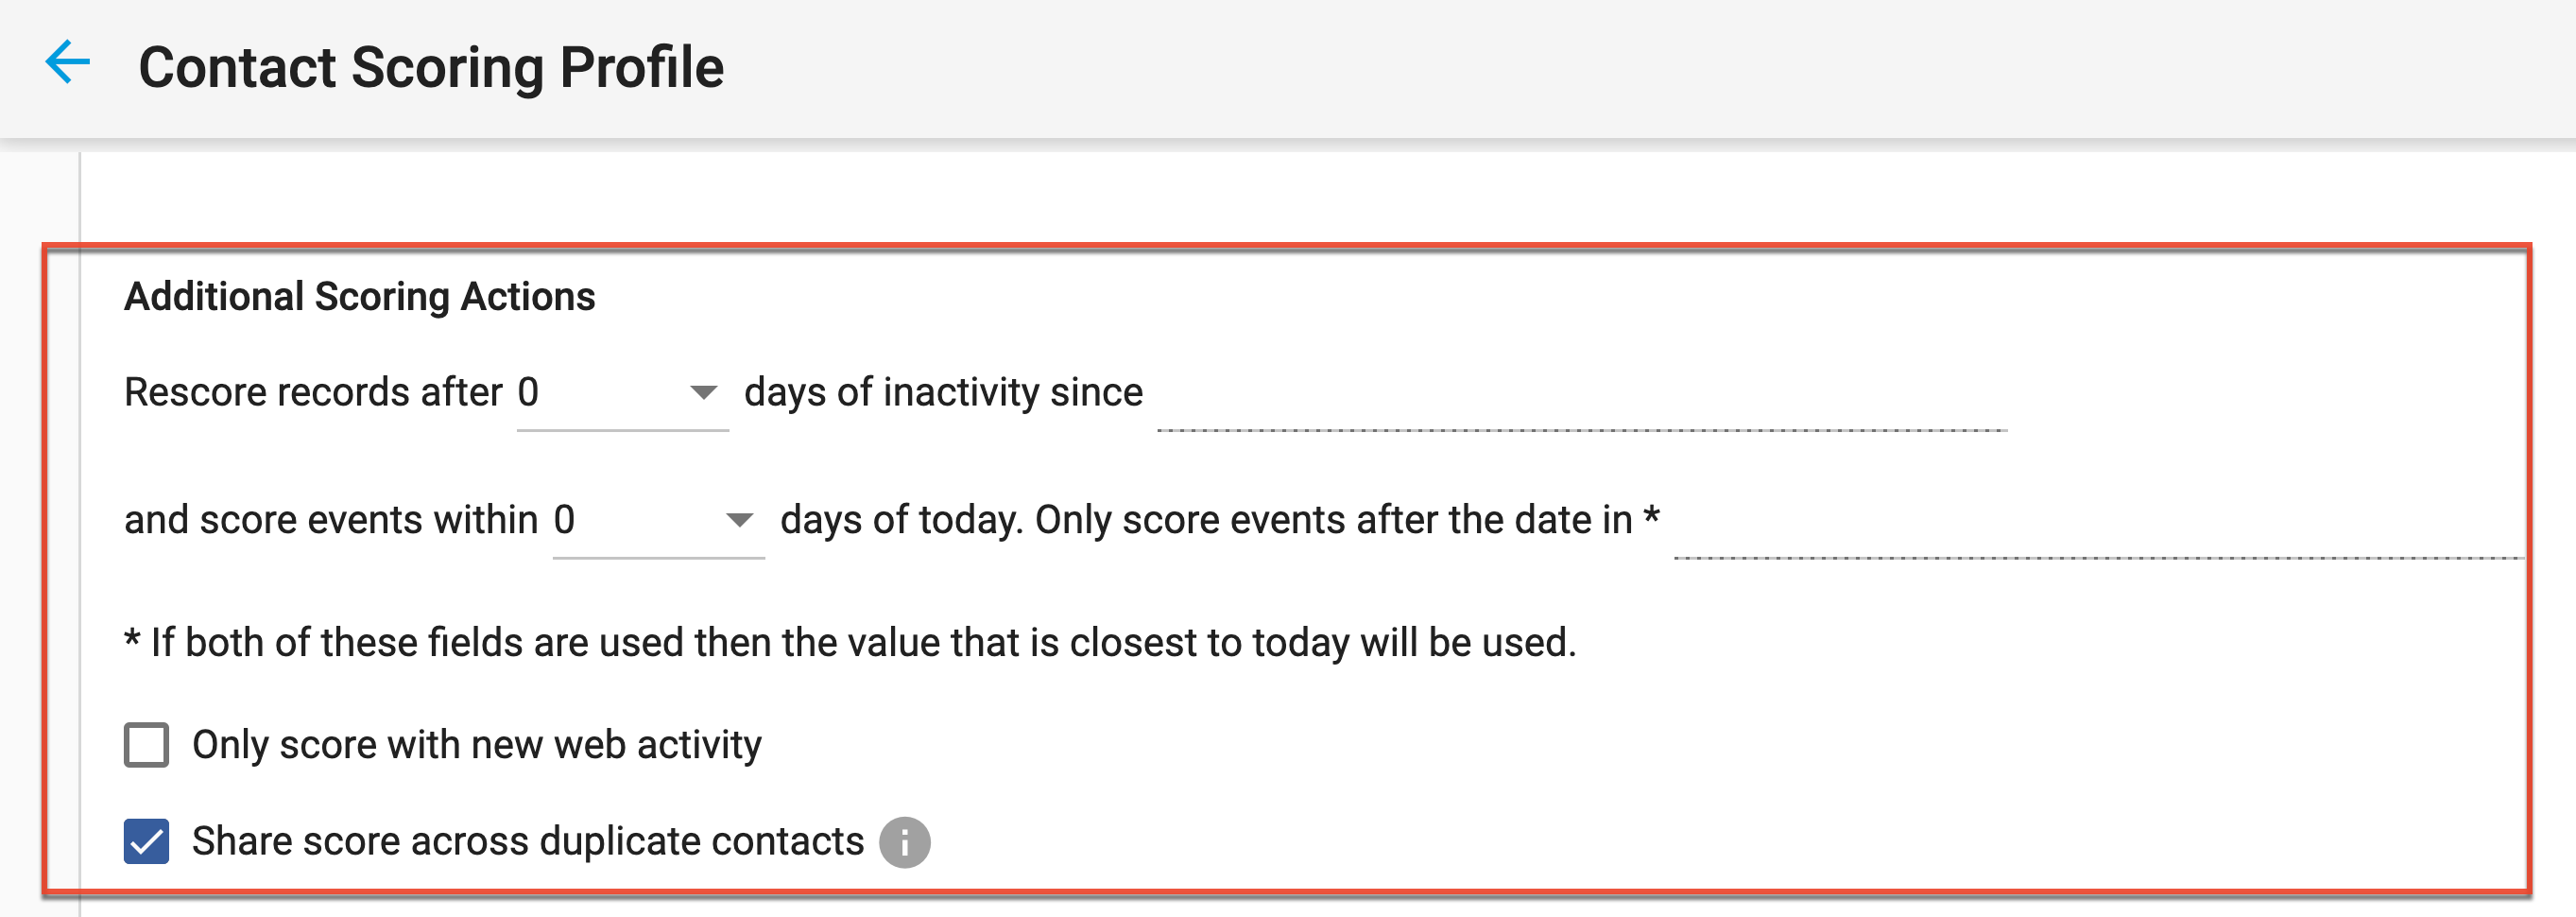
Using Additional Scoring Actions
Additional Scoring Actions allow you to ensure your leads are actively engaged with your content by identifying time parameters for specific scoring activities, which can ultimately degrade scores as leads become inactive over time with your marketing efforts. In the absence of Additional Scoring Actions, the profile score will remain the same regardless of the leads' inactivity duration. The fields in this section of the scoring profile are not required but are recommended.
| Field | Description |
|
"Rescore records after" and "days of inactivity since" |
In the first set of fields in the Additional Scoring Actions section, you identify the number of days of inactivity before the record will begin to rescore. The number of days identified in the "Rescore records after" field alerts Sugar Market to evaluate the value identified in "Days of inactivity since" on a daily basis. If the date for a record's scoring activity becomes older than the "Days of inactivity since" minus the number of days selected (e.g. 1/30/2020 minus 90 days), the activity will not be scored. This continues every night until the record has a score of 0, and then the record will not be scored until there is a new positive score. Using the default SalesfusionLastActivity field in "Days of inactivity since" is recommended, which includes web hits, email opens/clicks, event activity, form submission, and landing page visits. You can, however, select an alternate field here, if desired. |
| "and score events within" | The number of days in the "Score events within" field identifies how many days in the past Sugar Market will evaluate activity. If any scorable actions occur outside of the selected value, they will not be included in the updated score. This means the score may be deprecated for activities that were previously included in the score but now fall outside of the defined settings. For example, if "Score events within" is set to 60 and a contact received 20 points for a form submission 61 days ago, Sugar Market will degrade the contact's score by 20 points. Consider your sales cycle when determining the number of days for this setting, using the length of time before your sales team determines a lead to be dead as a guide. |
| "Only score events after the date in" | You can optionally select a date field for "Only score events after the date in" to take precedence over the scoring history window identified in "Score events within". This is typically a custom field, such as a renewal date. If the value set in "Score events within" is less than the scoring history length, then the scoring profile will use this date field instead. If a value is set in both "Score events within" and "Only score events after the date in", then the value that is closest to the current date will be used. |
| "Only score with new web activity" | Enable this setting if you want this scoring profile to only be scored when new web activity occurs. Otherwise, a re-score will not occur and any manual re-score attempts will not attempt to calculate any scoring actions at all - always resulting in zero. |
| "Share score across duplicate contacts" | If duplicate contacts exist in Sugar Market, determined by the same email address, then the score is applied to all records when this setting is enabled. When disabled, only the first record with the same email address Sugar Market encounters will be scored. |
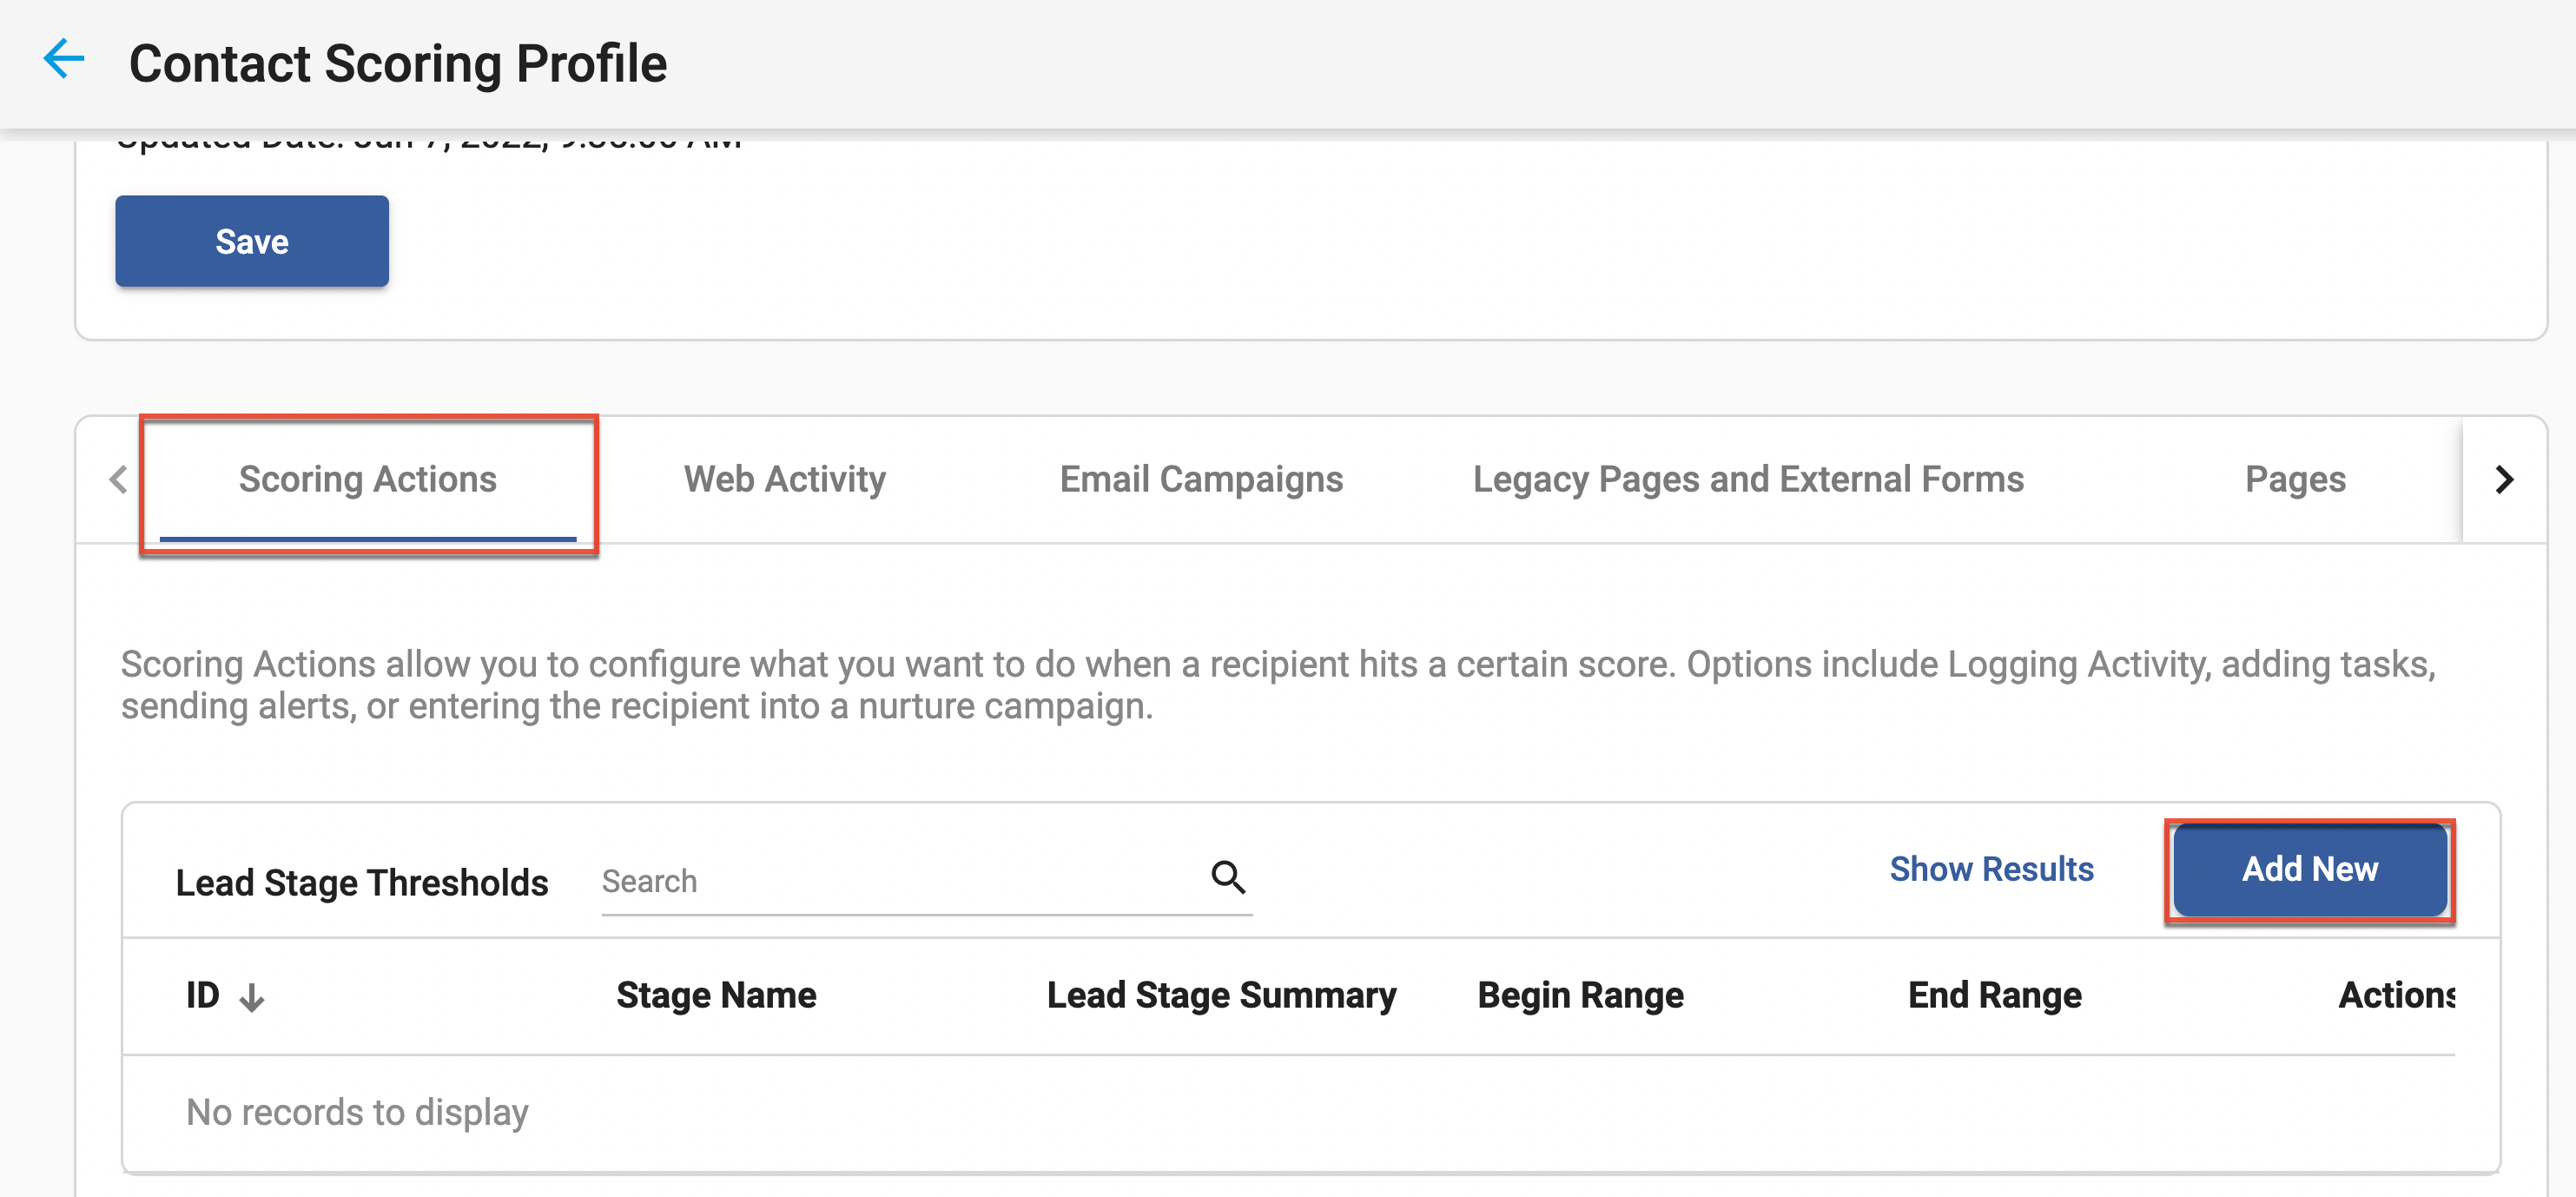
Defining Lead Stages
After defining the scoring profile, you define the scoring actions that will occur when a lead reaches a specific threshold. You first create a lead stage, assign a point range, and then select scoring actions to associate with the stage. You can use an unlimited number of lead stages within a scoring profile. A common grouping for leads stages is by temperature (hot, warm, cold). We recommend you plan your stages out fully before setting them up in Sugar Market. The threshold range should be proportionate to the point values you assign to each category. It is better to set your thresholds larger and points smaller since they add up quickly. While thresholds can be updated if they are not working to meet your needs, it is better to adjust points instead, so you do not have to retrain your sales team on modified thresholds.
To define a lead stage for a scoring profile:
- On the Scoring Actions tab, click the Add New button to create a new lead stage.
- In the Stage Name field, identify a descriptive name for the stage (e.g. Cold Leads).
- In the Lead Stage Summary field, either copy and paste the stage name, provide more detail to describe the stage (e.g. low engagement), or leave blank. When mapping the lead stage summary to a CRM field (as set in Step 3 of Defining the Scoring Profile), then the value you identify here will map to the record's description field.
- In the Begin Range field, identify the minimum number of points required for a contact to qualify for the stage. The threshold minimum is 1 and the maximum is 999.
- In the End Range field, identify the maximum number of points allowed for a contact to qualify for the stage. The threshold minimum is 1 and the maximum is 999. The highest recommended point value for an individual activity is 20. Keep this in mind when setting the end range to allow contacts to move through to the next threshold when they are active, while not advancing them to the next threshold too quickly if they are not ready.
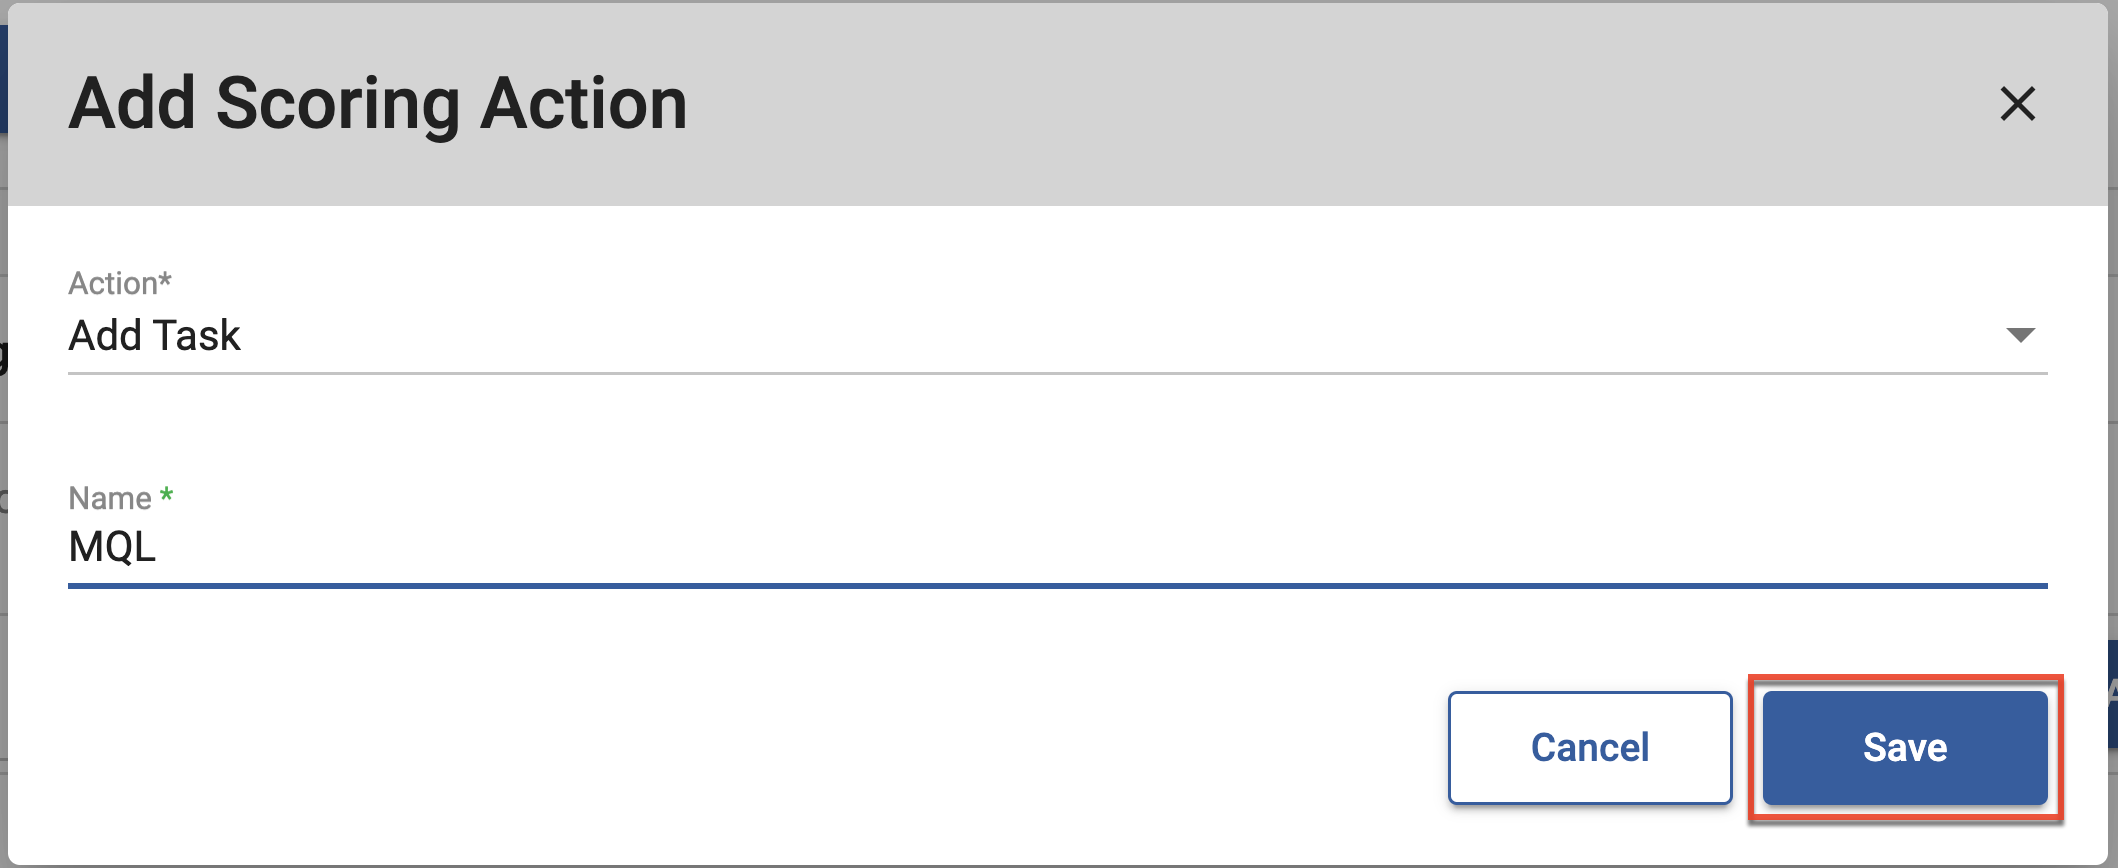
- In the Profile Scoring Actions section, click the Add New button to assign an action to automatically occur when a contact enters this stage. Please refer to the Scoring Actions table for descriptions of each action. You can set as many actions as you want for each stage or set no actions at all. We recommend you set actions for at least one stage to get the full benefit of lead scoring's powerful automation.
- Complete any qualifying fields shown in this dialog to further define the action (e.g. the specific nurture name and step), and then click the Save button in the Add Scoring Action dialog.
- In the Profile Scoring Actions section, click the Add New button to assign additional profile scoring actions as needed.
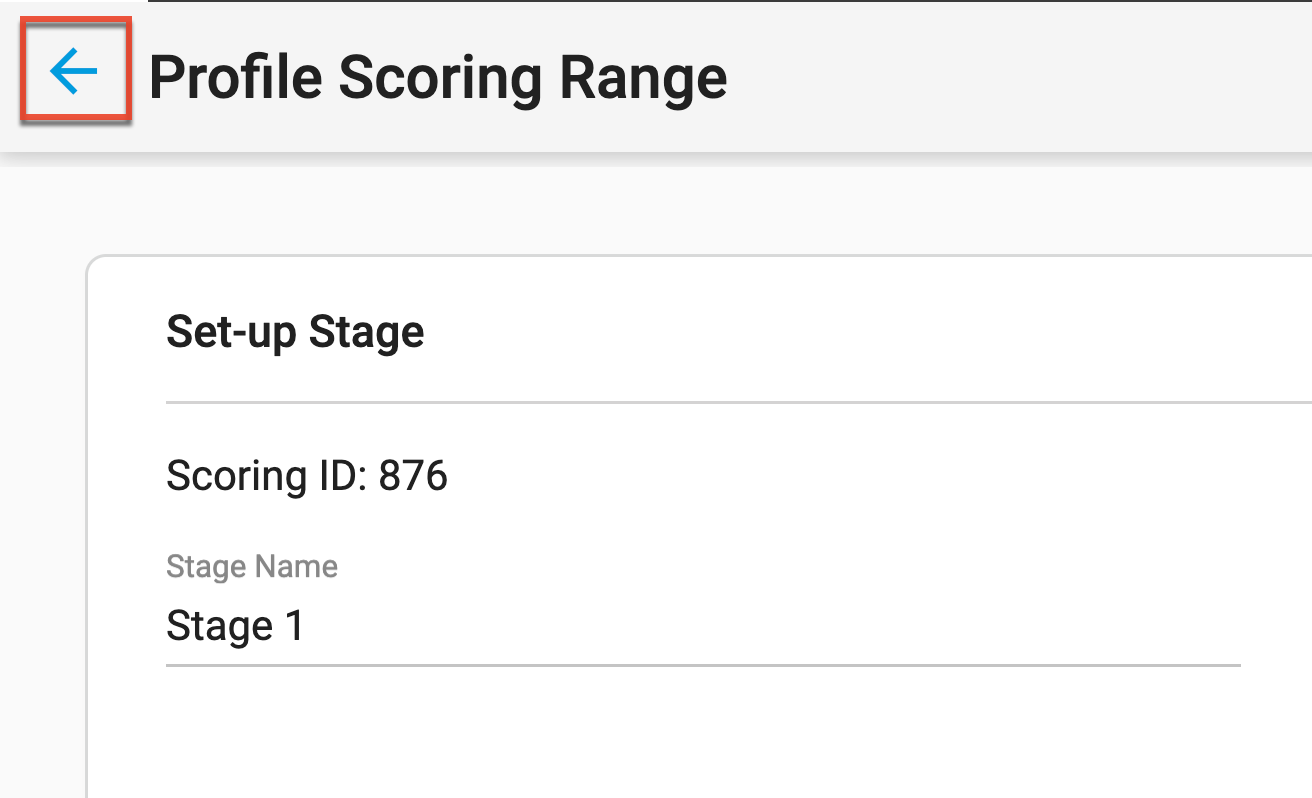
- In the Set-Up Stage section, click the Save button to save the lead stage.
- Click the back arrow at the top of the Profile Scoring Range page to return to the Contact Scoring Profile page. The Lead Stage Thresholds section of the scoring profile is populated with the lead stages you created.
- Repeat this process for all stages to be included in the scoring profile (e.g. "Warm Leads", "Hot Leads"), and then click the Save button within the Set-Up Profile section to save the contact scoring profile.
Scoring Actions
The following describes the actions to occur when a contact meets the lead stage threshold defined in the scoring profile. You can choose one or several actions for each lead stage threshold.
| Action | Description |
| Add Lead to External CRM |
Adds a new lead record in Sugar Market and your external CRM. If the lead already exists (based on the email address), then a new lead will not be created in the CRM. If the email address does not exist in the CRM, then a flag is set to add the lead to the CRM. |
| Push to External CRM | Alerts Sugar Market to update an existing record in the external CRM. This does not create a new record. When assigning this action, ensure your sync permissions are configured in your CRM sync settings. Please refer to the Sugar Market CRM Integration Guide for more information on sync settings. |
| Update Contact / Lead | Updates a field for the contact or lead based on the selected template. If the template does not exist, then create a template with the "Update Contact" type. This also creates or updates the contact record in the external CRM. |
| Add Task | Creates a new Task record in Sugar Market and in the external CRM, the task is assigned to the contact owner and logged in the Contact record. If a follow-up task with the title "Score Follow-up" already exists, then the task will not be created. If the desired task does not already exist in the Name dropdown list, create a new task template. |
| Add Opportunity |
Creates a new Opportunity record in Sugar Market and the external CRM and assigns it to the account owner. If the opportunity already exists for the given email address, then a new opportunity will not be created. Use the Opportunity Scoring Template to pre-populate the fields of the opportunity. Note: In Sugar Market and Salesforce, an Opportunity record is created at the account level while in Microsoft Dynamics, an Opportunity record is created at the contact/lead level. |
| Add to Distribution List | Adds the lead to the selected distribution list. |
| Add To Nurture | Adds the lead to the nurture identified in the Name field, at the location identified in the Add to Step field, unless the recipient already exists in the nurture or is on an exclude list. |
| Add to Nurture 2 | Adds the lead to the nurture identified in the Name field, at the location identified in the Add to Step field, unless the recipient already exists in the nurture or is on an exclude list. |
| Remove from Distribution List | Removes the lead from the selected distribution list. |
| Remove from Nurture | Removes the lead from the selected nurture. |
| Remove from Nurture 2 | Removes the lead from the selected nurture. |
| Send Email | Adds the leads to a trigger email, email, or drip email. If the lead is already a member of the selected email, they will not be added.
|
| Send Score Alert | An alert will be sent to the contact owner each time the score group is triggered through a scoring routine. You need to build your own template for this alert since it is based on Alert Templates, which automatically appends a subject line "Score Contact (or Lead) Alerts." The Send Score Alert in the action threshold sends up to one time per day if a recipient performs an action that triggers a rescore (opening/clicking an email, filling out a landing page). This occurs on opens, clicks, and landing page completes even if you are not specifically scoring these actions. |
| Alert User | Sends a copy of the entry and/or exit alert that the contact owner receives to the user identified in the Name field. This action requires an Alert Template. |
| Alert Role | Sends a copy of the entry and/or exit alert that the contact owner receives to the role identified in the Name field. This action requires an Alert Template. |
| Alert Geo | Sends a copy of the entry and/or exit alert that the contact owner receives to the Geo identified in the Name field. This action requires an Alert Template. |
Identifying Activity Points
After defining the scoring profile and defining lead stages, set rules that identify the points to be assigned to each activity. Activity points, managed within the tabs at the bottom of the scoring profile, are grouped into the following areas:
Setting Web Activity Scoring Rules
Use web activity scoring to assign points according to your leads' specific actions on your website and forms, or by the breadth and duration of their web activity sessions. Your web tracking script must be embedded in all pages where you want to track activity.
You can set web activity scoring rules in two ways, each working independently of each other:
- Scoring Details: Identify scoring by individual pages and forms.
- Web Page Properties Scoring: Identify scoring by web sessions.
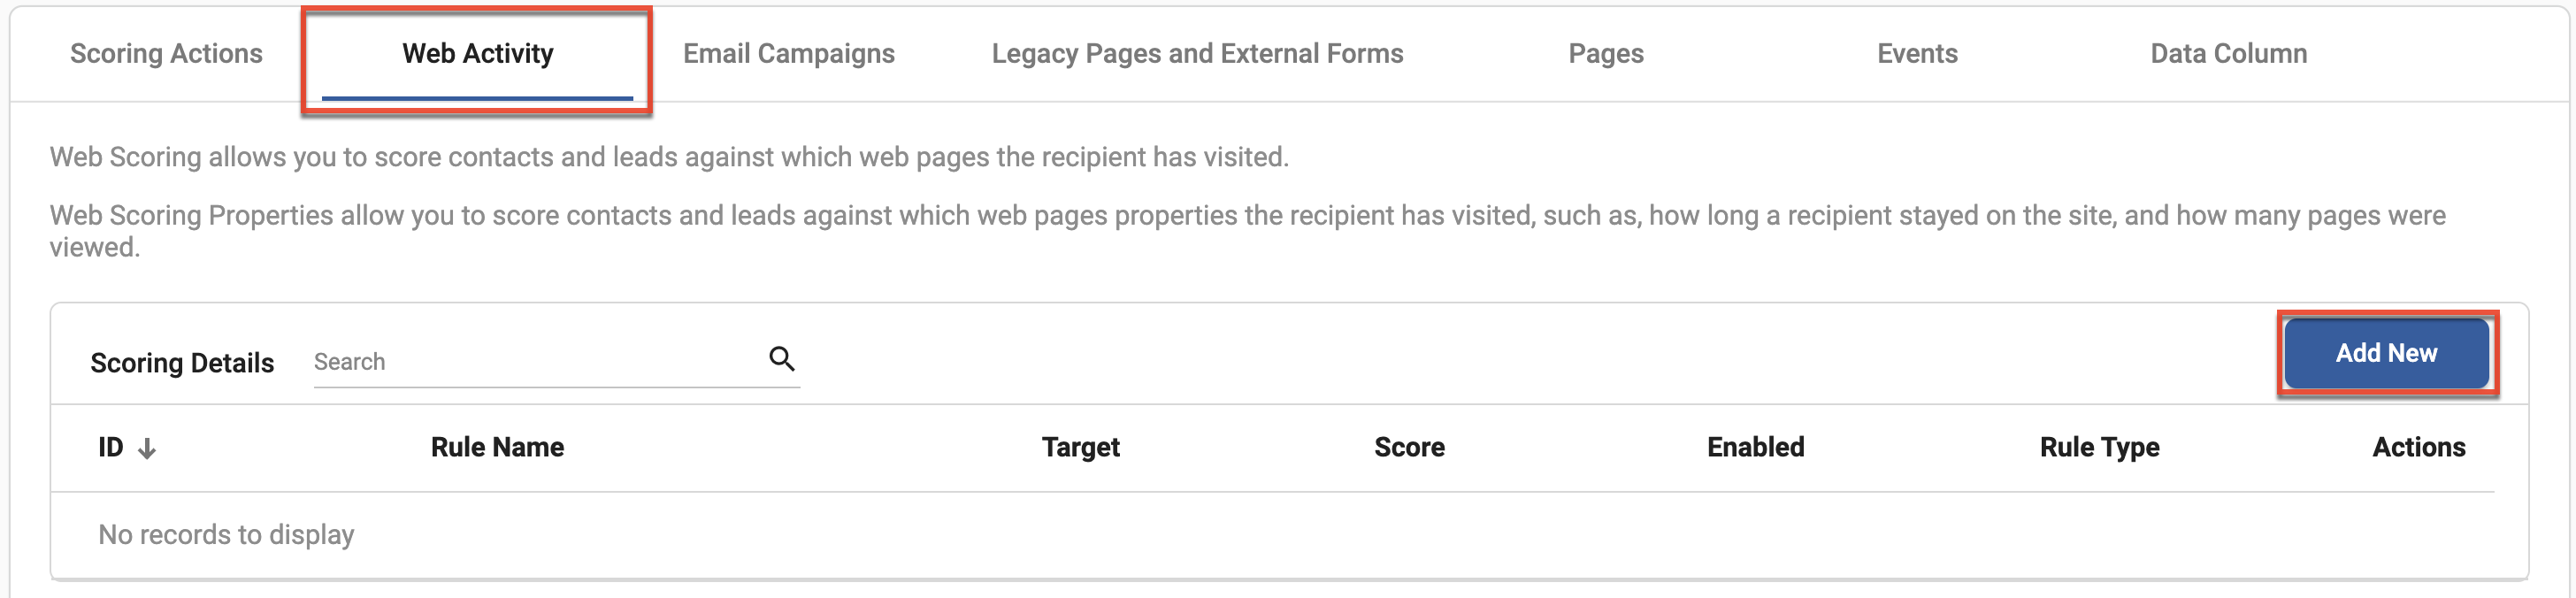
Scoring Details
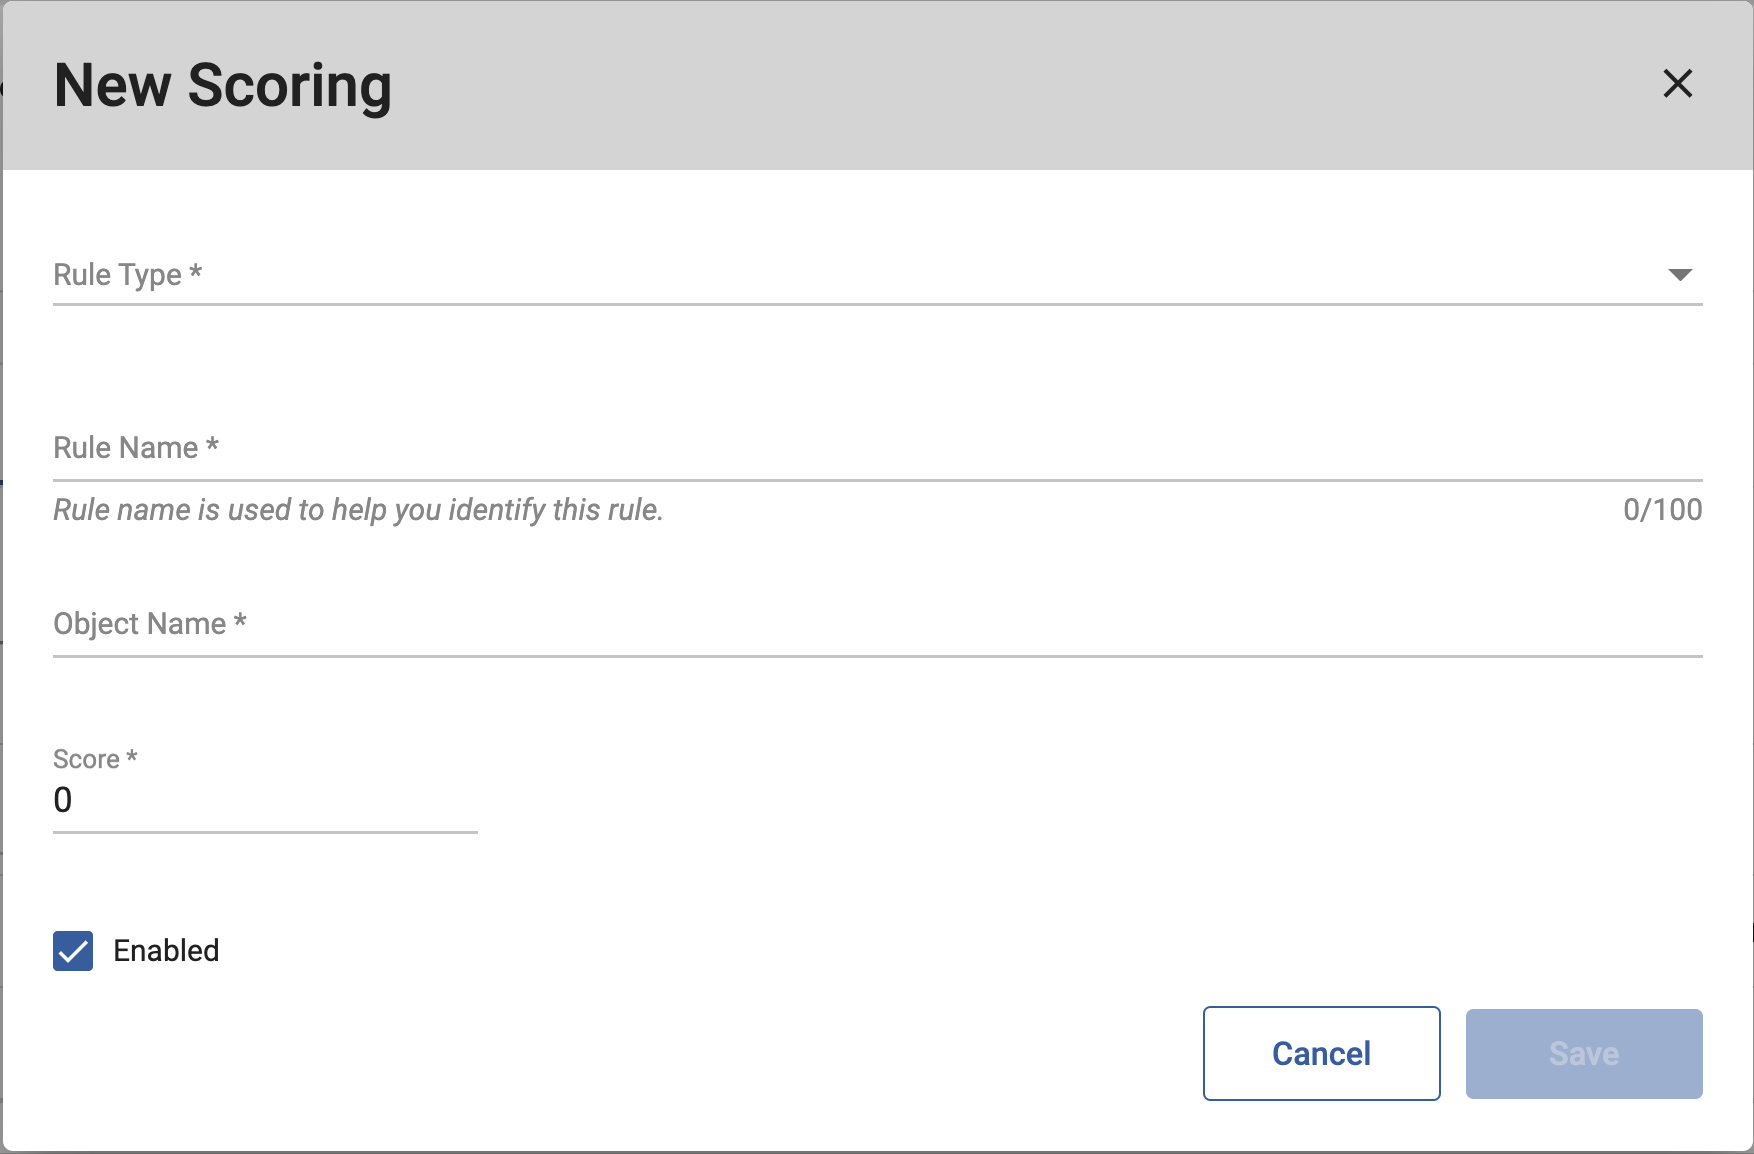
To set up scoring for individual web pages or forms:
- In the Scoring Details section of the Web Activity tab, click the Add New button to create a new scoring rule.
- Complete the following fields, and then click the Save button:
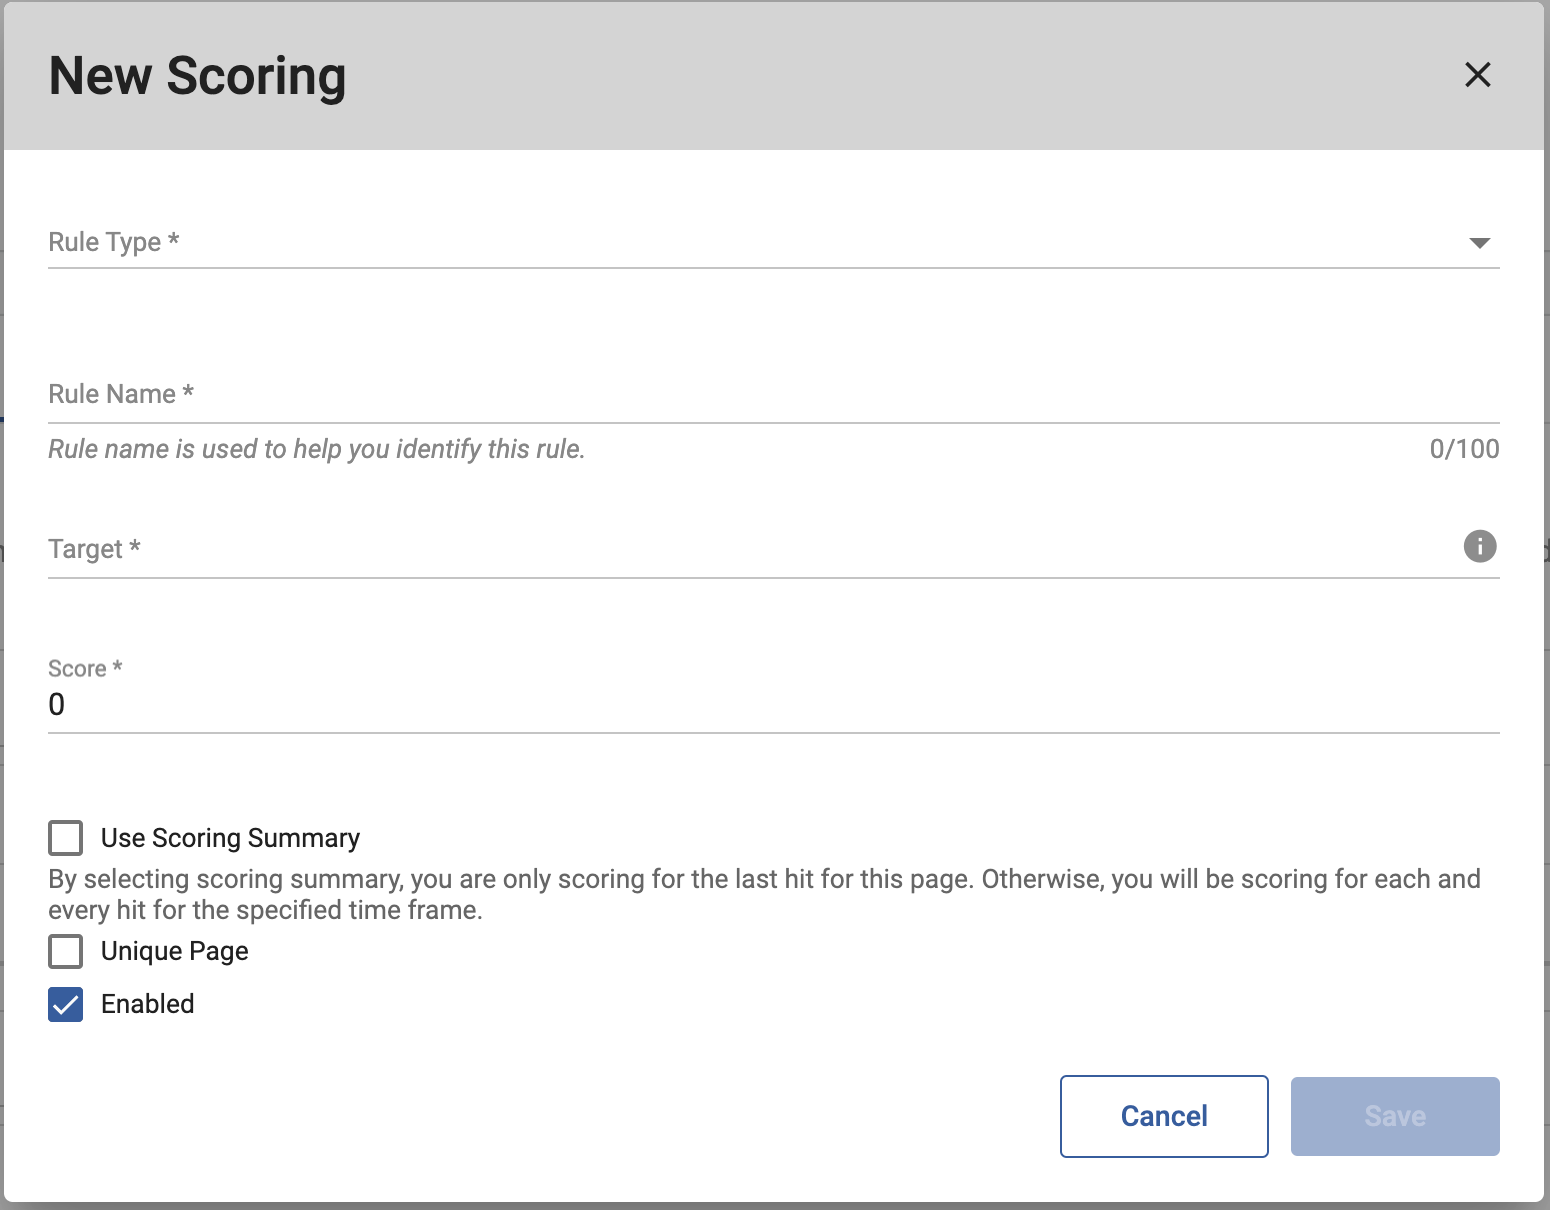
- Rule Type: Classification that defines the rule.
- Target Page: Awards points when contacts visit a page. For a specific page, identify the page URL in the Target field below (e.g. https://www.sugarcrm.com/why-sugar/). For any page on your site where your web tracking code exists, type "Any" in the Target field.
- Page Titles: Awards points when contacts visit a page that you identify by title, not page name as in the Target Page option. Identify the specific page title in the Target field below (e.g. CX, CRM & Marketing Automation Software Pricing | SugarCRM). The page title is what displays in the browser title or tab.
- Rule Name: Descriptive name for the rule that describes the specific target for scoring (e.g. Why Sugar - Main Website).
- Target: The specific location for the scoring action.
- If the selected Rule Type is "Page Titles", identify the page title in this field (what is displayed in a browser's title or tab).
- For all other rule types, identify the URL location of the page. If you are only using one web tracking script, only include the part of the address that comes after .com (e.g. /pricing.html). If using more than one script, then use the full URL.
- To award points for a visit to any page within a folder, type the folder location in this field (e.g. /solutions/) and ensure the Unique Page option below is disabled.
- To award points for a visit to any page on your website, type "Any" in this field (without the quotation marks).
- Score: The number of points to assign for each page visit. When assigning points, keep in mind the range you chose for your thresholds. Award the number of points based on the importance of the page hit for driving opportunities.
- Use Scoring Summary: When selected, points are only awarded one time when a contact visits the page. When not selected, the contact receives the number of points identified in the Score field every time they visit the page.
- Unique Page: When selected, points are only awarded if the contact navigated directly to URL identified in the Target field. When not selected, you can use the rule to award the same number of points for visits to any page within a group of pages that are contained within the same folder (e.g. /solutions/).
- Enabled: When selected, the rule is active.
- Rule Type: Classification that defines the rule.
- Click the Save button within the Set-Up Profile section to save your changes to the contact scoring profile.
Web Page Properties Scoring
To set up scoring for web sessions:
- In the Web Page Properties Scoring section of the Web Activity tab, click the Add New button to create a new scoring rule.
- Complete the following fields, and then click the Save button:
- Rule Type:
- Age of Relevance: This type is no longer in use.
- Single Session - Total Time: Awards points based on the total amount of time a lead spent visiting the website in one session.
- Single Session - Total Pages: Awards points based on the total number of pages a lead visited in one web session.
- Lifetime - Total Time: Awards points based on the total amount of time a lead spent visiting the website in all web sessions.
- Lifetime -Total Pages: Awards points based on the total number of pages a lead visited in all web sessions.
- Rule Name: Descriptive name for the rule that describes the specific target for scoring. This name automatically populates based on the selected Rule Type, but you can overwrite this name.
- Object Name: This field is dependent on the rule type selected. For example, if the Single Session-Total Time rule type is selected this field would be used to define the amount of time that needs to be met to trigger the scoring rule.
- Score: The number of points to assign for the activity selected in the Rule Type field. When assigning points, keep in mind the range you chose for your thresholds. Award the number of points based on the importance of the page hit for driving opportunities.
- Enabled: When selected, the rule is active.
- Rule Type:
- Click the Save button within the Set-Up Profile section to save your changes to the contact scoring profile.
Setting Email Activity Scoring Rules
Use email activity scoring to assign points according to your leads' engagement with single emails or nurtures.
You can set email activity scoring rules in four ways, each working independently of each other:
- Campaign Score: Identify scoring based on opens/clicks in a specific email.
- Generic Campaign Scoring: Identify scoring based on opens/clicks in any email sent through Sugar Market.
- Campaign Click-Through Score: Identify scoring based on specific clicks in an email.
- Wildcard Campaign Score: Identify scoring based on opens/clicks in any email using a wildcard keyword in the email name.
Campaign Score
To set up scoring for a specific email:
- In the Campaign Score section of the Email Campaigns tab, click the Add New button.
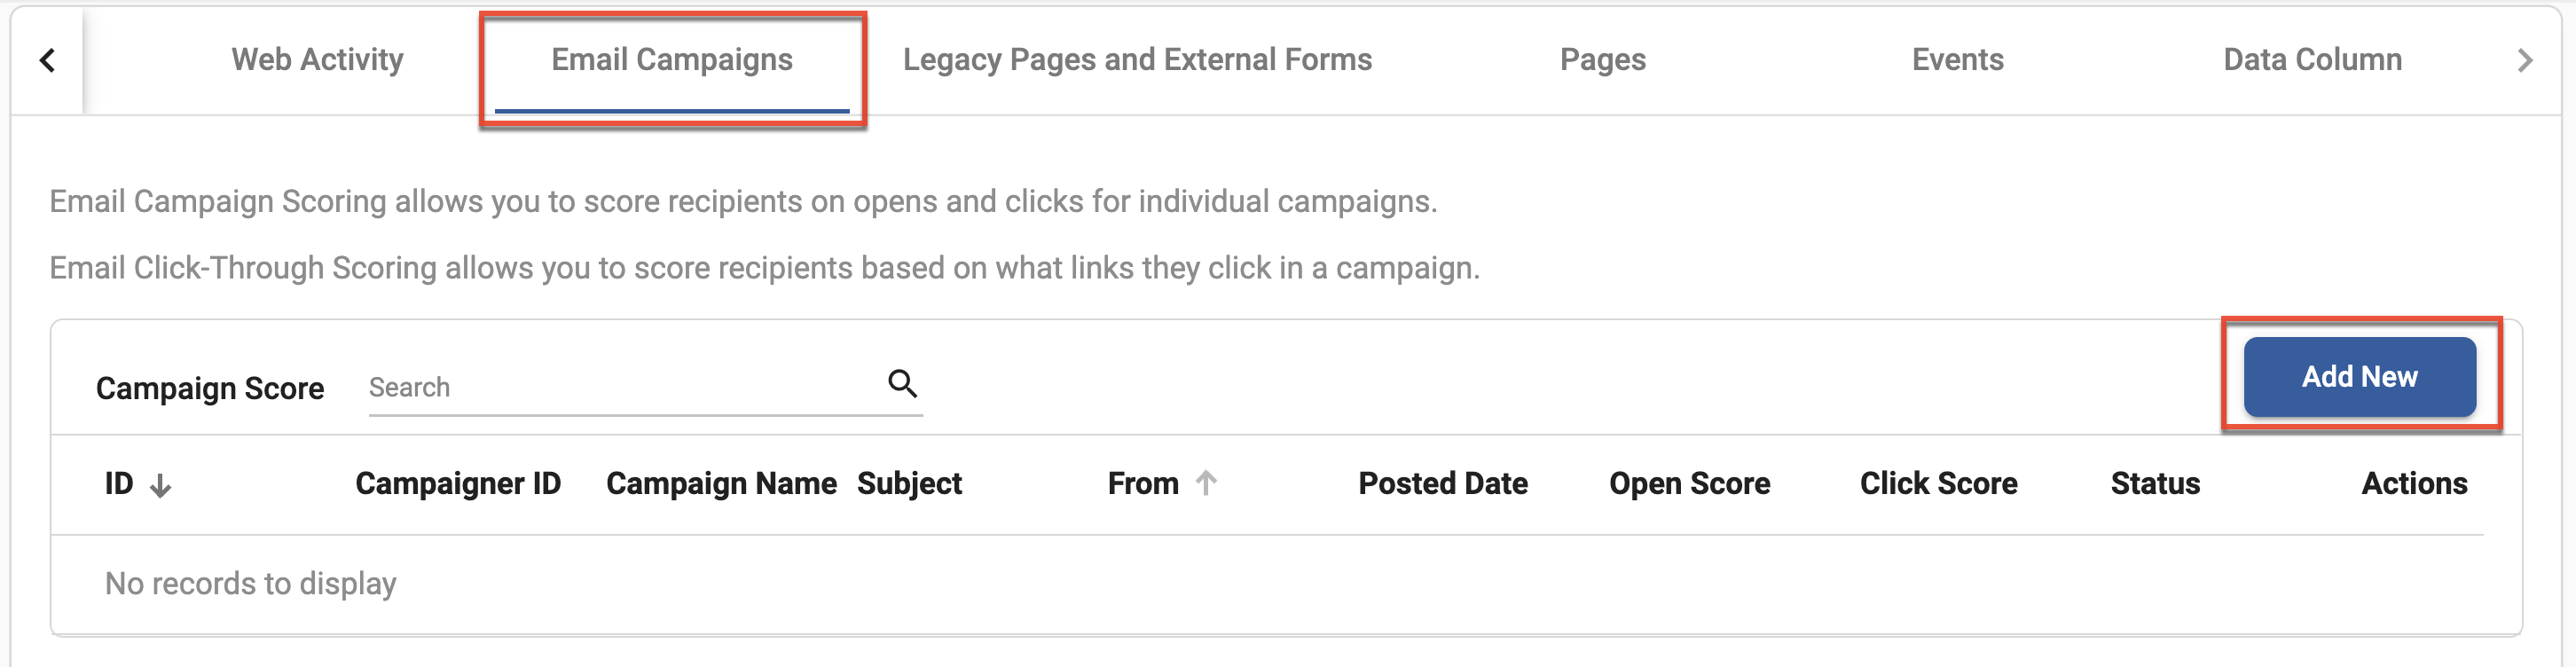
- Complete the following fields, and then click the Save button:
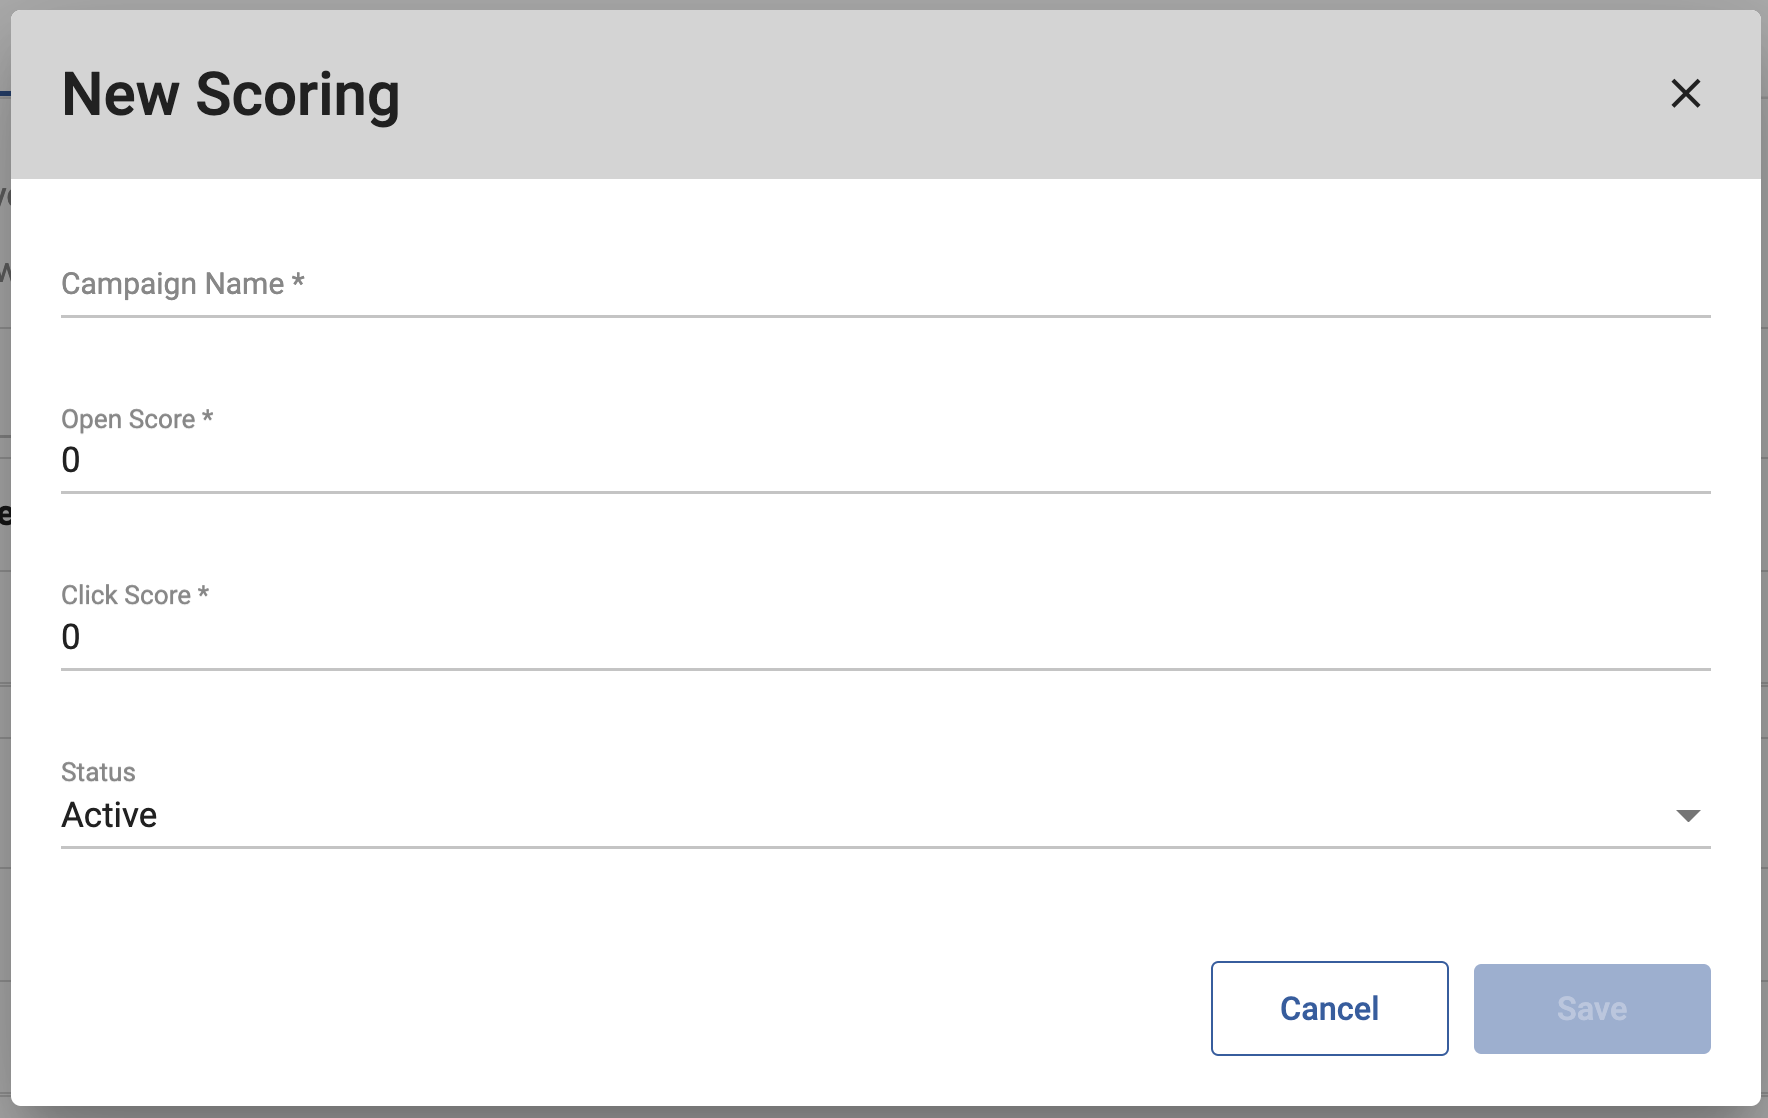
- Campaign Name: The name of the email for which open or click points will be awarded. All emails in Published or Draft status are included in this dropdown.
- Open Score: The number of points to award when a lead opens the email.
- Click Score: The number of points to award when a lead clicks any link in the email.
- Status: Whether the rule is Active or Inactive.
- Click the Save button within the Set-Up Profile section to save your changes to the contact scoring profile.
Generic Campaign Scoring
To set up scoring for any email:
- In the Generic Campaign Scoring section of the Email Campaigns tab, click the Add New button.
- Complete the following fields, and then click the Save button:

- Rule Type: Classification that defines the rule. While you can create both click rules and open rules, you need to follow this process once for each rule.
- Click Rule: Award points when a lead clicks any link in an email.
- Open Rule: Award points when a lead opens any email.
- Rule Name: Descriptive name for the rule that describes the specific target for scoring (e.g. Fall NE promo clickthroughs).
- Score: The number of points to assign for the activity selected in the Rule Type field. When assigning points, keep in mind the range you chose for your thresholds. Award the number of points based on the importance of the email open or click for driving opportunities.
- Target: This field is populated with "Any" since you are defining a generic email scoring rule, and cannot be edited.
- Use Scoring Summary: If checked, a contact can score a total of two activity points across all emails. If unchecked, a contact can score up to two activity points for each email. Points are scored if any email is opened and or clicked.
- Enabled: When selected, the rule is active.
- Rule Type: Classification that defines the rule. While you can create both click rules and open rules, you need to follow this process once for each rule.
- Click the Save button within the Set-Up Profile section to save your changes to the contact scoring profile.
Campaign Click-Through Score
To set up scoring for specific clicks in a email:
- In the Campaign Click-Through Score section of the Email Campaigns tab, click the Add New button.
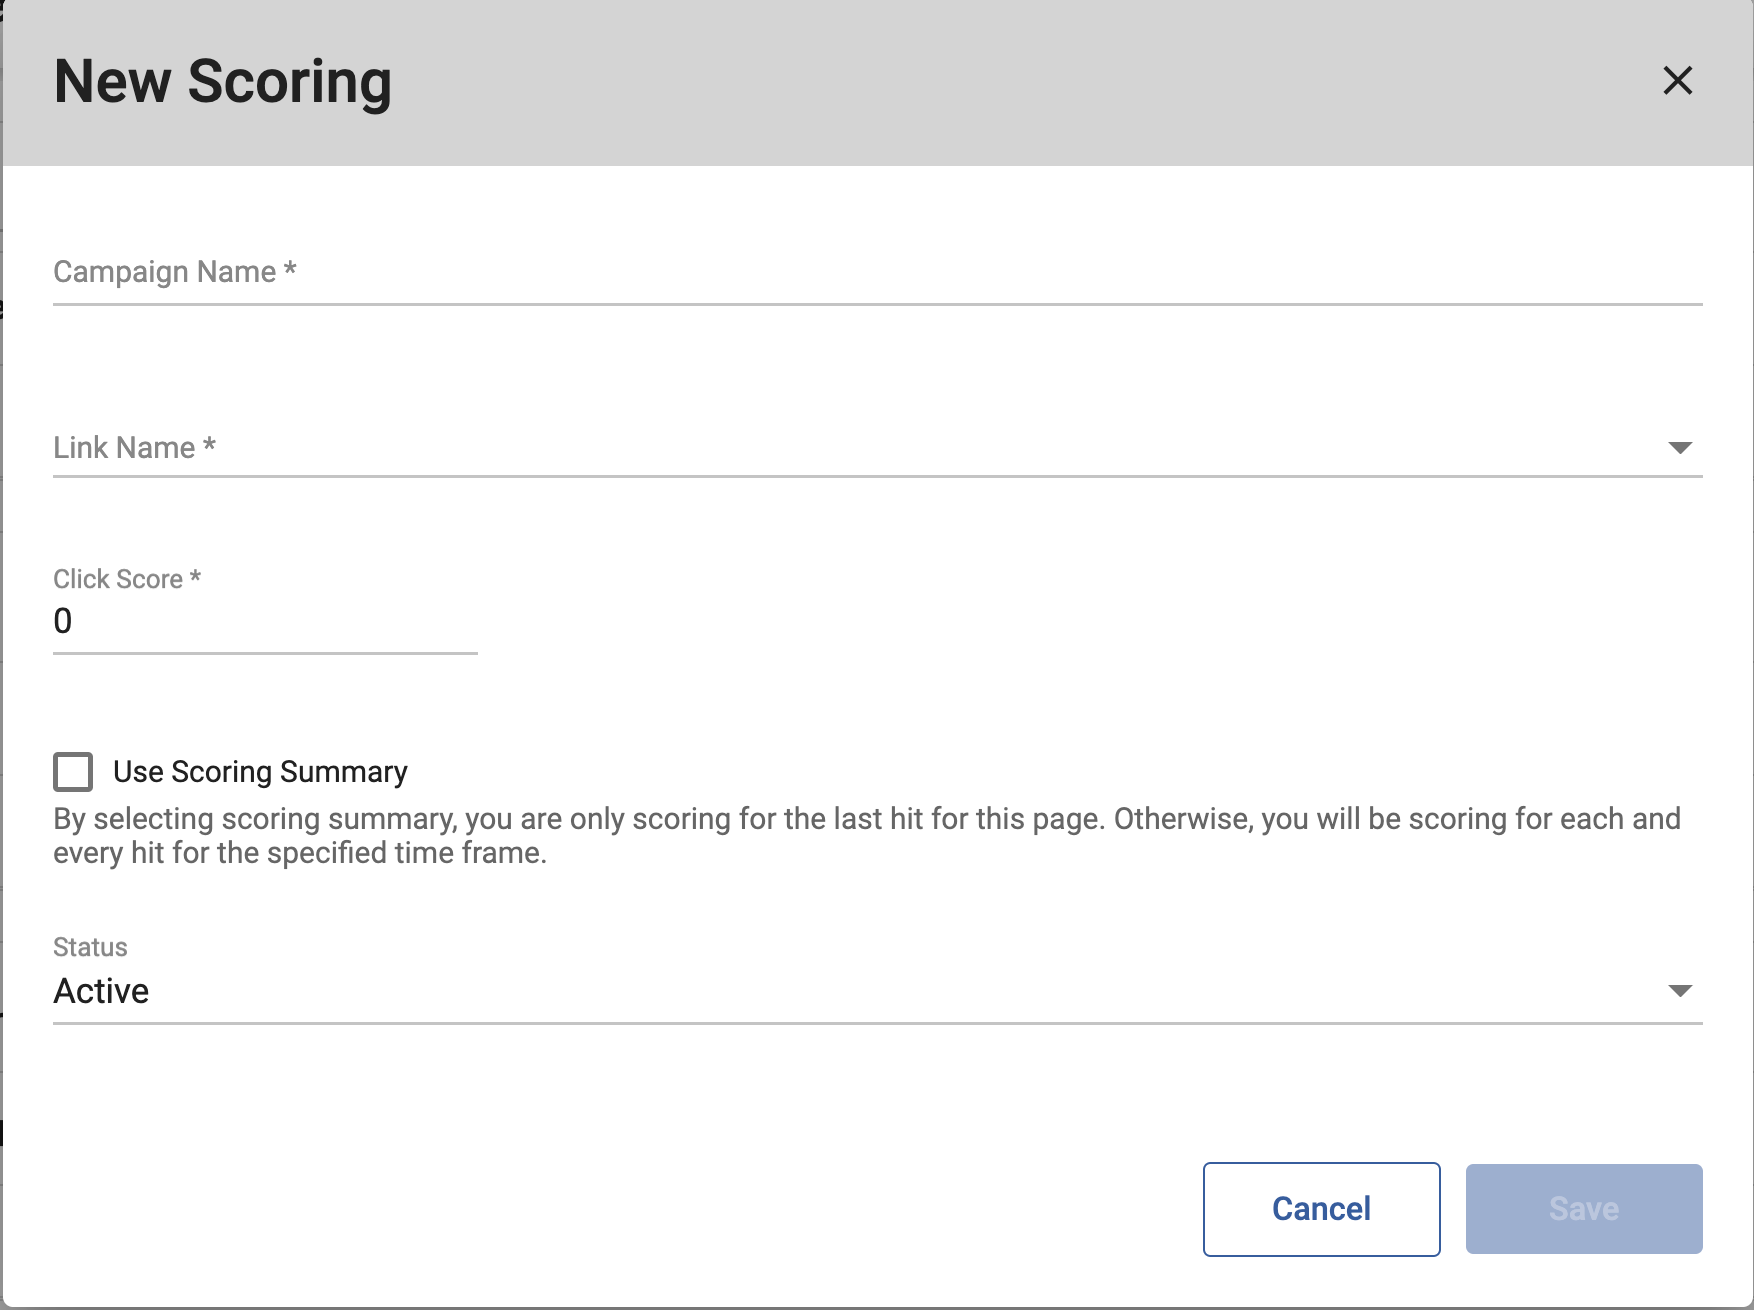
- Complete the following fields, and then click the Save button:
- Campaign Name: The name of the email for which click points will be awarded. All emails in Published or Draft status are included in this dropdown.
- Link Name: The name of the link in the email the lead must click to be awarded the points designated in the Click Score field.
- Click Score: The number of points to award when a lead clicks the specified link in the email.
- Use Scoring Summary: When selected, points are only awarded the first time a lead clicks the link. When not selected, the lead receives the number of points identified in the Click Score field every time they click the link.
- Status: Whether the rule is Active or Inactive.
- Click the Save button within the Set-Up Profile section to save your changes to the contact scoring profile.
Wildcard Campaign Score
To set up scoring for any email using wildcard keywords:
- In the Wildcard Campaign Score section of the Email Campaigns tab, click the Add New button.
- Complete the following fields, and then click the Save button:
- Rule Type: Classification that defines the rule.
- Clicks - Campaign Wildcard: Award points when a lead clicks any link in an email name that matches the identified wildcard.
- Opens - Campaign Wildcard: Award points when a lead opens any email in an email name that matches the identified wildcard.
- Rule Name: Descriptive name for the rule that describes the specific target for scoring (e.g. All 2020 promotions).
- Target: The wildcard used to select the emails with which to associate points for the scoring action (e.g. %promo%). Keywords must be surrounded by the % symbol, and multiple keywords must be separated by the % symbol.
- Score: The number of points to assign for the activity selected in the Rule Type field. When assigning points, keep in mind the range you chose for your thresholds. Award the number of points based on the importance of the email open or click for driving opportunities.
- Use Scoring Summary: When selected, points are only awarded one time when a contact visits the page. When not selected, the contact receives the number of points identified in the Score field every time they visit the page.
- Enabled: When selected, the rule is active.
- Rule Type: Classification that defines the rule.
- Click the Save button within the Set-Up Profile section to save your changes to the contact scoring profile.
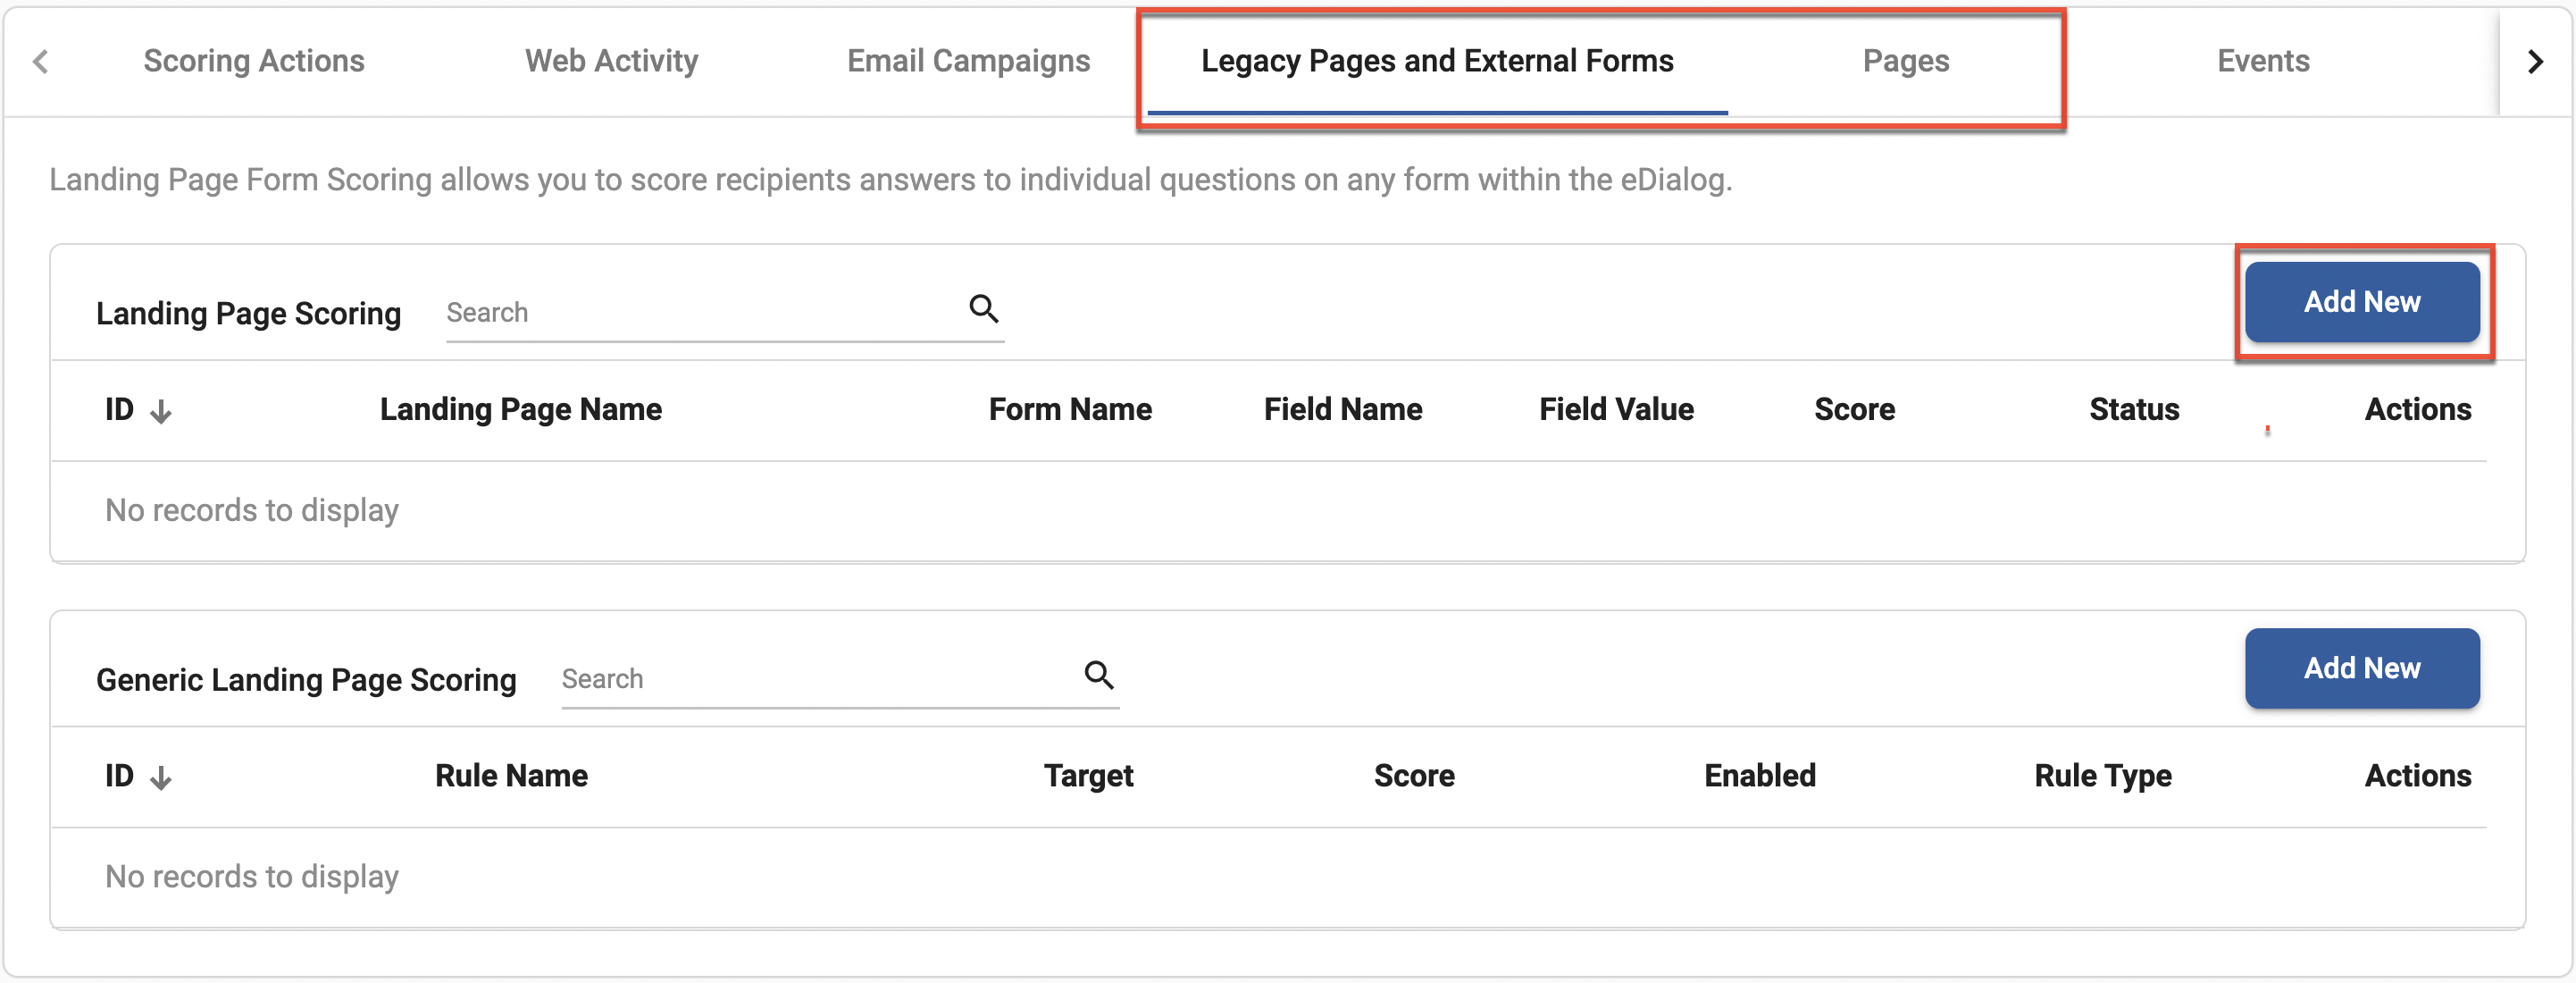
Setting Landing Page Activity Scoring Rules
Use landing page activity scoring to assign points according to your leads' engagement with your landing pages and forms.
Landing page activity is defined on two separate tabs: Legacy Pages and External forms for legacy pages, and Pages for pages built with Page Builder. Since the process for setting up scoring rules is the same for both types of pages, they are grouped together in the following sections.
Page Scoring
To set up scoring for a specific page:
- In the Page Scoring section of the Legacy Pages and External Forms or Pages tab, click the Add New button.
- Complete the following fields, and then click the Save button:
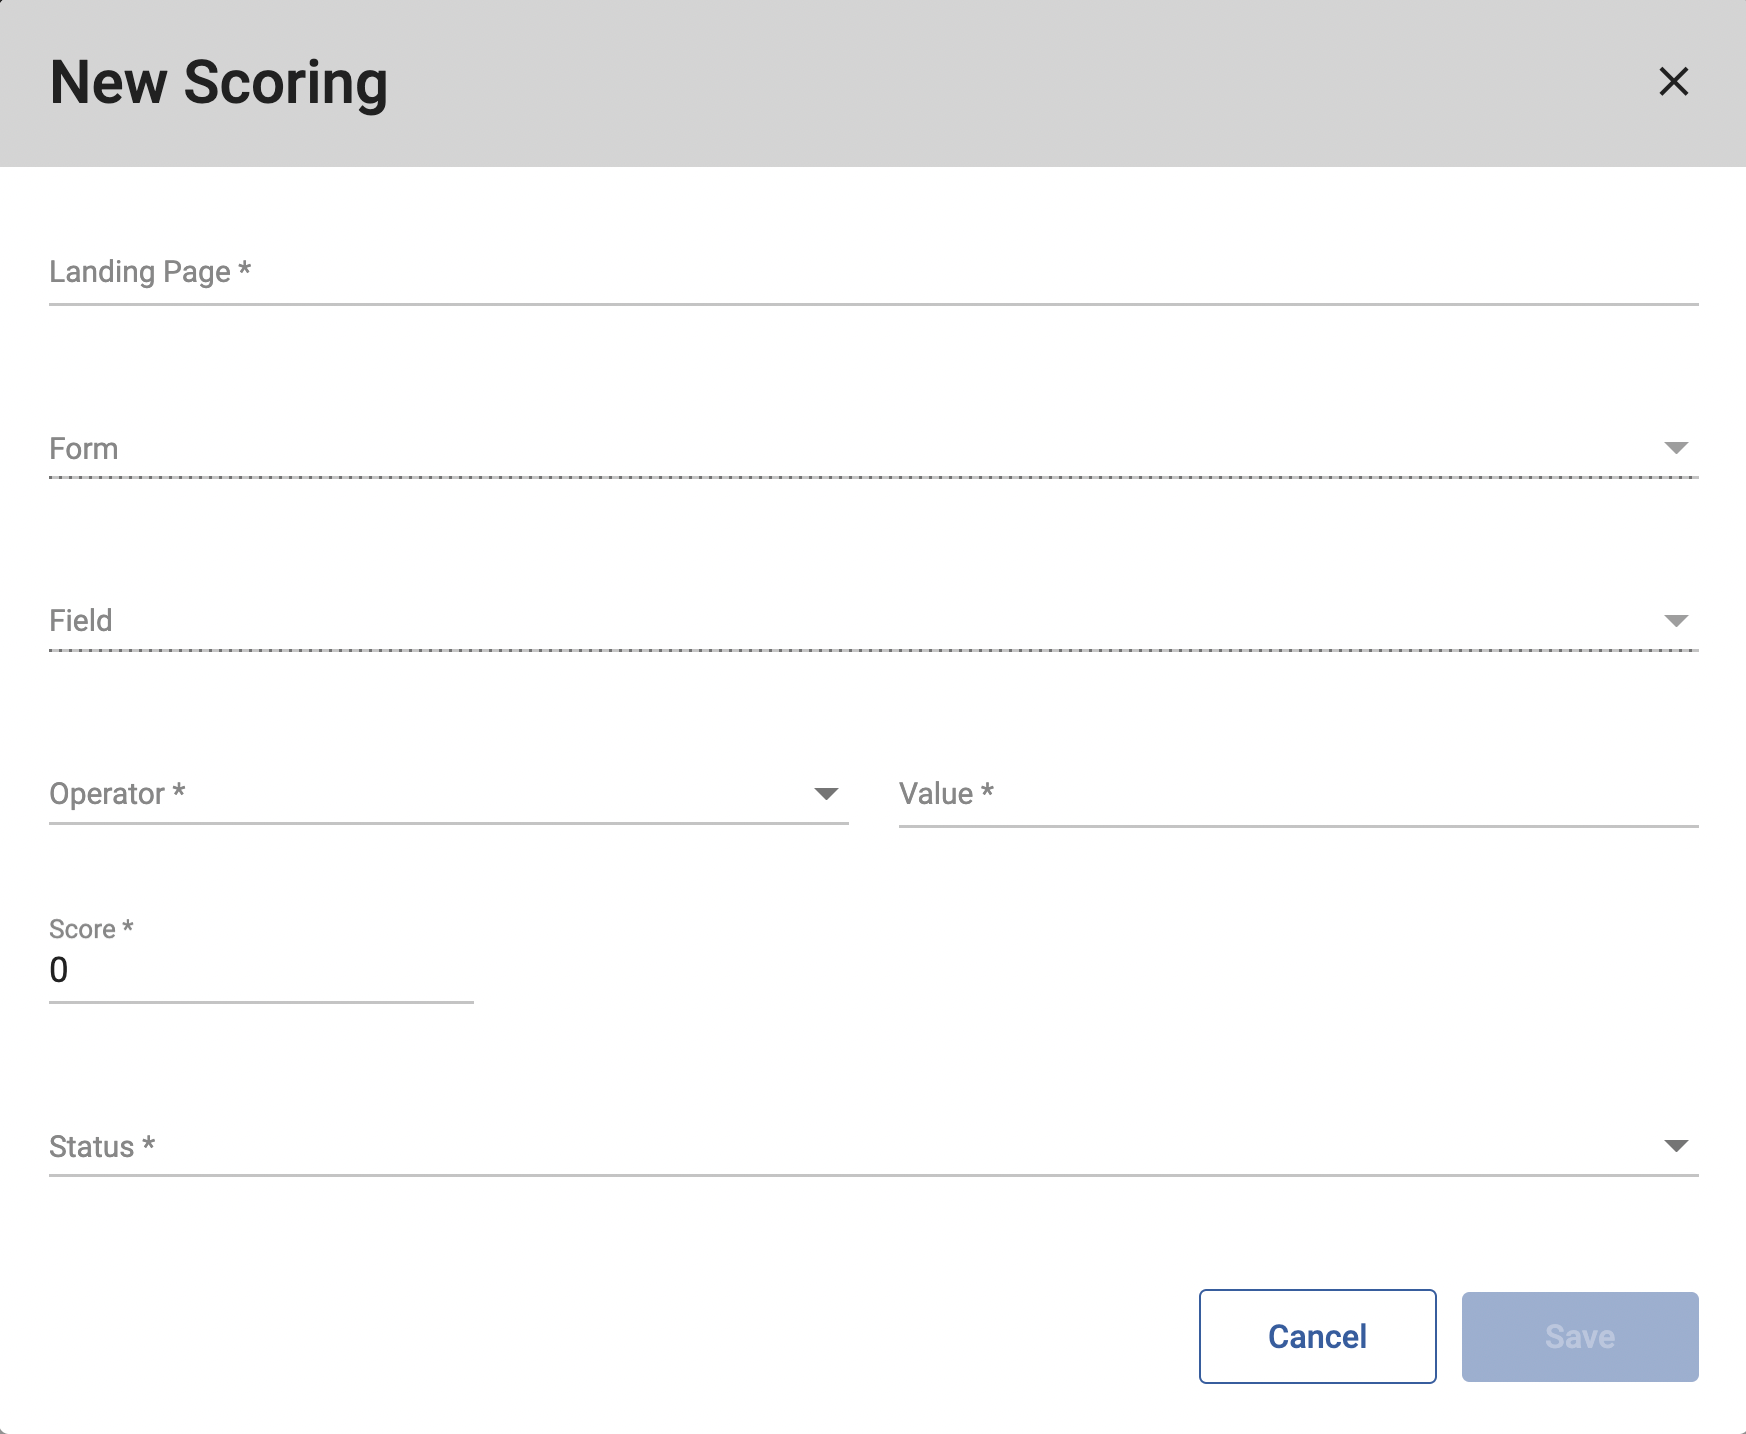
- Landing Page: Specific name of the landing page on which to base the score.
- Form: Name of the form on which to base the score.
- Field: Fields you want to evaluate on the selected form.
- Operator / Value: First select the operator from the dropdown list, and then identify the value to match in the second field. For multi-select fields, available values are included in the dropdown list.
- Score: The number of points to assign when the field matches the designated value.
- Status: Whether the rule is Active or Inactive.
- Click the Save button within the Set-Up Profile section to save your changes to the contact scoring profile.
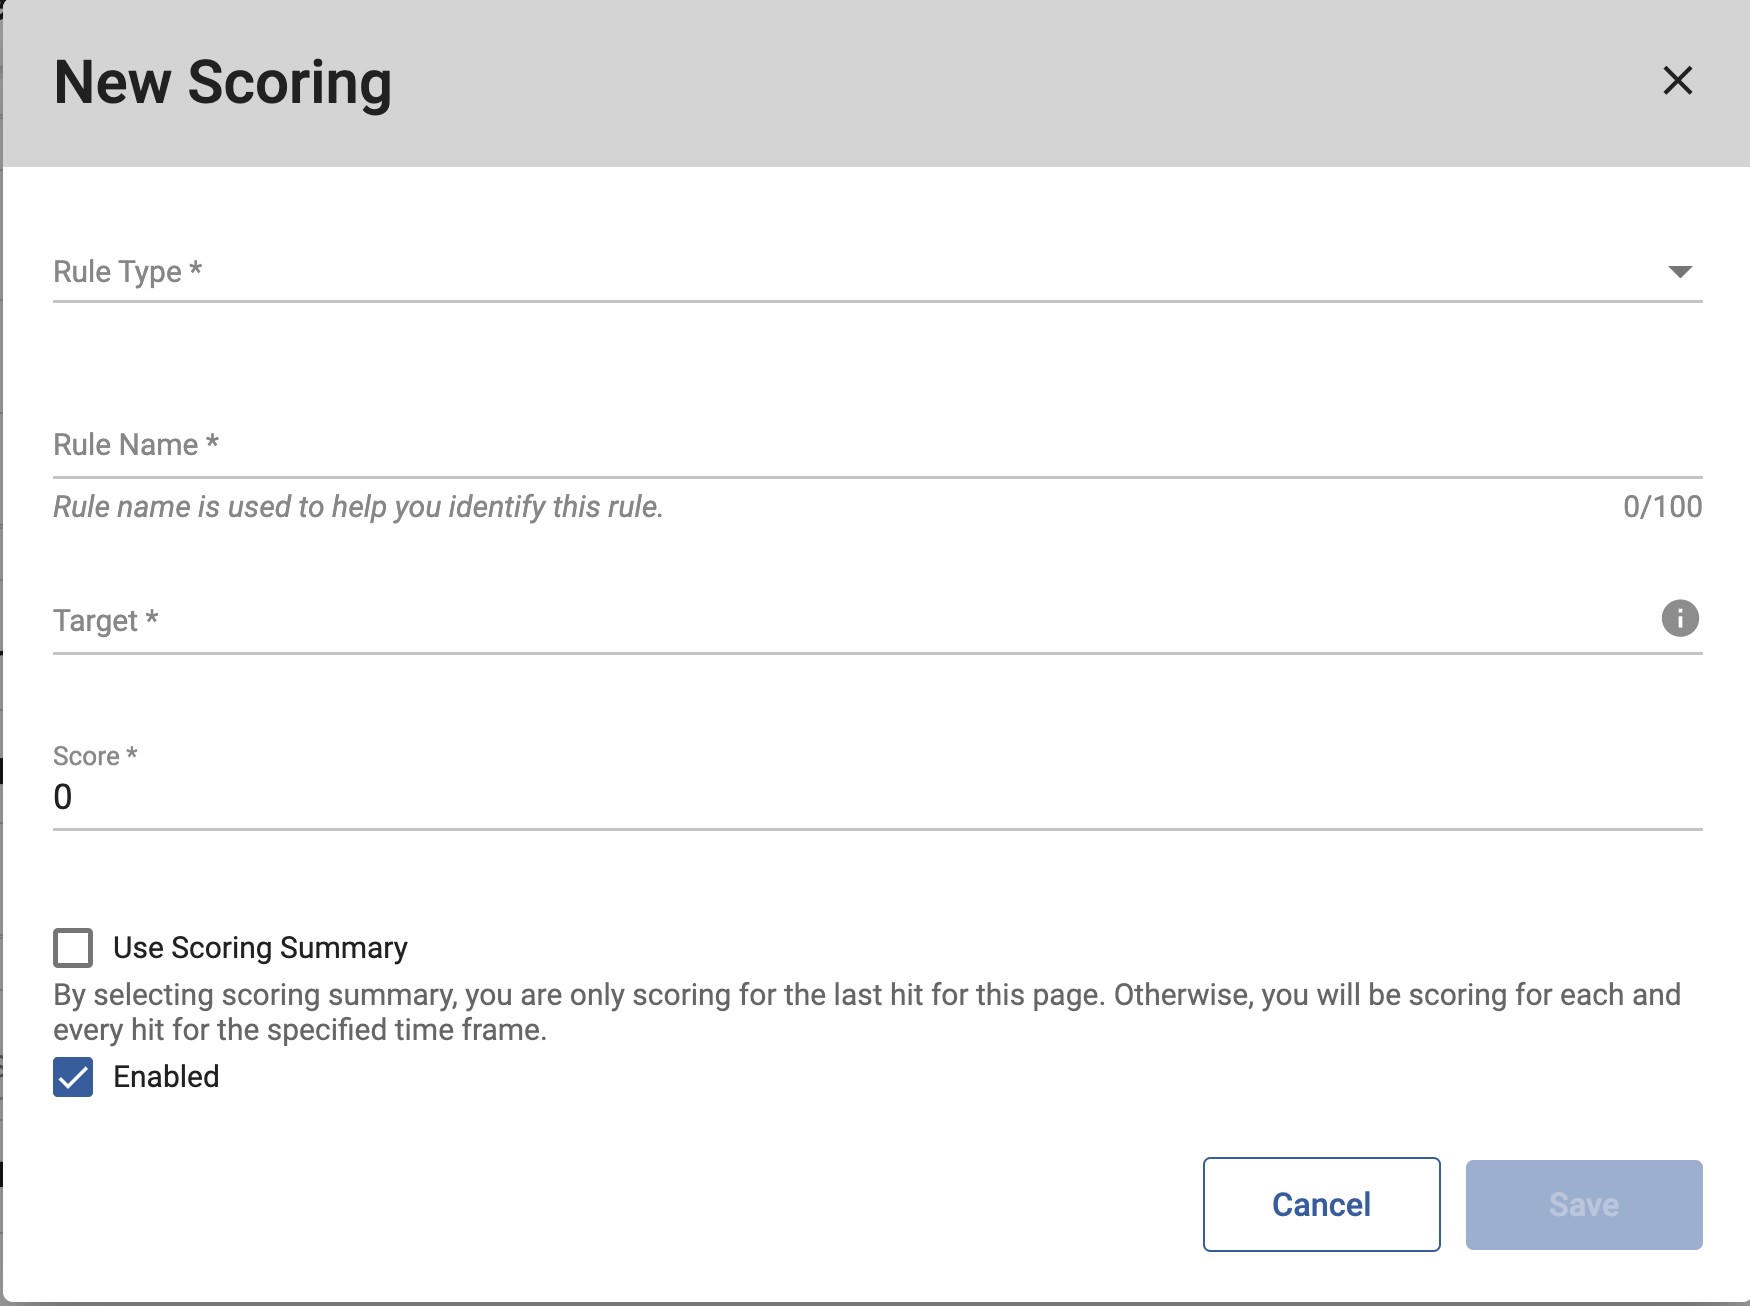
Generic Page Scoring
To set up scoring for a specific page:
- In the Generic Page Scoring section of the Legacy Pages and External Forms or Pages tab, click the Add New button.
- Complete the following fields, and then click the Save button:
- Rule Type: Classification that defines the rule.
- Started: Award points when a lead starts any page.
- Completed: Award points when a lead completes any page.
- Rule Name: Descriptive name for the rule that describes the specific target for scoring.
- Target: This field is populated with "Any" since you are defining a generic scoring rule, and cannot be edited.
- Score: The number of points to assign for the activity selected in the Rule Type field. When assigning points, keep in mind the range you chose for your thresholds. Award the number of points based on the importance of the email open or click for driving opportunities.
- Use Scoring Summary: When selected, points are only awarded one time when a contact visits the page. When not selected, the contact receives the number of points identified in the Score field every time they visit the page.
- Enabled: When selected, the rule is active.
- Rule Type: Classification that defines the rule.
- Click the Save button within the Set-Up Profile section to save your changes to the contact scoring profile.
Setting Event Scoring Rules
Use event activity scoring to assign points according to your leads' engagement with your Sugar Market events.
You can set event activity scoring rules in three ways, each working independently of each other:
- Event Scoring: Identify scoring based on a specific event registration and attendance.
- Generic Event Scoring: Identify scoring based on any event registration and attendance.
- Wildcard Events Score: Identify scoring based on engagement with any event using a wildcard keyword in the event name.
Event Scoring
To set up scoring for a specific event:
- In the Event Scoring section of the Events tab, click the Add New button.
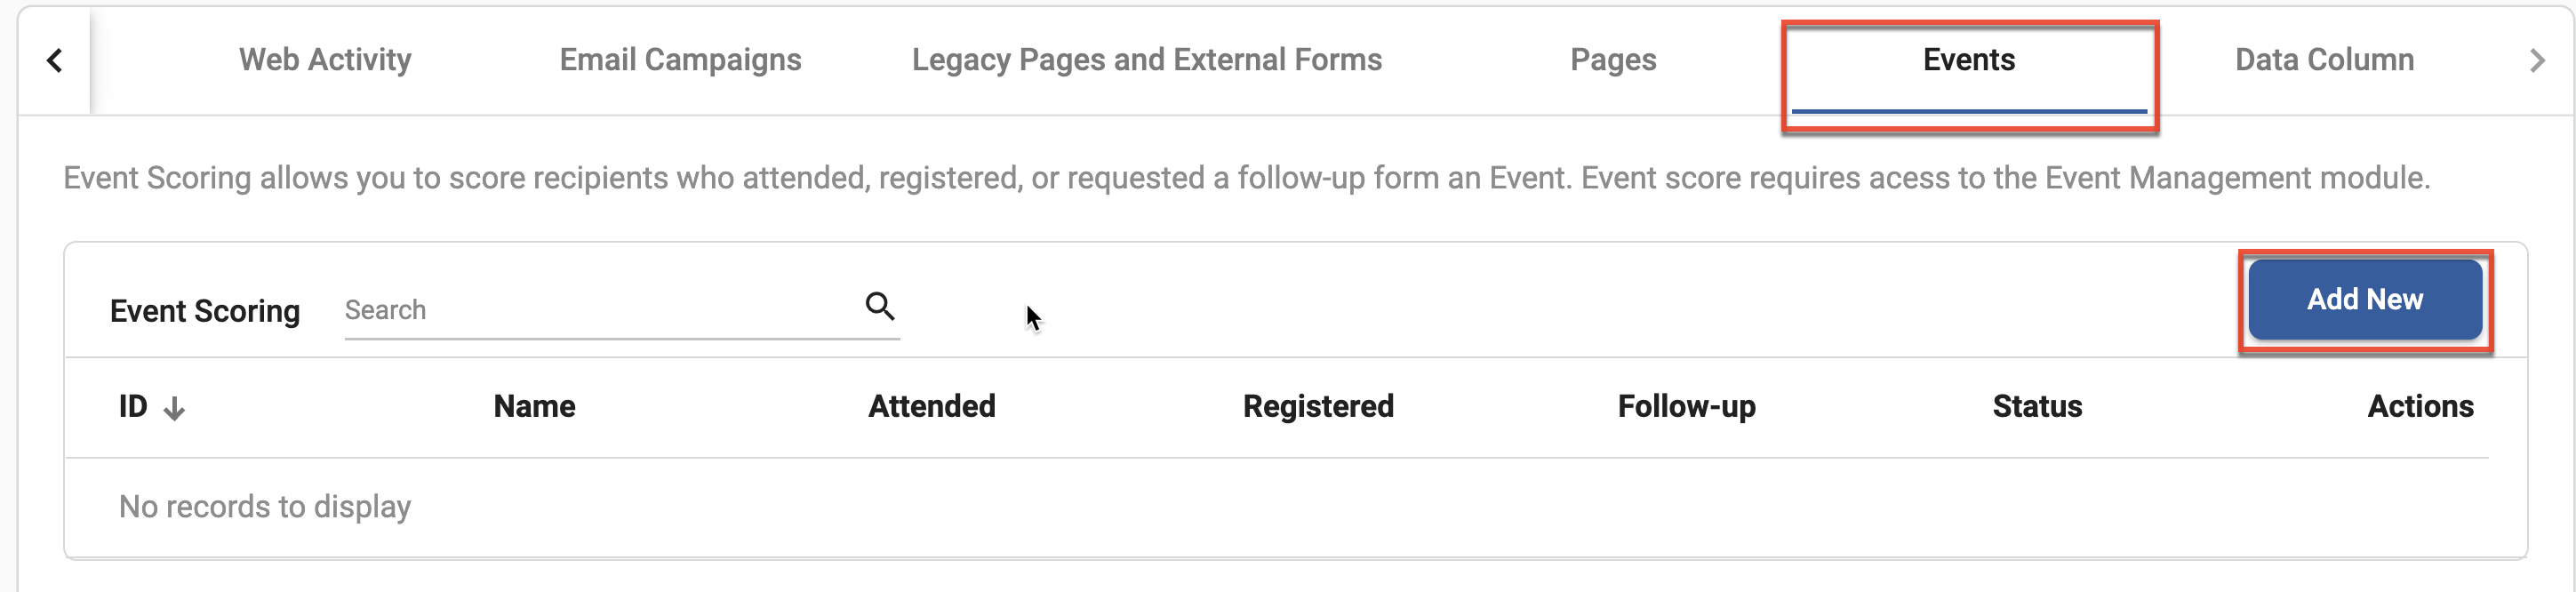
- Complete the following fields, and then click the Save button:
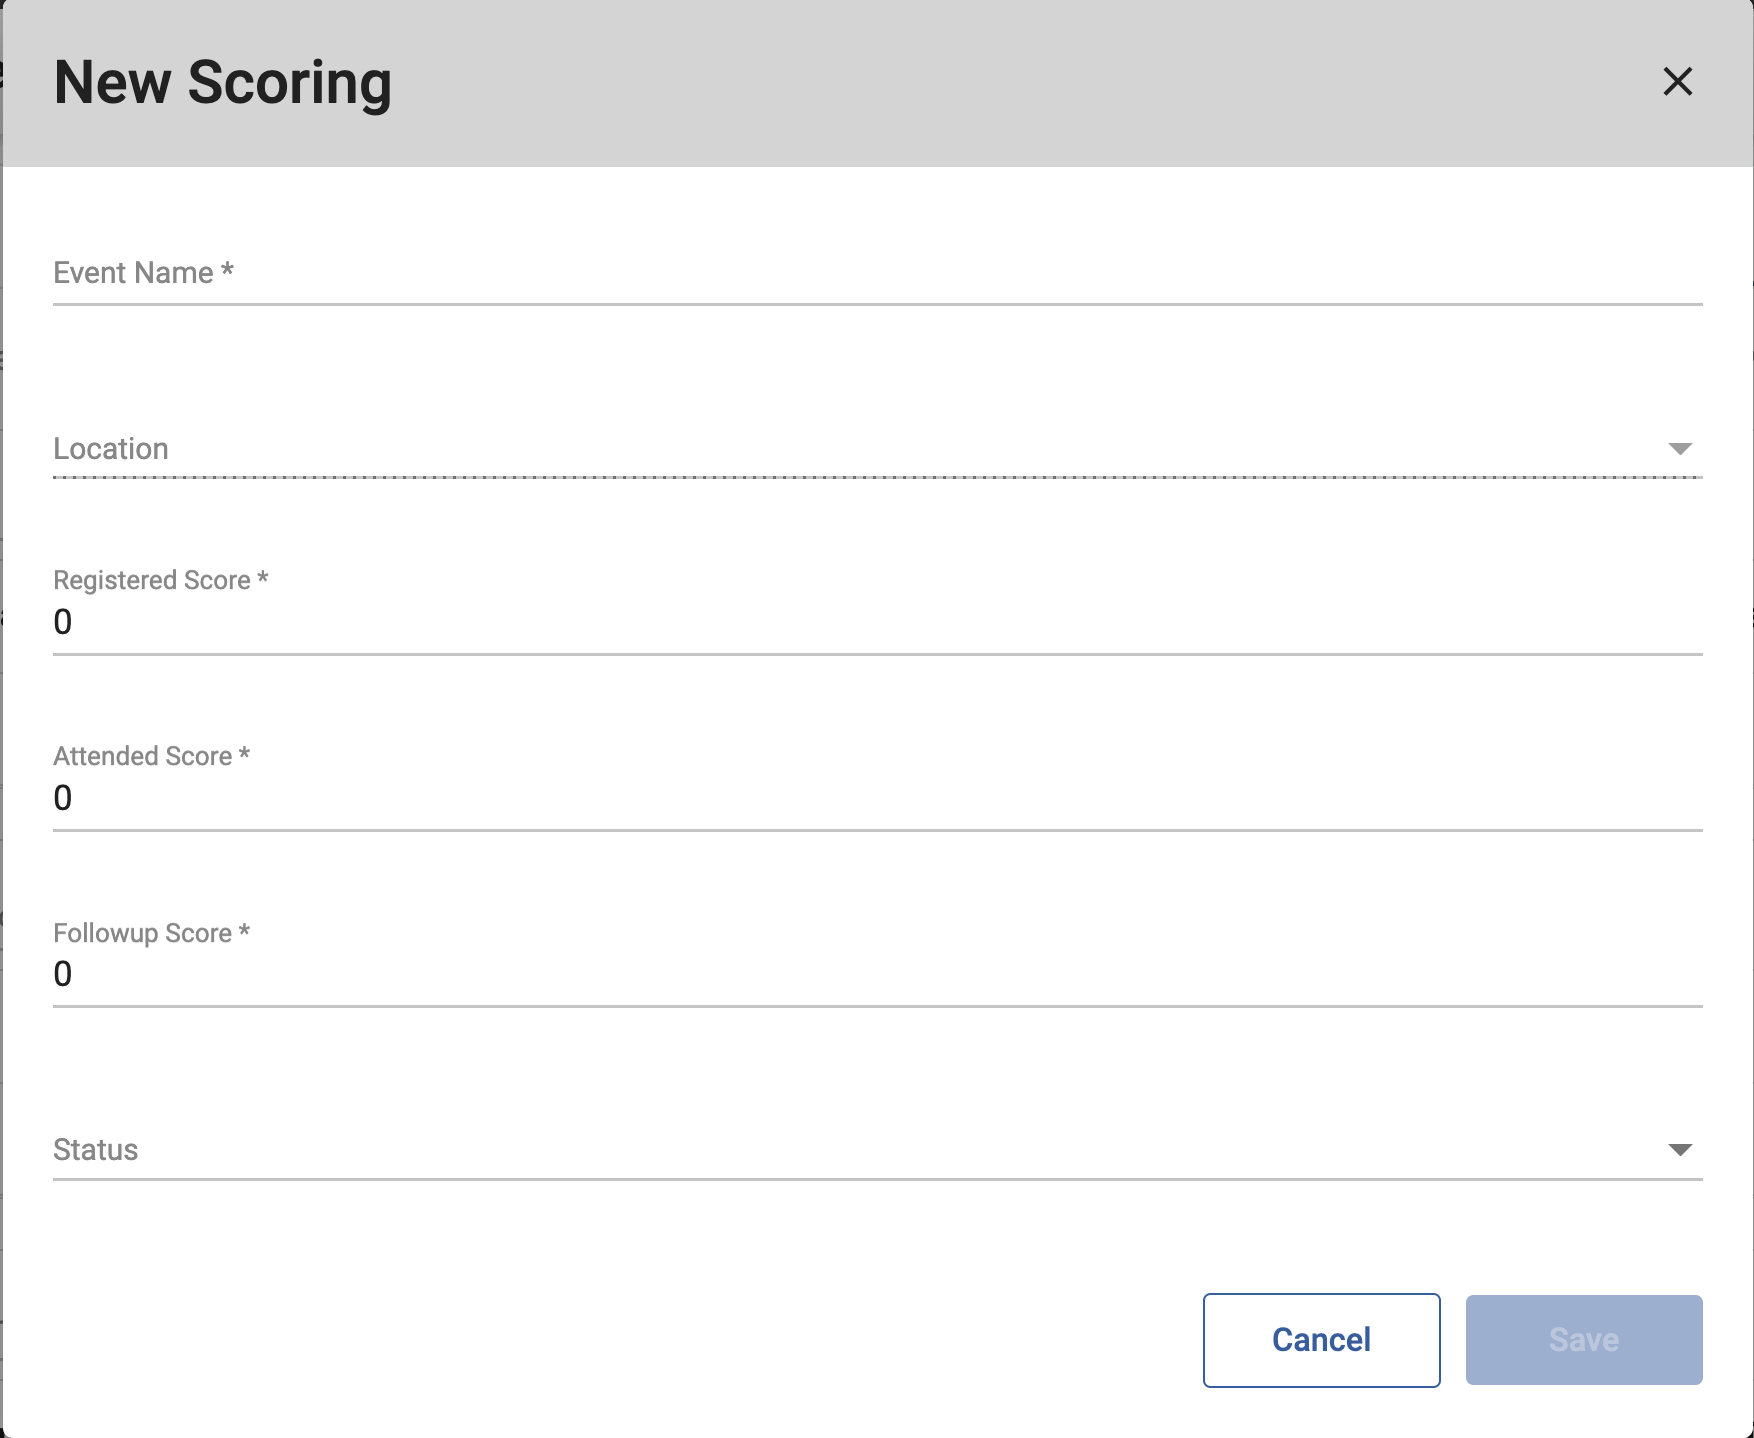
- Event Name: The name of the Sugar Market event associated with the scoring.
- Location: The Sugar Market session associated with the scoring.
- Registered Score: The number of points to assign when the lead registers for the event.
- Attended Score: The number of points to assign when the lead attends the event.
- Followup Score: The number of points to assign when the lead requests follow-up for the event.
- Status: Whether the rule is Active or Inactive.
- Click the Save button within the Set-Up Profile section to save your changes to the contact scoring profile.
Generic Event Scoring
To set up scoring for any event:
- In the Generic Event Scoring section of the Events tab, click the Add New button.
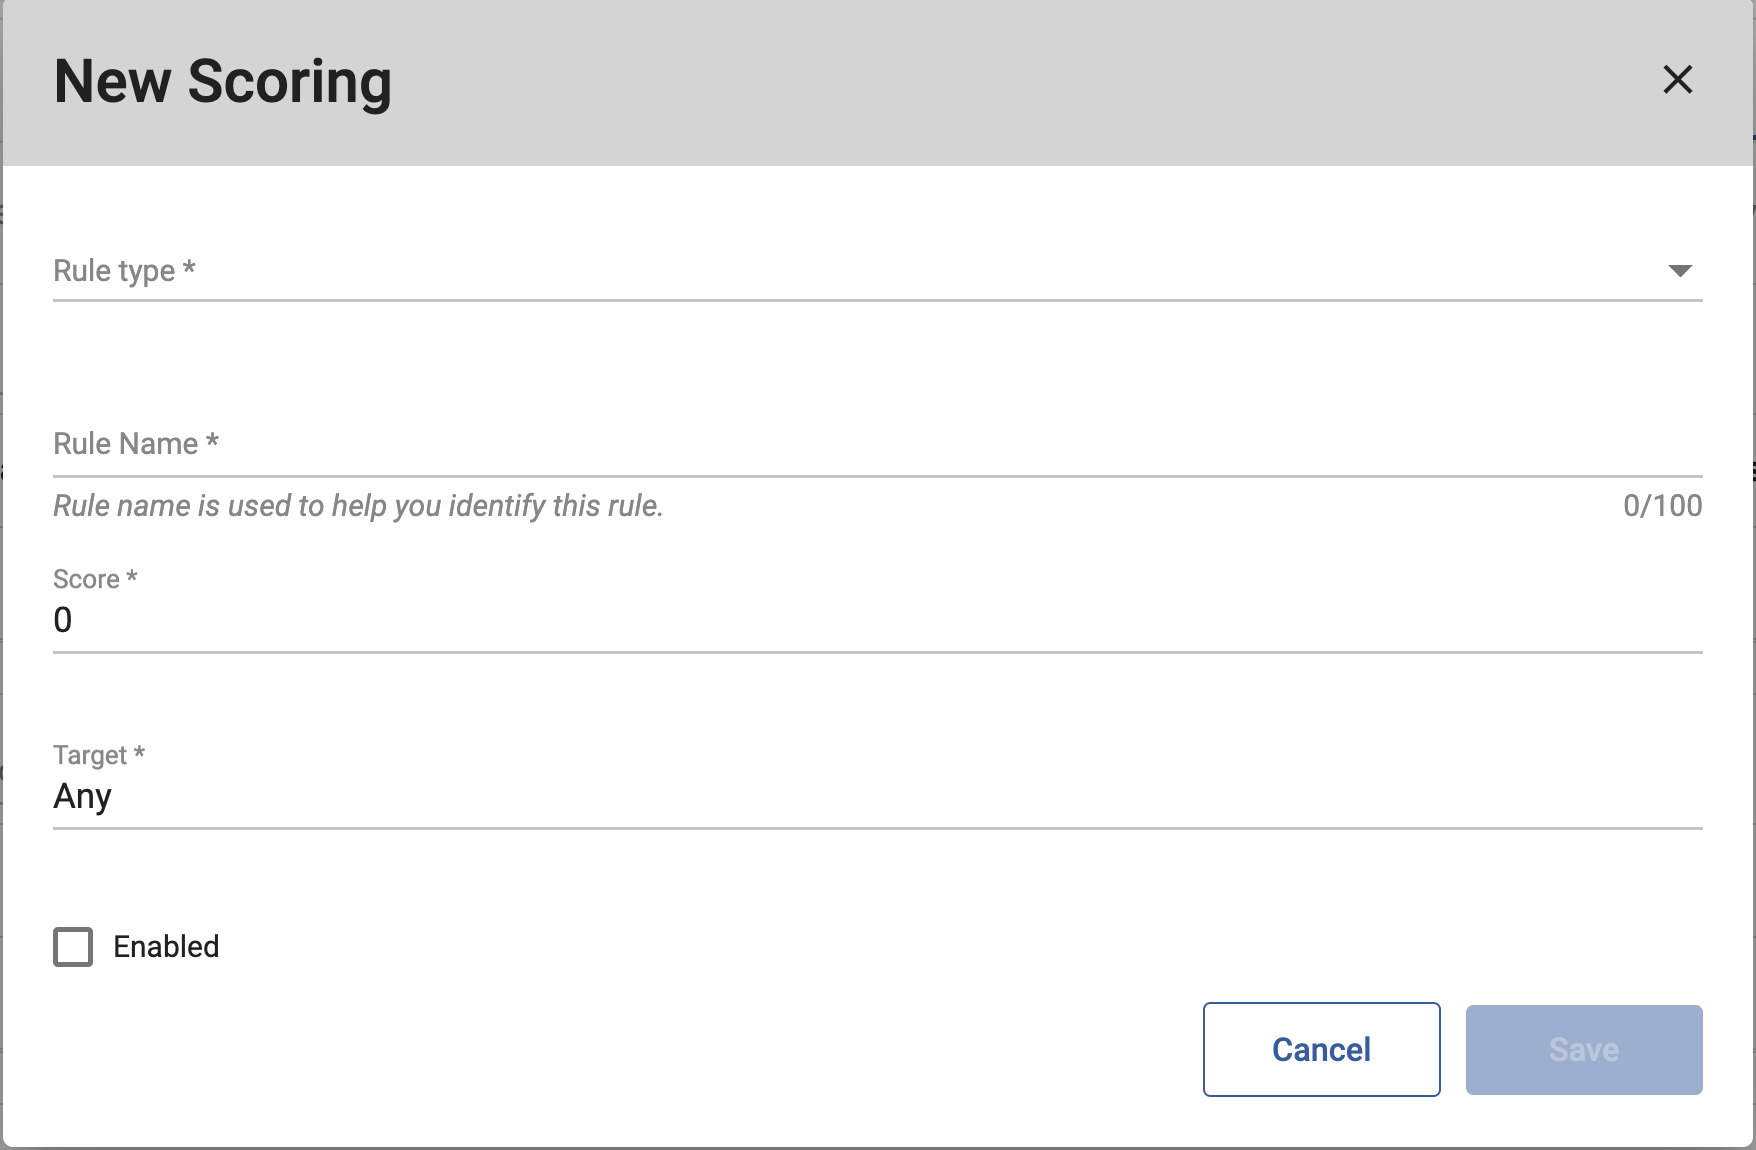
- Complete the following fields, and then click the Save button:
- Rule Type: Classification that defines the rule.
- Registered Rule: Awards points for any event that was registered.
- Attended Rule: Awards points for any event that was attended.
- Follow-up Rule: Awards points for any event that requested follow-up.
- Rule Name: Descriptive name for the rule that describes the specific target for scoring.
- Score: The number of points to assign for the activity selected in the Rule Type field. When assigning points, keep in mind the range you chose for your thresholds. Award the number of points based on the importance of the email open or click for driving opportunities.
- Target: This field is populated with "Any" since you are defining a generic event scoring rule, and cannot be edited.
- Enabled: When selected, the rule is active.
- Rule Type: Classification that defines the rule.
- Click the Save button within the Set-Up Profile section to save your changes to the contact scoring profile.
Wildcard Events Score
To set up scoring for any event using wildcard keywords:
- In the Wildcare Events Score section of the Events tab, click the Add New button.
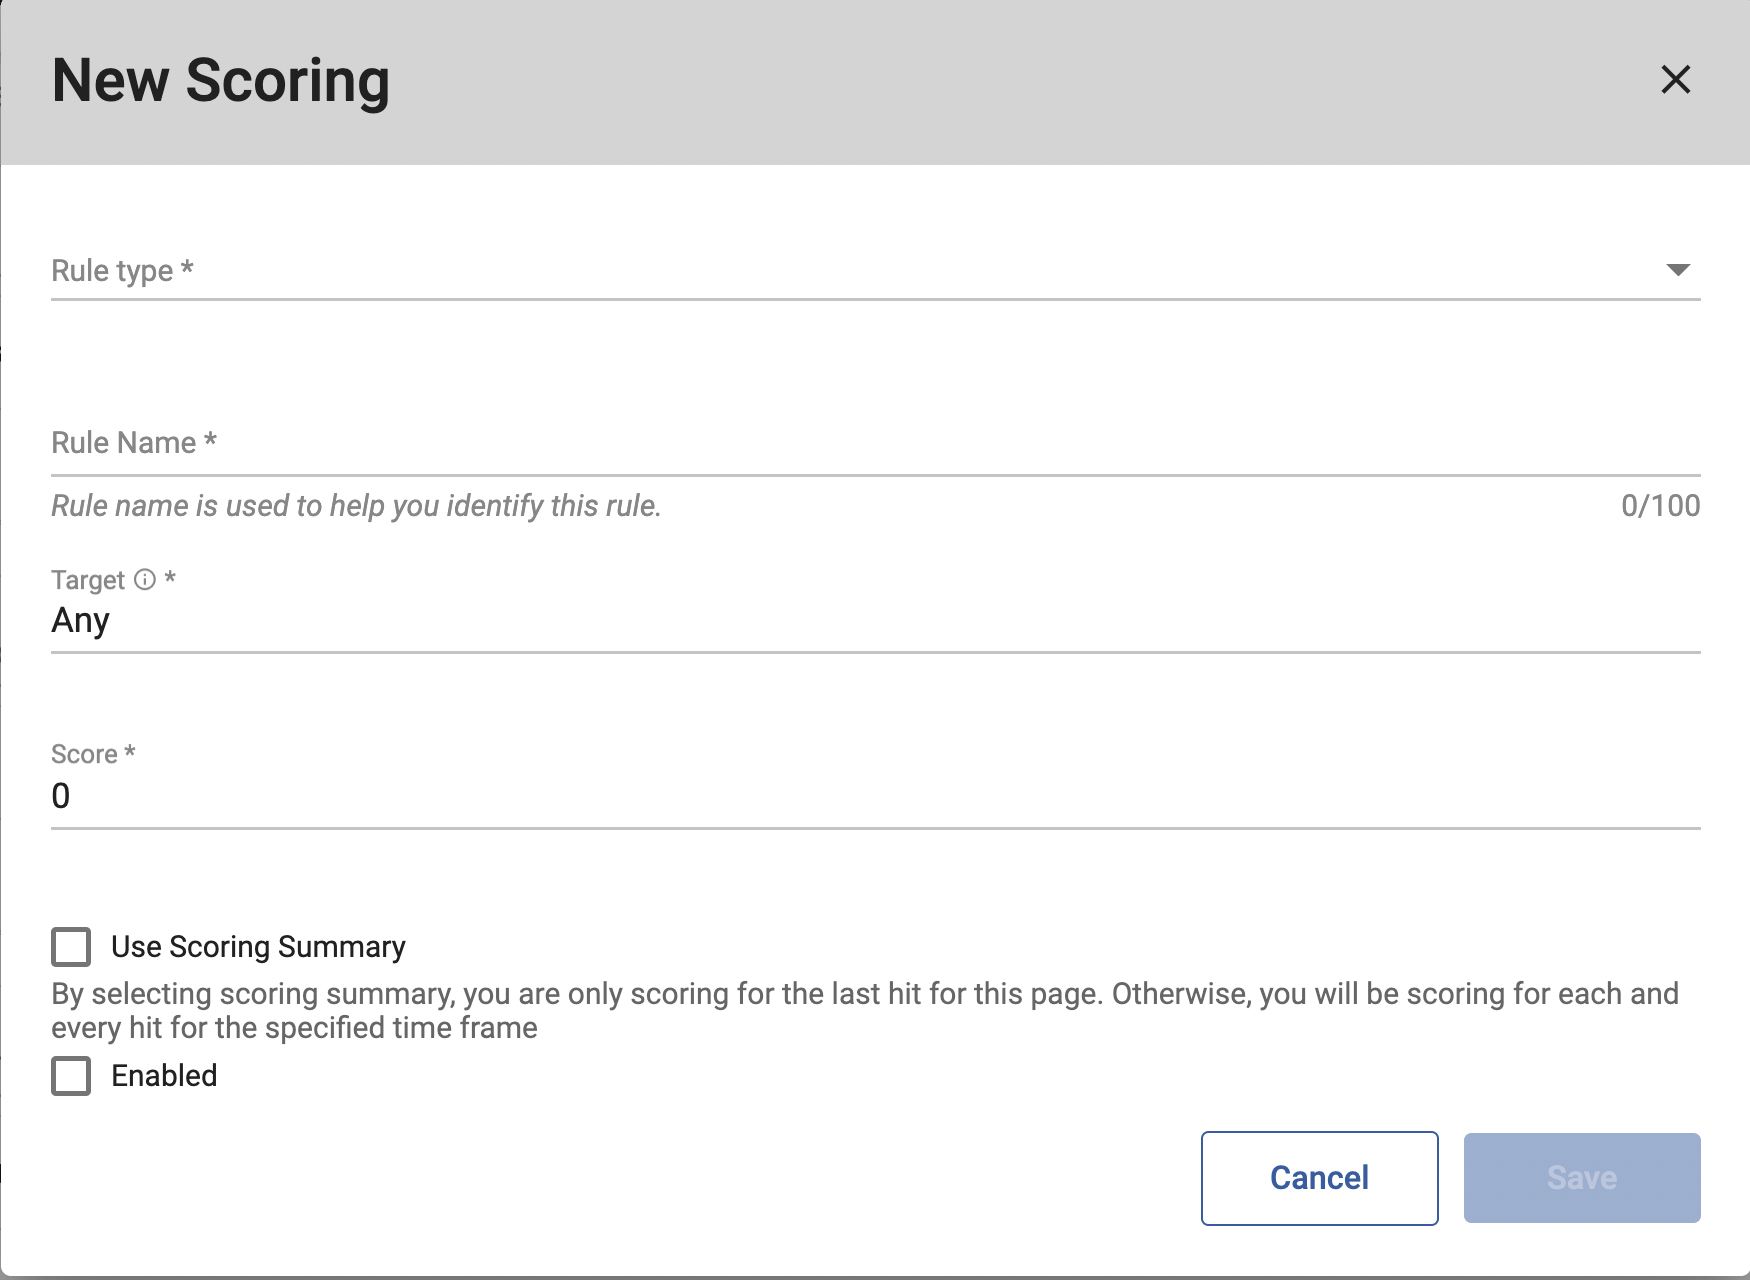
- Complete the following fields, and then click the Save button:
- Rule Type: Classification that defines the rule.
- Registered - Event Name: Award points when a lead attends an event with a name that matches the identified wildcard.
- Registered - Session Name: Award points when a lead attends an event with a session name that matches the identified wildcard.
- Attended - Event Name: Award points when a lead attends an event with a name that matches the identified wildcard.
- Attended - Session Name: Award points when a lead attends an event with a session name that matches the identified wildcard.
- Follow-up - Event Name: Award points when a lead requests follow-up from an event with a name that matches the identified wildcard.
- Follow-up - Session Name: Award points when a lead requests follow-up from an event with a session name that matches the identified wildcard.
- Rule Name: Descriptive name for the rule that describes the specific target for scoring.
- Target: The wildcard used to select the events with which to associate points for the scoring action (e.g. %promo%). Keywords must be surrounded by the % symbol, and multiple keywords must be separated by the % symbol.
- Score: The number of points to assign for the activity selected in the Rule Type field. When assigning points, keep in mind the range you chose for your thresholds. Award the number of points based on the importance of the email open or click for driving opportunities.
- Use Scoring Summary: When selected, points are only awarded one time when a contact performs the event activity. When not selected, the contact receives the number of points identified in the Score field every time they perform the event activity.
- Enabled: When selected, the rule is active.
- Rule Type: Classification that defines the rule.
- Click the Save button within the Set-Up Profile section to save your changes to the contact scoring profile.
Setting Data/Demographics Scoring Rules
Use data/demographic scoring to assign points based on your leads' demographic data (e.g. location, job title) matching field values in your external CRM.
To set up scoring for data/demographics:
- On the Data Column tab, click the Add New button.
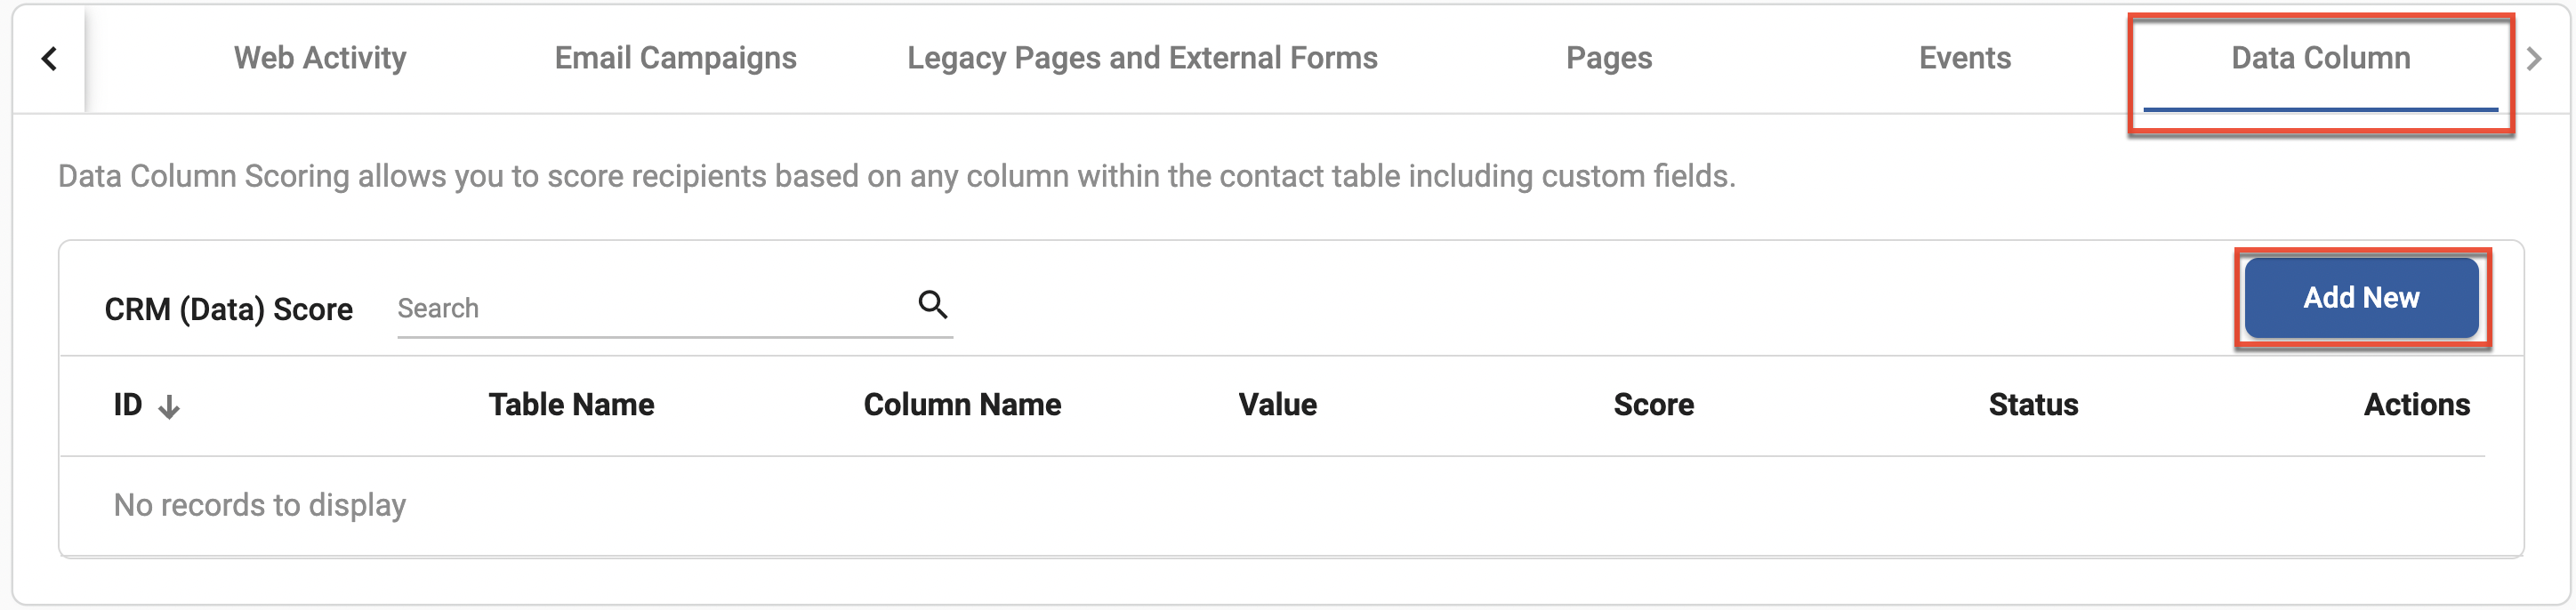
- Complete the following fields, and then click the Save button:
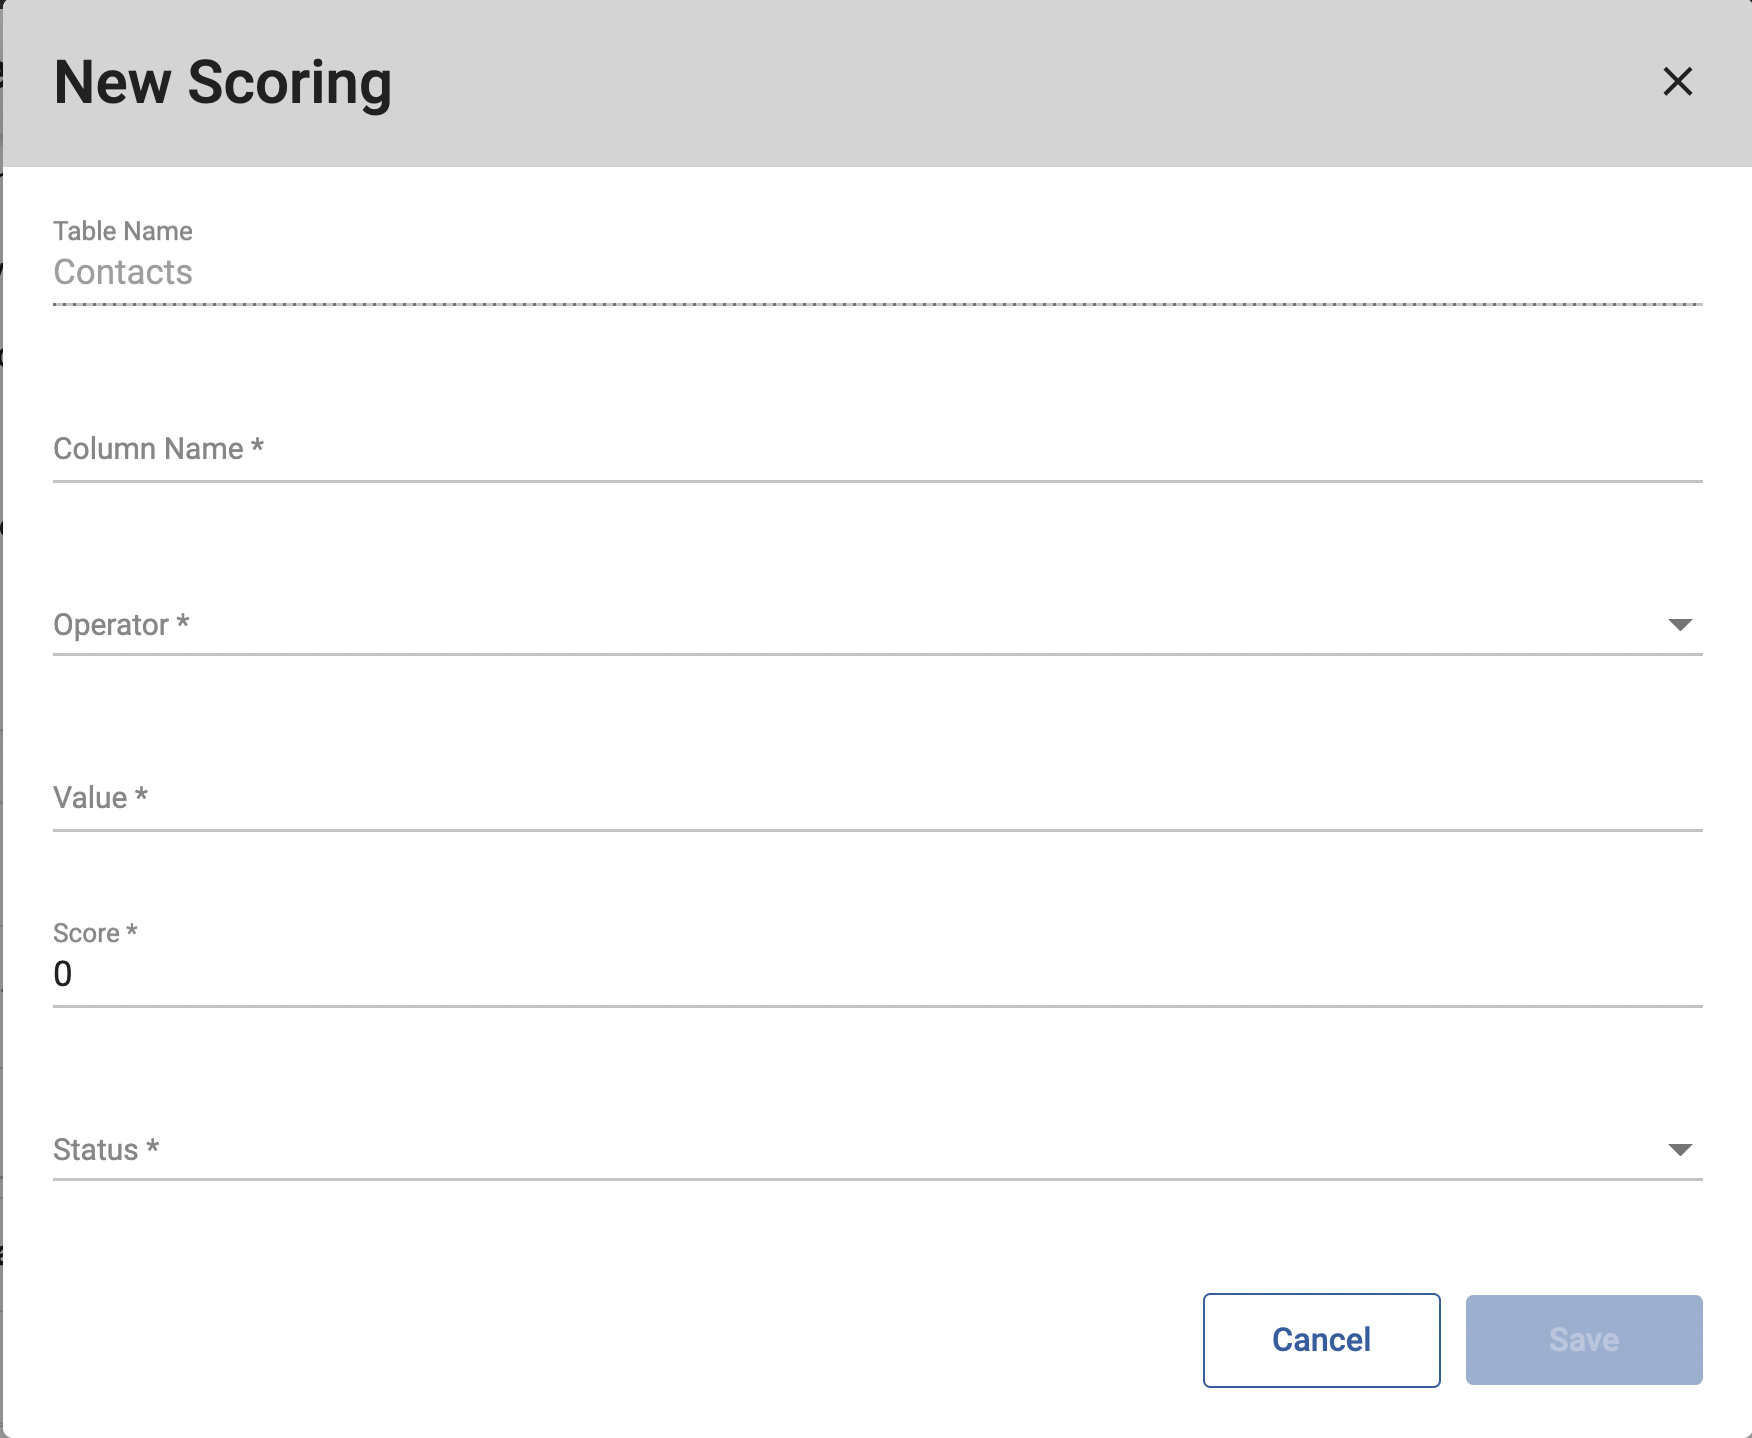
- Table Name: This field is automatically populated with "Contacts" and cannot be changed since this is the only table in your external CRM with which you can associate this scoring rule.
- Column Name: The column in the Contacts Table that represents the field to evaluate for this scoring rule.
- Operator / Value: When the value of the selected Column Name (field) plus the operator (e.g. contains) matches a lead's record, the number of points in the Score field will be awarded to the lead. Select the operator first, and then identify the value in the text box. When valid values can be returned for the selected field, you can select the value from the Possible Values dropdown list that populates below the Value text box.
- Score: The number of points to assign when the value of the selected field (Table Name + Column Name) in a lead's record matches the Value field. When assigning points, keep in mind the range you chose for your thresholds. Award the number of points based on the importance of the email open or click for driving opportunities.
- Status: Whether the rule is Active or Inactive.
- Click the Save button within the Set-Up Profile section to save your changes to the contact scoring profile.