Designing Nurtures
Overview
This page provides guidance on using the Nurture Builder designer, which is in Step 3 of the Nurture Builder, where you design your nurture flow.
Note: Before you begin designing your nurture, please note that all emails need to be created inline from Nurture Builder via Email Builder; you cannot select an existing email from Nurture Builder.
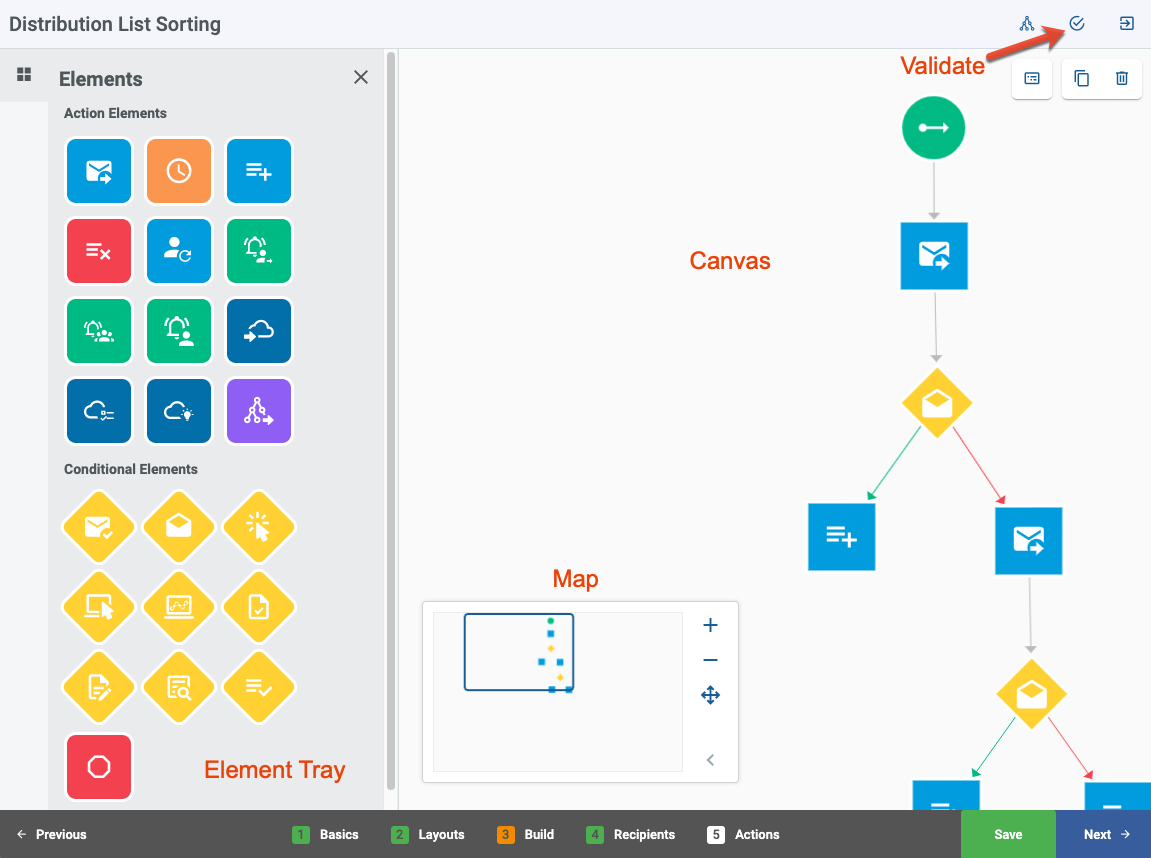
Nurture Builder Designer
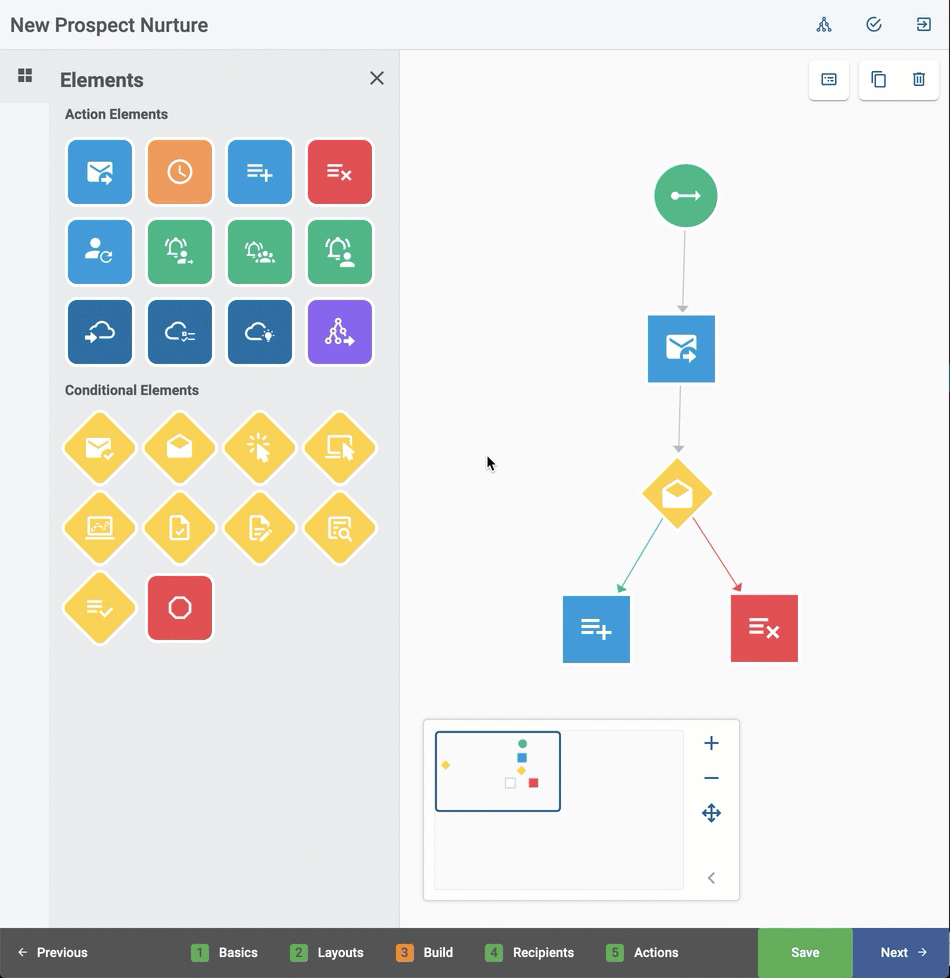
There are three components to the Nurture Builder Designer:
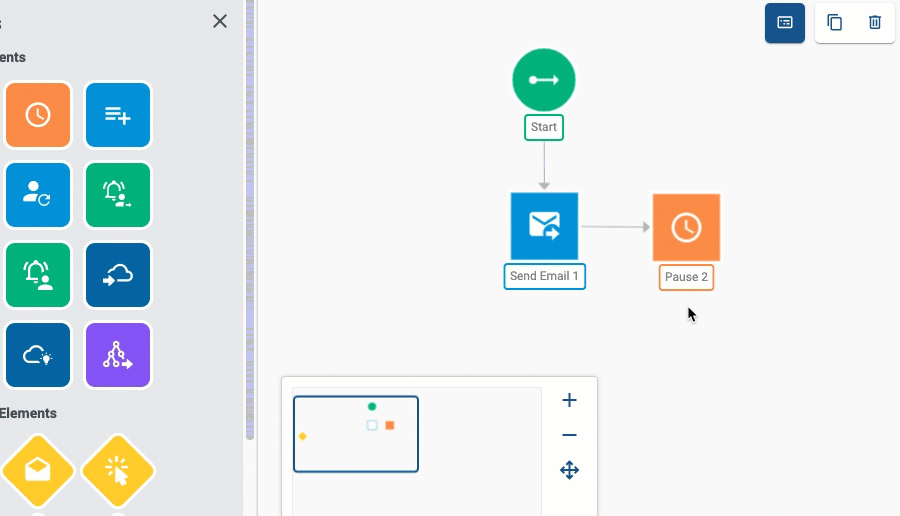
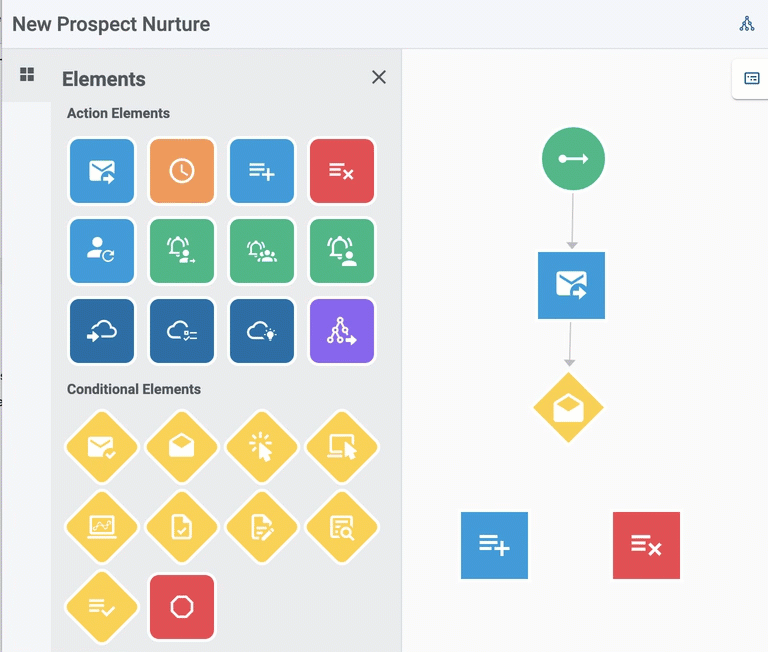
- Element tray: Contains the actions that define the nurture flow.
- Canvas: Design area where you drag elements from the tray and set criteria for each element.
- Map: Provides a thumbnail view of the nurture and allows you to navigate the canvas.
Working with Elements
Elements represent the actions and conditions in your nurture flow. Whether starting with a blank theme or an existing nurture design, you build your nurture flow with the following three steps:
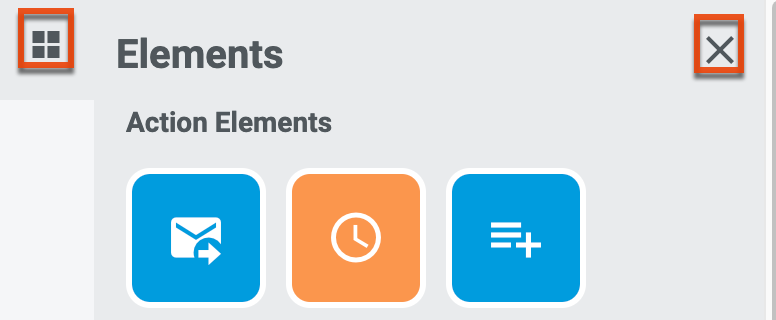
Element Tray
Available elements are displayed in the element tray at the left of the designer. Click the X at the top right to minimize the tray and display more canvas space. Click the four-square icon to expand the tray.
Adding an Element to the Nurture Design
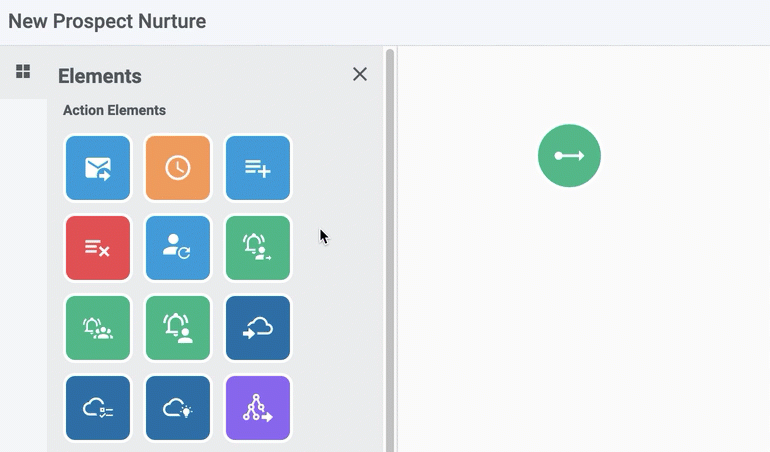
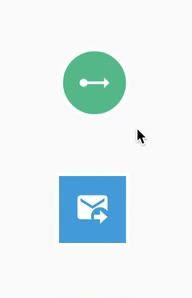
The Start element appears on the canvas when you first visit the nurture Build phase. Begin your design by dragging an element from the tray to the desired location on the canvas. Repeat with other elements, as needed.
Displaying Element Labels
By default, element labels are hidden to maximize available canvas space. If you prefer to see labels, click the Toggle Labels icon at the top right of the canvas:
Longer labels are truncated on elements to preserve canvas space. Mouse over the element label on the canvas to display the full label.
Configuring Elements
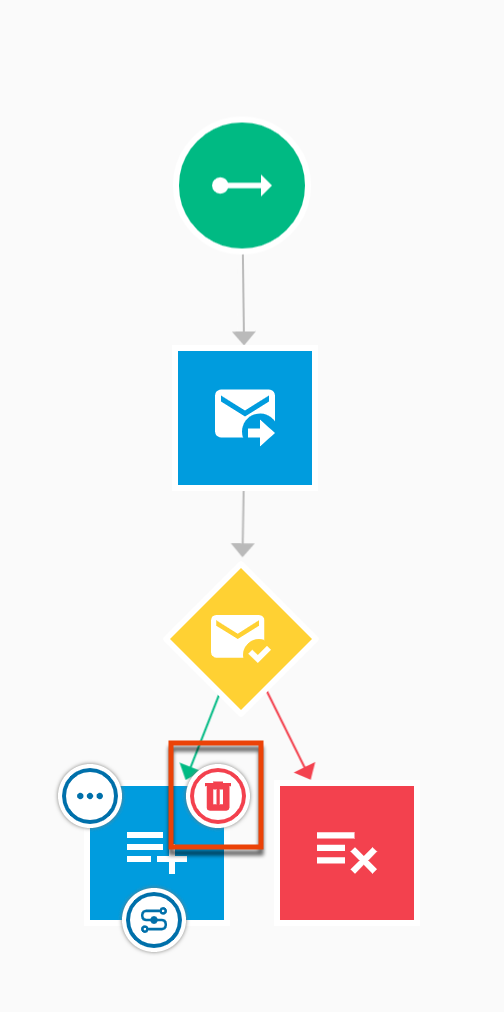
Mouse over the three-dot icon on the element and then click the settings gear icon to define the element settings. Click OK when complete. The element label now includes the identifying information.
Connecting Elements
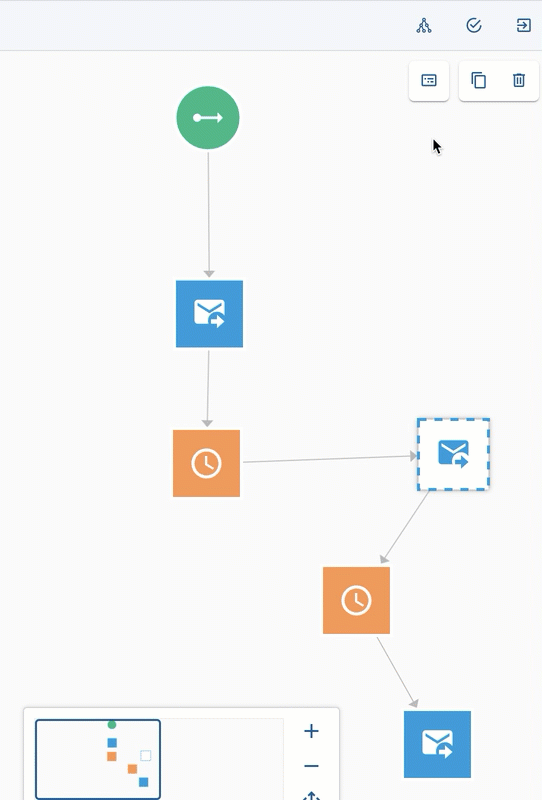
Mouse over the element to display the connector icon, and then drag your mouse to the element to which it should be connected. An arrow is displayed on the canvas when the connection is made. To delete the connection, mouse over the connector line until the trash icon displays.
Note: If the icon is not visible, the element label may be obscuring the icon. Drag the elements away from each other further until the icon is displayed.
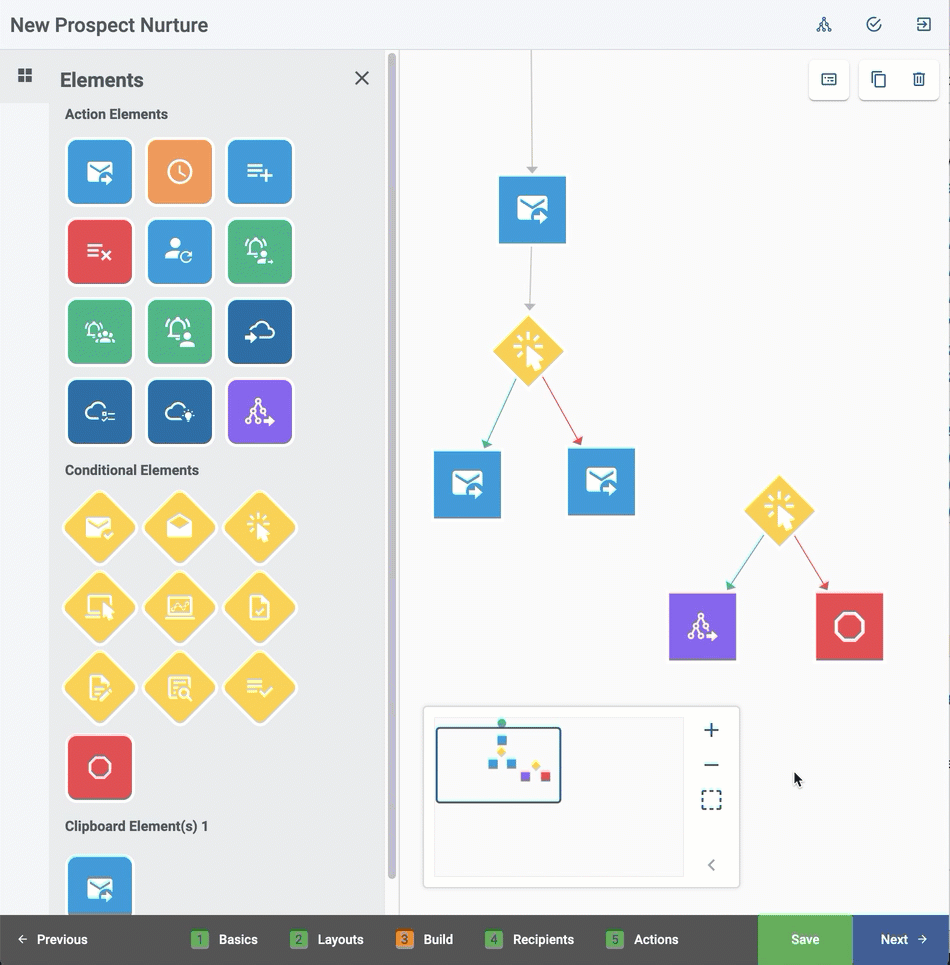
For conditional elements, mouse over the element to display the connector icon and then choose the checkmark icon for a Yes condition, or the X icon for a No condition before connecting to an element. Once connected, a green line identifies Yes conditions and a red line identifies No conditions.
Reorganizing Elements
You can drag elements around the canvas at any point during the design process, or use the auto-arrange feature to let Sugar Market organize the elements for you. To access this feature, click the Organize icon in the designer toolbar.
Copying Elements
To copy a configured element to reuse later, mouse over the element to display the three-dot icon and then click the copy icon. The configured element and its settings are copied to the Clipboard Elements section of the element tray and can be dragged to the canvas.
Note: The latest copied element overrides any existing Clipboard Elements.
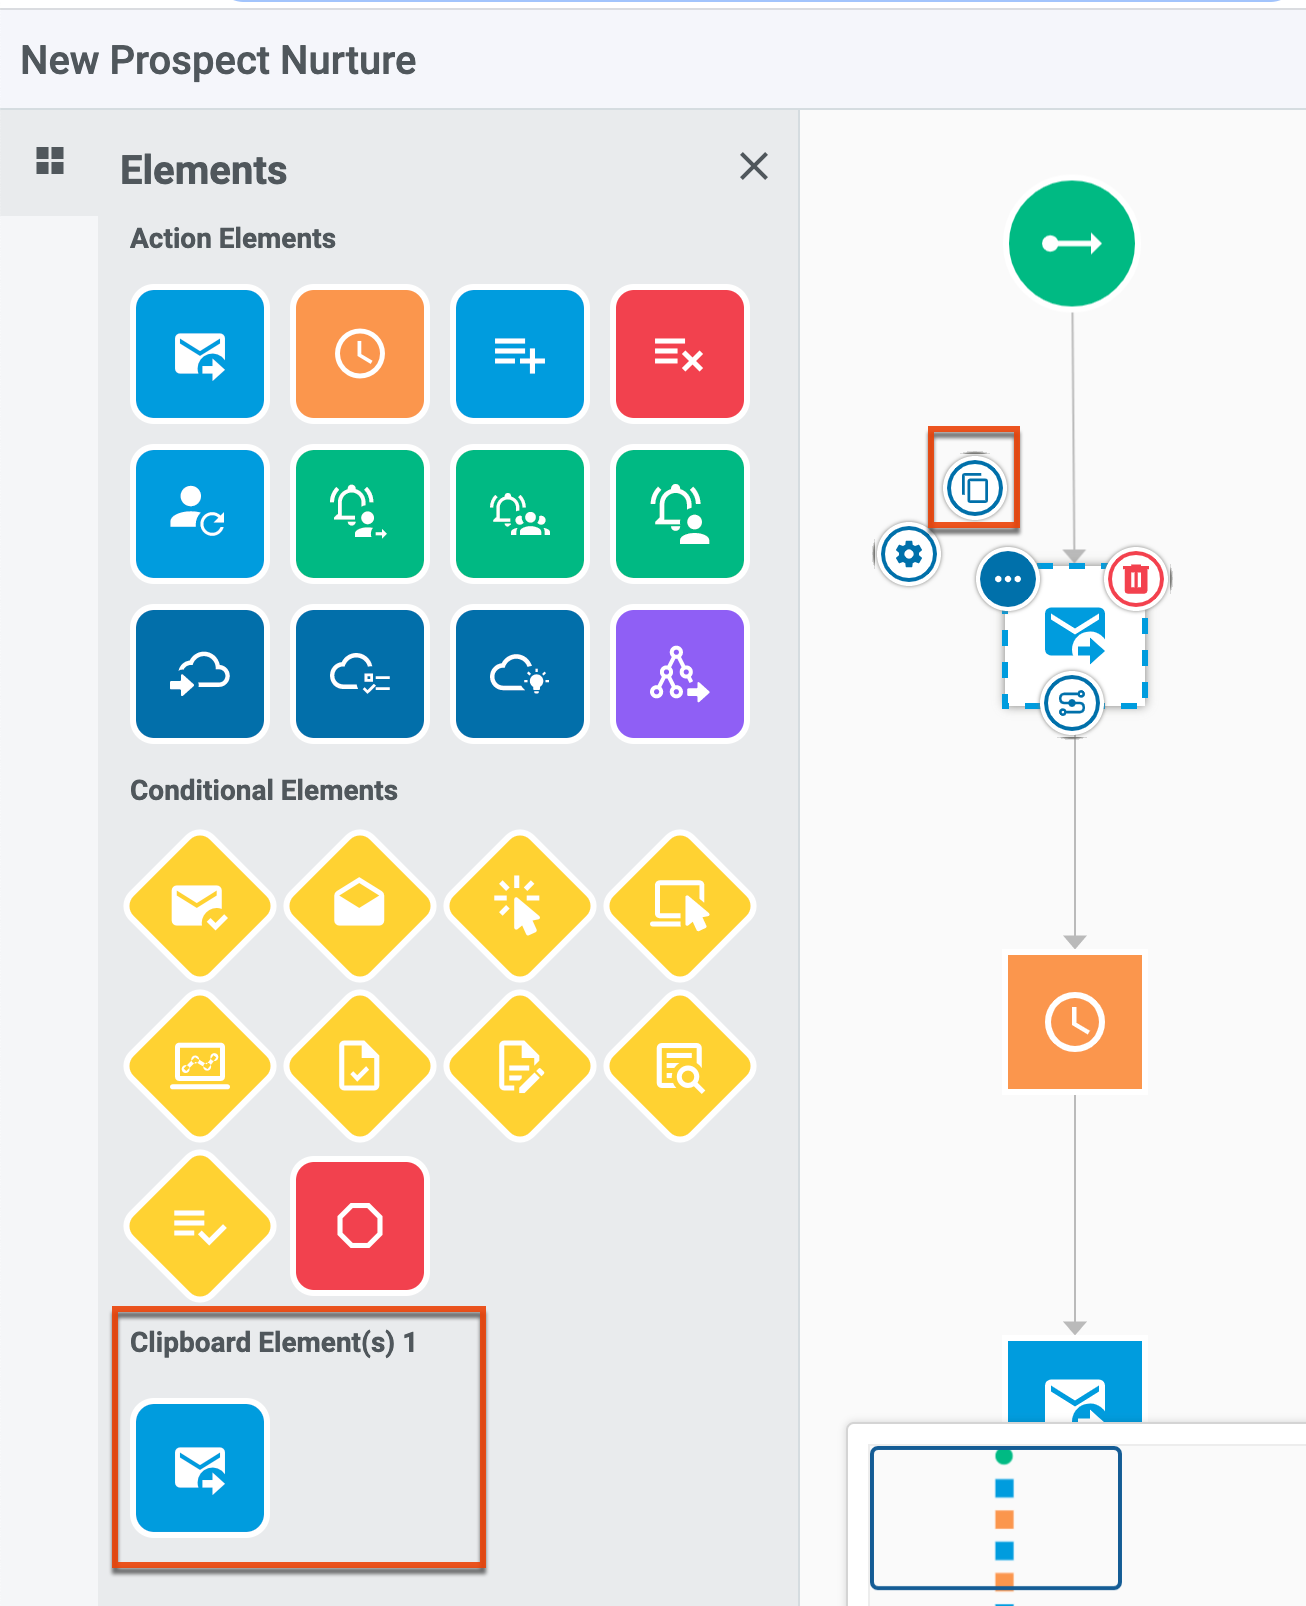
To copy multiple elements, ensure you are in Drag Mode, draw a bounding box around the elements, and then click the copy icon at the top of the canvas. The copied elements are made available in the Clipboard Elements section of the element tray.
Copying Send Email Elements
Copying a Send Email element will prompt you to either duplicate the element or create a linked copy of the element. You can make changes to a duplicated element without making the same changes in the original element. When you make changes to a linked copy of an element, those changes are also made to the original element and any other occurrences of the element in the nurture.
When you initiate a copy of a Send Email element, the following dialog displays: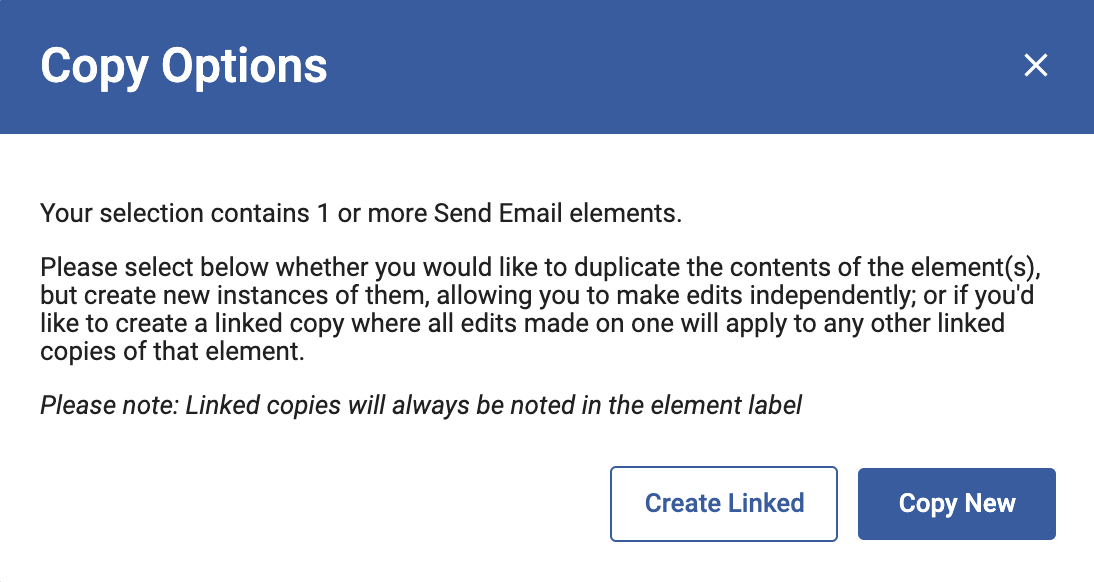
To create a duplicated copy of the element, click the Copy New button. To create a linked copy of the element, click the Create Linked button. Duplicated elements have a unique campaign ID, while linked copies carry the same ID as the originating campaign. Copied Send Email element labels include an additional field to identify whether the copied element is linked or not.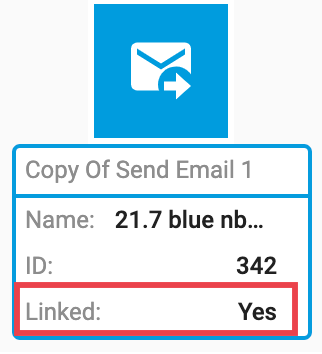
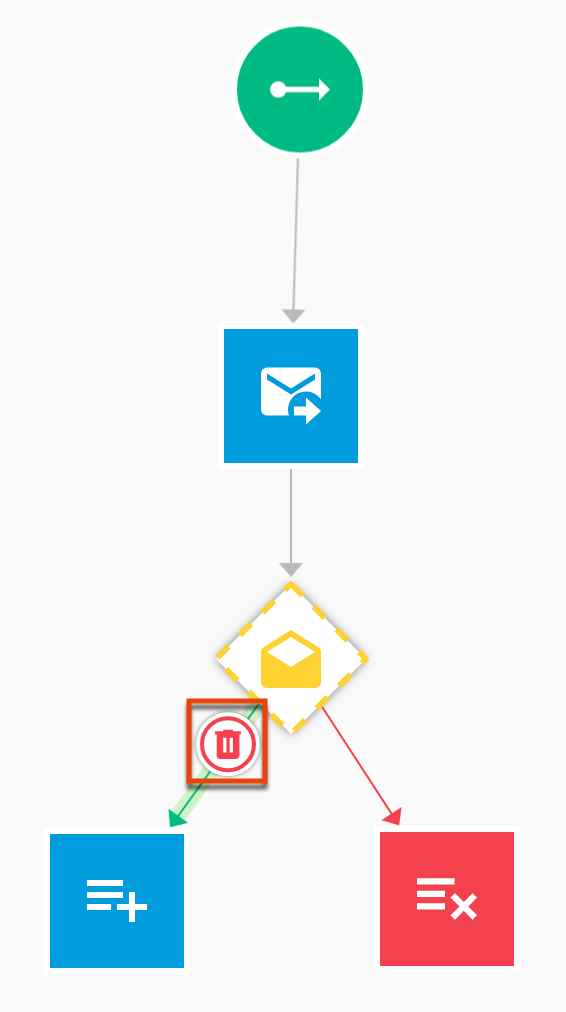
Deleting Elements
To delete a single element from the design, mouse over the element to display the three-dot icon and then click the delete icon. Click the Delete button in the confirmation dialog.
To delete multiple elements, drag a bounding box around the elements, or select one and then hold the Shift key while selecting others, and then click the Copy icon at the top of the canvas:
Deleting Elements in Published Nurtures
If you delete an element in a published nurture where recipients are currently flowing through, you will be prompted with the option to add those contacts to another step in the nurture. The following confirmation message displays when you delete a step, prompting you to select the step where the contacts are to be moved:
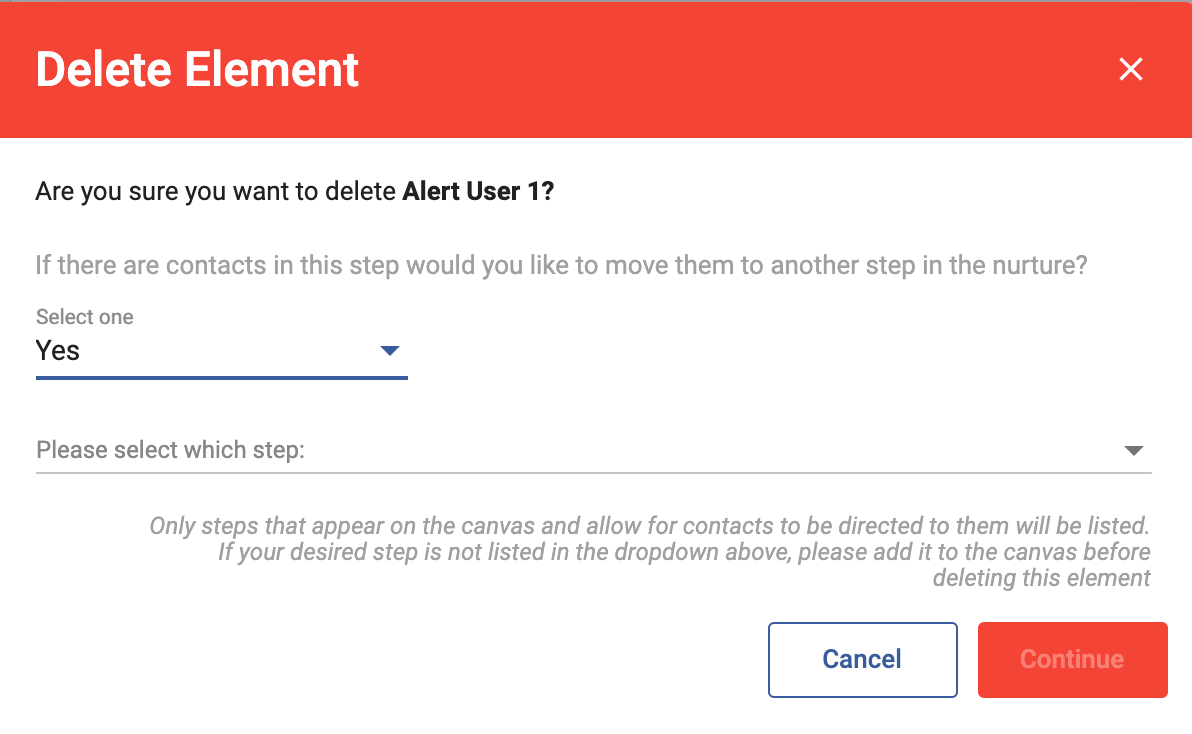
If you choose "Yes" when deleting an element, then select a step where the contacts are to be moved. If the desired step does not yet exist in your workflow, then click the Cancel button and add the step to your flow before you delete the existing element. If you choose "No", then any contacts currently flowing through the step are removed from the nurture.
Note: While you can select multiple elements to delete at once, you can only move the contacts flowing through those steps to one step. To move the contacts to separate steps, delete the elements individually.
Deleting Connections
To delete a connection between elements, mouse over the connector line and then click the trash can icon. Click the Delete button in the confirmation dialog.
Flow Design Requirements
The following requirements must be met for the nurture design to pass the validation check.
- All elements must be connected.
- All element settings must be configured with valid Sugar Market components (e.g. emails, pages, forms).
- All conditional elements must be connected to action elements with a Yes and No path.
- A Pause cannot be a terminal step.
Note that the flow does not have to be linear, but the designer will prevent you from setting up infinite loops.
Nurture Builder Designer Elements
The action and conditional elements you use to build your nurture flow are defined below.
Action Elements
The following elements define the nurture steps.
|
Icon |
Element Name |
Description |
 |
Start |
Every nurture begins with the Start element, which is automatically added to the canvas when you create a new nurture. You cannot configure or delete the Start element, and it can only be connected to one element. After the nurture is published, the start triggers the first step within five minutes. |
 |
Send Email |
Send designated email to nurture recipients using Email Builder. |
 |
Pause |
Add a delay between the previous and next steps. |
 |
Add to List |
Add nurture recipients to the designated list. You can create a new distribution list by clicking the + button and the Distribution List option. |
 |
Remove from List |
Remove nurture recipients from the designated list. |
 |
Update Contact or Lead in Sugar Market |
Update an existing Contact or Lead record in Sugar Market based on the information obtained through the nurture1. While there is a limit of five fields to identify in the Contacts/Lead record, you can add multiple instances of this element to your nurture design to use more than five fields. Custom fields are allowed in this element. |
 |
Alert User |
Send an email notification to a designated Sugar Market user, identifying the information obtained through the nurture. You must have an Alert Email Template set up before you can use this element. Merge tags are not allowed in the subject line. |
 |
Alert Role |
Send an email notification to a designated Sugar Market role, identifying the information obtained through the nurture. You must have an Alert Email Template set up before you can use this element. Merge tags are not allowed in the subject line. |
 |
Alert Contact Owner |
Send an email notification to the Sugar Market owner assigned to the Contact record, identifying the information obtained through the nurture. You must have an Alert Email Template set up before you can use this element. Merge tags are not allowed in the subject line. |
 |
Push to CRM |
Send the updated record to the external CRM. There is no configuration required for this element, it automatically connects to your external CRM. |
 |
Create Task in CRM |
Add a Task record in the external CRM based on the information obtained through the nurture1. Custom fields are allowed in this element. |
 |
Create Opportunity in CRM |
Add an Opportunity record in the external CRM1. Custom fields are allowed in this element. |
 |
Jump to Another Nurture |
Link to another nurture. Only published nurtures are available for jump steps. You can define a specific step to jump to within that nurture. This element, along with End Nurture, is a valid terminal step for conditional elements. Note: While there is no specific element for jumping to a step within the current nurture, you can accomplish jumps within a nurture by simply connecting elements. Please refer to the Using Jump Steps in Nurture Builder article for more information. |
1 This functionality has changed from the legacy nurture builder, which requires you to first create a record-specific template that you then reference in the flow designer.
Conditional Elements
Conditional elements check to see if a record meets a certain condition. Some conditional elements can be configured to check if a record meets the condition over a set period of time. Records that reach a conditional element that checks if a condition is met over a period of time will not proceed through the element until either they meet the condition or the set time period has been surpassed. Sugar Market checks conditional elements every four hours, with the exception of the Email Delivered element, which is checked every ten minutes.
|
Icon |
Element Name |
Description |
 |
Email Delivered |
Evaluate when linked email is delivered to nurture recipients. Sugar Market checks this step approximately every ten minutes. |
 |
Email Opened |
Evaluate when linked email is opened by nurture recipients. If the email is opened within the defined time period, then the recipient flows through to the Yes condition. If the email is not opened within the defined period, then the recipient flows through to the No condition. |
 |
Link Click |
Evaluate when nurture recipient clicks a link in the designated email. If the link is clicked within the defined time period, then the recipient flows through to the Yes condition. If the link is not clicked within the defined period, then the recipient flows through to the No condition. To identify a specific link within the email, enable the "Specific link in specified campaign" option, and then select the link. |
 |
Web Activity Sessions |
Evaluate when nurture recipients' number of web activity sessions meets a minimum number during a specified time period. Web tracking code must be in place on the designated website. |
 |
Web Page Hits |
Evaluate when nurture recipients' number of visits to your web page meets a minimum number during a specified time period. Your page needs to have the Sugar Market tracking code embedded for hits to be recorded. |
 |
Form Completion |
Evaluate whether nurture recipients complete your form. When your form is embedded in more than one page, select the specific page when you configure this element. |
 |
Form Question Answer |
Evaluate the answer nurture recipients submitted to a question on your Sugar Market form. |
 |
Evaluate Field Value |
Evaluate when a Sugar Market contact, lead, account, or opportunity field matches a designated value. |
 |
List Checker |
Evaluate whether the record exists within a specified list. We recommend adding a one-hour Pause action element before any List Checker conditional element to ensure the check is as accurate as possible, as records may take varying amounts of time to appear on the list depending on how they are being added. |
 |
End Nurture |
Last step of nurture path when no other action needs to be taken. This element, along with Jump to Another Nurture, is a valid terminal step for conditional elements. |
Working with the Canvas Map
The canvas map is open by default when you first visit the Nurture Builder designer. It provides an overview of your flow layout and allows you to manipulate the canvas by zooming in and out, re-centering, and panning the canvas. Click the arrow in the map to collapse the map view.
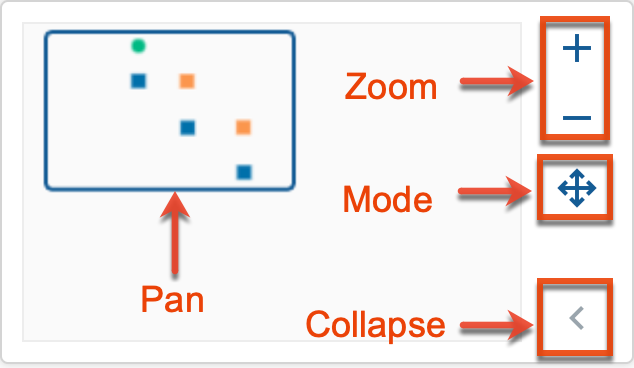
Drag and Select Modes
The canvas map provides access to two modes for canvas manipulation:
- Drag: Move the entire flow together. Grab any part of the flow and drag to move it on the canvas.
- Select: Move individual or multiple elements around the canvas. To move more than one element together, drag a bounding box around the elements on the canvas and then move.
Zooming In/Out
Use the +/- icons in the map to change the canvas to a closer or more distant view.
Panning the Canvas
Drag the blue rectangle in the map to pan to a different location of the canvas.