Creating Nurtures
Overview
This page describes how to use Sugar Market's Nurture Builder to create and manage nurtures.
Understanding Nurture Enrollment
Before you design your nurture, it is important to understand and few key behaviors on how recipients are enrolled and progress through a nurture.
- Records can be enrolled in a nurture via form, scoring action, or listener triggers. Records can also be added with inclusion lists.
- If your nurture allows records to be re-enrolled, records actively enrolled in the nurture will be re-enrolled after reaching a terminal step.
- Custom reports and inclusion list with auto-refresh enabled will not re-enroll records into a nurture.
- Record's deleted from the Sugar Market CRM will be removed from any nurtures they were enrolled in.
- Lead records that are converted to a contact while actively progressing through a nurture that is set to only allow lead records will not be removed from the nurture.
- Changes to a record's email will be checked at every Send Email step in a nurture.
- There can be up to a 30 minute delay before a enrolled record begins progressing through a nurture.
- Enrolled records will progress through action elements immediately with the exception of Pause steps.
- Records will remain on conditional elements until either the condition is met or the time period set to review if the condition is met is exceeded.
Working in the Nurture Builder
The Nurture Builder steps you through the process of creating your nurture with the following steps:
- Define Setup Options
- Design and Validate
- Select Recipients
- Defining Nurture Activation
- Publish the Nurture
Accessing the Builder
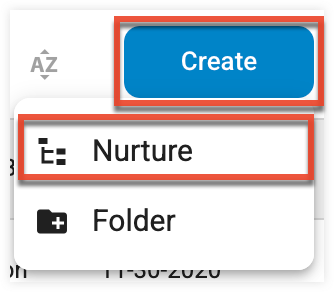
Access Nurture Builder by:
- In the navigation bar, click the Nurtures module.

- From the Nurtures list view, click the Create button.
- Click the Nurture option.
Navigating the Builder

- Click the Save button at any point to save your work in progress.
- Click the Next button after you complete a step to advance to the next step in the builder.
Defining Setup Options
The nurture setup includes setting identifying information in Step 1 and your initial nurture design choice in Step 2.
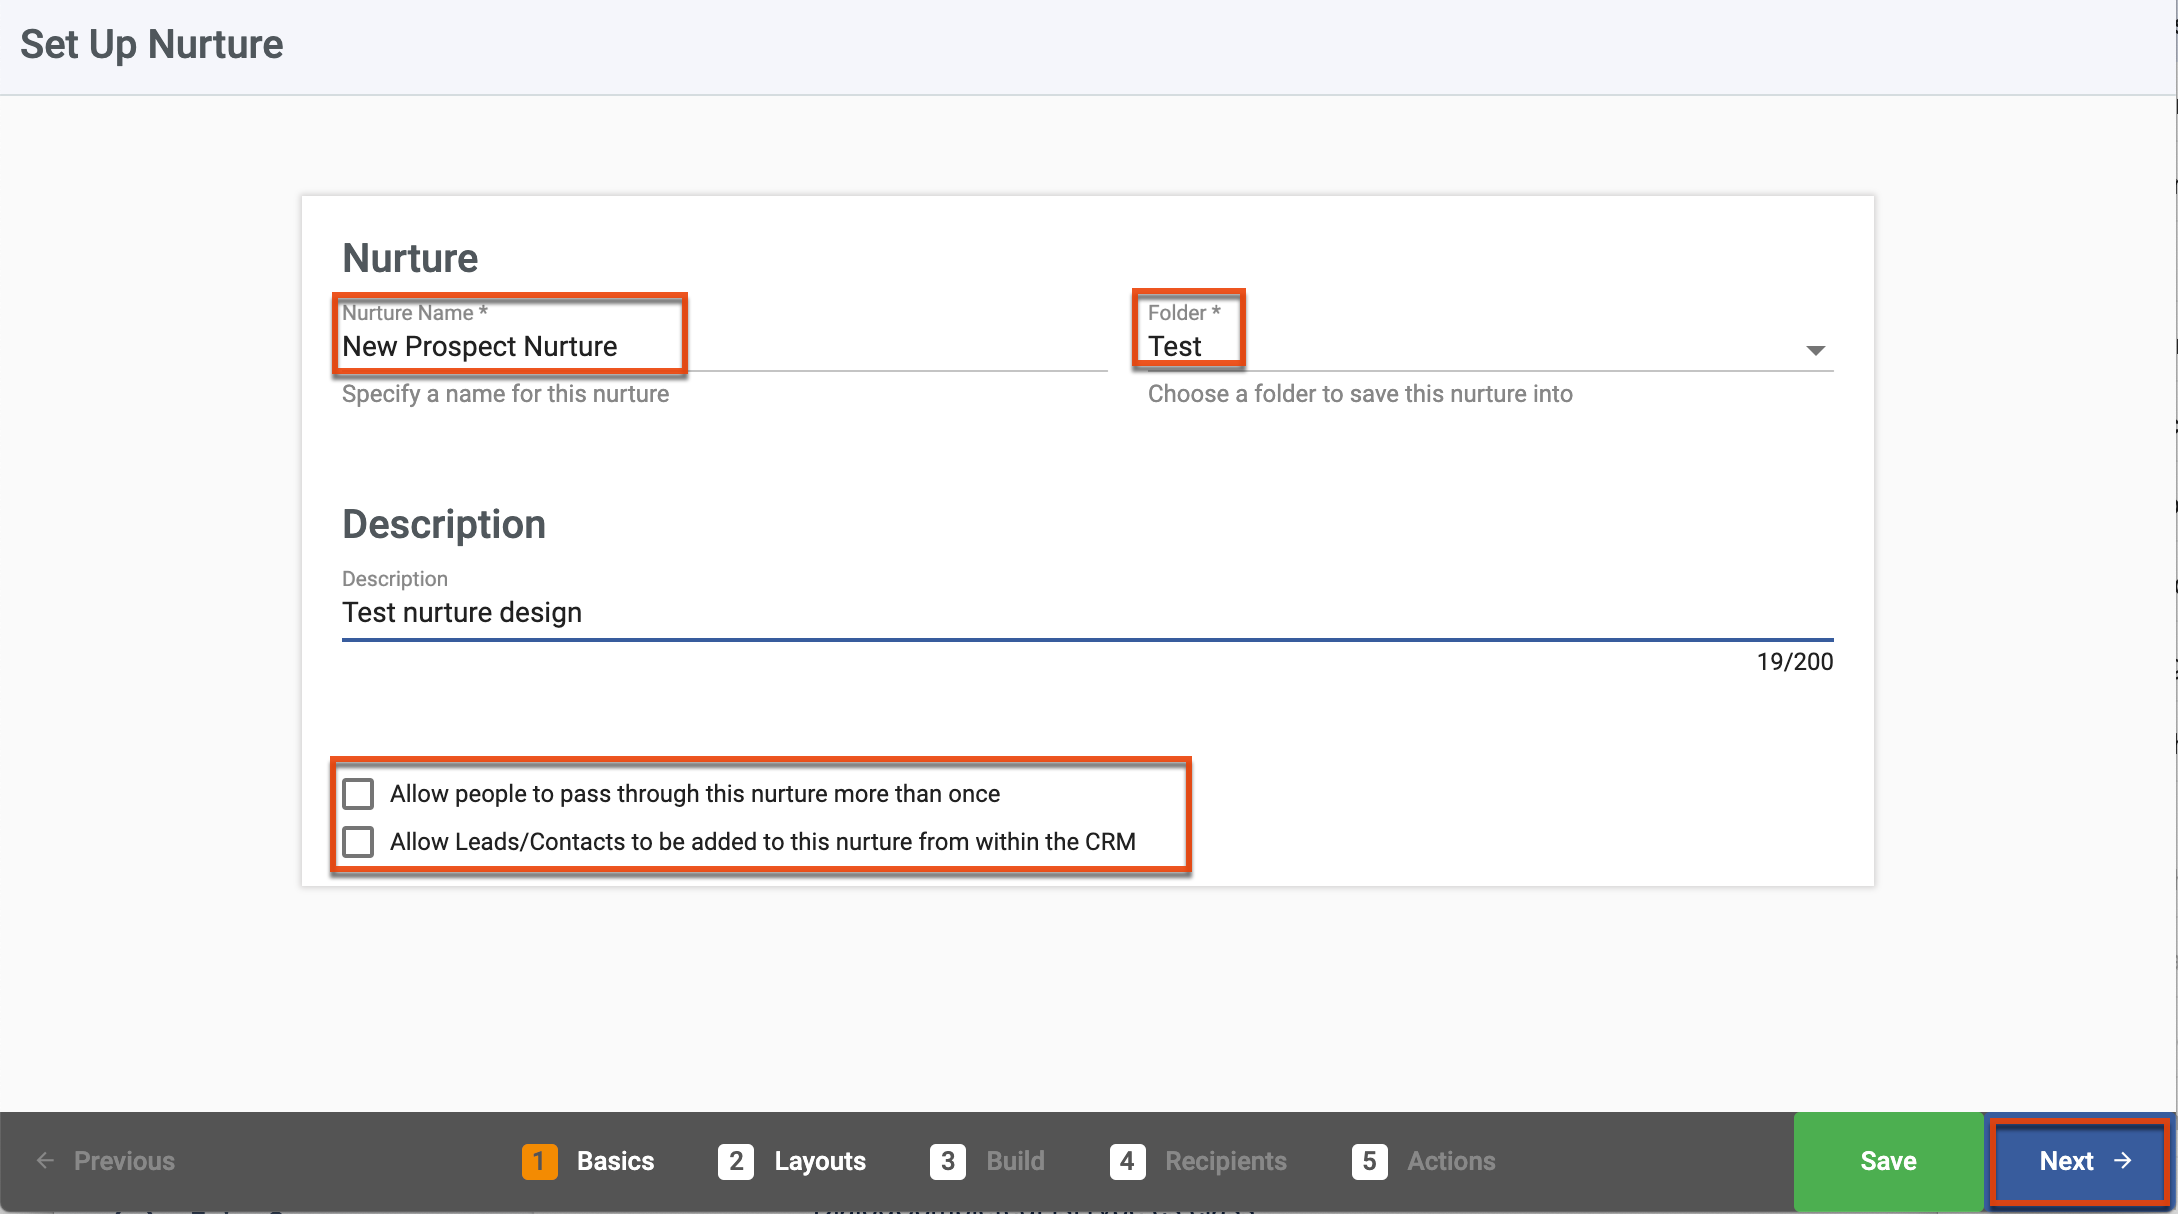
Step 1: Basics
- Identify a name and folder location where the nurture will be saved. If the folder does not yet exist, click the New Folder button, assign a name, and then click Save. Note that this folder is different from the folder used in Email Builder.
- Add a description, if desired.
- Check the "Allow people to pass through the nurture more than once" option if you want to allow records to be re-enrolled in your nurture multiple times. Custom reports and inclusion list with auto-refresh enabled will not re-enroll records into a nurture.
- Select the "Allow Leads/Contacts to be added to this nurture from within the CRM" option if you want to enable the ability to add leads and contacts through the Buyer's Journey Integration in your external CRM.
- Click the Next button at the bottom right.
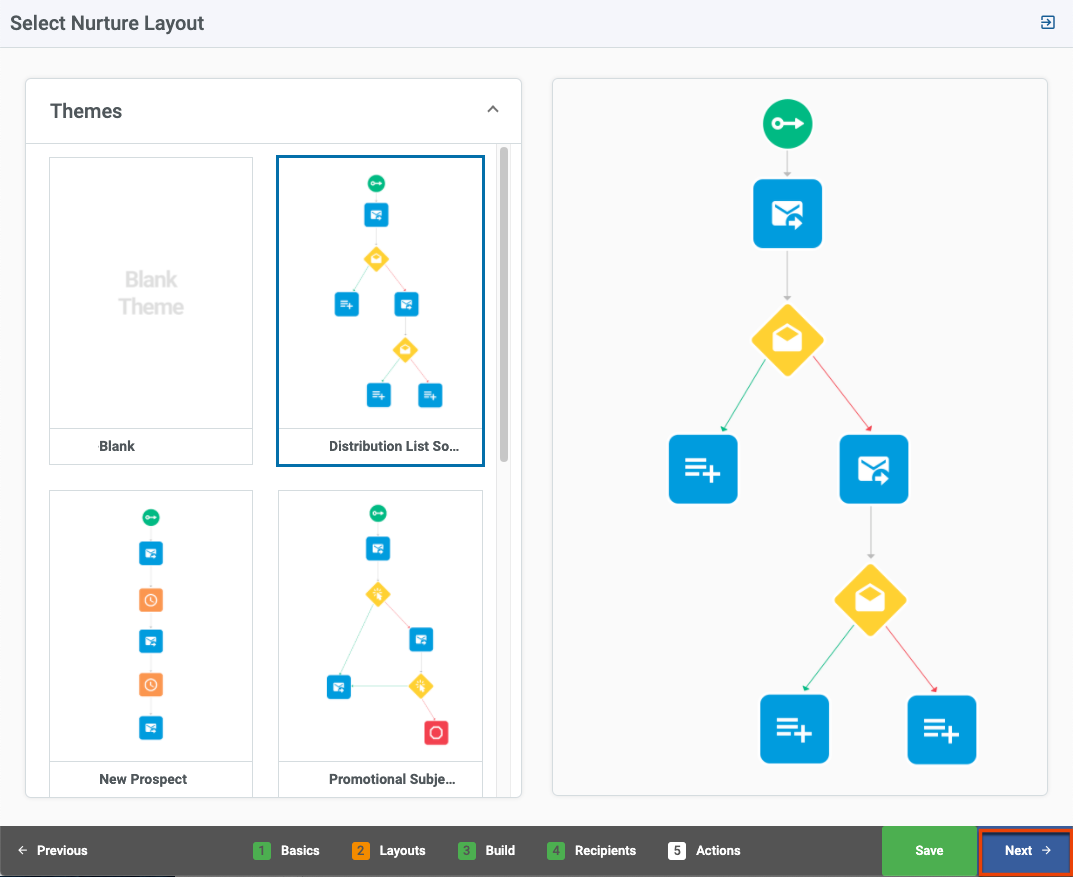
Step 2: Layouts
- Select a Theme thumbnail in the left-hand panel to view the design in the right-hand panel. For detailed examples of nurtures that use each theme type, see the Nurture Playbook.
- Click the Next button when the desired theme is selected.
Designing and Validating the Nurture
You design and validate your nurture in Step 3. See Flow Design Requirements to learn what is checked during validation.
Note: If you plan to use any alert elements in your design, you will need to create alert templates if they do not already exist.
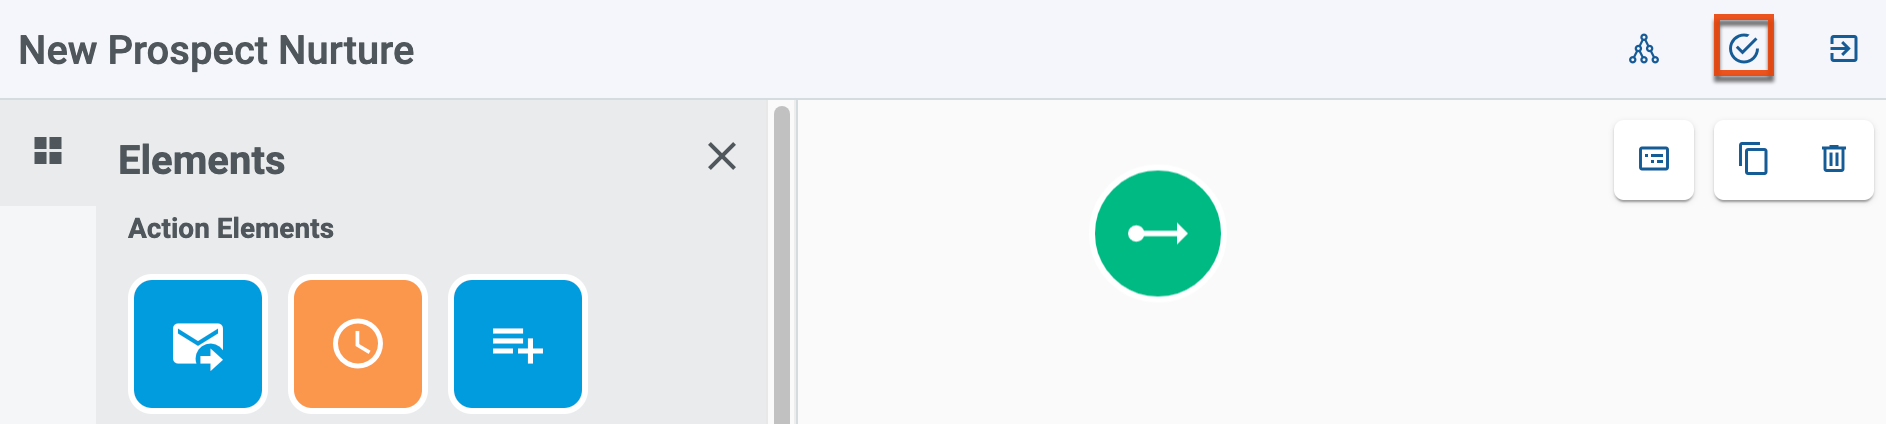
- Design your nurture by dragging elements to the canvas and configuring, as described on the Working with Elements page.
- Nurture Builder utilizes Email Builder to create emails inline while designing your nurture. To design your nurture email, click the Create New button when you configure the Send Email element to launch Email Builder where you create the email.
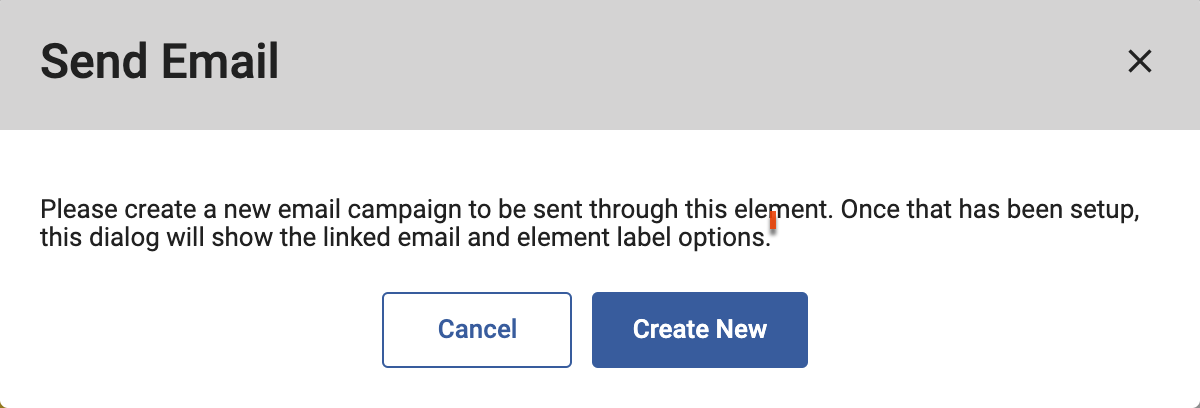
- Click the Complete button in Email Builder to return to the nurture designer, and then click the OK button in the Send Email dialog.
- Click the Validate Nurture button in the designer toolbar:
If any errors are present, an error message displays with the validation report and the elements containing errors are highlighted: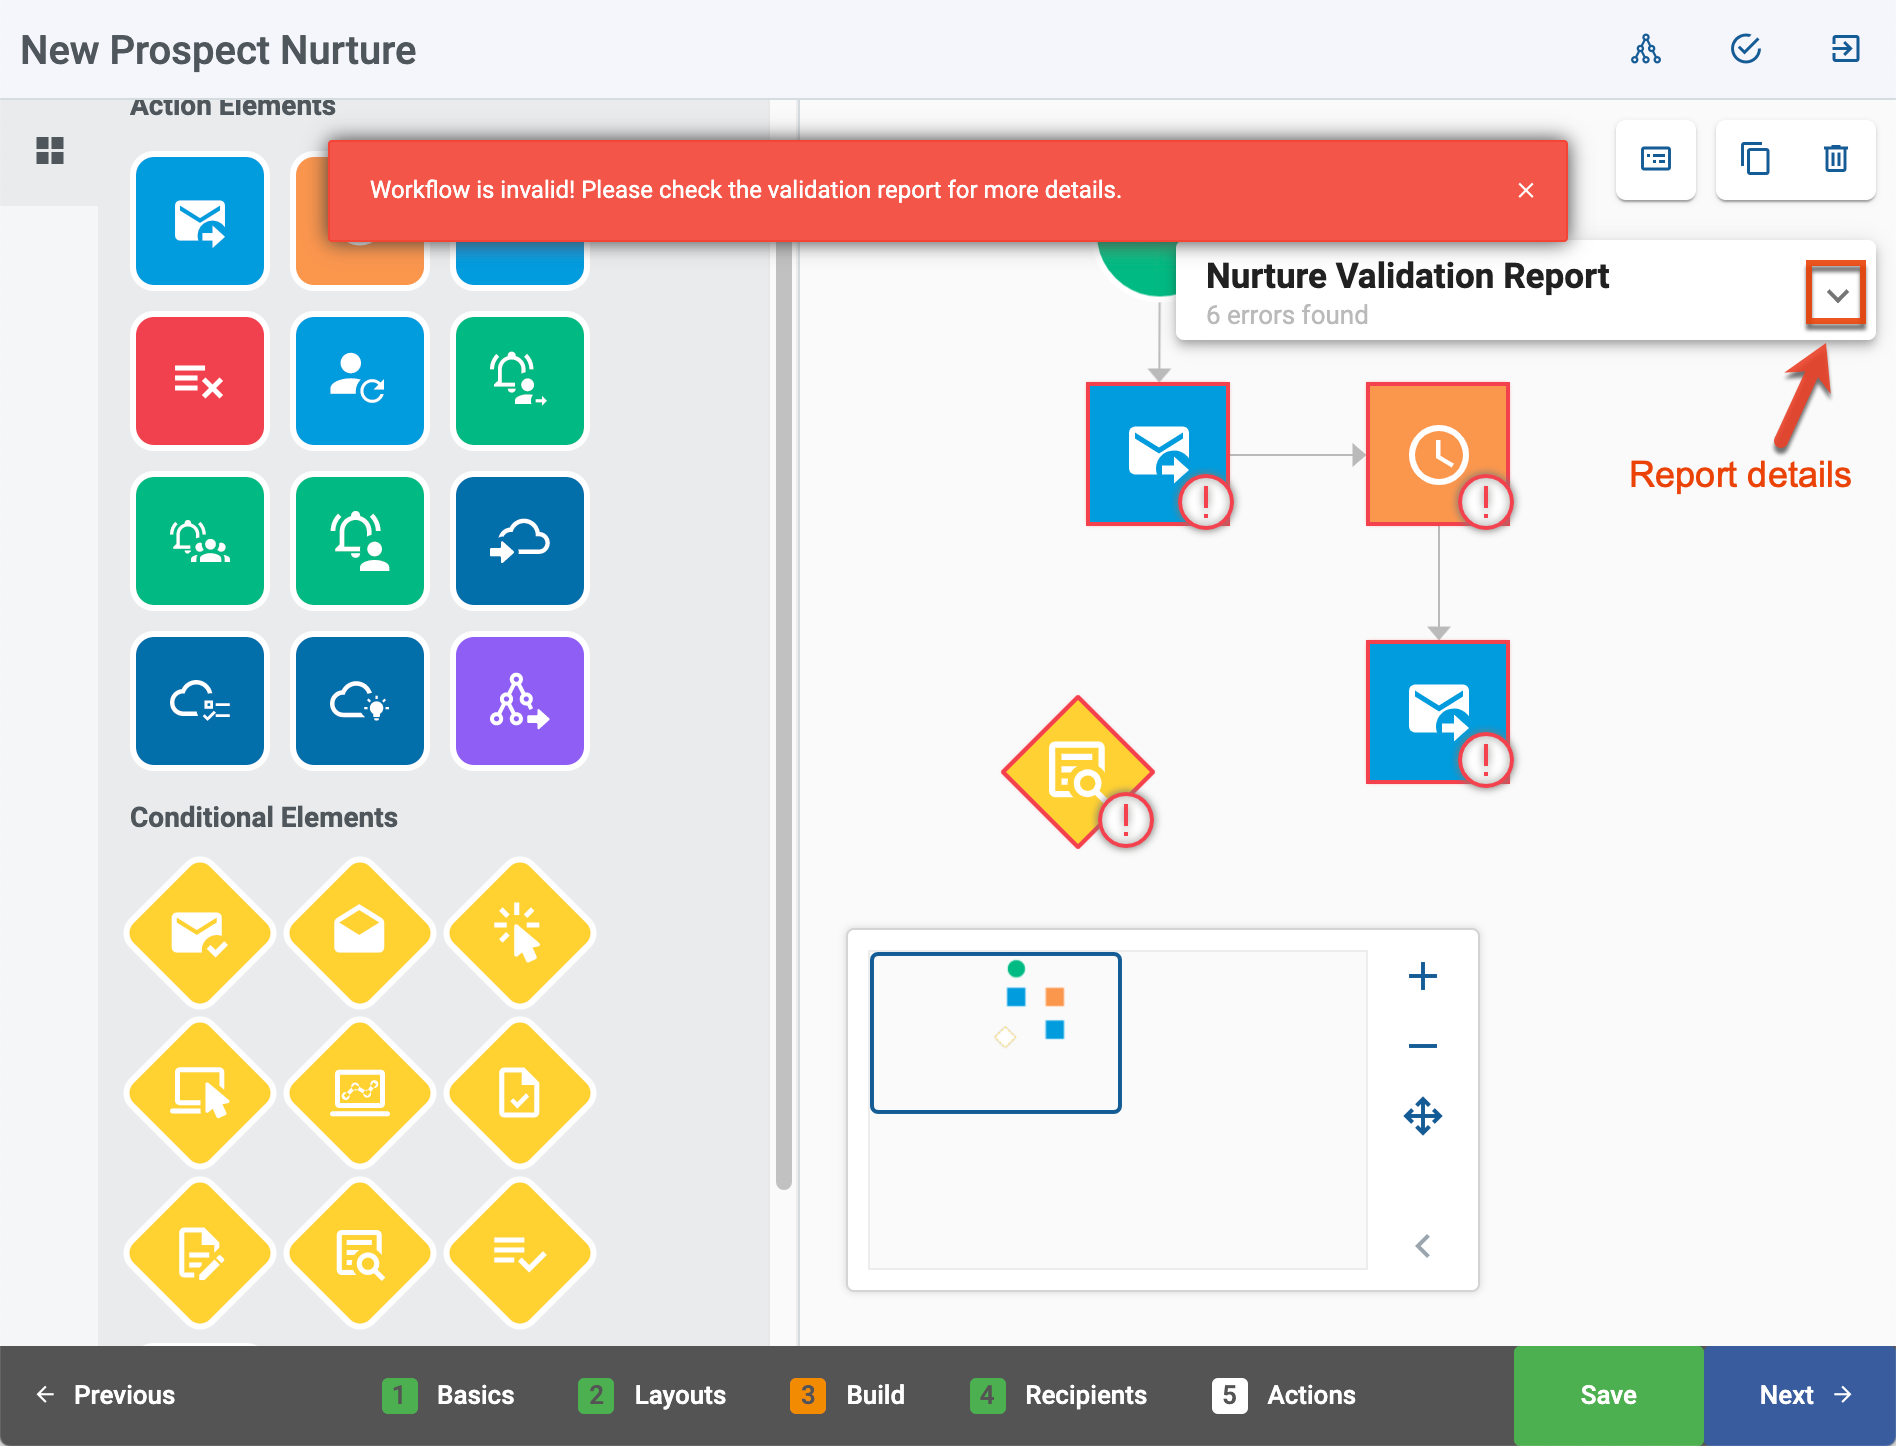
5. Resolve all errors and validate again. When no errors remain, click the Next button.
Using Form, Scoring, and Listener Triggers
When using a form submission, scoring action, or event listener as a trigger for your nurture, ensure you select the "Add to Nurture Builder 2" option. The "Add to Nurture" option is for the legacy builder. These triggers add recipients to the beginning of the nurture.
Selecting Recipients
In Step 4, select the recipients for your nurture from Sugar Market lists. Quickly filter and search by list type, and then drag and drop the list into the include or exclude sections:
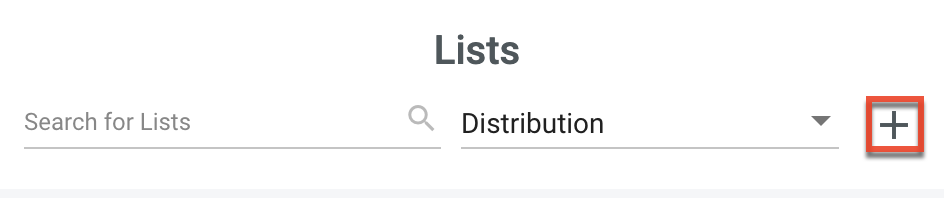
- From the Lists section you can filter your lists by type and use the search field to find a specific list. You can also create a new distribution list by clicking the + button and the Distribution List option. Once the list is created it will automatically be added as an included list.
- Drag the list name to the Include column for recipients or the Exclude column for lists to specifically exclude.
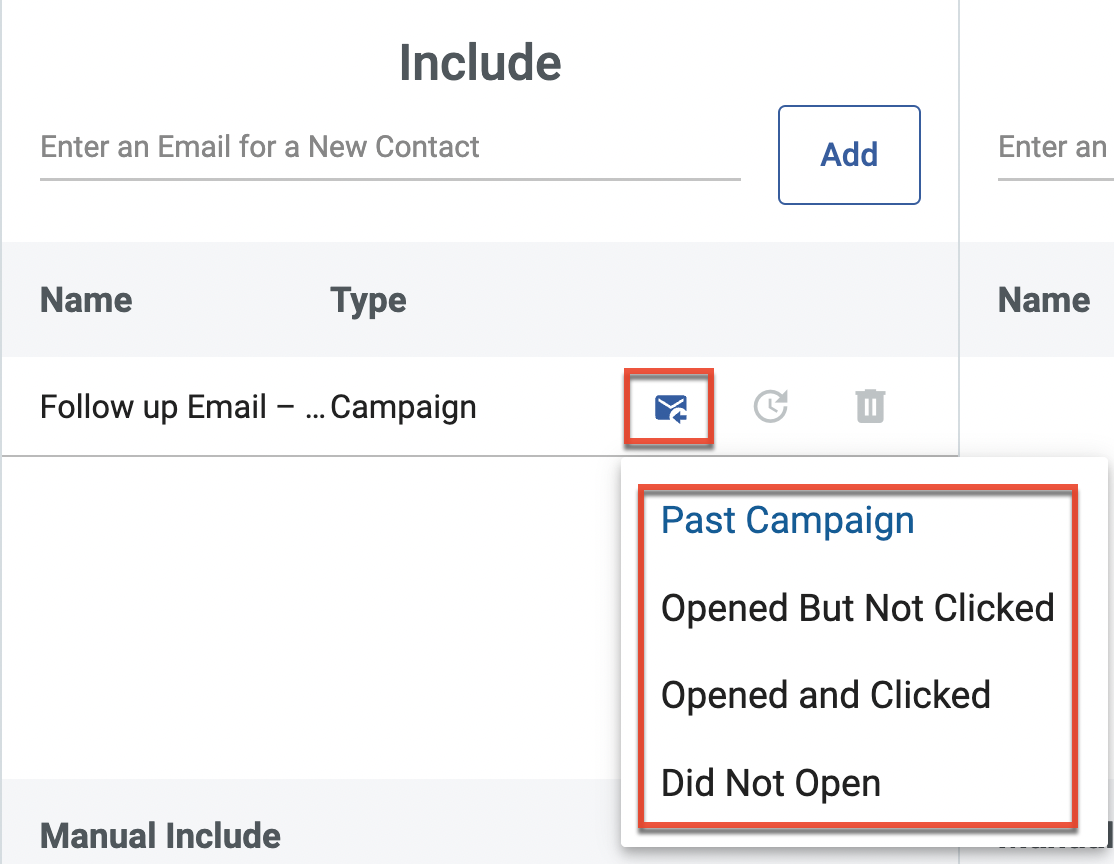
Note: Contacts without an email address will be prevented from entering nurtures that include an email send step. - If a list has qualifiers, drag and drop the list name, and then click the overflow option to select the qualifier.
- To set an interval at which Sugar Market should check your include and exclude lists for updates, click the Auto Refresh icon and then select a time interval.
Note: Recipients added to a nurture via a report recipient list will not pass through a nurture more than once, even if you have configured the report to refresh periodically. For dynamic distribution lists, the auto-refresh setting here is independent of the auto-refresh setting defined in the list settings.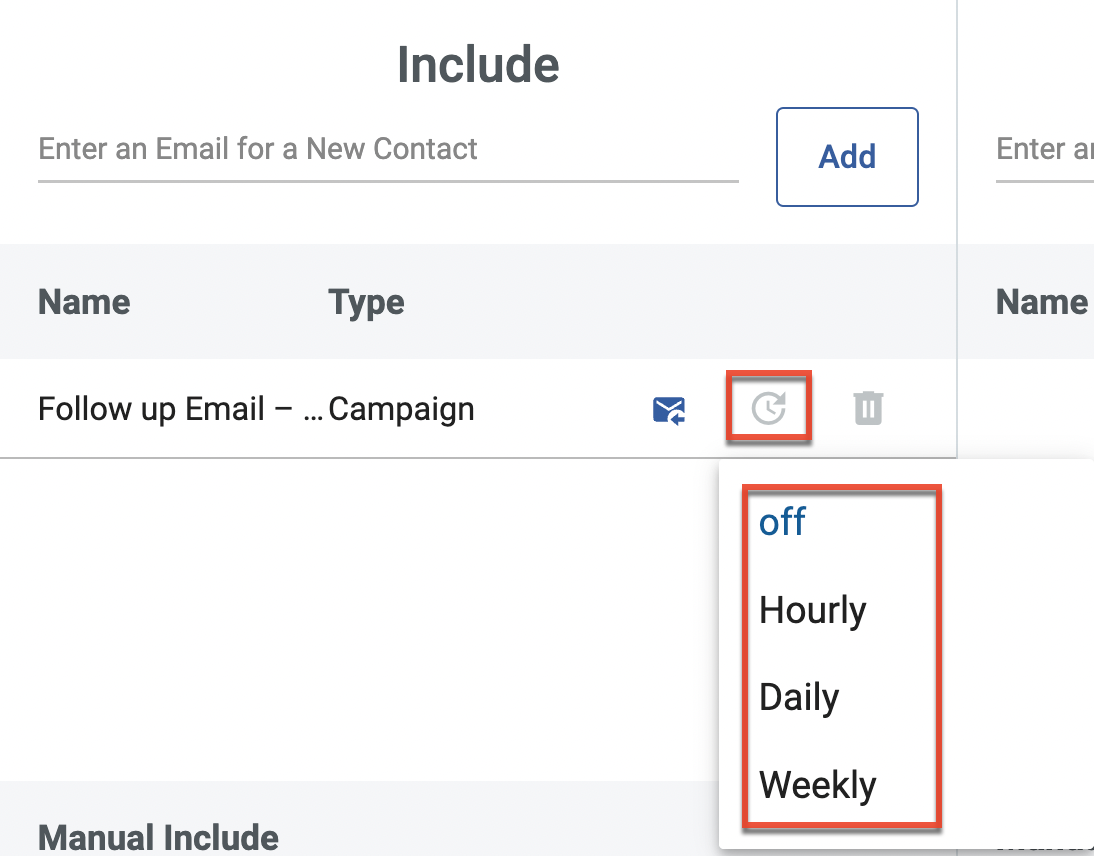
- To manually include or exclude individual email addresses, type the address at the top of the Include or Exclude column, and then click the Add button. The individual names are displayed in the lists at the bottom of the page. Sugar Market creates a new contact with the email address if it does not already exist.
-
Click the Next button when you are done.
Narrowing Lists with Qualifiers
You can use the following qualifiers to refine your list members to include or exclude when using Campaign, Event, and Nurture list types:
Campaign Lists
- Past Campaign: Contact was a member of the selected campaign, regardless of their open and click status.
- Opened But Not Clicked: Contact opened the email but did not click through any embedded links.
- Opened and Clicked: Contact opened the email and clicked through at least one embedded link.
- Did Not Open: Contact did not open email.
Event Lists
- Registered: Contacts who registered for the event.
- Attended: Contacts who registered for and attended the event.
- Requested Follow-Up: Contacts flagged for follow-up information after the event.
Nurture Lists
- Currently and Previously Enrolled: Contacts that are members of the nurture, or were members of the nurture in the past. To select currently enrolled members that are in the process of flowing through the nurture, use the Active qualifier instead.
- Completed: Contacts that have flowed through and reached the terminating step in the nurture.
- Active: Contacts that are currently flowing through the nurture.
- Removed: Contacts that were removed from the nurture by any method, including manually and by a trigger.
Preference Lists
- Opt In: Contacts in the preference list that are opted in.
- Opt Out: Contacts in the preference list that are opted out.
Defining Nurture Activation
In Step 5, identify when the nurture will be sent.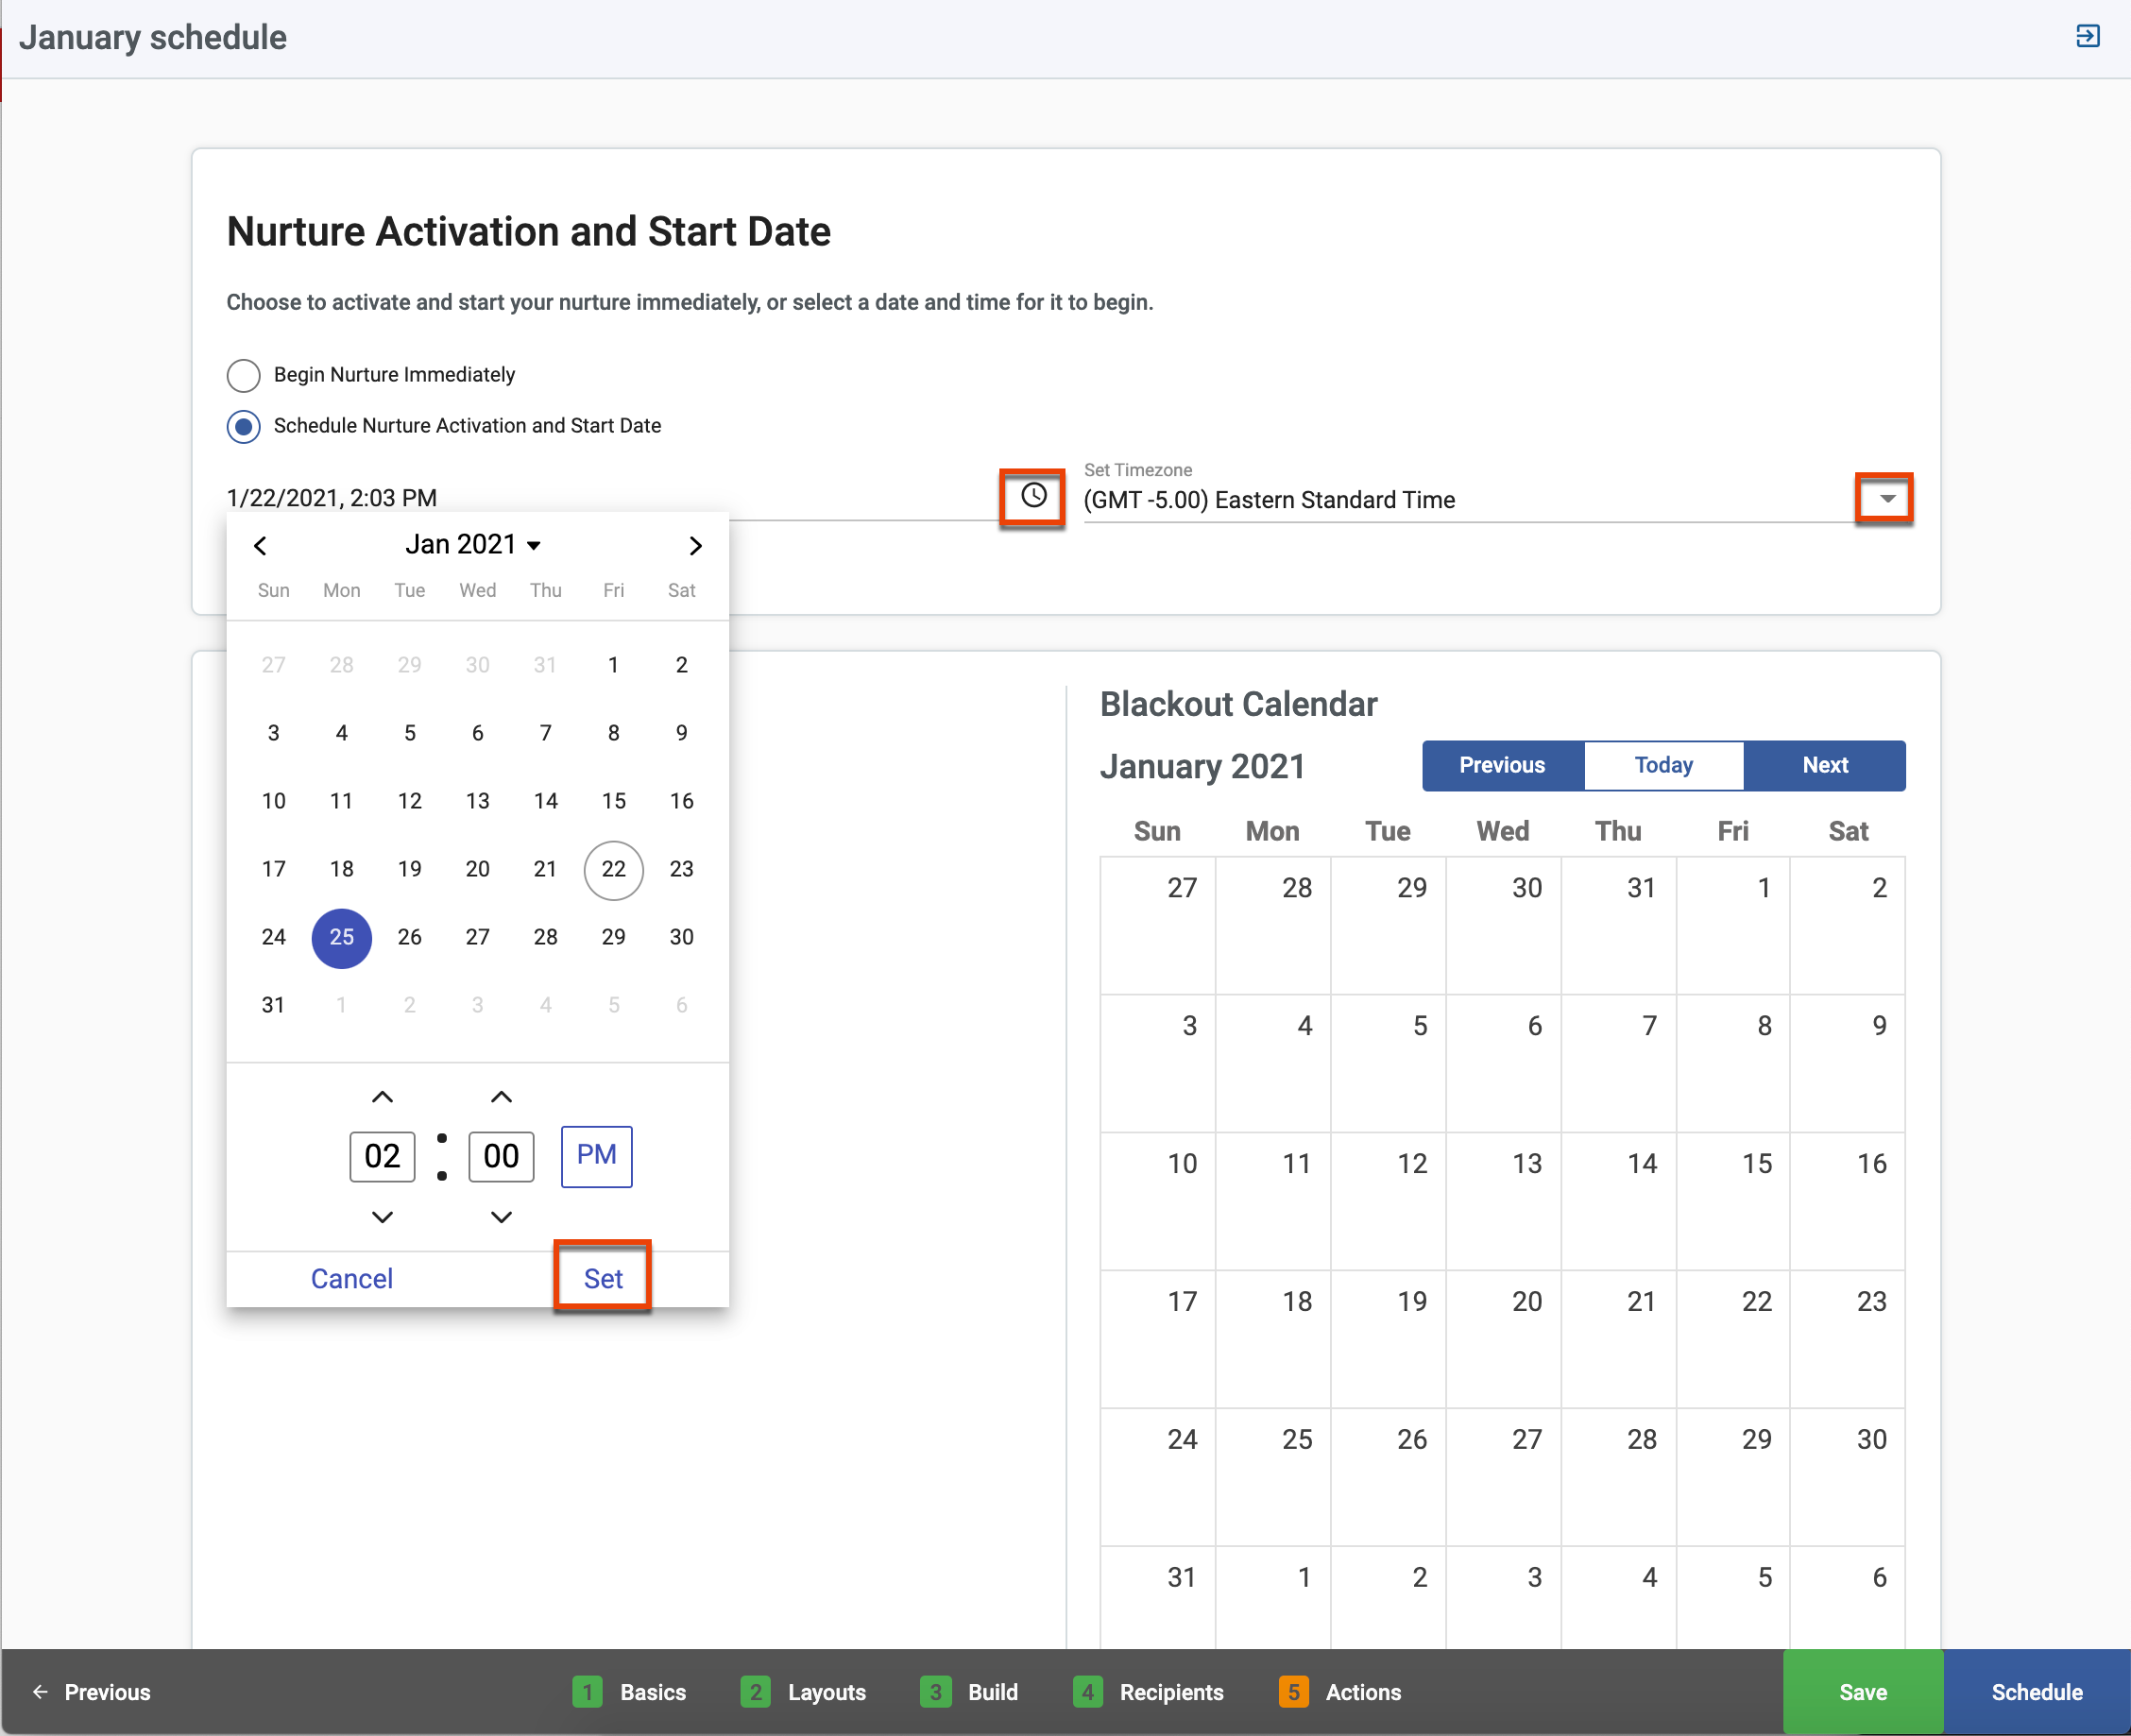
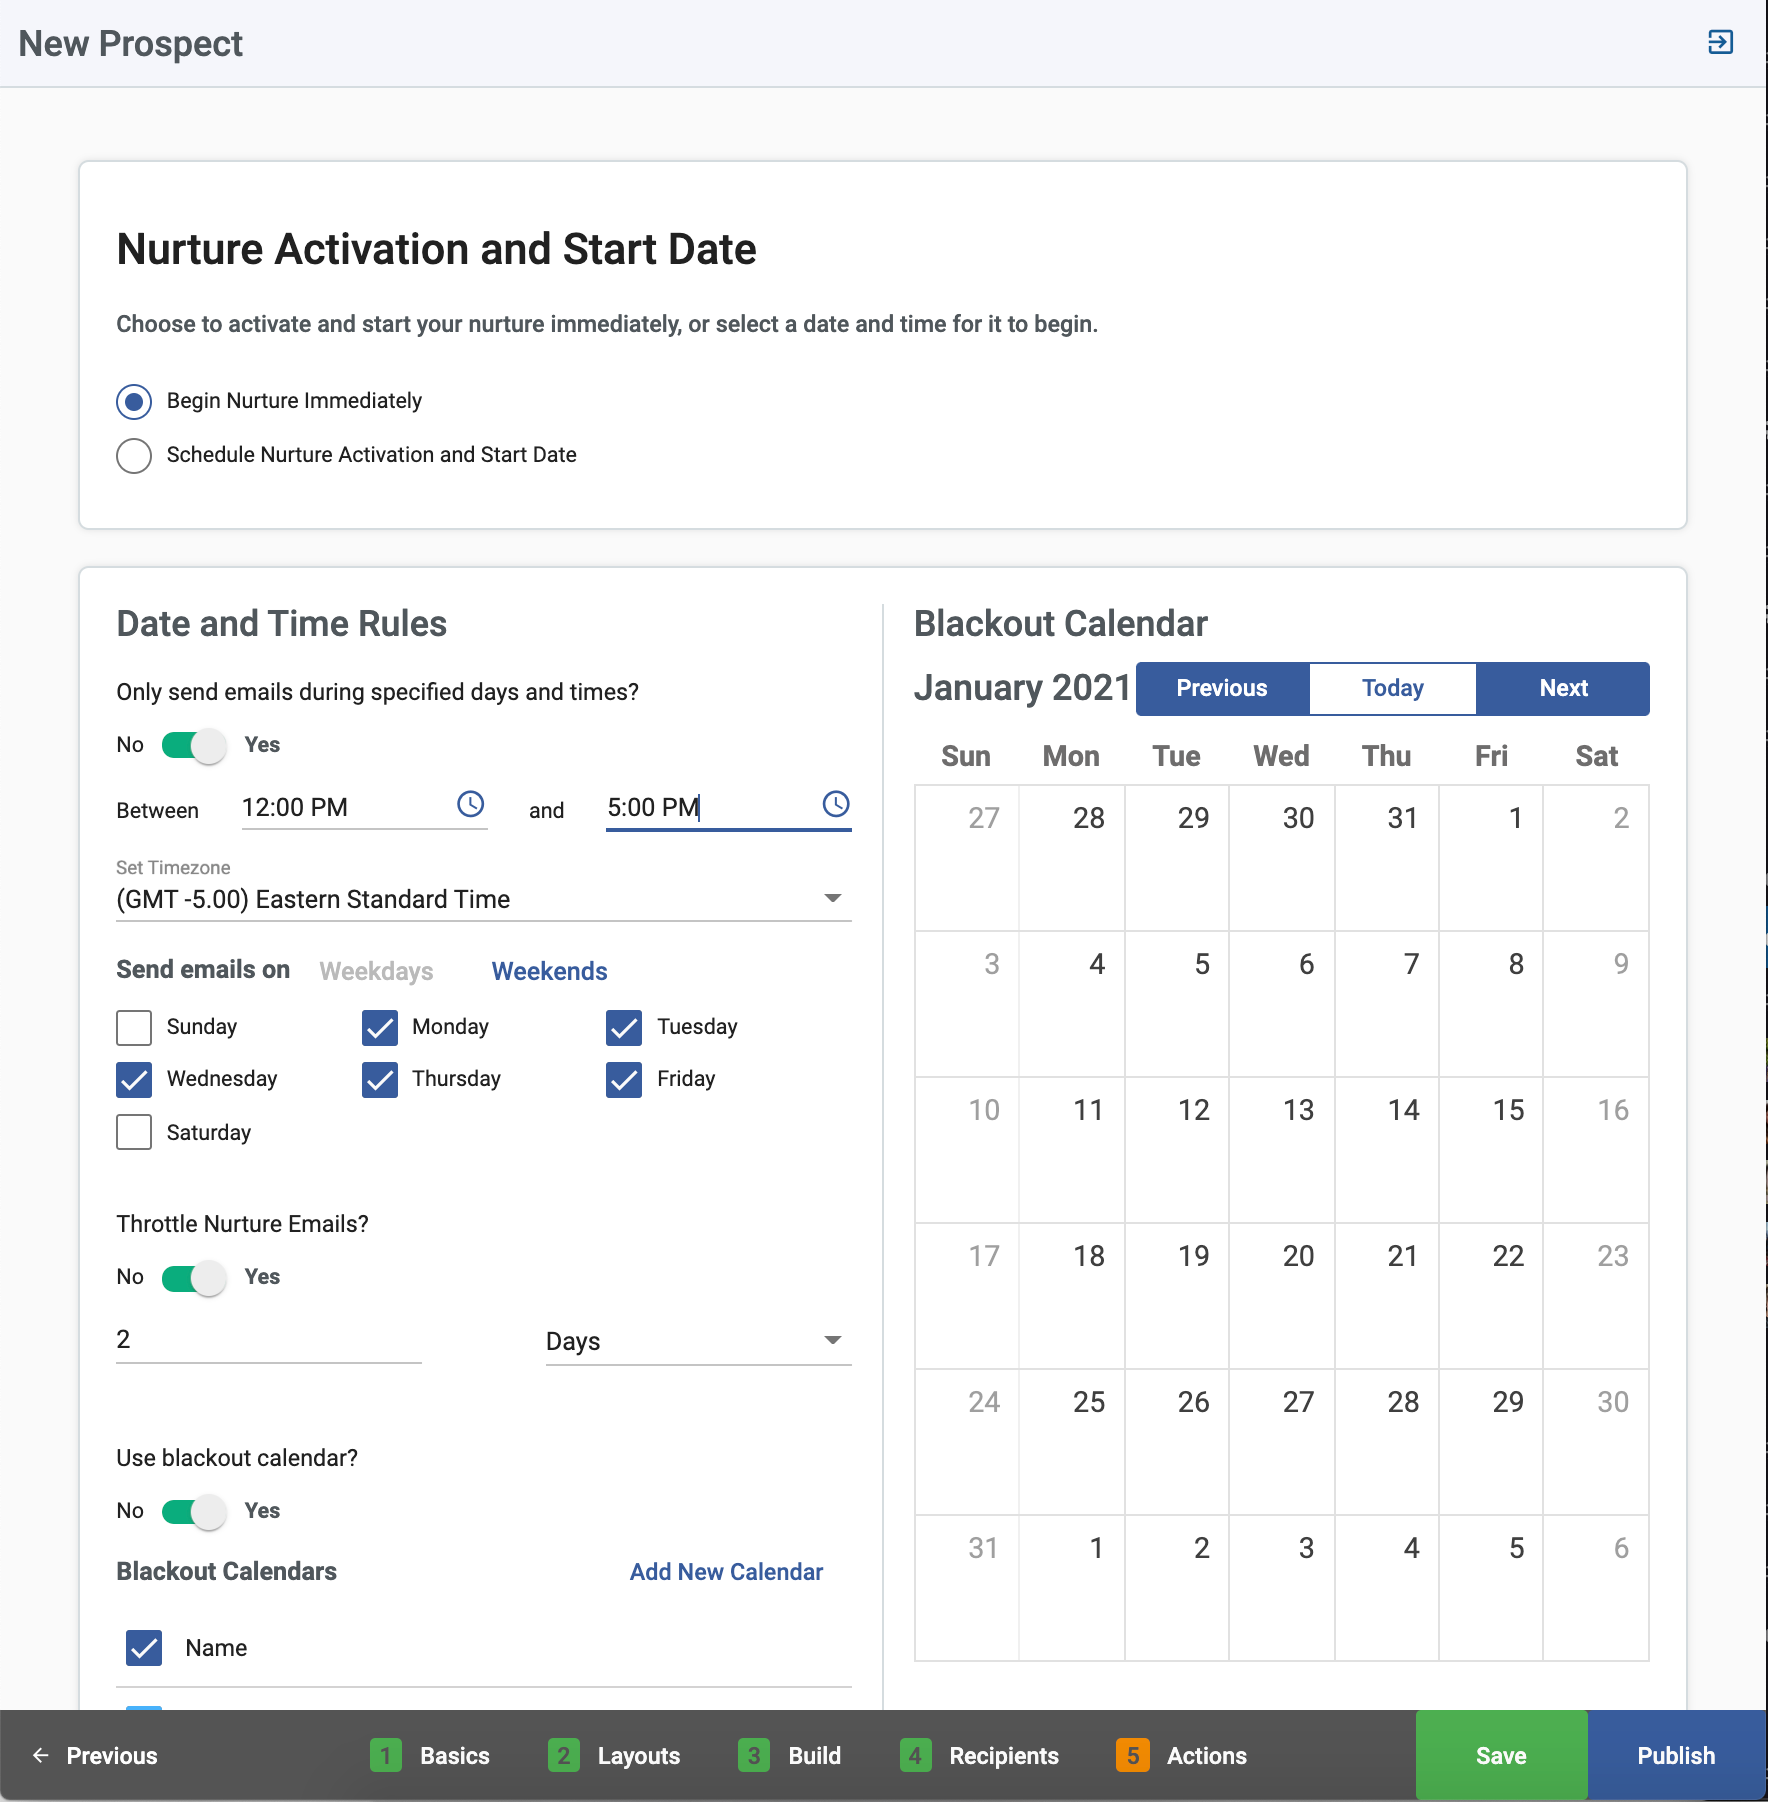
- To begin your nurture immediately after publishing, select the "Begin Nurture immediately" option.
- To schedule the nurture to begin in the future, select the "Schedule Nurture Activation and Start Date" option, click the clock icon to select the date and time, and then click the Set button. The timezone defaults to your current timezone; use the dropdown to select another timezone if necessary.
Note: Any date and time rules defined in the nurture will be respected when scheduling nurtures. For example, if a nurture is scheduled to begin on a Monday, and Mondays are not defined as a send day in the Date and Time rules, then the nurture will begin on the Tuesday after the scheduled date.
Date and Time Rules
Drag the sliders to the Yes position to enable the following date and time rules.
Sending Emails During Specified Times
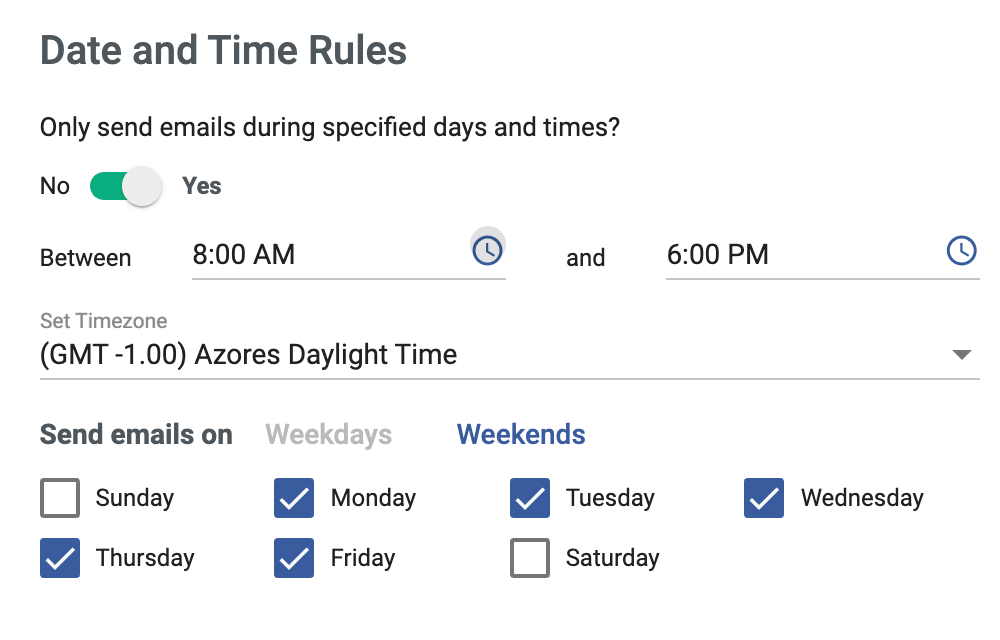
To limit email sends to a specific time range:
- Slide the day and time option to the Yes position.
- Click the clock icons to set the start and end times to define the time range when the emails should be sent. Either type numbers in each field or use the arrows to increase and decrease the numbers.
- Click the AM/PM button to toggle to the desired period, and then click the Set button.
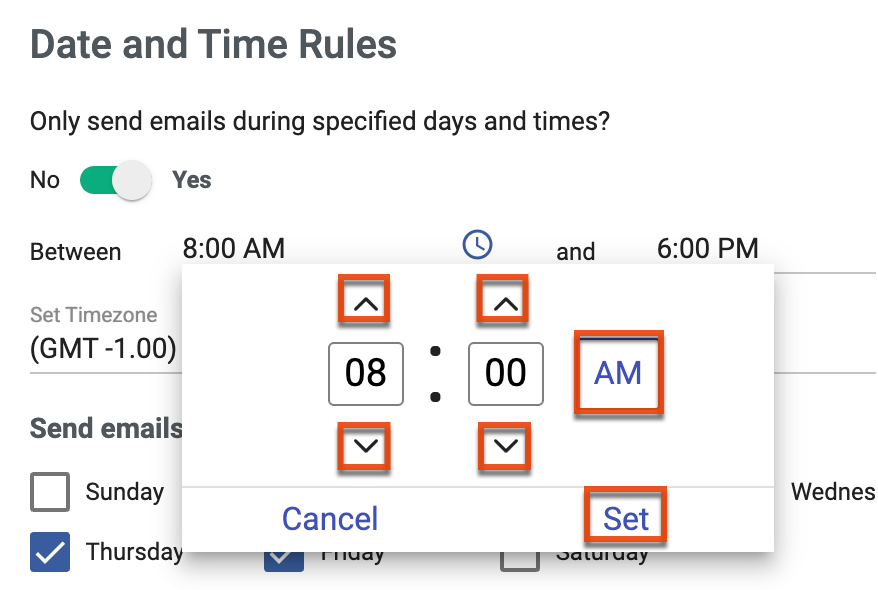
- Click the down arrow in the Set Timezone field to select another time zone.
To limit email sends to specific days of the week:
- Select the checkboxes next to the days when emails should be sent; or
- Choose the Weekdays or Weekends option to automatically choose days.
In the following example, nurture emails will only be sent Monday through Friday between 8:00 AM and 6:00 PM Azores Daylight Time. Click the Weekends label to also send emails on Saturdays and Sundays.
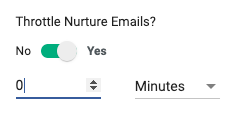
Throttling Nurture Emails
Throttling checks whether the recipient received any other email communication from you within the selected time period (e.g. a 2-day throttle holds the nurture email for 2 days and then sends). It can be useful to enable throttling when you are also sending targeted emails at the same time, ensuring your contacts do not receive too many emails from you within a short time period. Be careful using this feature when your nurture includes time-sensitive information.
To enable throttling:
- Slide the throttle option to the Yes position.
- Type a number or use the arrows to increase or decrease the number of increments.
- Click the down arrow to display time increments and then make a selection.
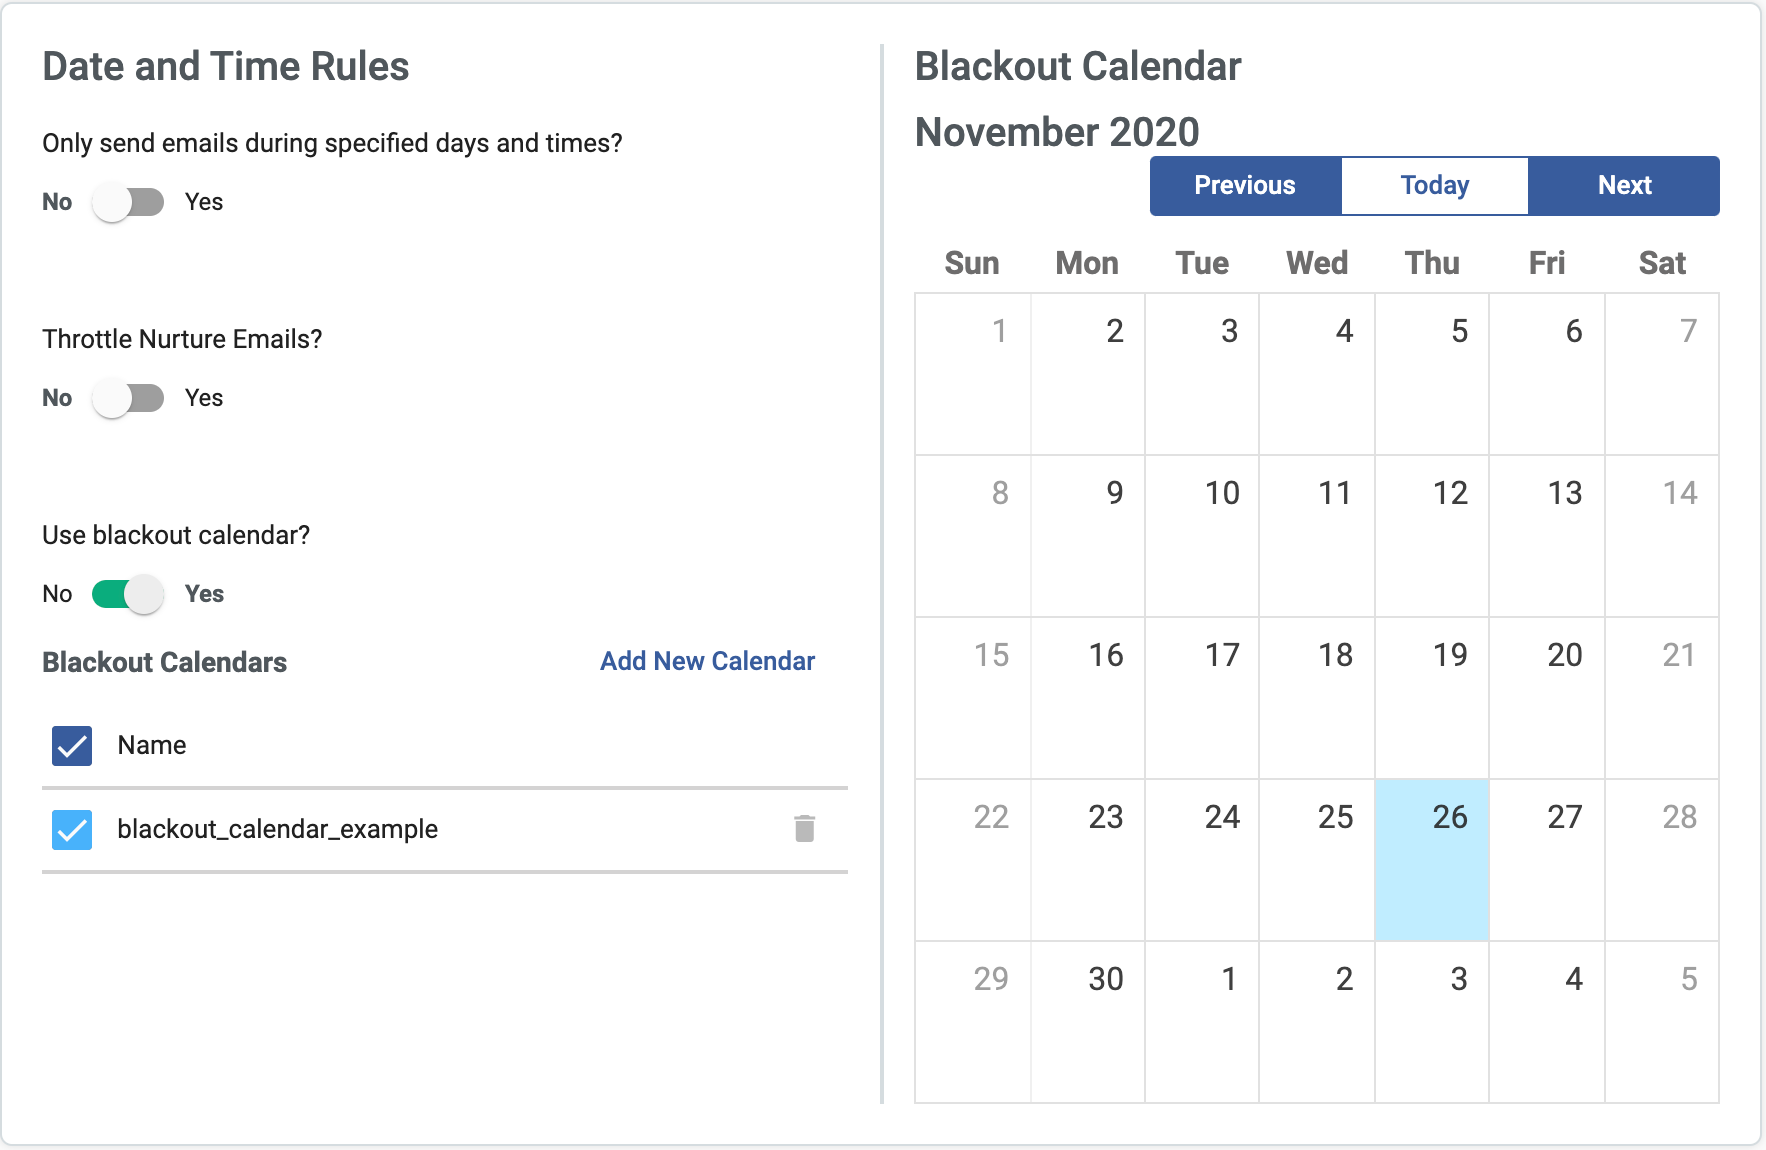
Using Blockout Dates
Blockout dates will pause send email action elements for all nurture recipients. Nurture recipients will proceed through the send email action element on the next non-blockout date that meets all other set conditions. You can identify blockout dates for your nurture individually or by a group of dates contained in a blockout calendar.
To use blockout dates:
- Slide the blockout calendar option to the Yes position.
- Click the Add New Calendar link to upload a new calendar, identify specific days, or choose an existing blockout calendar.
Adding a New Blockout Calendar
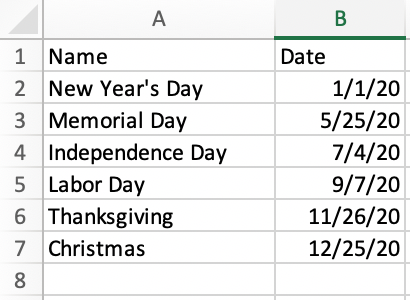
Blockout calendars contain groups of blockout dates. You may want to use blockout calendars to group and identify sets of related dates (e.g. Sales Holidays, Trade Shows). You can attach an unlimited number of blockout calendars to your nurture. The required format for calendars is an .XLS, .XLSX, or .XLSM file with one column for Name and one column for Date (MM/DD/YY), as in the following example:
To add a blockout calendar:
- In the Add New Calendar dialog, select the Upload New option.
- Either drag a file to the space indicated or click the Choose File button to navigate to the file location.
- The file name automatically populates the Blockout Calendar Name field. To use a descriptive name for ease of identifying the calendar in the future, overwrite the name (e.g. Support Holidays).
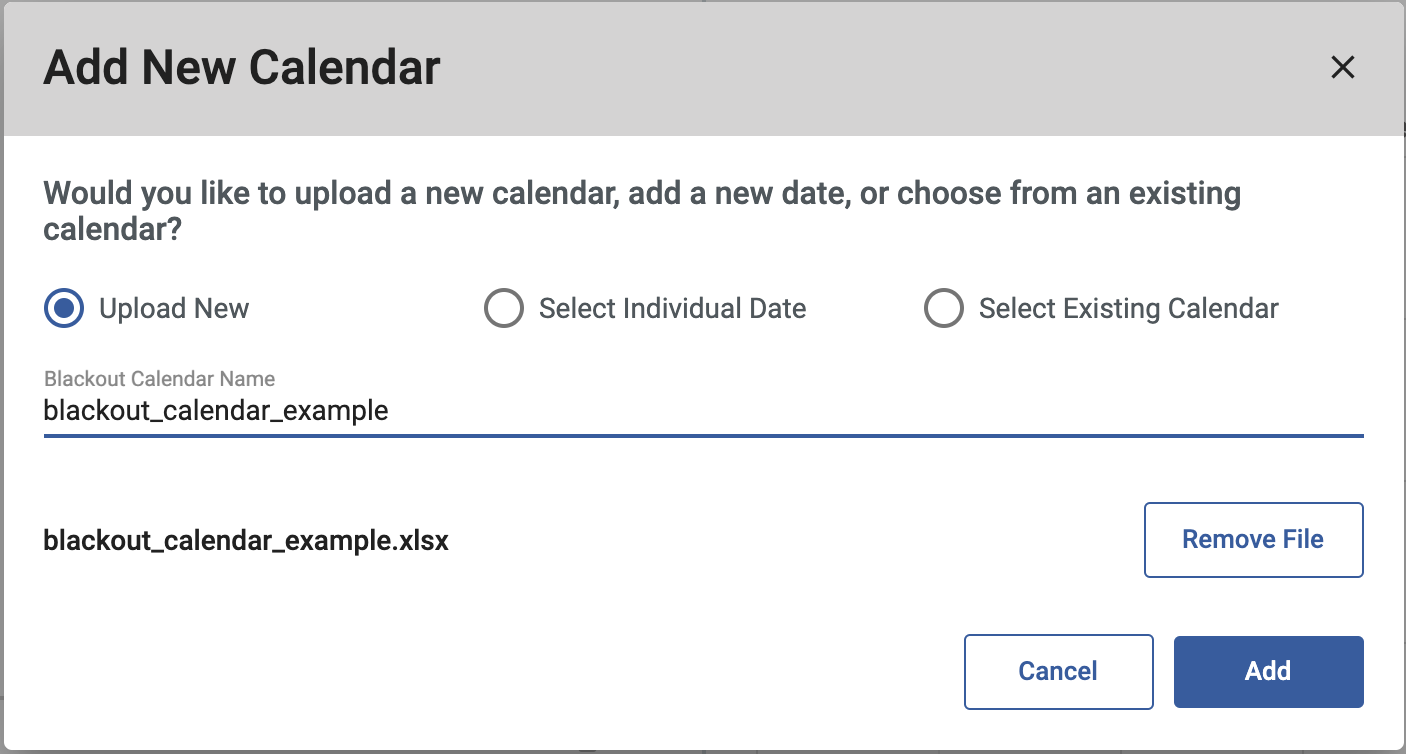
- Click the Add button. The calendar name appears in the Blockout Calendars section and the dates are shaded on the calendar.
Identifying Specific Blockout Dates
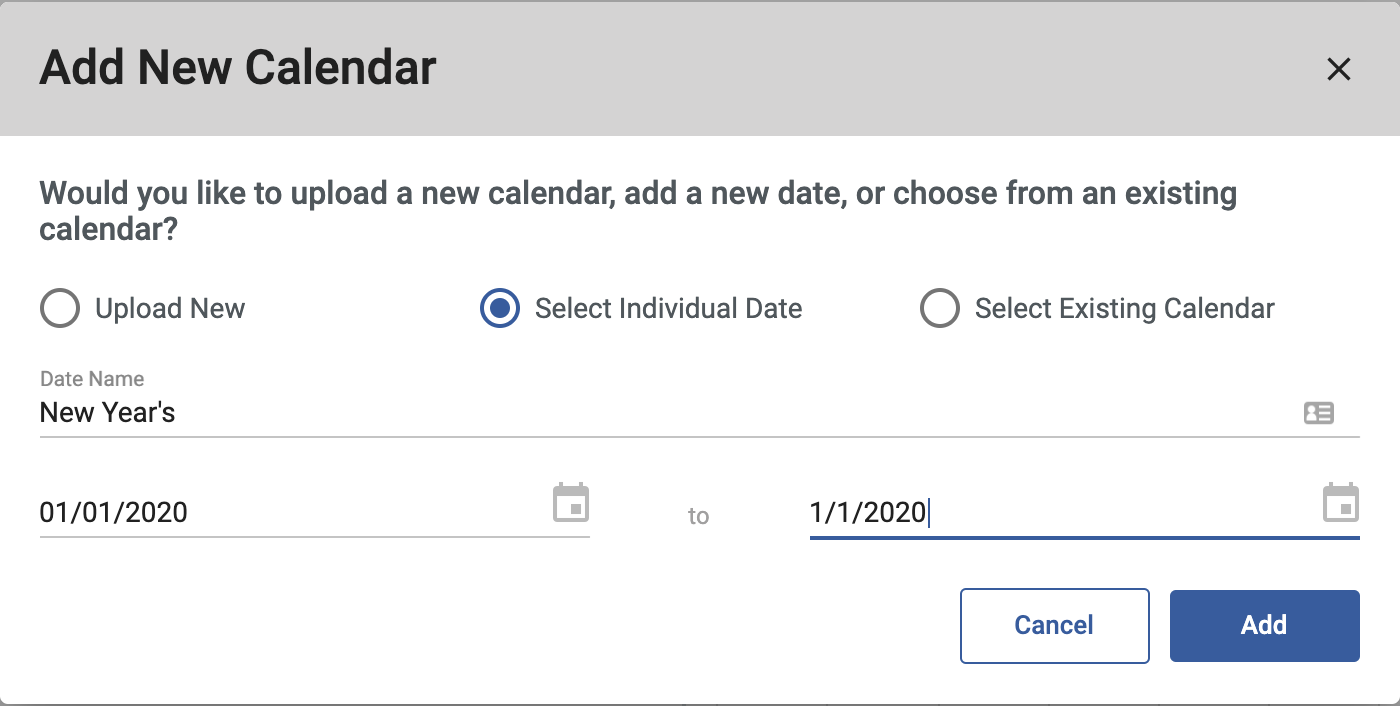
To add individual blockout dates:
- In the Add New Calendar dialog, select the Select Individual Date option.
- In the Date Name field, add an identifying name for the date (e.g. New Year's Day).
- Either type the start and end dates or use the calendar widgets to select dates. This can be an individual date or range of dates.
- Click the Add button. The date name appears in the Blockout Calendars section and the dates are highlighted in blue on the calendar.
Using an Existing Blockout Calendar
All previously uploaded blockout calendars are saved in Sugar Market, and there is no limit to the number of calendars you can use in a nurture.
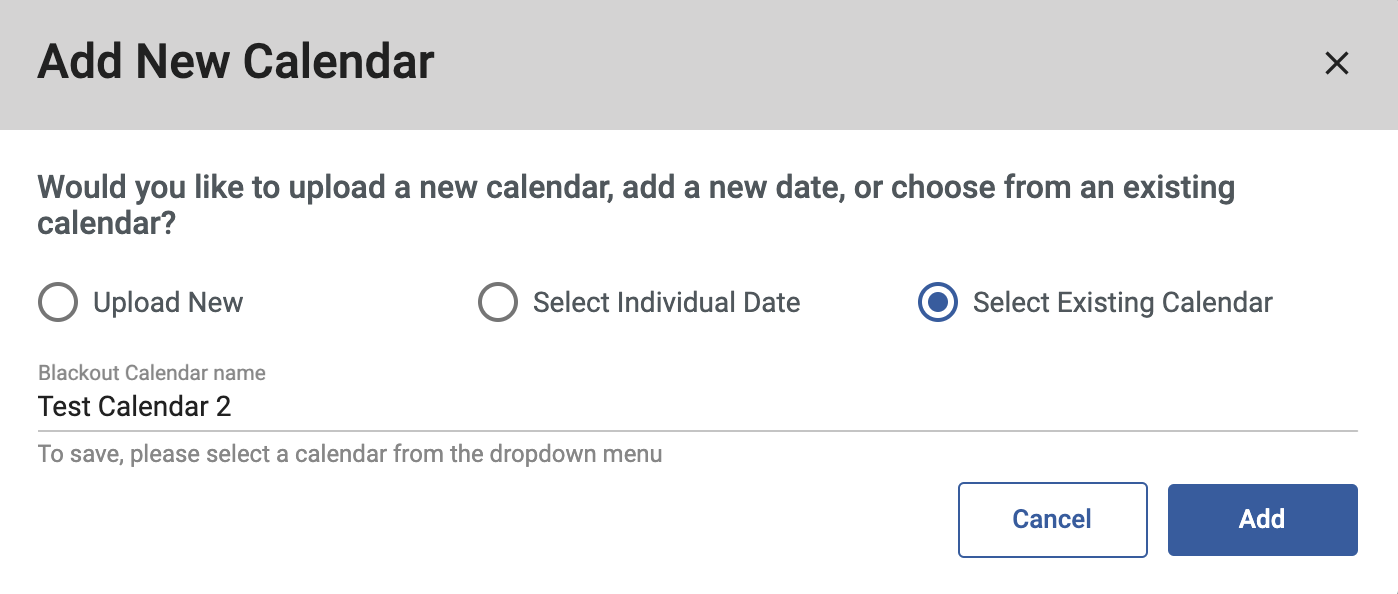
To use an existing calendar:
- In the Add New Calendar dialog, select the Select Existing Calendar option.
- Shift the focus to the Blockout Calendar Name field, and either start typing a calendar name or use the scrollbar to browse the existing calendars.
- Select the desired calendar, and then click the Add button. The calendar name appears in the Blockout Calendars section and the dates are highlighted in blue on the calendar.
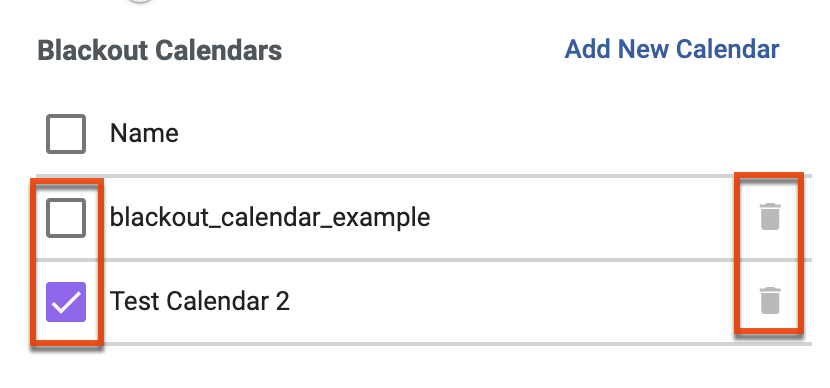
Removing a Blockout Calendar
Remove a blockout calendar that is attached to your nurture on a temporary basis by selecting the checkbox next to the attached calendar name, or click the trash icon to remove it from the nurture entirely. This does not remove the calendar from Sugar Market; it will still be available in the list of existing calendars.
Publishing the Nurture
Also in Step 5, the final step is to activate the nurture. The label of the button that activates the nurture dynamically updates to reflect the activation method you selected above. Click the Publish/Schedule button at the bottom right, and then click the Yes button to confirm that you are ready to activate the nurture. The nurture will start immediately and the nurture status will change from Draft to Published.

Note: If there is an active edit session open for any emails referenced in the nurture, then an error message will prompt you to close all active email sessions in Email Builder before the nurture can be published or scheduled.