Creating Events
Overview
The Events module allows you to track and manage event engagement for in-person and webinar event sessions. From the Events module, you can configure session details, manage participants, and automate communications.
Preparing for Your Event
To prepare for your event we recommend completing the following setup steps:
Creating a Form
Sugar Market forms can be used to register participants for your event session. Once your form and event session are created you will need to connect them to register participants, the form can then be embedded on a page and shared with participants.
Note: If you are creating a webinar event session synced to Zoom, registration for the webinar should only be done via either Zoom or Sugar Market to avoid attendees receiving duplicate communications.
To connect a form to your event:
- In the Setup step of the form builder set the Type field to "Event".
- Use the Select Event field to select your event. You can also click the + icon to create a new event in a separate tab.

- Add either a radio or dropdown field.
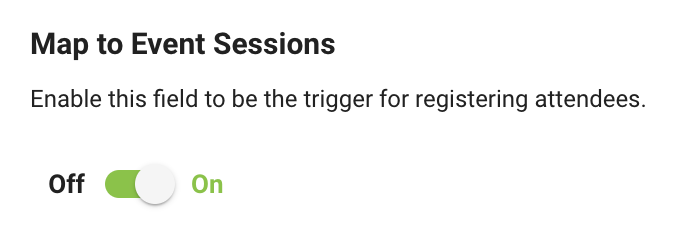
- Turn on the Map to Event Sessions option within the field settings.
- Set a Field Name.
Note: When setting the Field name do not use any special characters. Special characters may cause issues connecting the form to your event session. - Apply the field settings.
Creating Email Templates
With each event session, you can trigger unique email templates for four different email communication types: Registration Confirmation, Follow-Up to Participants That Attended, Follow-Up to Participants That Did Not Attend, and Reminder to Registered Participants. For more information on creating email templates, please see the Working with Email Templates page.
Note: Event trigger emails can only use email templates created in Email Builder.
Push Event Data to External CRMs
If you have an integrated external CRM, event data can be pushed from Sugar Market to your integrated CRM.
To enable the sync:
- From the user menu, click "Admin".
- In the CRM Administrator section, within the External Connectors tab, click your external [CRM Name].
- Within the Push Data section of the external CRMs settings check the box to enable the sync to push event data.
Creating Your Event
An event is used to group event sessions and connect them to other objects like forms and pages. To create an event:
- Click the open button at the top of the navigation bar to view all available modules.
- Click the Events module.

- From the Events list view, click the Create button.
- From the Create Event pop-up, set a name for your event and select which folder the event will be saved in.
- Click the Create button.
Creating An Event Session
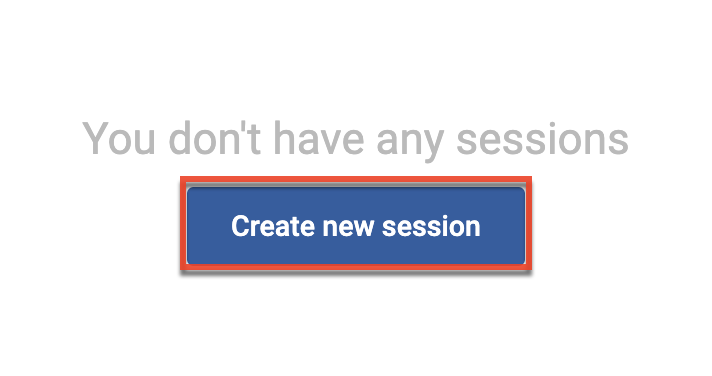
Once you have created your event you can create sessions for the event. To create an event session:
- Click the Create new session button from the event edit view.
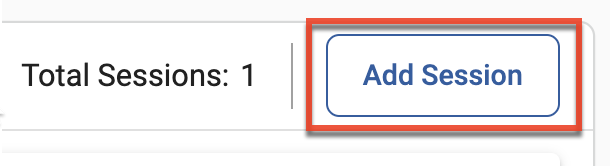
- To create additional event sessions click the Add Session button.
- Select the Session Type.
- If you are creating an In Person Session, complete the required fields and click Save.
- If you are creating a Webinar, you will use the Webinar Software field to select the webinar platform you will sync your event session to. Note: If you are syncing your event session to a Zoom webinar you will need to first add the Zoom Webinar Integration for Sugar Market app to your Zoom account. For more information on setting up the Zoom connection please refer to Zoom Webinar Connection section of this page.

- Once your have selected your webinar platform you will either be prompted to connect to the platform by logging in or if the connection is already established you will use the Webinar Sessions field to select the webinar session you wish to sync your event session to.
Zoom Webinar Connection
When using the Zoom Webinar connection there are a few prerequisites that must be met to establish the connection and requirements to be aware of when creating your event session.
Connection Prerequisites
As a Sugar Market user you must meet the following requirements before you can connect a Zoom webinar to your Sugar Market event session:
- You are a user in your Zoom account, the account is subscribed to Zoom Webinars, and you have the needed permissions in Zoom to access webinars.
- The Zoom Webinar Integration for Sugar Market app is added to your Zoom user account. The app can be added through any of the methods below:
- Log into your Zoom account via an event session in Sugar Market and the app will be added automatically to your user account
- Add the app directly from the Zoom App Marketplace to your user account
- A Zoom admin can add the app to your user account
- Once the app is added, if the "Require publicly listed apps on the Zoom App Marketplace to be approved by admin" setting is enabled in your Zoom account, the app must be approved by your Zoom admin before you can establish a connection. How it is approved depends on your Zoom account settings. You can find more information on approving apps via Zoom's Support documentation.
- Once the app is added and approved, you can establish a connection between your Zoom webinar and Sugar Market event session.
Session Requirements
Once you have established a connection to your Zoom Webinar there are some session requirements that are important to follow:
- When creating your webinar in Zoom, registration must be marked as required in the Zoom webinar settings. If registration is not marked as required, Zoom will be unable to push webinar data to Sugar Market.
- To avoid attendees receiving duplicate communications, always manage webinar registration and communications exclusively in either Zoom or Sugar Market.
- If any participant synced from Sugar Market to Zoom cannot meet the registration requirements set for the Zoom Webinar their attendance status will be set to Registration Rejected.
Configuring Your Event Session
Once you have created an event session you can begin configuring the details of your session. Session details are divided into sections which can be expanded and collapsed as needed.
Only the fields that affect the behavior of your event sessions are outlined below. All other fields are used only as merge tags. Fields associated with a merge tag allow you dynamically pull the field's specific value into your event session trigger emails. To copy a field merge tag, click the tag icon next to the field then you can paste it into your email. 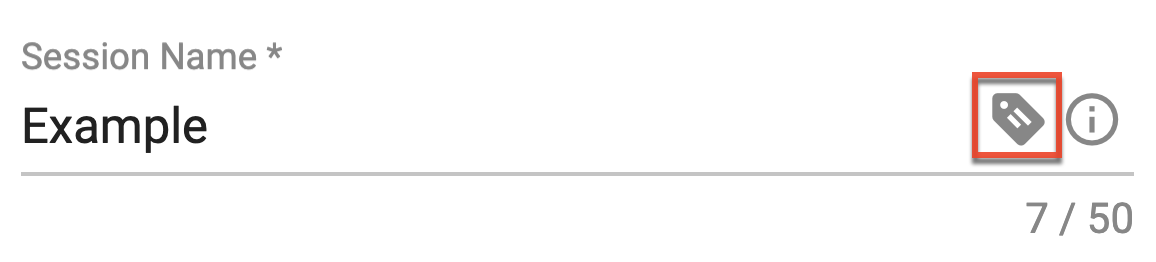
General Information
The General Information section contains fields used to set the status, start/end time, and the max amount of participants allowed.
| Field | Description |
| Session Name | The name of the event session. This value is used in the subject line of event session trigger emails |
| Session Status |
The status of the event session. The value selected will cause the following behavior:
|
| Time Zone | The time zone for the start/end time and trigger email send times of your event session |
| Start Time | The start time of the event session |
| End Time | The end time of the event session |
| Max Amount of Participants | The maximum amount of participants that can be enrolled in the event session. Once the maximum amount of participants have enrolled the session will be hidden on pages with a connected form |
Webinar/Dial In Details
The Webinar/Dial In Details section contains fields that can be used to share call and webinar information.
| Field | Description |
| Webinar Software | For Webinar event sessions, this will display the name of the webinar software syncing with the event session |
Location and Time
The fields in the Location and Time section are used as merge tags to share specific location and time details in your event session trigger emails.
Calendar Invite
The fields in the Calendar Invite section are used to share a calendar event for your event session.
| Field | Description |
| Outlook Calendar Invitation | A dynamic Outlook calendar event that can be shared with participants. The title of the event will be the Session Name field value |
| Google Calendar Invitation | A dynamic Google calendar event that can be shared with participants. The title of the event will be the Session Name field value |
| In-Calendar App Reminder | When enabled this will generate a reminder in the participant's calendar application if they have added the calendar event. Note: This feature only functions for certain Outlook calendar applications |
| Invite Text | Texted added to this field will be displayed in the calendar event description text |
| Participant Join URL | For webinar event sessions this link is synced from GoToWebinar and can be shared with participants so they can join the webinar |
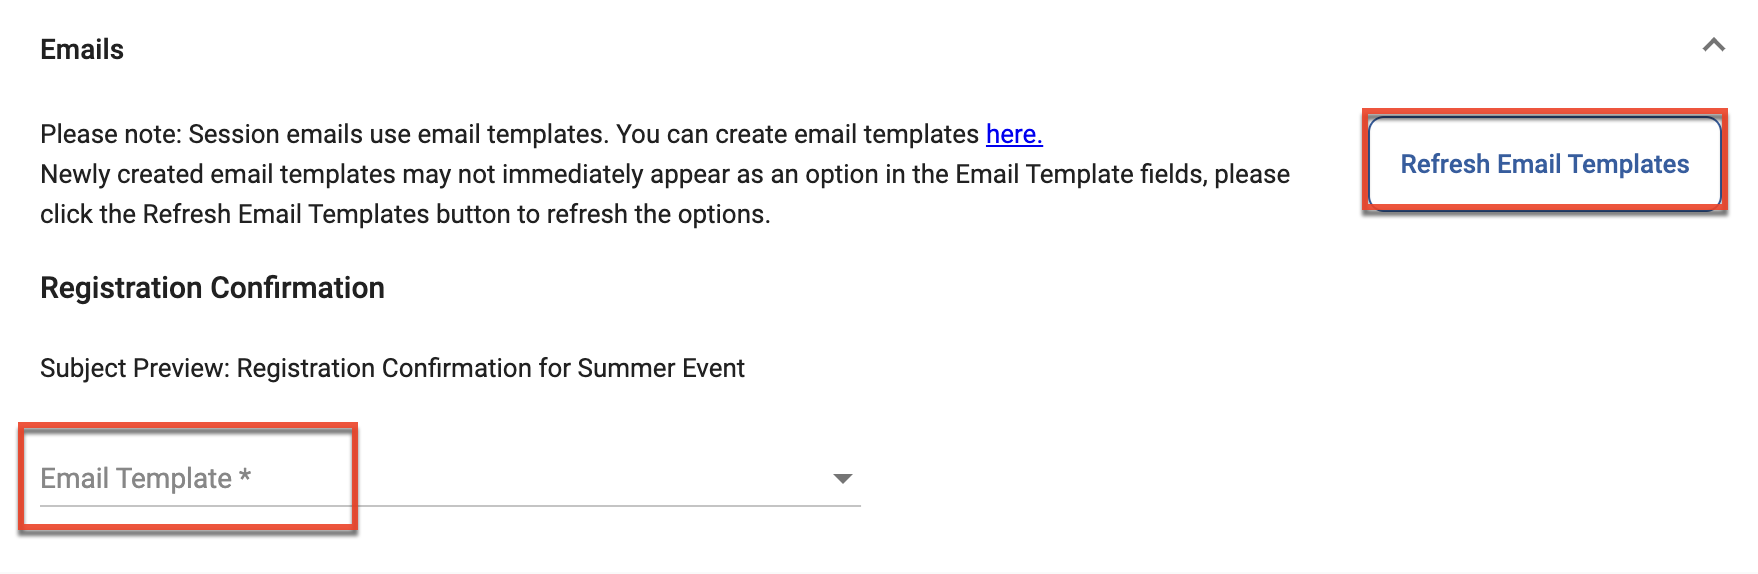
Emails
The Emails section is used to configure trigger emails so you can automate your communications to participants. Session event trigger emails use Email Builder email templates.
Note: If you are creating a webinar event session synced to Zoom, communications for the webinar should be always be done exclusively in either Zoom or Sugar Market to avoid attendees receiving duplicate communications.
To enable a session trigger email:
- Complete the Session Emails Setup fields.
Note: Once the Registration Confirmation email is enabled the Session Emails Setup fields can no longer be edited. - For the "Follow-Up To Participants That Did Not Attend" and "Reminder to Registered Participants" trigger email types, select the Time Amount, Unit of Time, and Send Time.
- Select the email template to be sent for the specific email type. Newly created templates may not immediately appear as an option in the Email Template fields, you can click the Refresh Email Templates button to refresh the options.
- Check the Enable Email Sending checkbox and click the Send button after reviewing the confirmation message.
Note: Once the Registration Confirmation email is enabled it cannot be disabled.
Once an email type is enabled for sending it has specific send conditions that control when the email is sent and to which participants:
| Trigger Email Type | Participant Status | Send Time |
| Registration Confirmation | Registered | Immediately |
| Follow-Up to Participants That Attended | Attended | After the session end time |
| Follow-Up to Participants That Did Not Attend | Registered | At the set date and time |
| Reminder to Registered Participants | Registered | At the set date and time |
Activating your Event
Once your event session is configured you can change your Event Status, in the General Information section, to Active to allow participants to register. For more information on managing participants, please see the Managing Participants page. For more information on managing existing events, please see the Managing Events page.