Salesforce Connector for Sugar Market
Overview
This page covers integrating Sugar Market with Salesforce CRM, including configuring, syncing, and using data mappings.
Important: Review Integration Overview: All CRM Types before proceeding with this topic.
Topics
- Supported Versions
- Integration With Salesforce
- Installing Sugar Market
- Configuring the Salesforce Connector
- Integrating with Campaigns
- Custom Entities
- Lightning Experience
- Salesforce Shared Contacts (Contact Tied to Multiple Accounts)
- Uninstalling Sugar Market
- Salesforce CRM Mappings (separate page)
Supported Versions
Refer to the Sugar Market Supported Platforms page for the current list of Salesforce CRM versions that Sugar Market supports.
Integration With Salesforce
Emails
Once Sugar Market has captured the delivery status of an email recipient, the respective record in CRM will be updated per the connector configuration. The two options are to create either a Sugar Market Email Activity record, or a native Activity (history) record.
Option 1: Sent Email to Sugar Market Email Entity
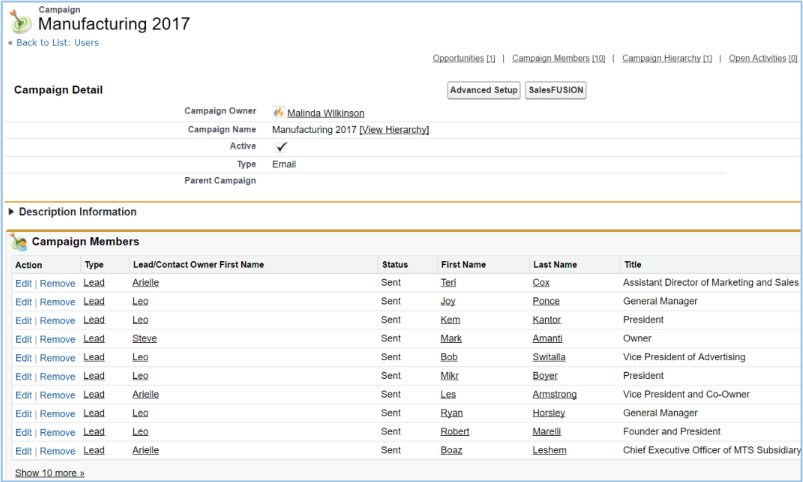
Does contain Opens and Clicks count, as well as being able to see who email was sent from and the name of the campaign. This is a good option if you don't want to clutter up the Activity History section.
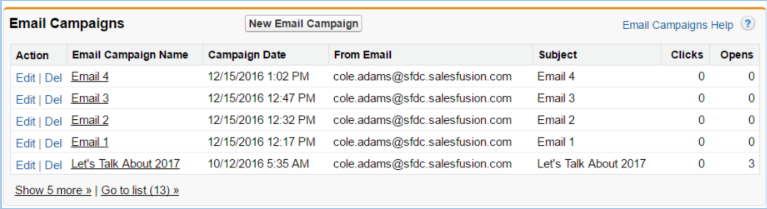
Email URL Link Clicks
Clicking into a campaign pushed to our custom entity will allow you to see the Links\URLs clicked.
Note: Open Activities and Activity History are Salesforce entities, and are not related to the Campaign detail.

Option 2: Sent Email to Activity (History) Entity
This doesn't contain opens and clicks, but is a good option if your sales team lives in the Activity History.

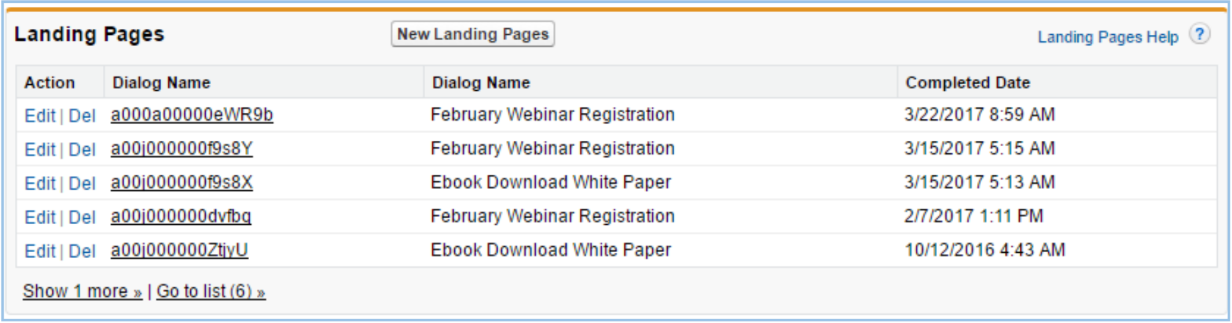
Landing Pages
Once Sugar Market has captured a landing page completion, the respective record in CRM will have a Landing Page completion added to the Landing Pages custom entity.
Completions to Custom Entity
You will be able to see the Dialog Name and completed date for each landing page completion.
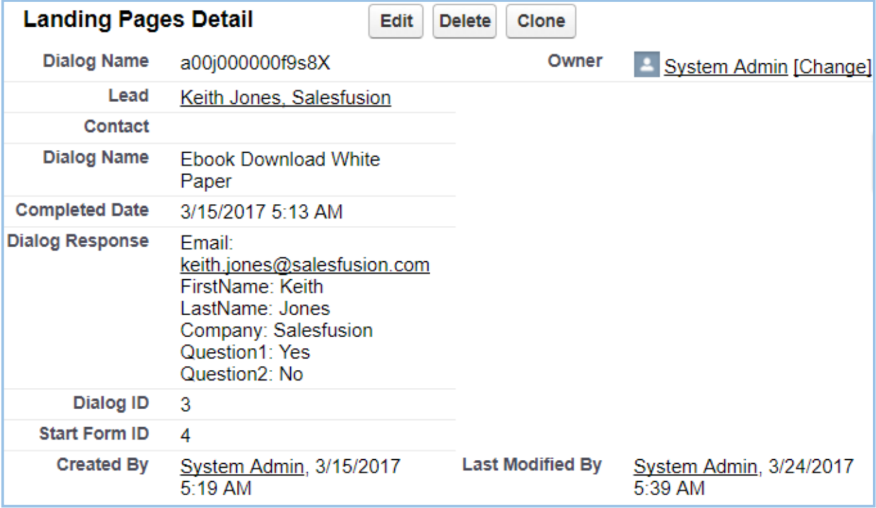
Completion Detail
Clicking into the completions allows visibility of the data submitted into the landing page. (Dialog Response)
Web Activity
Once Sugar Market has captured cookied web activity for a lead or contact, the respective record in CRM will be updated per the connector configuration. The two options are to create either a Sugar Market Web Activity record, or a native Activity (history) record.
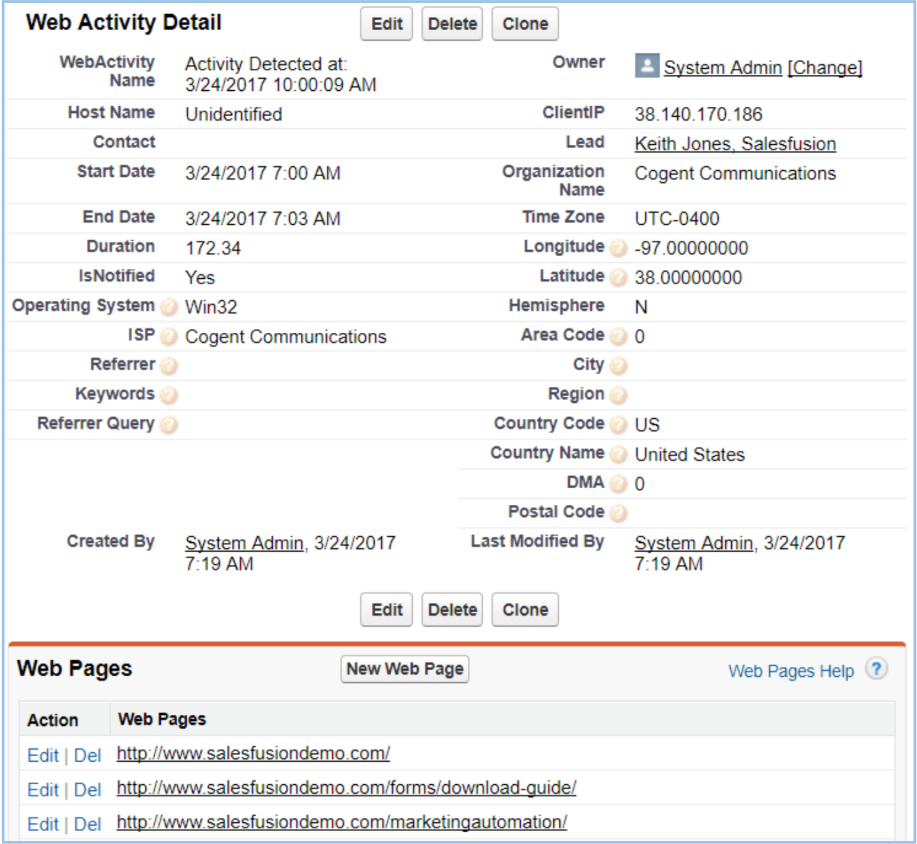
Option 1: Web Activity to Sugar Market Web Activity Entity
This allows you to see more information easily, without having to click into the activity. Pushing the activity to our custom entity also will keep your Activity History from possibly getting cluttered with lots of web activity.
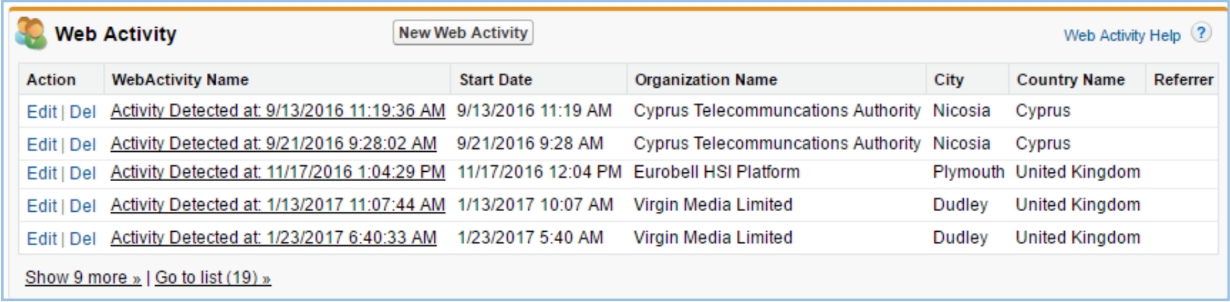
Clicking into any of these activities grants you visibly into more activity details, as well as the web pages that were hit.
Option 2: Web Activity to Activity (History) Entity
This is a good option if your team lives in the Activity History.
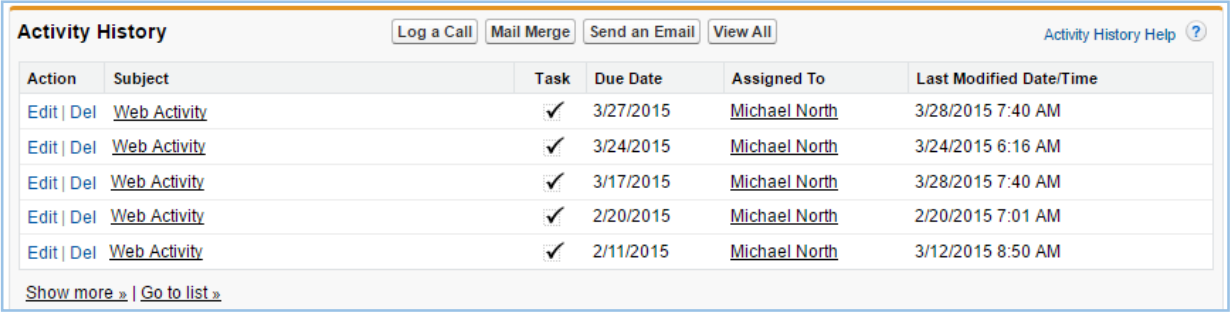
Clicking into any of these activities will allow you to see additional details regarding the web activity.
Tasks
When a task is created in Sugar Market, you can push those as Open Activities to the corresponding CRM record.

Events
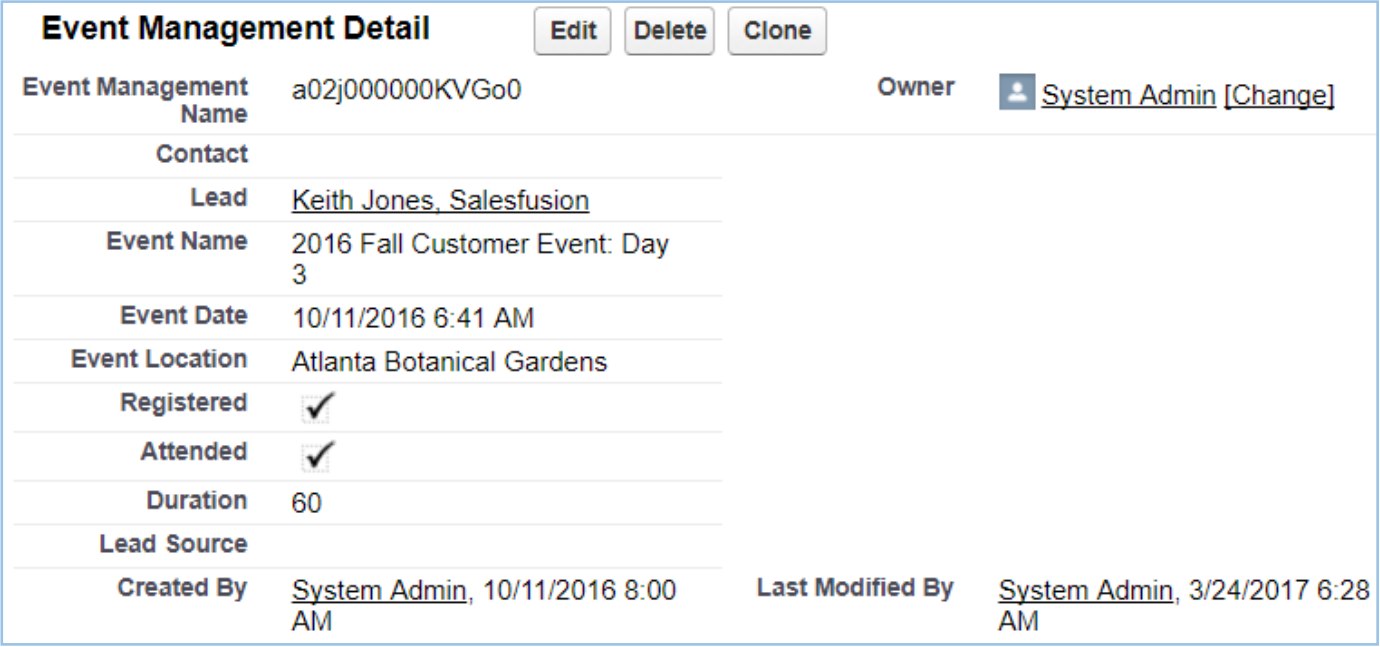
Once an event in Sugar Market is over, all registered and attended contacts and leads will have their respective records in CRM updated with the event information inserted into the custom Event Management entity.
Events to Custom Entity
This will allow you to see the events which the record has registered for and attended.

Clicking into any of these events will allow you to see additional information about the event.
Salesforce Campaigns
Distribution Lists
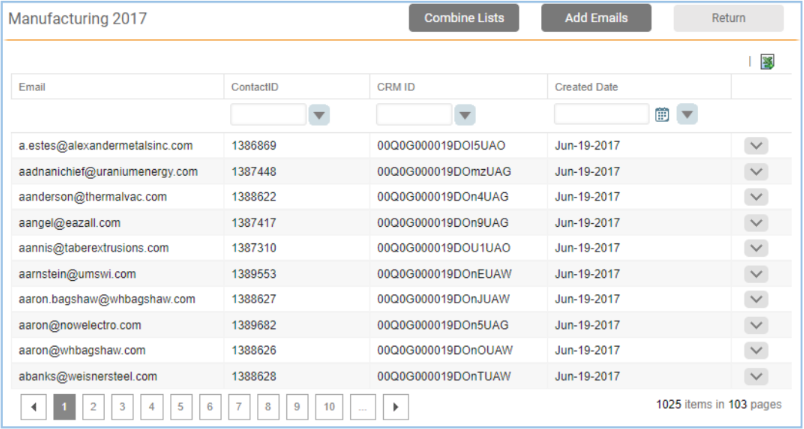
By selecting the corresponding checkbox in the Sugar Market connector screen, (Download Campaign Members to Distribution Lists) Sugar Market will sync down members of Salesforce campaigns into a distribution list, which can then be used as an include or exclude list.
Notes regarding syncing Salesforce campaign lists:
- If the records do not already exist in our database (in contact table), we will not sync them into the Sugar Market distribution list.
- Sugar Market distribution lists do not contain duplicate emails
- Sugar Market distribution lists do not contain blank or invalid emails
Installing Sugar Market
Overview
There are 4 main components to the installation:
- Installing Sugar Market from the Salesforce AppExchange
- Customize your Salesforce options
- Modifying the Sugar Market Custom Objects
- Campaign Click Configuration
To install Sugar Market, you will need Salesforce credentials with administrator privileges.
Step 1: Login to Salesforce
Visit this URL and login with your salesforce credentials: https://login.salesforce.com/packaging/installPackage.apexp?p0=04t2J000000V9RU
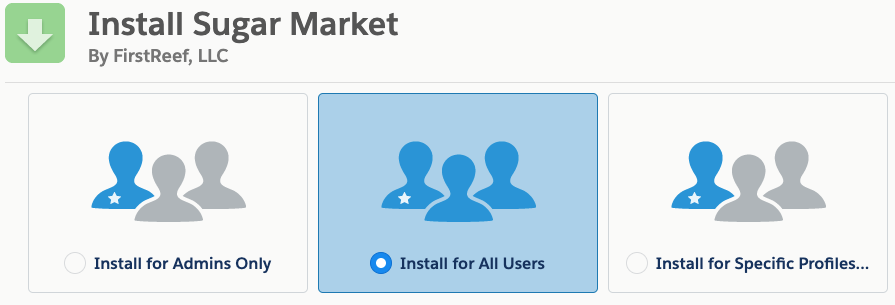
Step 2: Select users to access
You will see the following screen where you can select who will be able to use the bundle. Select your preferred access. If you would like all users to access the Sugar Market components, then select 'Grant access to all users' and click Install. You may also select either of the other options that will restrict access to certain users. Doing so will limit the users who can access the marketing data available in the Sugar Market iFrame as well as data pushed up to custom entities installed with this bundle.
Step 3: Verify install complete
Once the installation is complete, you will receive an installation successful message. If for some reason you did not then please record the error message and reach out to support.
Post-Installation Configuration
Now that the application is installed, you will need to configure it so that the Sugar Market components will show underneath your Contacts and Leads.
Step 1: Customize Lead Layout
Click App Setup. Then select Setup > App Setup > Customize > Leads > Page Layout > Edit. You should see a screen similar to the image below. If you have multiple page layouts, you may be prompted to select the layout you wish to add the Salesfusion components to.
Step 2: Adding Custom Objects
There are 4 custom objects that you have the option to add to your Page Layout:
- Web Activity
- Email Campaign
- Landing Pages
- Event Management
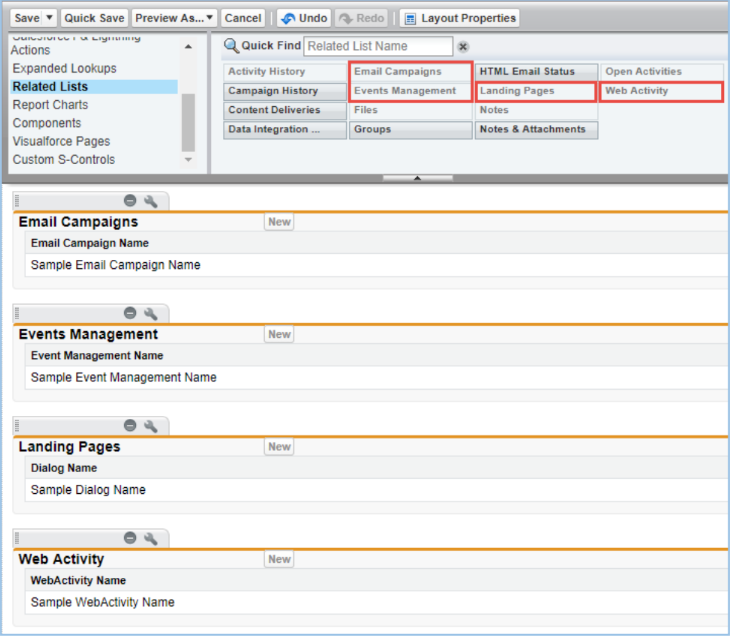
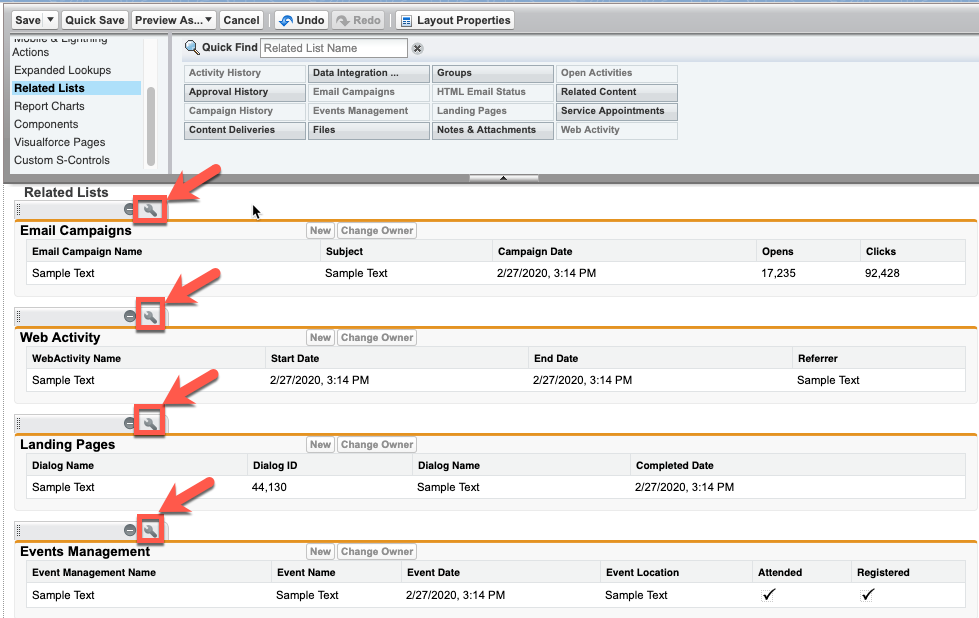
Select the Related Lists section at the top left of the layout configuration. Here, you will see Web Activity, Email Cam-paigns, Dialogs, and Events Management. You can drag and drop these four items to anywhere on your page layout.
Step 3: Adding the Customer Journey
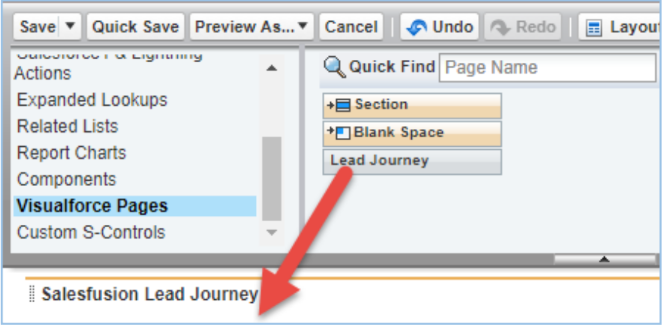
Select the Visualforce Pages. Drag "Section" to your desired location on the Lead Layout Card. After releasing the mouse, you will see this popup. Configure the popup as pictured: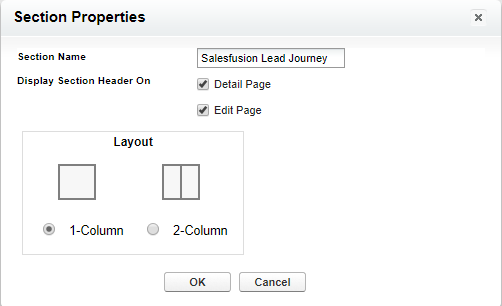
Click "OK" to create the new section, and then drag the 'Lead Journey' to the new section.
Step 4: Customize the Lead Journey
You will need to configure the width of the lead journey VisualForce Page by selecting the wrench icon.
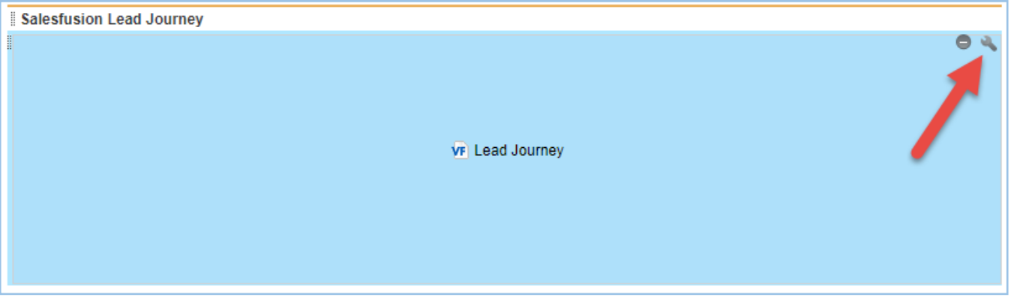
Select the properties to a width = 100%, height = 500 pixels, and check the "show scrollbars" option. Click ok, then click save in the toolbar to save the new customer journey section.
Step 5: Repeat steps 1-4 above on the Contacts record
Modifying the Sugar Market Custom Objects
If you would like more detail to appear on your four custom objects in the Lead and Contact card, then you can add additional fields to display additional information.
Note: Below are recommendations based on how many customers choose to customize, but please add/remove as you see fit for your organization.
Step 1: Edit the Lead Layout
Select Setup > App Setup > Customize > Leads > Page Layout > Edit. Select the "wrench" icon on top right of each custom panel (this will be the same for all 4 panels).
Step 2: Select Fields
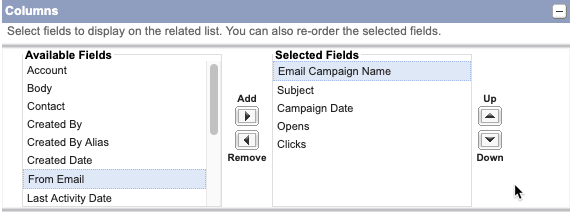
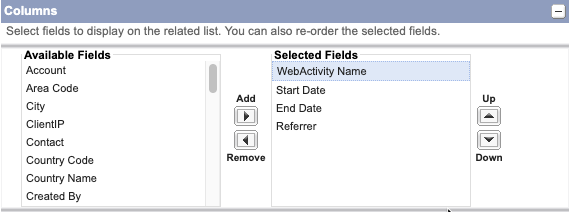
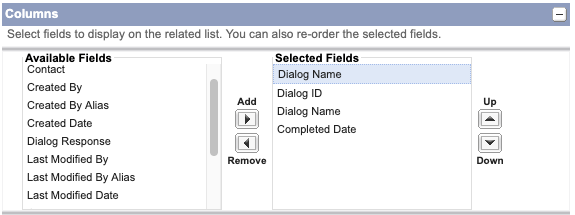
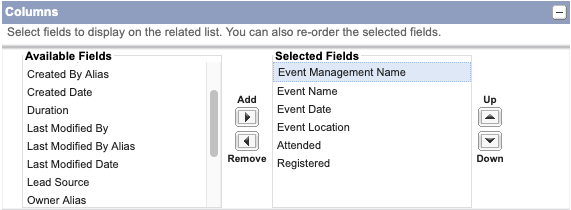
You will see a pop up window with options of fields you can choose to add to this view. After selecting your fields, choose OK. Below are the recommended fields to display for each custom object.
Email Campaigns Field Recommends:
Web Activity Field Recommends:
Landing Pages Field Recommends:
Events Management Field Recommends:
Step 3: Repeat steps 1 and 2 for the Events, Web Activity, and Email Campaign Objects
Step 4: Repeat steps 1-3 for the Contact record
Campaign Click Configuration
Step 1: Open the Email Campaign Object
Select Setup > Create > Objects > Select Email Campaigns. Click the word Email Campaign, not the edit button.

Step 2: Edit Layout
Email Campaigns have their own unique layout, so scroll down to the Page layouts and select Edit to configure the layout.

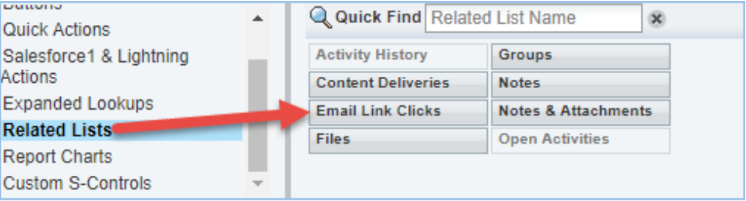
Step 3: Configure the layout
Configure the layout by selecting "Related lists.' This will present an option for 'Email Link Clicks'. Drag and drop this before the 'Open Activities' section shown below.
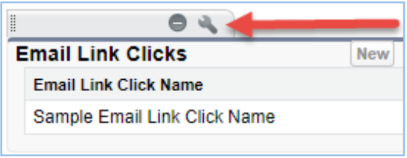
Step 4: Configure Related list
Configure this list view by selecting the 'wrench' icon.
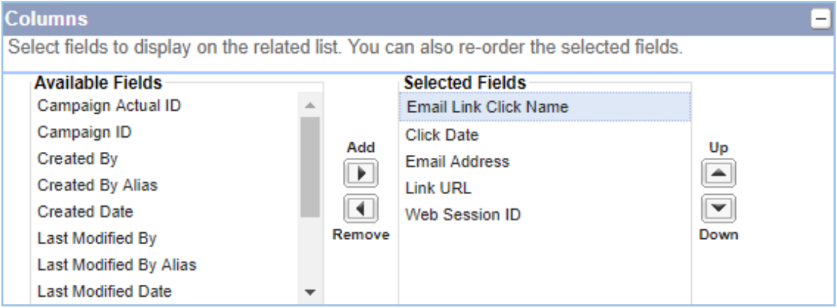
Step 5: Add Fields
Add the selected fields. Then click ok.
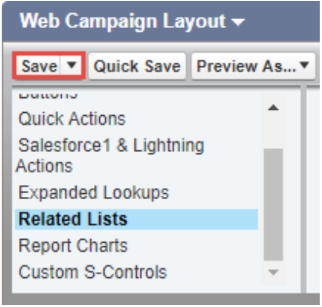
Step 6: Save the layout
Verifying Setup
To make sure your setup is correct, you can open a contact or lead record. Scroll to the bottom of the page (or wherever you've added these entities), and you should see your four new sections. You will also see a new panel for Sugar Market Customer Journey that you added.
Note: In your layout options, you'll see the following legacy features that you can disregard.
- Fields: Fusion Score, Fusion Score Value, Fusion Score Description
- Buttons: Sugar Market (Legacy Feature)
- Custom S-Controls: Sending Using Sugar Market (legacy Feature)
Salesforce Security
Salesforce guidelines require that you have added valid IP Ranges to your Salesforce instance in order for Sugar Market to sync with your database. To do this, please follow these steps:
- Log into you Salesforce.com account.
- Access the Setup menu located at the top of your screen.
- Select Administration Setup > expand the Security Controls section > select Network Access.
- Refer to the Configuring IP Addresses, Ports, and Domains article for the IP addresses to add.
Once complete - please refer to directions for Configuring your Sugar Market Connector.
Post-Installation Configuration - Lightning (Optional)
If you have Salesforce Lightning Experience enabled for your company you will need to follow the below steps to configure it so that the Sugar Market components will show underneath your Contacts and Leads. If you've already completed the steps above in classic view, then there is no need to follow these steps again.
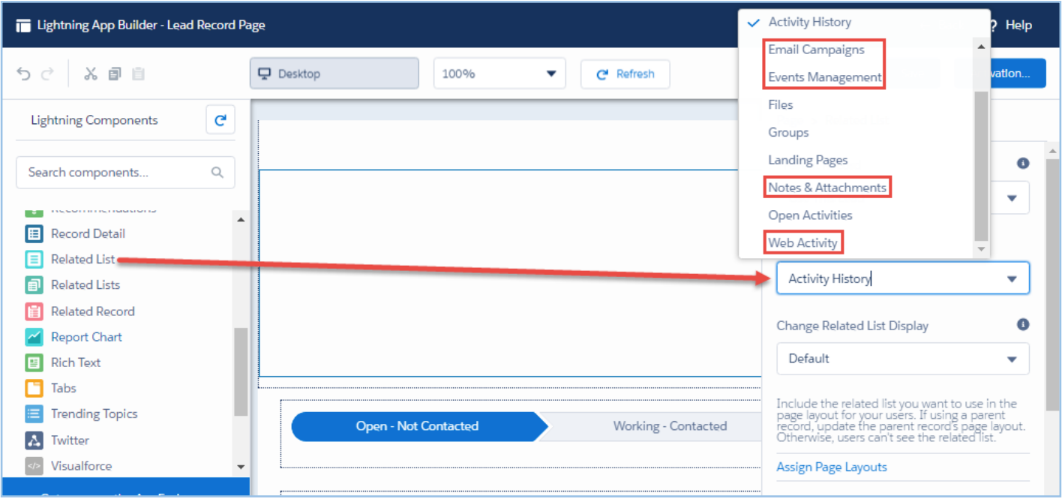
Step 1: Customize Lead Layout
Click the Gear Cog. Then select Setup > Objects and Fields > Object Manager > Leads > Lightning Record Pages > Select Page to Configure > Edit.

Step 2: Adding Custom Objects
There are 4 custom objects that you have the option to add to your Page Layout:
- Web Activity
- Email Campaigns
- Landing Pages
- Event Management
Select Related Lists on the left side of the layout configuration.
Step 3: Adding the Customer Journey
On the left hand list, select Visualforce.

Step 4: Customize the Lead Journey
You may adjust the Height and Label of the Journey as shown in red if desired, this is not a requirement.
Step 5: Repeat steps 1-4 above on the Contacts record
Configuring the Salesforce Connector
Accessing the Salesforce Connector
Your Sugar Market CRM Connector will provide access to setup & modify your password access, synchronization preferences and a time table of the last completed sync with your CRM. To access the Salesforce Connector, you will log in to your Sugar Market account. From the user menu in the upper right-hand corner of the screen, choose Account Configuration.
On the left hand side of the screen, you'll see a section for external connectors. After selecting Salesforce.com, you will then see the Salesforce.com Configuration screen.
Step 1: Syncing Credentials
First thing you'll do is enter the Salesforce.com username and password that Sugar Market will use to sync with your CRM. You may create a new user or use one that is pre-existing as Salesforce.com allows for concurrent logins. However, do note that all records created or updated by our sync will be attributed to the syncing user. The sync-ing user must have the necessary permissions to read and\or update all records which you wish Sugar Market to sync.
Fields:
- Username : The Salesforce.com CRM username we will user to authenticate via your web services
- Password : The password for above user
After entering the credentials as mentioned above, click Save Connection to the right.
Step 2: Syncing Dates
No Action Needed - this table will show you the last time Sugar Market has synced with your CRM. These will be up-dated once we have completed the initial integration. See the Integration With Salesforce section for a deeper explanation on this component.
Step 3: Syncing Preferences
Set up your syncing preferences. This includes what information you want Sugar Market to sync down and what information you'd like Sugar Market to update and create, among other preferences. See the full explanation of each item below.
Pull Data (Sync from CRM)
|
Download Accounts |
Whether or not Sugar Market should sync down Accounts from Salesforce CRM |
|
Download Contacts |
Whether or not Sugar Market should sync down Contacts from Salesforce CRM |
|
Download Leads |
Whether or not Sugar Market should sync down Leads from Salesforce CRM |
|
Download Opportunities |
Whether or not Sugar Market should sync down Opportunities from Salesforce CRM |
|
Download Tasks |
Whether or not Sugar Market should sync down Tasks from Salesforce CRM |
|
Download Events |
Whether or not Sugar Market should sync down Events from Salesforce CRM |
|
Download Campaign Members to Distribution Lists |
Whether or not Sugar Market should sync down Campaign members from Salesforce CRM into a Distribution List. |
|
Keep picklist values in Sync |
Whether or not Sugar Market will sync down the picklist values from Salesforce, and keep those lists updated as values are added or removed. This will allow these picklists to be used in landing page questions or select-ed in a drop down on the contact card. Note: Sugar Market picklists are not restrictive, so values outside of the pick-list values will still be allowed. |
Push Data (Sync to CRM)
|
Allow Sugar Market to Insert and Update Salesforce Records |
Allow Sugar Market to Insert new or Update already existing contacts and leads. Once checked, the following options are available. Insert as Lead – All new records will be inserted as a lead, regardless of if lead or contact in Sugar Market Insert as Contact – All new records will be inserted as contacts regardless of if lead or contact in Sugar Market Insert as Lead or Contact – All new records will be inserted based off of whether lead or contact in Sugar Market Insert as Person Account – All new records will be inserted as a person account, regardless of if they are a contact or lead in Sugar Market. |
|
Allow Sugar Market to update the 'HasOptedOutOfEmail' Field |
When someone unsubscribes through Sugar Market, allow Sugar Market to update the Unsubscribe status of that Lead or Contact record in Salesforce |
|
Allow Sugar Market to update the Score Field |
If a CRM custom field is selected as the field to be used in a scoring profile, allow Sugar Market scores to be pushed into Salesforce as well. Field must be an integer field and exist on both contact and lead tables. Scores are pushed to Salesforce in batches of 200 records. |
|
Allow Sugar Market to update delivery message |
Allow Sugar Market to push up the delivered or bounced reason to a custom field in CRM. Field must be nvarchar(100) |
|
Do not push email content (Saves storage space) |
Omit the Email body from being pushed up to CRM, drastically reducing space consumed in the remote database. |
|
Create New Tasks in Salesforce.com |
Tasks can be created for contacts\leads through Sugar Market. This allows these tasks to be pushed up into Salesforce as well. |
|
Allow the creation of new Opportunities |
Allow Sugar Market to push Opportunity records to Salesforce. |
|
Push Web Activity |
Choose where, if at all, Sugar Market should push Web Activity. The options are: • Disabled: Do not push Web Activity • Activity Entity: Web Activity will be pushed to CRM as a completed Activity record for the corresponding Account/Lead/Contact • Sugar Market Web Activity Entity: Web Activity will be pushed for the corresponding Account/Lead/Contact to the Custom Web Activity Entity installed with the Sugar Market App
|
|
Push Email Activity to: |
Choose where, if at all, Sugar Market should push Email Activity. The options are: • Disabled: Do not push Email Activity • Activity Entity: Email Activity will be pushed to CRM as a completed Activity record for the corresponding Account/Lead/Contact • Sugar Market Web Activity Entity: Email Activity will be pushed for the corresponding Lead/Contact to the Custom Email Campaigns Entity installed with the Sugar Market App.
|
|
Push Email URL Clicks |
This will push up the URLs of each click in an email to the Custom Email Campaigns Entity installed with the Sugar Market App. |
|
Push Landing Page Completion Data |
This will push the landing page completion data to the Custom Landing Page entity installed with the Sugar Market App |
|
Push Event Registration Data |
This will push event registration\member data to the Custom Event entity installed with the Sugar Market App |
Step 4: Remove Data from Marketing
When our bundle is installed, triggers are added which make an API call against ourdatabase when a record is de-leted, ensuring that these removed records are also deleted from Sugar Market's database. An autodelete report may also be added to remove records from Sugar Market with a specific critieria if desired.
Step 5: CRM Alerts
Insert the email addresses of whom should be alerted should there be an credential issue with your sync. We typically recommend you include the CRM Admin and the syncing user. You can separate multiple email addresses with a semicolon.
Note: Completing the bundle installation and connector configuration will not initiate the sync. You will need to contact Sugar Market to turn on the Sync.
Viewing Sync Status
You can review the status of your sync between Sugar Market and Salesforce with the Salesforce Sync Dashboard. The dashboard can be accessed via the user menu > Admin > CRM Administrator > External Connectors > [CRM Name] Sync Dashboard.
Dashboard
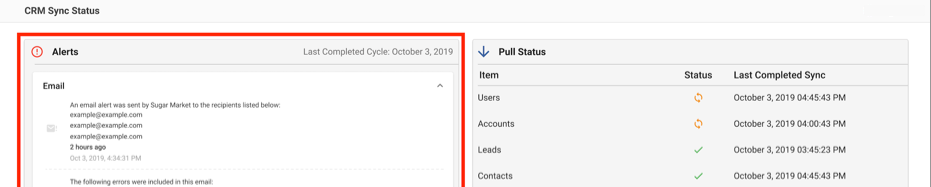
Last Completed Cycle
The date shown here is the last time an entity was successfully synced.
Dashboard Alerts
The alerts section shows sync problems that occurred, categorized into two main error types:
- CRM Login Error : This is a configuration problem that occurs when the password for the syncing user was changed in the CRM, but not updated in Sugar Market connector settings. This can be easily remedied by going to the CRM Connector Settings page via user menu > Admin > CRM Administrator > External Connectors > [CRM Name].
- API Error : Since APIs can have an intermittent connectivity issue, it is best to wait until the error has occurred more than once. Admins can quickly investigate if there is an issue on their side that can be fixed. If it cannot be fixed, they can contact customer support and provide the information given to help troubleshoot the issue.
Email Alerts
Login Email Alert
An email alert will be sent after (3) three consecutive Login errors. Alerts will continue to be sent daily if the issue is still occuring.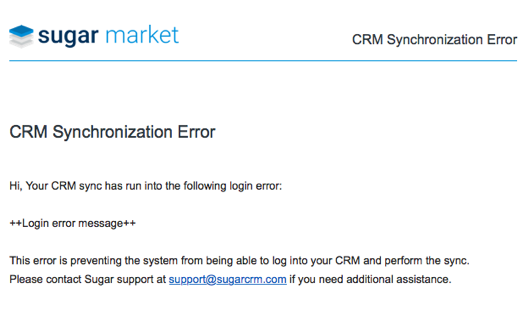
API Email Alert
An email alert will be sent daily if there is an API error. Connectivity issues can cause a sync to fail without there being a problem with the sync itself, so we do not want to alert the user via email unless it fails consistently. Alerts will continue to be sent daily if the issue is still occuring.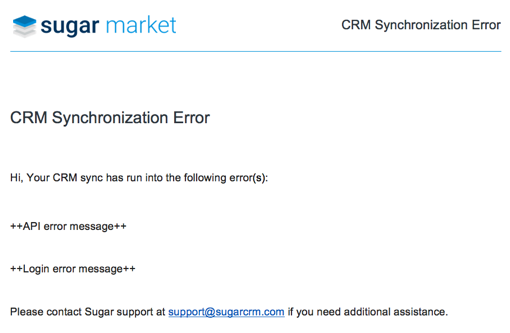
If there is both a login error and an API error, then the daily email will contain information regarding both errors.
Email alerts are sent to the email addresses specified in the CRM Connector Alerts section. Admins can navigate to this page via user menu > Admin > CRM Administrator > External Connectors > [CRM Name]. Multiple email addresses can be specified using a semicolon delineation.
Pull Status
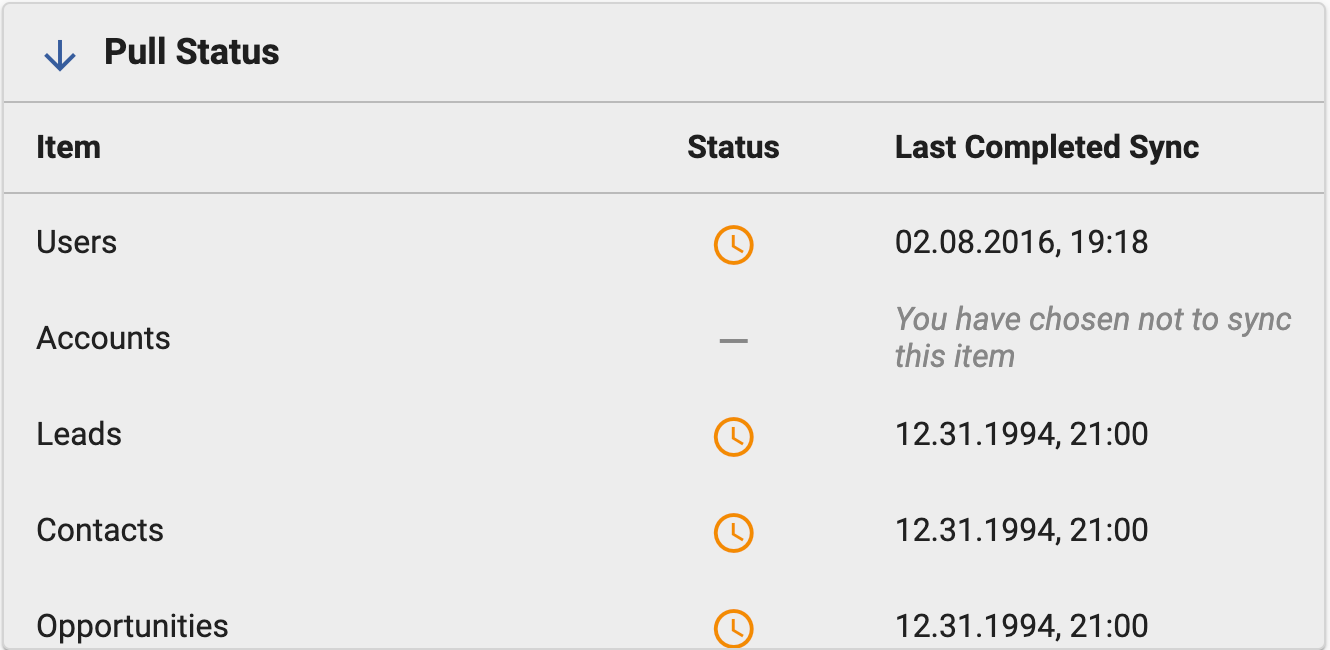
The pull status shows the sync status from the CRM into Sugar Market.
The icon in the status column denotes status of the sync for that entity.
- A green check mark indicates that a sync has completed successfully.
- An orange circle of arrows indicates that a sync is currently ongoing.
- A red circle of arrows with a line through it indicates that a sync that was previously on has been turned off.
Note: If the sync was previously on and turned off before the launch of this feature, the last completed sync date will appear with a green checkmark instead of the red circle of arrows. - A red X indicates that an error has stopped the sync.
- A "-" dash with grey text indicates the item has not been configured to be synced.
- An orange clock indicates that the specific entity is waiting for its turn to start syncing. This usually happens when the sync is newly set up since the entities take a longer time for the first sync.
Push Status
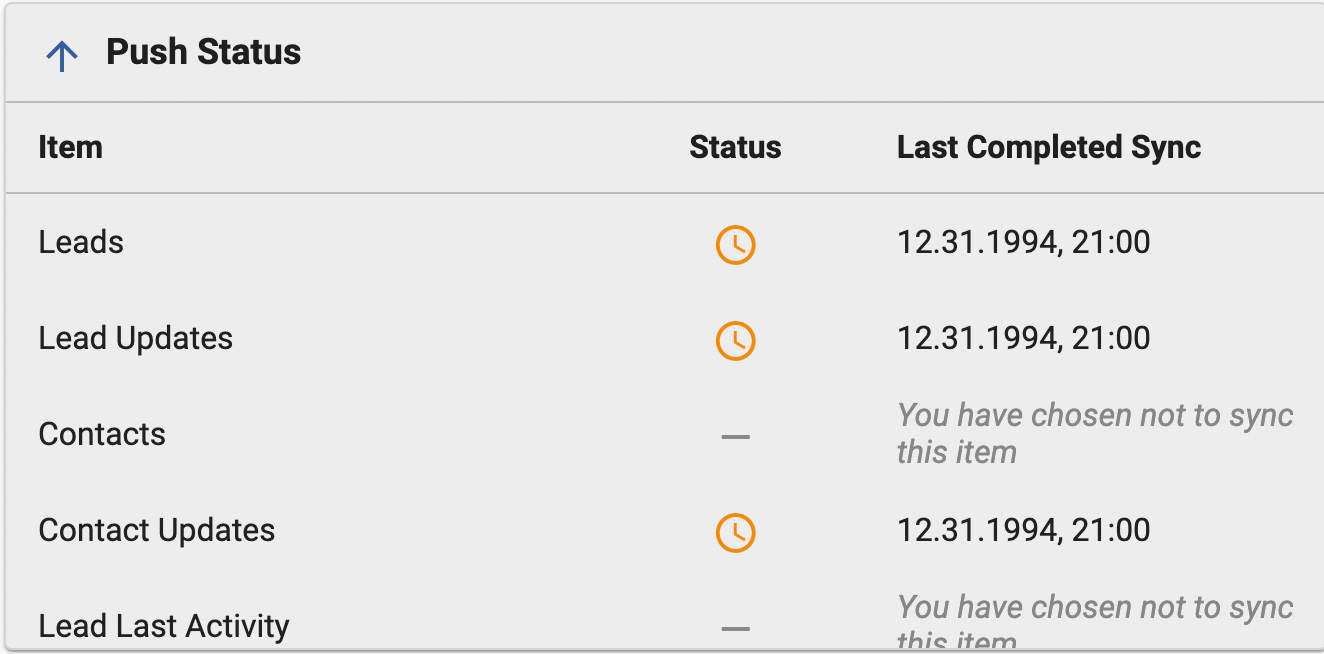
The push status shows the sync status from Sugar Market to the CRM.
The icon in the status column denotes status of the sync for that entity.
- A green check mark indicates that a sync has completed successfully.
- An orange circle of arrows indicates that a sync is currently ongoing.
- A red circle of arrows with a line through it indicates that a sync that was previously on has been turned off.
Note: If the sync was previously on and turned off before the launch of this feature, the last completed sync date will appear with a green checkmark, instead of the red circle of arrows. - A red X indicates that an error has stopped the sync.
- A "-" dash with grey text indicates the item has not been configured to be synced.
- An orange clock indicates that the specific entity is waiting for its turn to start syncing. This usually happens when the sync is newly set up since the entities take a longer time for the first sync.
Integrating With Campaigns
Users can integrate their form submission data with the campaigns in their CRM. Marketers who want to track the contacts via their campaigns built within a CRM such as Salesforce can do so with ease. With the Campaign Objects integration, the submission data automatically syncs up to your CRM campaign whenever a new lead fills out a form that has a campaign specified.
How does it work?
1. Start building your form through Form Builder and go through the Basics step.
2. When you reach the Build Step, insert your form fields as normal.
The following are required for Campaign Objects to sync to your CRM:
- Your form must have a First Name field and you must map it to the FirstName CRM field.
- Your form must have a Last Name field and you must map it to the LastName CRM field.
- Field submission values must be something that Salesforce can recognize, otherwise, the contact won't sync. For example, if a user submitted a string value of 'Hi my name is Jake' for a Revenue field which expects a number, then Salesforce won't be able to sync that submission up to the campaign.
3. Continue to the Actions step where you'll first add a redirect URL. Then, a new button displays where you can add a new form action.

4. Click the form action button to see a dropdown with some options. Select the action Push to Campaign Object.
Note: If you do not see the Push to Campaign Object option after completing the previous steps, please reach out to Sugar Support.
5. Select from the list of campaigns that are synced down from your Salesforce instance. There 2 important fields that you need to be set:
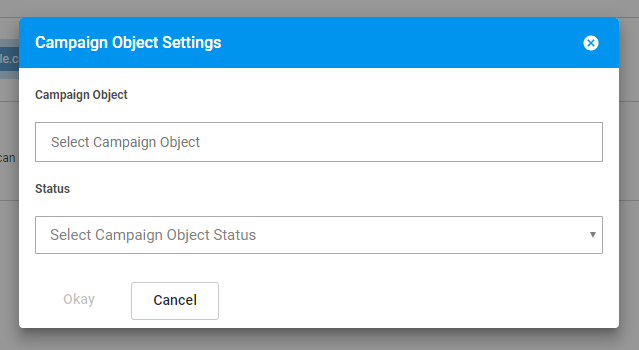
- Campaign Object - Select the campaign in Salesforce to which you want to sync your form submissions
- Status - Select the status for a lead that submits a form. Contacts are synced to your campaign in Salesforce with the specified status. These values are pulled from the campaign member statuses in your Salesforce Campaign.
6. Search and select your campaign to which you want to push your form submission records.
7. The Status field is then enabled for you to select the status for your submissions to have when they are pushed up to the campaign in Salesforce.
8. Click Okay. A new form action element appears under the Form Actions section on the page as shown:

The campaign object has been successfully associated to the form.
9. Publish your form. You are now ready to use your campaign object integrated form to start collecting and syncing your form submission data.
You have 2 options:
- Embed the form into your page by grabbing the code that's presented after publishing your form.
- Embed the form into a landing page built with Page Builder.
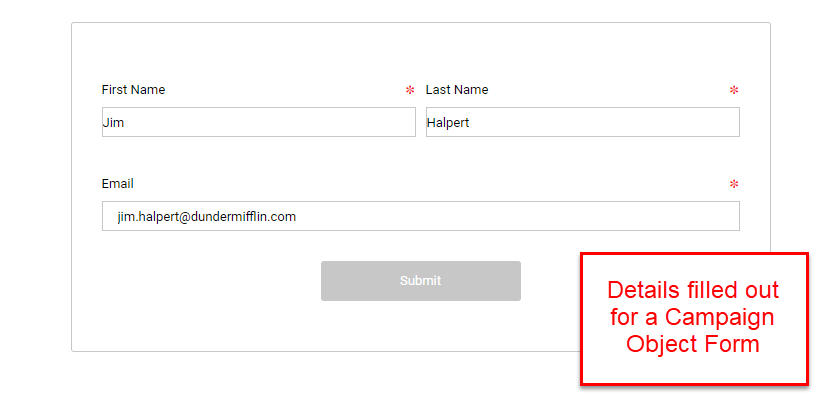
I've embedded my form onto my page. What happens now?
Now that you've placed your campaign object enabled form on your page, here's what you can expect. When a new contact fills out that form, that contact syncs up to your campaign in your CRM. Below is an example screenshot of how it works for the Salesforce CRM.
And here is that contact form submission showing up in the campaign within Salesforce:
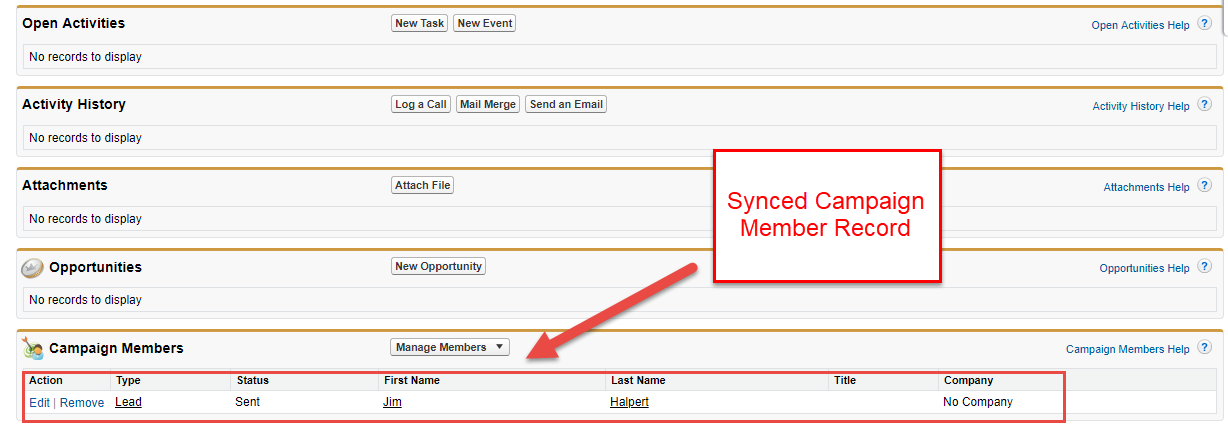
And that's it! You should see a corresponding record populate in the Campaign Members section for every record that submits the form.
Uninstalling Sugar Market
Disclaimer: Please note that uninstalling our bundle will perform the following:
- Permanently delete all components in this package
- Permanently delete all customizations you have made to these components
- Permanently delete all data that you have created for all custom objects in this package
- Permanently delete any reports, views, and custom tabs based on the custom objects in this package
- Permanently delete any relationships and related lists associated with the custom objects in this package
Step 1: Navigate to Installed Packages (Setup > Installed Packages)
Click Uninstall next to the Sugar Market package.
Step 2: Select type of uninstall
The next page breaks down everything that will be uninstalled from Salesforce. Scroll down to the bottom of the page to select whether you want to save the data contained in our bundle or not. When you uninstall a package, by default, all its data as well as related notes and attachments are automatically saved as an export file. This file is available for 48 hours in case you need to recover the data. To reload the data, import the export file manually and recreate any relationships between objects. Some components can't be recre-ated and others require special treatment.
You can also prevent the package data from being exported by selecting the Do not save a copy of this package's data after uninstall radio button. If you select to not save a copy, you will be asked to confirm this in a browser pop up.
Step 3: Select final checkbox confirming uninstall of package, then click the Uninstall button
Step 4: Confirm Uninstall
Upon clicking the uninstall button in the previous step, you will be re-directed to the Installed Packages page. There you will see Sugar Market in the Uninstalled packages section, temporarily with an Uninstall Status of "In Progress".
Lightning Experience
Salesforce offers the ability to upgrade to the Lightning Experience. Lightning is the collection of tools and technologies behind a significant upgrade to the Salesforce platform. These upgrades are made to both the backend of the platform as well as the UI\frontend.
Both the Sugar Market Sync and Sugar Market Bundle support either the Classic and Lightning version of Salesforce. When upgrading from Classic to Lightning, the only thing that may be necessary is to update the page layouts, and add the Sugar Market custom entities and iFrame after upgrading.
Salesforce Shared Contacts (Contact Tied to Multiple Accounts)
SalesForce rolled out a feature in the Summer 2016 release that allows contacts to be associated to multiple accounts. This is done through use of a custom object, which handles these additional relationships. Due to the fact that it uses a custom object, it is not something that it is not supported at this time.