Infor Connector for Sugar Market
Overview
This page covers integrating Sugar Market with Infor CRM, including configuring, syncing, and using data mappings.
Important: Review Integration Overview: All CRM Types before proceeding with this topic.
Topics
- Supported Versions
- Integration with Infor
- Installing Sugar Market
- Adding the Recycle Bin to LAN
- Installing the Buyer's Journey Integration for LAN Client
- Accessing the Infor Connector
- Configuring the Infor Connector
- Downloads
- Infor Teams
- Infor AdHoc Groups
- Infor CRM Mappings (separate page)
Supported Versions
Refer to the Sugar Market Supported Platforms page for the current list of Infor CRM versions that Sugar Market supports.
Integration with Infor
There are two main pieces contained in the Sugar Market Bundle - the Iframe and the Custom Entities.
Buyer's Journey Integration
The Buyer's Journey Integration is automatically installed and added to the forms for Contacts and Leads, and can be found near the bottom left-hand side of the page when viewing a record.
Custom Entities
There are 5 custom entities(tabs) that are installed with the Sugar Market Infor CRM Bundle – Dialogs, Events, Web Activities, Target, and Clicked Links. They can be found under (by default) the More Tabs area when viewing a contact or lead. You're welcome to drag them out to the main tab bar if desired. These custom entities can be used to store activity pushed from Sugar Market to Infor CRM. You can also choose to push certain activity to the Notes\History tab in Infor instead of using the custom entities.
Emails
Once Sugar Market has captured the delivery status of an email recipient, the respective record in CRM will be updated per the options selected in the connector configuration. The two options are to create either a Target record, or Notes\History record.
Option 1: Sent Email to Sugar Market Email Entity (Target)
Contains both the Open and Click count, as well as being able to see the name of the campaign. This is a good option if you don't want to clutter up the Notes\History section as well as see more information at a glance.
Email URL Link Clicks (Clicked Links)
Clicking into a campaign pushed to our custom entity will allow you to see the Links\URLs clicked.
Option 2: Pushing Email Sent, Opened, and Clicked to Notes\History
This option does not have the ability to roll up to one sent email. Therefore, each activity will be pushed up as a separate entry. This can become a bit cluttered, however, if your sales team lives in the Note\History, it can be a good option.
Landing Pages
Once Sugar Market has captured a landing page completion, the respective record in CRM will have a Landing Page completion added to the Dialogs custom entity.
Completions to Custom Entity
You will be able to see the Dialog Name and completed date for each landing page completion.
Completion Detail
Clicking into the completions allows visibility of the data submitted into the landing page.
Web Activity
Once Sugar Market has captured cookied web activity for a lead or contact, the respective record in CRM will be updated per the connector configuration. The two options are to create either a Sugar Market Web Activity record or a native Notes\History record.
Option 1: Web Activity to Sugar Market Web Activity Entity
This allows you to see more information easily, without having to click into the activity. Pushing the activity to our custom entity also will keep your Activity History from getting cluttered with lots of web activity. Clicking into any of the activities brings up more details on the web session.
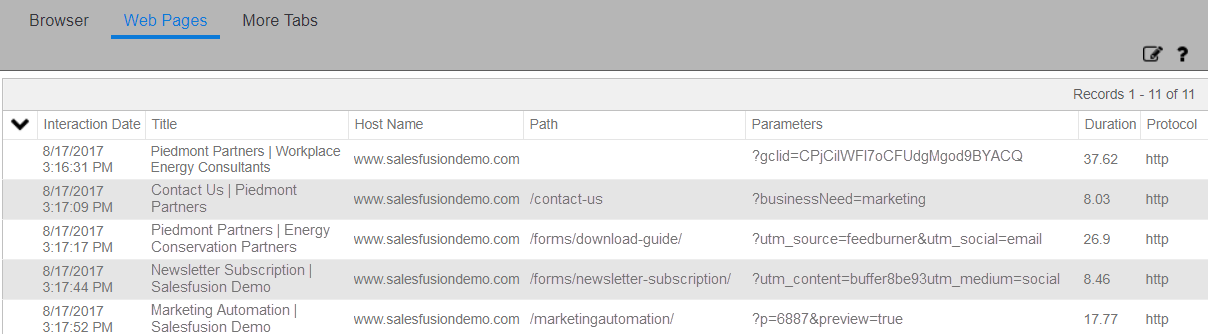
Web Activity Details
Once you've clicked into any of the activities, you'll add information contained in the tabs seen below.
Web Pages:
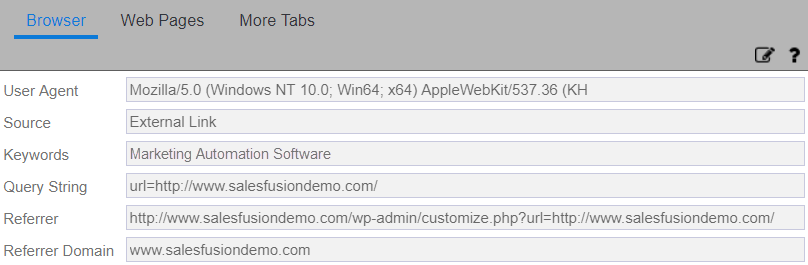
Browser:
Option 2: Web Activity to Activity Entity
This is a good option if your team lives in the Notes\History section of contacts and leads. The activity will be marked as completed by the syncing user. Clicking "show more" will allow you to see more information about the session as well.
Events
Once an event in Sugar Market is over, all registered and attended contacts and leads will have their respective records in CRM updated with the event information inserted into the custom Event Management entity.
Events to Custom Entity
This will allow you to see the event attendance information for any event that record has registered for.
Tasks
When a task is created in Sugar Market, you can push those as Activities to the corresponding CRM record.
Note: If Sugar Market Task.Status is set as "Complete" through a Sugar Market automation we'll push the Status up as "Complete", otherwise we will push the task up as "ToDo" as seen above.
AdHoc Groups
By selecting the corresponding checkbox in the Sugar Market connector screen, (Pull Marketing Lists to Distribution Lists) Sugar Market will sync down members of any AdHoc Groups from Infor into a Sugar Market distribution list, which can then be used as an include or exclude list. Please refer to this knowledge base article for more details on the requirements for syncing down groups.
Notes regarding syncing AdHoc Groups:
- If the records do not already exist in our database (in contact table), we will not sync them into the Sugar Market distribution list.
- Sugar Market distribution lists do not contain duplicate emails.
- Sugar Market distribution lists do not contain blank or invalid emails.
Installing Sugar Market
Prerequisites
- Saleslogix Web Update 01 (Core and Model)
- Make database and VFS backups of your target Infor CRM environment
- Verify that you can successfully Build Interfaces
- Verify that you can successfully Deploy Web Services
Steps to Complete
- Install LAN bundle via Saleslogix Administrator. Filename: Infor_SF_AllTableBundles.sxb
- Update the CampaignTargetsView. Run the following ALTER statement against the target Saleslogix database, via either the SalesLogix Administrator (Manage > Database) or directly within SQL Server Management Studio:
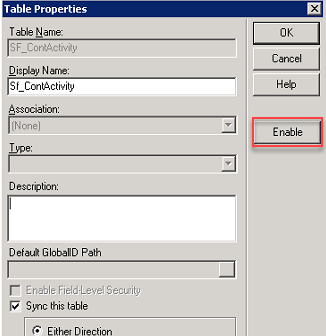
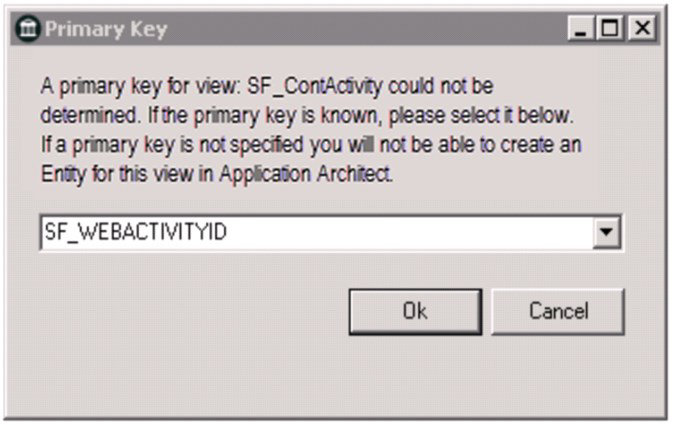
ALTER VIEW [sysdba].[CampaignTargetsView] AS SELECT ct.CAMPAIGNTARGETID, cp.CAMPAIGNNAME, ct.CAMPAIGNID,ct.CREATEUSER, ct.CREATEDATE, ct.MODIFYUSER, ct.MODIFYDATE, ct.ENTITYID, c.FIRSTNAME,c.LASTNAME, c.ACCOUNT AS Company, ct.GROUPNAME, '' AS PRIORITY, ct.INITIALTARGET, ct.STATUS, ct.STAGE, ct.TARGETTYPE, c.SECCODEID, (SELECT MAX(RESPONSEDATE) AS Expr1 FROM sysdba.TARGETRESPONSE AS tr WHERE (ct.CAMPAIGNTARGETID = CAMPAIGNTARGETID)) AS RESPONSEDATE, ct.FORMS AS FORMS,ct.FRIENDFORWARD AS FRIENDFORWARD,ct.DELIVERYSTATUS AS DELIVERYSTATUS, ct.DELIVERYMESSAGE AS DELIVERYMESSAGE,ct.CLICKED AS CLICKED,ct.C_OPEN AS C_OPEN,ct.UNSUB AS UNSUB FROM sysdba.CAMPAIGNTARGET AS ct INNER JOIN sysdba.CAMPAIGN cp ON ct.CAMPAIGNID=cp.CAMPAIGNID INNER JOIN sysdba.CONTACT AS c ON ct.ENTITYID = c.CONTACTID UNION SELECT ct.CAMPAIGNTARGETID,cp.CAMPAIGNNAME,ct.CAMPAIGNID, ct.CREATEUSER, ct.CREATEDATE, ct.MODIFYUSER, ct.MODIFYDATE, ct.ENTITYID, l.FIRSTNAME, l.LASTNAME, l.COMPANY, ct.GROUPNAME, l.PRIORITY,ct.INITIALTARGET, ct.STATUS, ct.STAGE, ct.TARGETTYPE, l.SECCODEID AS SECCODEID, (SELECT MAX(RESPONSEDATE) AS Expr1 FROM sysdba.TARGETRESPONSE AS tr WHERE (ct.CAMPAIGNTARGETID = CAMPAIGNTARGETID)) AS RESPONSEDATE, ct.FORMS AS FORMS,ct.FRIENDFORWARD AS FRIENDFORWARD, ct.DELIVERYSTATUS AS DELIVERYSTATUS,ct.DELIVERYMESSAGE AS DELIVERYMESSAGE, ct.CLICKED AS CLICKED,ct.C_OPEN AS C_OPEN,ct.UNSUB AS UNSUB FROM sysdba.CAMPAIGNTARGET AS ct INNER JOIN sysdba.CAMPAIGN cp ON ct.CAMPAIGNID=cp.CAMPAIGNID INNER JOIN sysdba.LEAD AS l ON ct.ENTITYID = l.LEADID - Enable the Sugar Market tables and views via SalesLogix Administrator. Open the Database Manager within SalesLogix administrator. For each of the following database objects:
- Open their properties.
- Adjust the Display Name.
- Click Enable (May already be enabled).
- Select the appropriate Primary Key (if applicable).
- Be sure to apply (save) these changes before existing the Database Manager
Table Name
Display Name
Primary Key
SF_ContActivity
Sf_ContActivity
SF_WEBACTIVITYID
Sf_ContactLeadCampLinkClick
Sf_ContActLeadCampLinkClick
CampaignerLinkClickID
Sf_EmailStatistics
Sf_EmailStatistics
None
SF_ExtWebActivity (found in SF_WebActivity parent table)
Sf_ExtWebActivity
None
SF_LeadActivity
Sf_LeadActivity
SF_WEBACTIVITYID
SF_GroupRelease
SfGrouprelease
None
Example:

- Update sysdba.sf_config table
- Log into Sugar Market and navigate to the Infor CRM Connector page (Profile Icon > Account Configuration > Infor CRM)
- Under "Infor CRM Connection Information", click the "Generate Unique Key" button
- Click "Save Profile"
- Copy the GUID generated in step B into the following update statement as the sfvalue and execute against your SalesLogix database:
Update sysdba.sf_config set sfvalue='PASTE GUID HERE' where SFNAME='Salesfusion.CustomerID'
- Create an insert trigger for the ADHOCGROUP table. Run the following statement against the ADHOCGROUP table in the Saleslogix database, directly within SQL Server Management Studio:
GO IF EXISTS (SELECT * FROM sys.triggers WHERE object_id = OBJECT_ID(N'[sysdba].[ADHOCGROUP_INSERT]')) DROP TRIGGER [sysdba].[ADHOCGROUP_INSERT] GO SET ANSI_NULLS ON GO SET QUOTED_IDENTIFIER ON GO CREATE TRIGGER [sysdba].[ADHOCGROUP_INSERT] ON [sysdba].[ADHOCGROUP] AFTER INSERT AS BEGIN SET NOCOUNT ON; declare @pluginid varchar(12); declare @groupid varchar(12); declare @createuser varchar(100); declare @modifyuser varchar(100); SELECT @groupid = INSERTED.GROUPID FROM INSERTED SELECT @createuser = INSERTED.CREATEUSER FROM INSERTED SELECT @modifyuser = INSERTED.MODIFYUSER FROM INSERTED if(SELECT COUNT(*) from sysdba.GROUPRELEASE where PLUGINID=@groupid) > 0 Begin Update [sysdba].[GROUPRELEASE] set MODIFYDATE=getutcdate() where PLUGINID=@groupid End else Begin insert into [sysdba].[GROUPRELEASE] (GROUPRELEASEID,CREATEUSER,CREATEDATE,MODIFYUSER,MODIFYDATE,PLUGINID) values(@groupid,@createuser,getutcdate(),@modifyuser,getutcdate(),@groupid); End END GO - Create a delete trigger for the ADHOCGROUP table. Run the following statement against the ADHOCGROUP table in the Saleslogix database, directly within SQL Server Management Studio:
GO IF EXISTS (SELECT * FROM sys.triggers WHERE object_id = OBJECT_ID(N'[sysdba].[ADHOCGROUP_DELETE]')) DROP TRIGGER [sysdba].[ADHOCGROUP_DELETE] GO SET ANSI_NULLS ON GO SET QUOTED_IDENTIFIER ON GO CREATE TRIGGER [sysdba].[ADHOCGROUP_DELETE] ON [sysdba].[ADHOCGROUP] AFTER DELETE AS BEGIN SET NOCOUNT ON; declare @groupid varchar(12); declare @createuser varchar(100); declare @modifyuser varchar(100); SELECT @groupid = DELETED.GROUPID FROM DELETED SELECT @createuser = DELETED.CREATEUSER FROM DELETED SELECT @modifyuser = DELETED.MODIFYUSER FROM DELETED Update [sysdba].[GROUPRELEASE] set MODIFYDATE=getutcdate() where PLUGINID=@groupid END GO - Create SF_GroupRelease view by dropping and creating the [sysdba].[SF_GroupRelease]. Run the following statement in the Saleslogix database, directly within SQL Server Management Studio:
IF EXISTS (SELECT * FROM sys.views WHERE object_id = OBJECT_ID(N'[sysdba].[SF_GroupRelease]'))
DROP VIEW [sysdba].[SF_GroupRelease]
GO

SET ANSI_NULLS ON
GO

SET QUOTED_IDENTIFIER ON
GO

CREATE View [sysdba].[SF_GroupRelease] as

SELECT GR.GROUPRELEASEID, P.PLUGINID,P.FAMILY,US.USERCODE,GR.MODIFYDATE FROM sysdba.PLUGIN P
INNER JOIN sysdba.SECRIGHTS S_AA ON ( P.USERID = S_AA.SECCODEID )
INNER JOIN sysdba.USERSECURITY US ON S_AA.ACCESSID = US.USERID
INNER JOIN sysdba.GROUPRELEASE GR ON GR.PLUGINID = P.PLUGINID
WHERE US.USERCODE <> 'admin'

UNION ALL

SELECT GR.GROUPRELEASEID, P.PLUGINID,P.FAMILY,US.USERCODE,GR.MODIFYDATE FROM sysdba.PLUGIN P
INNER JOIN sysdba.PLUGIN P1 ON P.BASEDON = P1.PLUGINID
INNER JOIN sysdba.USERSECURITY US ON P.USERID = US.DEFAULTSECCODEID
INNER JOIN sysdba.GROUPRELEASE GR ON (GR.PLUGINID = P1.PLUGINID OR GR.PLUGINID = P.PLUGINID)
WHERE US.USERCODE <> 'admin'

UNION ALL

SELECT GR.GROUPRELEASEID,P.PLUGINID,P.FAMILY,'Admin' USERCODE,GR.MODIFYDATE from sysdba.PLUGIN P
INNER JOIN sysdba.GROUPRELEASE GR ON GR.PLUGINID = P.PLUGINID

GO
Note: If, during the step below you would like to manually add the customizations to either Contactdetails, Leaddetails, or Campaigndetails, you may uncheck those boxes, and follow the Manual Sugar Market Customization documentation found on this page. - Install the Web bundle via SalesLogix Application Architect. Filename: Infor_SF_8.0_8.3_ForFreshInstance.zip (The versions listed may differ slightly).
Note: Step 1 only applies to Infor CRM version 8.5 if you are using another version skip to step 2.
- If your Infor CRM version is 8.5, after selecting the bundle file, expand the bundle to show all the bundle content. Please uncheck the below two items before bundle installation:
- Infor_SF_8.3-8.4 V2.2 > Entity Model > Relationship > uncheck the last item. (Campaign. CampaignTargetsView 1:M Campaign Targets View. Campaign)
- In the “Items to Delete” section, uncheck the first item (Campaign Targets View. Campaign M:1 Campaign)
- Preview the conflicts and uncheck any Sugar Market changes that may overwrite previous client-side customizations. We have added SmartParts to the following primary objects:
- Account
- Contact
- Lead
- Campaign
- We have modified the Details forms of the following to contain a "Launch Sugar Market" button:
- Contact – ContactDetails
- Lead – LeadDetails
- Campaign – CampaignDetails
- Our bundle also replaces the out-of-the-box relationship between Campaign and CampaignTargetsView. As part of the bundle install, the stock relationship is removed (both cannot exist).
- If your Infor CRM version is 8.5, after selecting the bundle file, expand the bundle to show all the bundle content. Please uncheck the below two items before bundle installation:
- Update entities.
- Expand your VFS, Entity Model, Packages, SalesLogix Application Entities.
- Right-click on the following entities, select update properties. Select every field and press Finish:
- Campaign
- CampaignTarget
- CampaignTargetsView
- SF_CampaignerLinkClick
- Build Interfaces.
- Once the bundle has installed, right-click on the active project workspace and select "Reload Project".
- Select File > Save All.
- From the Build menu, select Packages > Entity Interfaces
- You can now build web platform and (re)deploy.
Note: If you have a LAN Client, please continue to the next section, otherwise, all install steps are complete.
Adding the Recycle Bin to LAN
The Sugar Market Recycle Bin facilitates the synchronization of deleted records from Infor CRM to Sugar Market. This feature exists in the Web client via business rules which are not interfaced from the LAN client. In order to provide the same functionality to the LAN client, we replace\supplement the Web business rules with the SQL triggers created within this script.
The script will create triggers on the Account, Contact and Lead tables, as well as add a new stored procedure that generates an SLX primary key outside of the SLX OLEDB provider.
Instructions:
- Download the "Infor_LAN_RecycleBin" zip file from this knowledgebase article.
- Execute the script listed under "Install".
Remove Business Rules from Web for Recycle Bin
If desired, you may also remove the business rules (if no one is using the Web client). The following steps will outline how to do so through the Application Architect.
- Account Entity - navigate to Entity Model > Packages > Saleslogix Application Entities > Rules > Events. Go to 'OnAfterDelete' event and remove 'OnAfterDeleteStepPre' from Pre Execute steps tab and save the changes.
- Repeat Step 1 (removal of the 'OnAfterDeleteStepPre') for both the Contact and Lead entities.
- Click on Build Interfaces.
- After the Build Interfaces is complete, click Build Web Platform.
- After Web Platform is built, deploy SlxClient from Deployment explorer. After deployment you might need to do an iisreset depending on your environment to clear the cache.
Installing the Buyer's Journey Integration for LAN Client
Instructions:
- Download the "iFrame for Infor CRM LAN" zip file further down on this page.
- Install .sxb file contained in zip file.
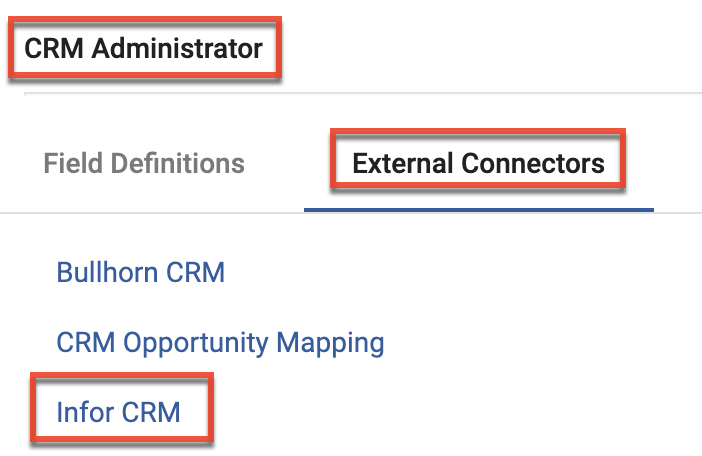
Accessing the Infor Connector
Your Sugar Market CRM Connector will provide access to setup & modify your password access, synchronization preferences and a timetable of the last completed sync with your CRM.
To access the Infor CRM Connector:
- Log in to your Sugar Market account and from the user menu, click "Admin".
- In the CRM Administrator section, within the External Connector tab, click "Infor CRM".
Configuring the Infor Connector
Step 1: Syncing Credentials
First thing you'll do is enter the Infor username and password that Sugar Market will use to sync with your CRM. You may create a new user or use one that is pre-existing as Infor CRM allows for concurrent logins. However, do note that all created or updated actions that occur due to the sync will be attributed to that syncing user. Therefore, if possible, we recommend a unique user for auditing purposes. The syncing user must have the necessary permissions to read and\or update all records which you wish Sugar Market to sync.
Fields:
- User ID: The Infor CRM username we will use to authenticate within sData
- Password: The password for the user mentioned above
Note: After saving the password, the password will appear blank.
After entering the credentials as mentioned above, click Save Connection to the right side of the screen.
Step 2: sData and Organization Information
Complete the following fields:
- On Premise/Hosted: Select what version of Infor CRM you have. If you are hosted by Infor, select "Hosted". If you are self-hosted without IFD (published web resources externally), select "On-Premise".
- Customer ID: Should all equal the Unique Key generated per the button
- sData URL: The externally facing sData URL we will use to sync data
- Default user for new leads: The user assigned as the default (catchall) owner of a new lead when it is pushed up to Infor and the user does not already exist in Infor (the user only exists in Sugar Market). When the user does not already exist in Infor, Sugar Market assigns the defined user in this setting as the lead record owner. The user name only populates this list after the initial sync is complete.
- Group ID for Lead Owner: We automatically pull the Group ID for the lead owner mentioned above to this field.
- Infor CRM Version: Your current version of Infor.
Once the information above is complete, click Save Profile to the right side of the screen.
Step 3: Sync Dates
No Action Needed - this table will show you the last time Sugar Market has synced with your CRM. These will be updated once we have completed the initial integration. See the Integration With Infor section for a deeper explanation on this component.
Step 4: Syncing Preferences
Set up your syncing preferences. This includes what information you want Sugar Market to sync down and what information you'd like Sugar Market to update and create, among other preferences. See the full explanation of each item below.
Pull Data (Sync from CRM)
|
Pull Accounts |
Whether or not Sugar Market should sync down Accounts from Infor CRM |
|
Pull Leads |
Whether or not Sugar Market should sync down Leads from Infor CRM |
|
Pull Contacts |
Whether or not Sugar Market should sync down Contacts from Infor CRM |
|
Pull Opportunities |
Whether or not Sugar Market should sync down Opportunities from Infor CRM |
|
Accounts: Pull Only Owner and Account Name |
By checking this box, we will only pull down the account owner and account name into Sugar Market. However, we will still pull down all other column names, just not the values. |
|
Contacts and Leads: Pull Only Name, Email, Title, Phone, Unsubscribe and Owner |
By checking this box, we will only pull these 6 values into Salesfu-sion. However, we will still pull down all other column names, just not the values. |
|
Pull Marketing Lists to Distribution Lists |
Whether or not Sugar Market should sync down static Ad Hoc Groups as distribution lists |
|
Keep Picklist values in sync |
Whether or not Sugar Market will sync down the picklist values from Infor CRM, and keep those lists updated as values are added or removed. This will allow these picklists to be used in landing page questions or selected in a drop down on the contact card. *Note – Sugar Market picklists are not restrictive, so values outside of the picklist values will still be allowed. |
Push Data (Sync from CRM)
|
Allow Updates for Lead and Contact Records |
Allow Sugar Market to push updated values to Lead and Contact records in Infor CRM |
|
Allow creation of New Leads |
Allow Sugar Market to create new Lead records in Infor CRM. |
|
Allow creation of New Contacts |
Allow Sugar Market to create new Contact records in Infor CRM. |
|
Allow Updating of Unsubscribe Status |
Allow Sugar Market to update the Unsubscribe status (DoNotEmail field) of Lead and Contact records in Infor CRM |
|
Allow Updating of Score Field |
Allow Sugar Market to push Scoring values to Infor CRM as mapped by Scoring Profiles. Scores are pushed to Infor one record at a time. |
|
Push Sent Email to Activity History |
This will allow Sugar Market to push sent emails into the Notes\History of the corresponding record in SalesLogix. |
|
Push Email Opens to Activity Record |
This will allow Sugar Market to push email opens into the Note\History of the corresponding record in Infor |
|
Push Email Clicks to Activity |
This will allow Sugar Market to push email clicks into the Note\History of |
|
Push Web Activity to Activity Record |
This will allow Sugar Market to push web activity into the Note\History of the corresponding record in Infor |
|
Push Tasks to Activity Record |
This will allow Sugar Market to push tasks into the Activity Record of the corresponding record in Infor |
|
Push Opportunities Created from Scoring |
This will allow Sugar Market to push opportunities into Infor |
|
Allow Sugar Market to update delivery message |
You have the ability to map the delivery status captured from emails sent from Sugar Market back to your CRM. To do this you will need to create a custom field in your CRM. This field will need to be created in both con-tacts and leads and the field name must be exactly the same for both. This will need to be a text field as we will be mapping either "Delivered" or the Bounced message as values. After the initial sync you will be able to choose your custom field that you created in the drop down box. We push the de-livery status once a day at 11PM EDT and it is retroactive. |
Sugar Market Infor CRM 2.0 Connector
All customers currently have access to these features, and the description text next to each explains what each is for. Please note that you can not use options when also using the "Push Sent Email" or "Push Web Activity" to Activity History.
Remove Data from Marketing
Recycle Bin - This feature requires the Sugar Market Bundle to be installed, as it creates triggers or business rules for your Accounts, Contacts, and Leads in Infor CRM. If you are using the Infor LAN Client, we have a database script which will need to be run by your CRM Administrator. This script can be found below.
Alerts
Insert the email addresses of whom should be alerted should there be an credential issue with your sync. We typi-cally recommend you include the CRM Admin and the syncing user. You can separate multiple email address with a semicolon.
Note: Completing the bundle installation and connector configuration will not initiate the sync. You will need to contact Sugar Market to turn on the Sync.
Downloads
Note: Before applying any changes in the bundles below, Sugar Market requires, at minimum, that a current backup of your VFS be made. If errors are encountered, please revert back to the backup and contact Sugar Market Support. More detail on this can be found in the documentation contained in the installation instructions.
New Installations
If you currently do not have the Sugar Market solution installed in your CRM, then download the following:
For Infor 8.3-9.4 Web:
Infor CRM 8.3-9.4 Web - New Installation - V2.2
Infor CRM 8.0-8.2 Web - New Installation - V1.2
For Infor 8.0-8.4 LAN (First install appropriate Web bundle from options above):
For Infor Recycle Bin LAN/Web (8.0-9.4):
Infor CRM Recycle Bin for LAN (8.0-9.4) - V1.0
Upgrades
If you are upgrading your CRM to one of the following versions, then download the following:
For Infor 8.3-9.4 Web:
Infor CRM 8.3-9.4 Web - Upgrade - V2.2
Infor CRM 8.0-8.2 Web - Upgrade - V1.2
For Infor 8.0-8.4 LAN:
Infor CRM 8.0-8.4 LAN - Upgrade - V1.3
Infor Teams
Infor's contacts and leads have two functions for record assignment:
- Single assignment via the accountmanager field
- Group assignment via the seccodeid field
- The seccodeid can be used to select teams or departments
Sugar Market uses the single assignment function to pull the account manager for that record and reference it to the contact or lead owner in the Sugar Market CRM.
Sugar Market does not sync down the group assignment function at this time. If a record is assigned to a group (team or department) and sync'd down to Sugar Market, a default owner will be assigned.
Infor AdHoc Groups
In order for a group to sync down as a distribution list in Sugar Market, there are a few criteria:
- It is an AdHoc Group
- It has been shared in Infor CRM with our syncing user (this ensures its available to our user in sData)
- It is based off the Contact or Lead tables
- The Modify Date of the group falls into the time since we've last synced (this is how we evaluate what to sync down for all tables)
- Only leads\contacts that exist in Sugar Market as well will be synced down into the Distribution List.
Currently when adding records to an adhoc group in Infor, the modify date of the group is not changed. The best way to ensure the modify date is updated correctly, the group "properties" can be adjusted. For example, changing the Description or Name will suffice.
We've informed Infor of the fact that adding someone to the group doesn't adjust the modify date, and they confirmed it's a known issue to be fixed in one of their future releases.
To accommodate for the inconvenience of having to rename the group too adjust the modify date, we currently re-pull all lists modified within the past year every 12 hours in addition to the normal list sync that runs every ~20 minutes.
Note: When syncing groups, we use the Group sData endpoint per Infor standards. (/Sdata/slx/system/-/groups)