Understanding Round Robin Activities vs. Round Robin Actions
Overview
Process definitions created via SugarBPM can contain Activities and/or Actions, both of which can be configured using a round-robin assignment method. Round Robin elements may reassign a process flow, a Sugar record, or both to the next sequential user. This article covers when to use a Round Robin Activity versus a Round Robin Action and how to incorporate them in process definitions.
Prerequisites
- To use the SugarBPM modules, you must be an administrator or have developer access to the module defined as the Target Module in your use case.
- You should review the SugarBPM documentation before executing the steps in this tutorial.
- Schedulers, specifically the SugarBPM™ Scheduled Job, must be running.
Activities vs. Actions
Activity elements always require user interaction, while Action elements are automated occurrences. The following sections will go over scenarios of when to use a Round Robin Activity and when to use a Round Robin Action when creating your process definition.
- Round Robin Activity: Use the Round Robin Activity in a process definition to elicit a response (e.g. approval) from the next sequential user on a given team. For example, users from the Sales Management team will take turns approving quote records.
- Round Robin Action: Use the Round Robin Action to re-assign a Sugar record to the next sequential user on a given team. Optionally, you can configure it to only assign to users who are available for work according to their shifts, shift exceptions, and holidays.
Note: The processing order of Round Robin Activities and Round Robin Actions is based on the Created By date of the user record in the Users module.
Round Robin Activity
Use a Round Robin Activity to equally distribute a user activity (e.g. approvals) to the explicit members of a team in a take-your-turn fashion. For example, if Jim and Sally belong to the East team, the Round Robin Activity (Approve/Reject) for the team will be assigned to Jim for approval the first time the process runs. When the process runs the second time, the activity will be assigned to Sally for approval, then to Jim again for the third process approval and so forth.
Note: The "Reports-to" members of a team are not included in Round Robin Activities.
Use Case
In this use case, all new leads will be routed to a reviewer from a specific team. The members of the team will take sequential turns reviewing the leads. This will require a Round Robin Activity configured with a Route form and Round Robin assignment method.
Steps to Complete
The following steps cover creating a Round Robin Activity for the Leads module as an example:
- Create a new process definition record according to the Process Definitions documentation.
- Enter the following information on the record view layout and click "Save and Design":
- Name: Lead Round Robin once Approved
- Target Module: Leads

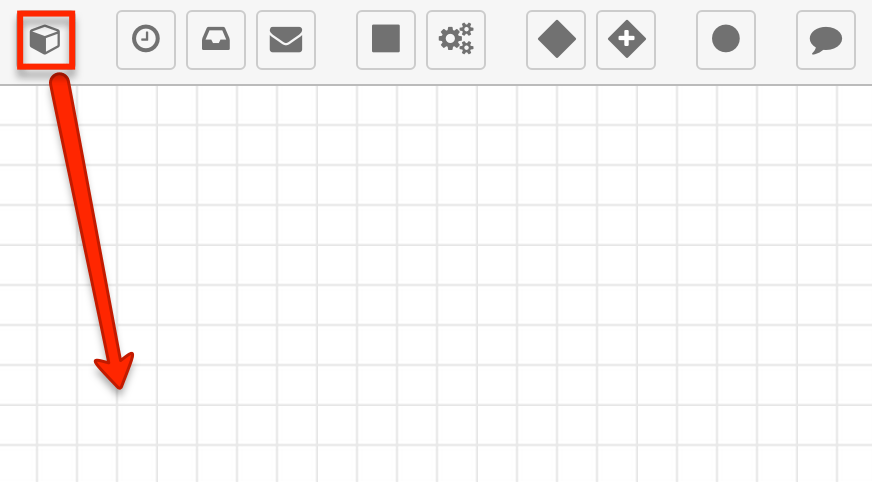
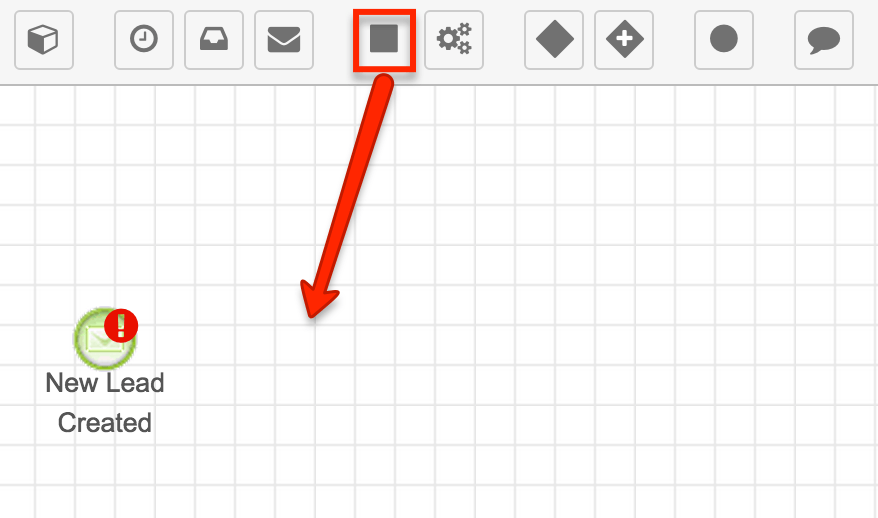
- From the Visual Designer, add a Start event by dragging the target module Start event icon onto the design canvas.
- Note: The Start event is represented by a Sugar cube icon in the design toolbar.
- Configure the Start event as follows:
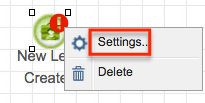
- Right-click on the start event and select "Settings".
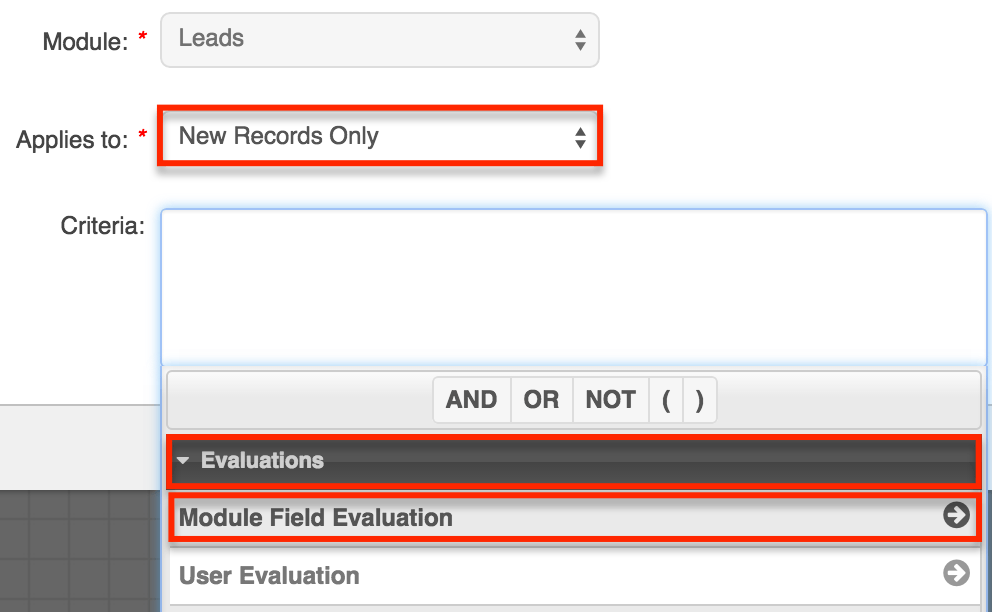
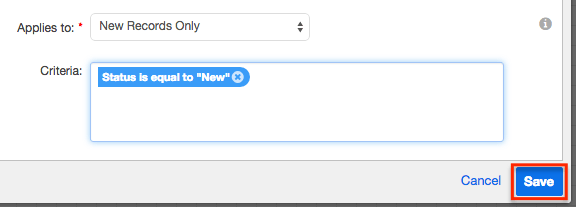
- Select "New Records Only" from the Applies To field. Click inside the Criteria field and select "Evaluations" then choose "Module Field Evaluation".
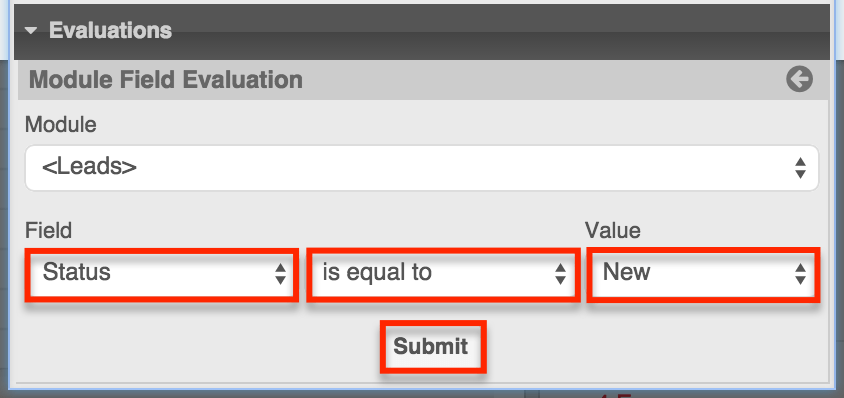
- Select "Status" from the Field dropdown menu and set the condition to "is equal to". Select "New" from the Value dropdown menu then click "Submit" to add this to the criteria window.
- Click "Save" to finalize the changes.
- Right-click on the start event and select "Settings".
- Drag an Activity element onto the design worksheet and label it "Review New Lead".
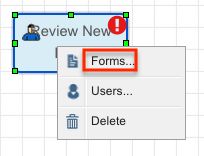
- Right click on the Activity element and select "Forms".
- Select "Route" from the Form Buttons dropdown menu and click "Save".

- Right click on the Activity again and select "Users".
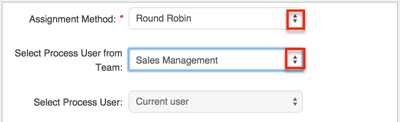
- Select "Round Robin" from the Assignment Method dropdown menu, then select the team (e.g. Sales Management) that will be tasked with reviewing new leads. Click "Save" to return to the design canvas.
- Drag a connector line from the Start event to the Activity element.
- Drag an End event onto the design worksheet and place it to the right of the Activity element. There is no need to configure the End event as it will default to "Do Nothing".
- Drag a connector line from the Activity element to the End event. The completed Process Definition should look similar to this:
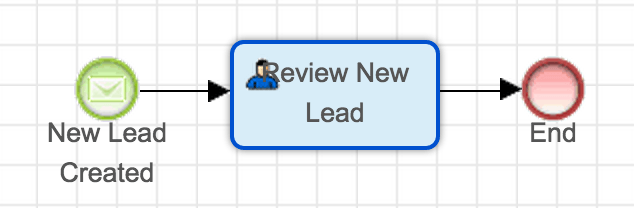
Once the Process Definition is enabled, any new leads will be sent to a reviewer on the Sales Management team.
Note: New process definitions are set to "Disabled" by default. Please refer to the Enabling a Process Definition section for more information on enabling a process definition.
Round Robin Action
Use a Round Robin Action to assign the the process and record to explicit members of a team in a take-your-turn fashion. For example, if Jim and Sally belong to the East team, a Round Robin distribution for the team will assign the target record to Jim the first time the process runs. When the process runs the second time, the record will be assigned to Sally, then to Jim again on the third execution and so forth. Please note that records are not assigned to users if they have an inactive status at the time the process is run.
Note: The "Reports-to" members of a team are not included in Round Robin Actions.
Use Case
In this use case, all new leads will be equally distributed to members of a specific team. This will require a Round Robin Action with the "Update 'Assigned To' on record" setting enabled.
Steps to Complete
The following steps cover creating a Round Robin Action for the Leads module as an example:
- Create a new process definition record according to the Process Definitions documentation.
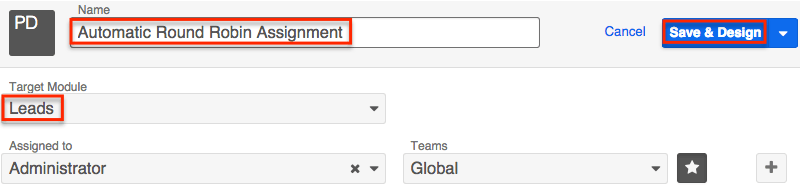
- Enter the following information on the record view layout and click "Save and Design":
- Name: Automatic Round Robin Assignment
- Target Module: Leads
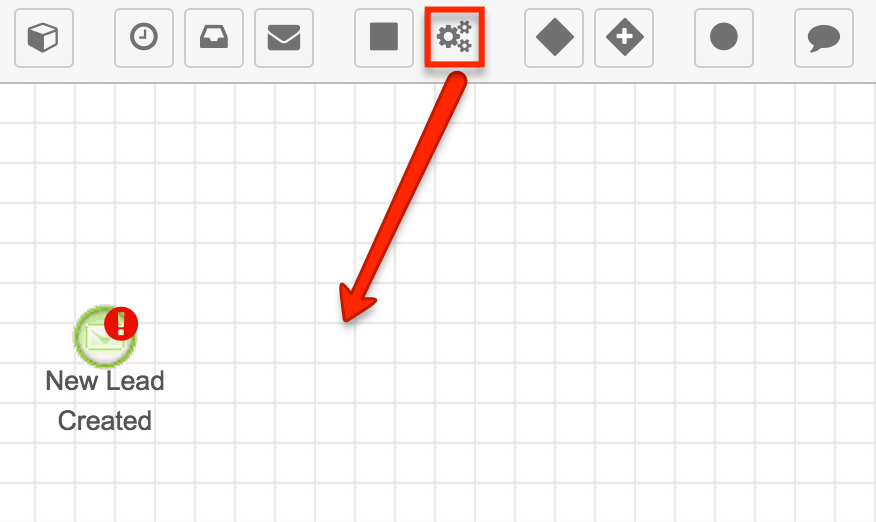
- From the Visual Designer, add a Start event by dragging the target module Start event icon onto the design canvas. Change the label of the Start event to "New Lead Created".
- Note: The Start event is represented by a Sugar cube icon in the design toolbar.
- Configure the Start event as follows:
- Right-click on the Start event and select "Settings".
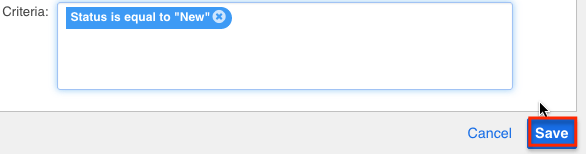
- Select "New Records Only" from the Applies To field. Click inside the Criteria field and select "Evaluations" then choose "Module Field Evaluation".
- Select "Status" from the Field dropdown menu and set the condition to "is equal to". Select "New" from the Value dropdown menu then click "Submit" to add the criteria.
- Click "Save" to finalize the changes.
- Right-click on the Start event and select "Settings".
- Drag an Action element (Gears icon) onto the design worksheet and label it "Lead Assignment".
- Configure the Action element as follows:
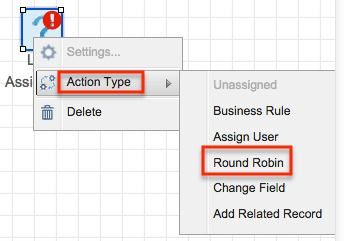
- Right-click on the Action element and select "Action Type" then choose "Round Robin".
- Right-click on the Action element again and select "Settings".
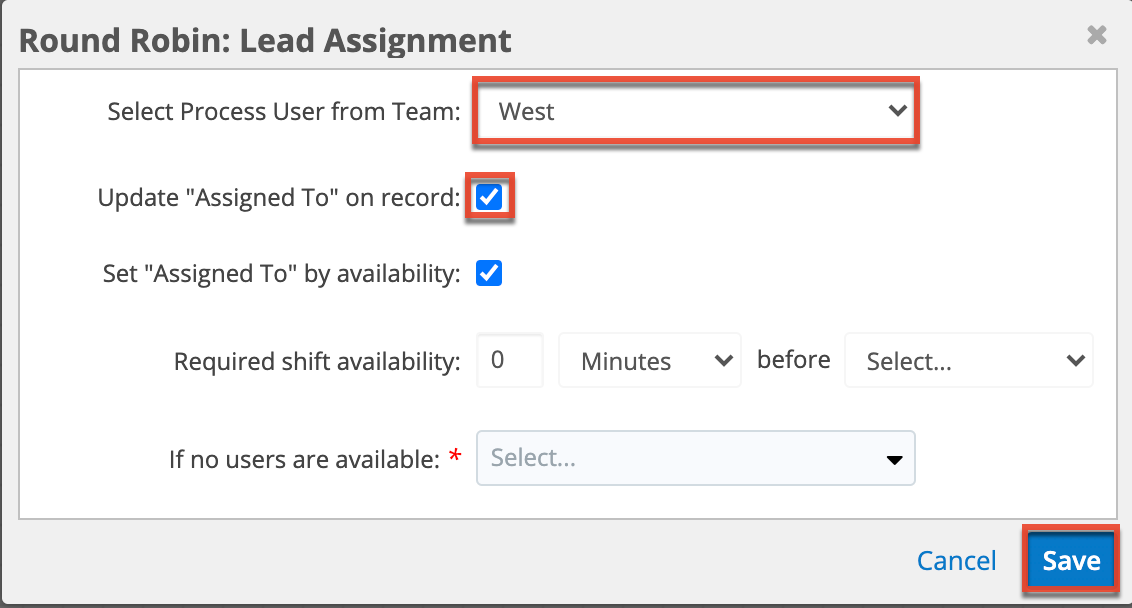
- From the Select Process User from Team field, choose the team (e.g. West) that will receive the Round Robin assignments. Enable the "Update 'Assigned To' on record" setting by marking the checkbox. Optionally, you can configure the fields that appear to only assign records to users who are available for work; see the Process Definitions documentation for more details. Click "Save".
- Right-click on the Action element and select "Action Type" then choose "Round Robin".
- Drag a connector line from the Start event to the Action element.
- Drag an End event onto the design worksheet and place it to the right of the Action element. There is no need to configure the End event, as it will default to "Do Nothing".
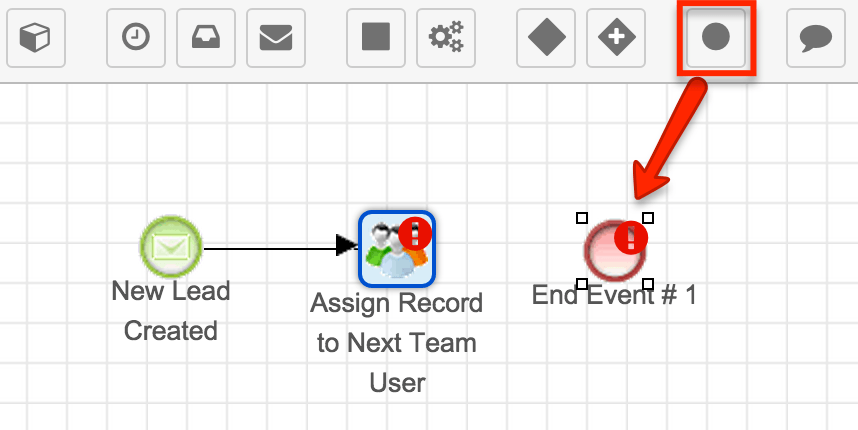
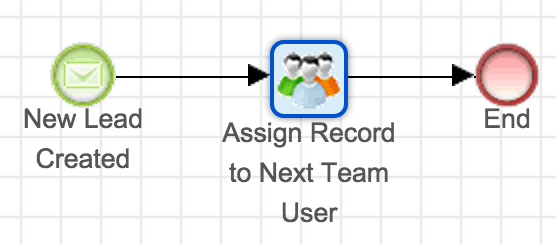
- Drag a connector line from the Action element to the End event. The completed Process Definition should look similar to this:
Once the Process Definition is enabled, any new leads will automatically be assigned to the next sequential user from the selected team, or to the next user who is available, if that is how you configured the Round Robin action.
Note: New process definitions are set to "Disabled" by default. Please refer to the Enabling a Process Definition section for more information on enabling a process definition.
Enabling a Process Definition
New process definitions are set to "Disabled" by default. This is a preventative feature that ensures a process instance is not triggered inadvertently during the design phase. After the design is fully configured, exit the Visual Designer and set the process definition to "Enabled" via the Process Definitions dashlet or list view. For more information, please refer to the Process Definitions documentation.
Downloads
The two module records created in this section are provided here for your convenience. While these records are importable to their respective modules, keep in mind the following:
- A process definition (.bpm) file that contains a reference to an email template or business rule should be imported after those related records have been created in or imported to the instance.
- You must re-configure the settings for the Business Rule action before enabling the process definition.
- Always review the settings of imported SugarBPM files to confirm that they are configured as expected.
- Process definition files may import in a "Disabled" state. Please enable the process definition after confirming its elements' settings.
| Process Business Rule File | Process Definition File |
| .pbr | .bpm |
Note: For more information about importing SugarBPM records, please refer to the SugarBPM page in the Administration Guide.