Creating Dependent Dropdown Lists
Overview
Dropdown fields in Sugar are fields where users can choose a value from a list of values when creating or editing records. A dependent dropdown field is the same except that the list of values is dynamic and dependent on a parent dropdown. Dependent dropdowns usually represent category and sub-category scenarios. The first, parent dropdown's value controls which options are available to choose in the second, dependent dropdown. This article covers how to create a dependent dropdown field and configure the options that appear for each value of the parent dropdown.
Use Case
When ABC Company's support team creates a case in Sugar, they select a reason for the customer's inquiry in a custom field, "Case Reason," which contains the following options:
- Software
- Feature
- Usability
- License
- Other
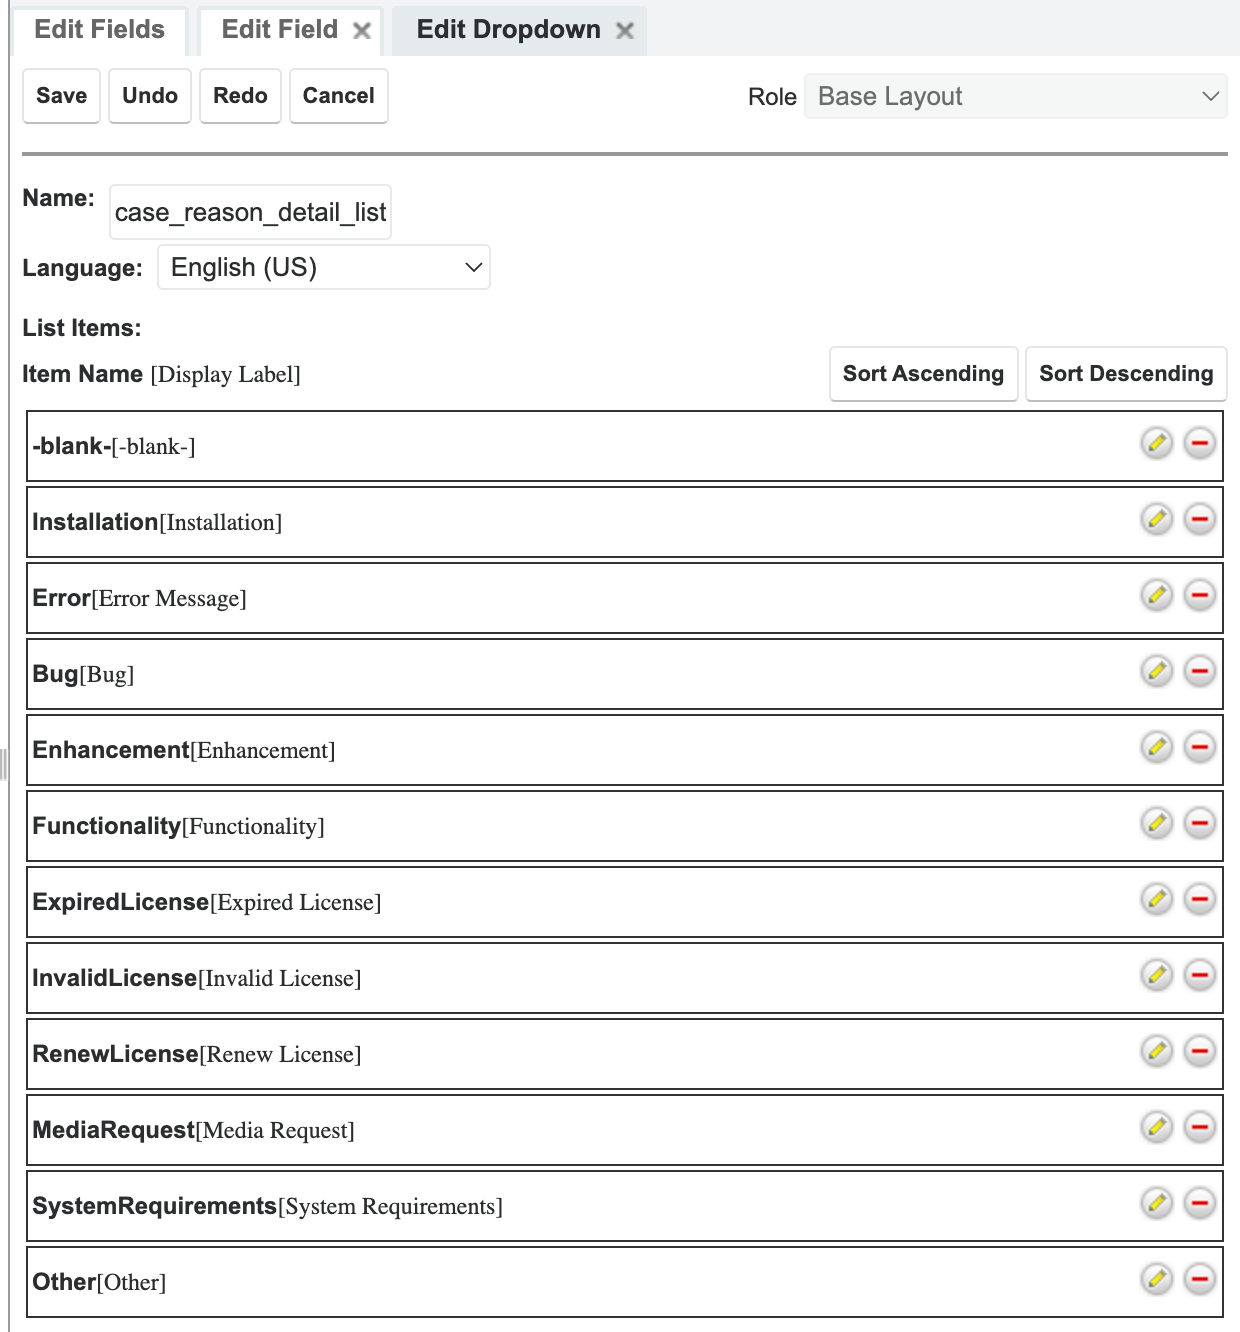
Upon selecting the case reason, a second field, "Case Reason Detail", appears where the user refines the type of issue being reported. This dependent dropdown field will display some or all of the following values depending on the option selected in the Case Reason field:
- Installation
- Error Message
- Bug
- Enhancement
- Functionality
- Expired License
- Invalid License
- Renew License
- Media Request
- System Requirements
- Other
As an example, this article covers how to create the two dropdown fields via Admin > Studio and configure the dependent dropdown options relative to the parent dropdown.
Prerequisites
You must be an admin user or have developer-level role access in order to create dropdown fields and configure dependencies via Admin > Studio.
Steps to Complete
Creating the Dropdown Fields
First, create the parent and dependent dropdown fields via Admin > Studio. Use the following steps to create the dropdown fields:
- Navigate to Admin > Studio > Cases > Fields and click "Add Field".
- Set the Data Type field to "DropDown".
- Enter the field name (e.g., Case_Reason) then hit the Tab key to populate the display label.
- Next, click the Add button below the Drop Down List field to create a new dropdown list.
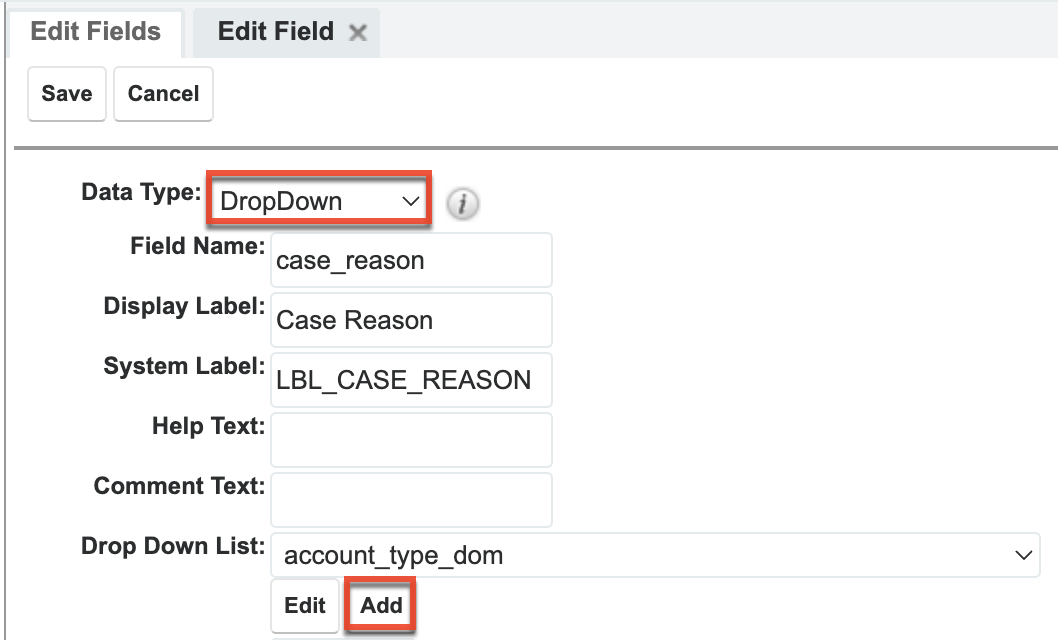
- Add the dropdown list options by entering the "Item Name" and "Display Label" corresponding to each value. The item name is what Sugar stores in the database. The display label is what users see when using Sugar. For more information on creating dropdown lists, please refer to the Developer Tools documentation. Click "Add" once you have populated both fields to add the value to the dropdown list.
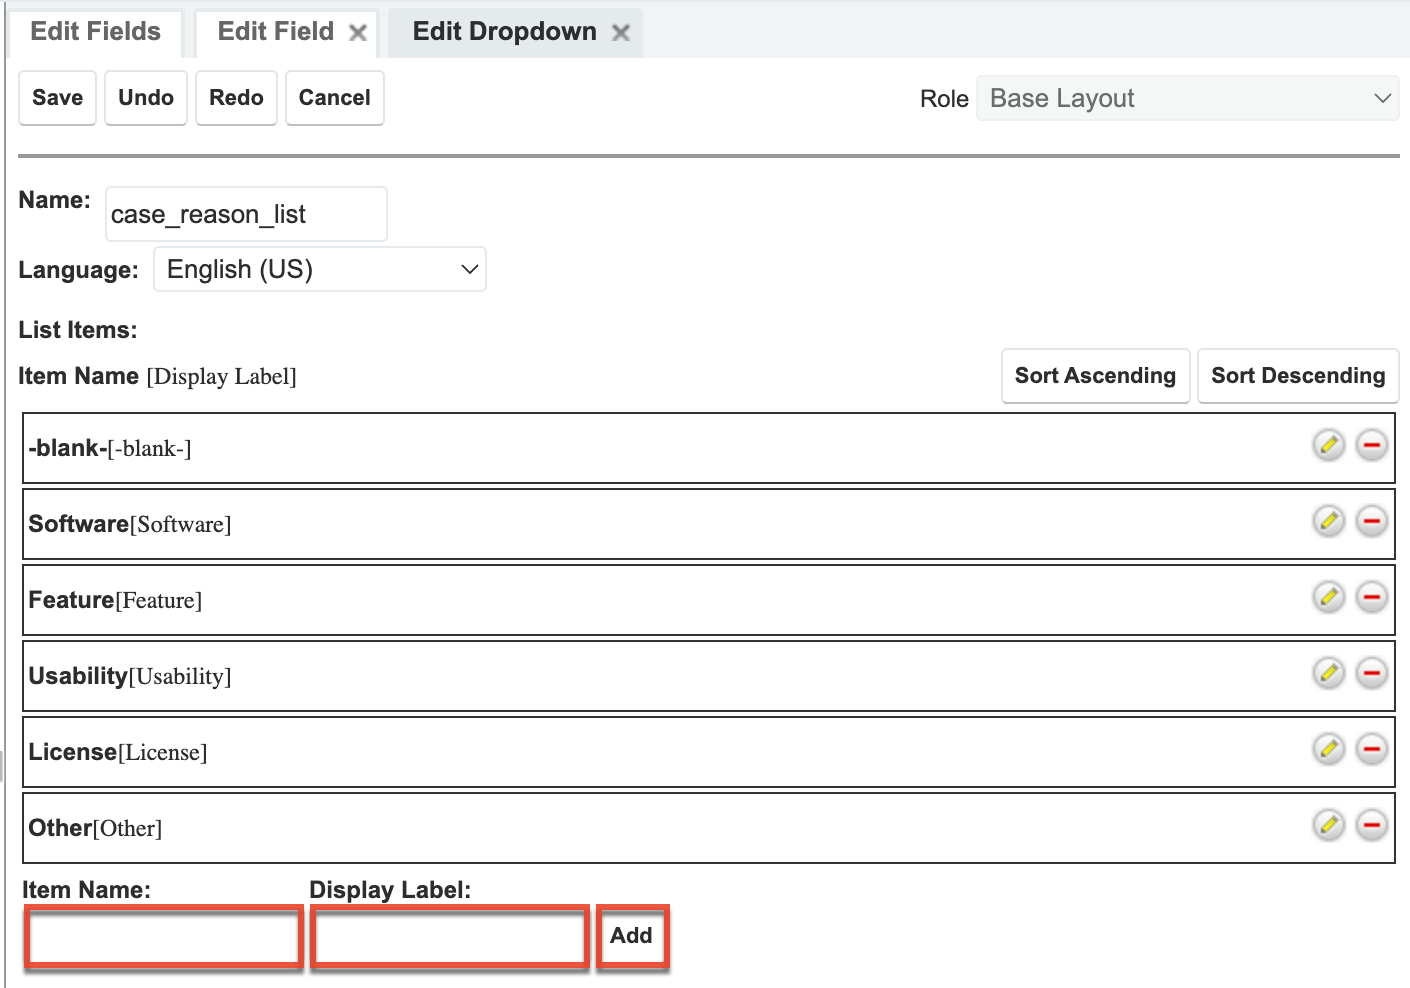
- After adding all of the values to the dropdown list, click "Save" at the top of the screen to create the dropdown list.
- Complete the remaining, optional field settings and then click "Save" to create the Case Reason dropdown field.
Note: You can configure dependent dropdowns as required fields in Studio, but the requirement is only enforced when the user selects a parent value with dependent options as described in the Configuring the Dependency section. - Repeat steps 1 - 7 to create the dependent dropdown field, naming it "case_reason_detail" with the display name "Case Reason Detail". It should have the following options:
Configuring the Dependency
Use the following steps to configure the dependency for the dependent dropdown field:
- Navigate to Admin > Studio > Cases > Fields and select the field that will be dependent, "Case Reason Detail".
- Ensure that the default value for the field is set to the blank value. For more information, please refer to the Adding a Blank (NULL) Value as the First Value of a Dropdown List.
- In the Dependent field, select "Parent Dropdown" to specify that a parent field controls which options should be shown.
- In the Parent Dropdown field, choose the Case Reason option.
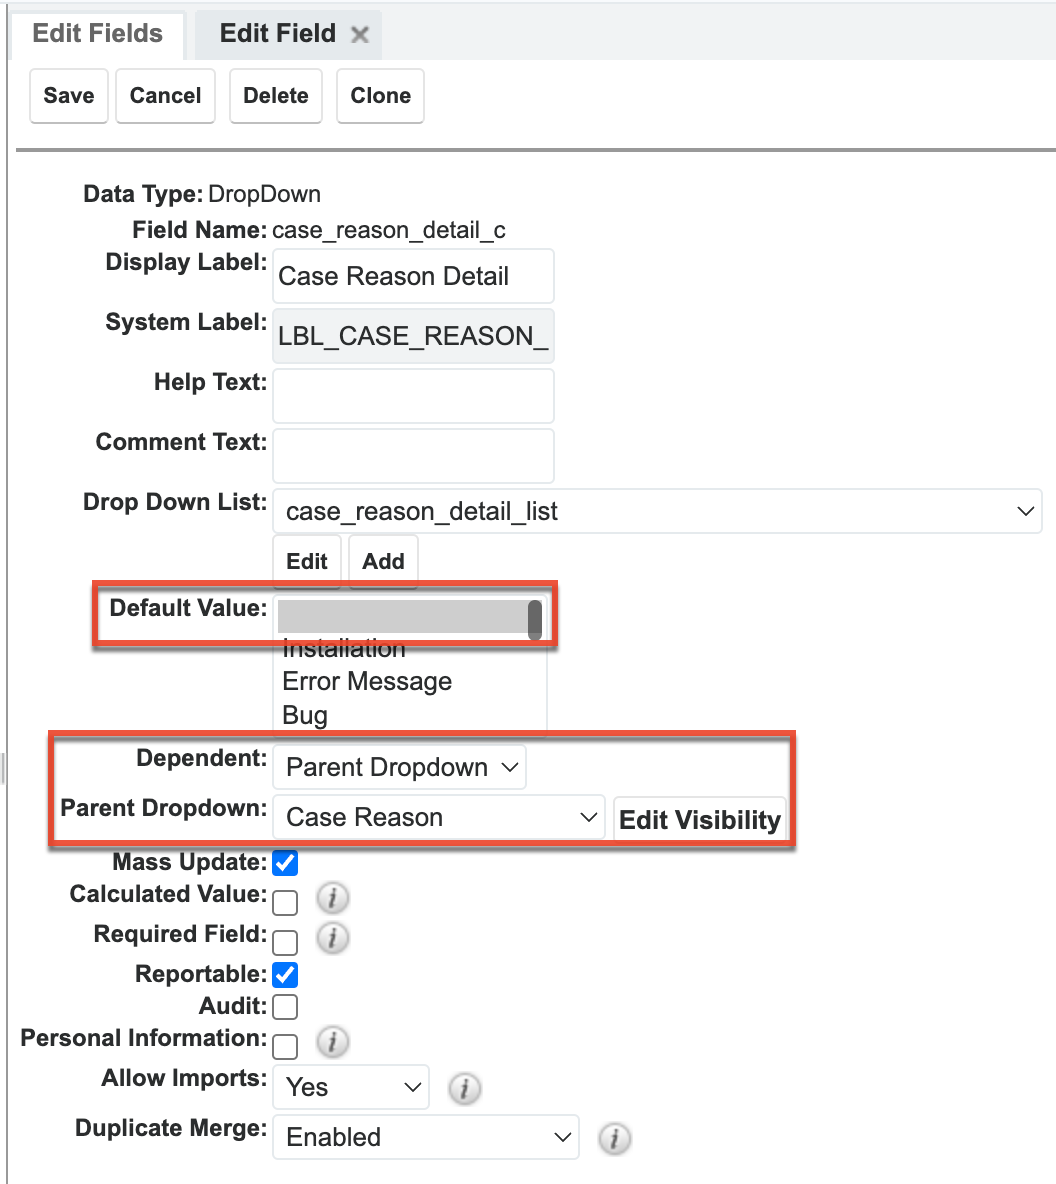
- Next, click "Edit Visibility" to specify which options are available for each value of the parent dropdown.
- In the Visibility Editor window, drag and drop values from the Available Options list on the left to the parent dropdown values on the right.
- Values in the Available Options list can be added to multiple parent dropdown options.
- To remove a value from a parent dropdown option, simply drag and drop the value to the recycle bin on the left.
- If a parent dropdown option contains no values from the Available Options list, then the dependent dropdown field will not display when that value is selected in the parent dropdown. For example, if no options are added to "License", then the Case Reason Detail field will remain hidden if a user selects "License" in the Case Reason field.
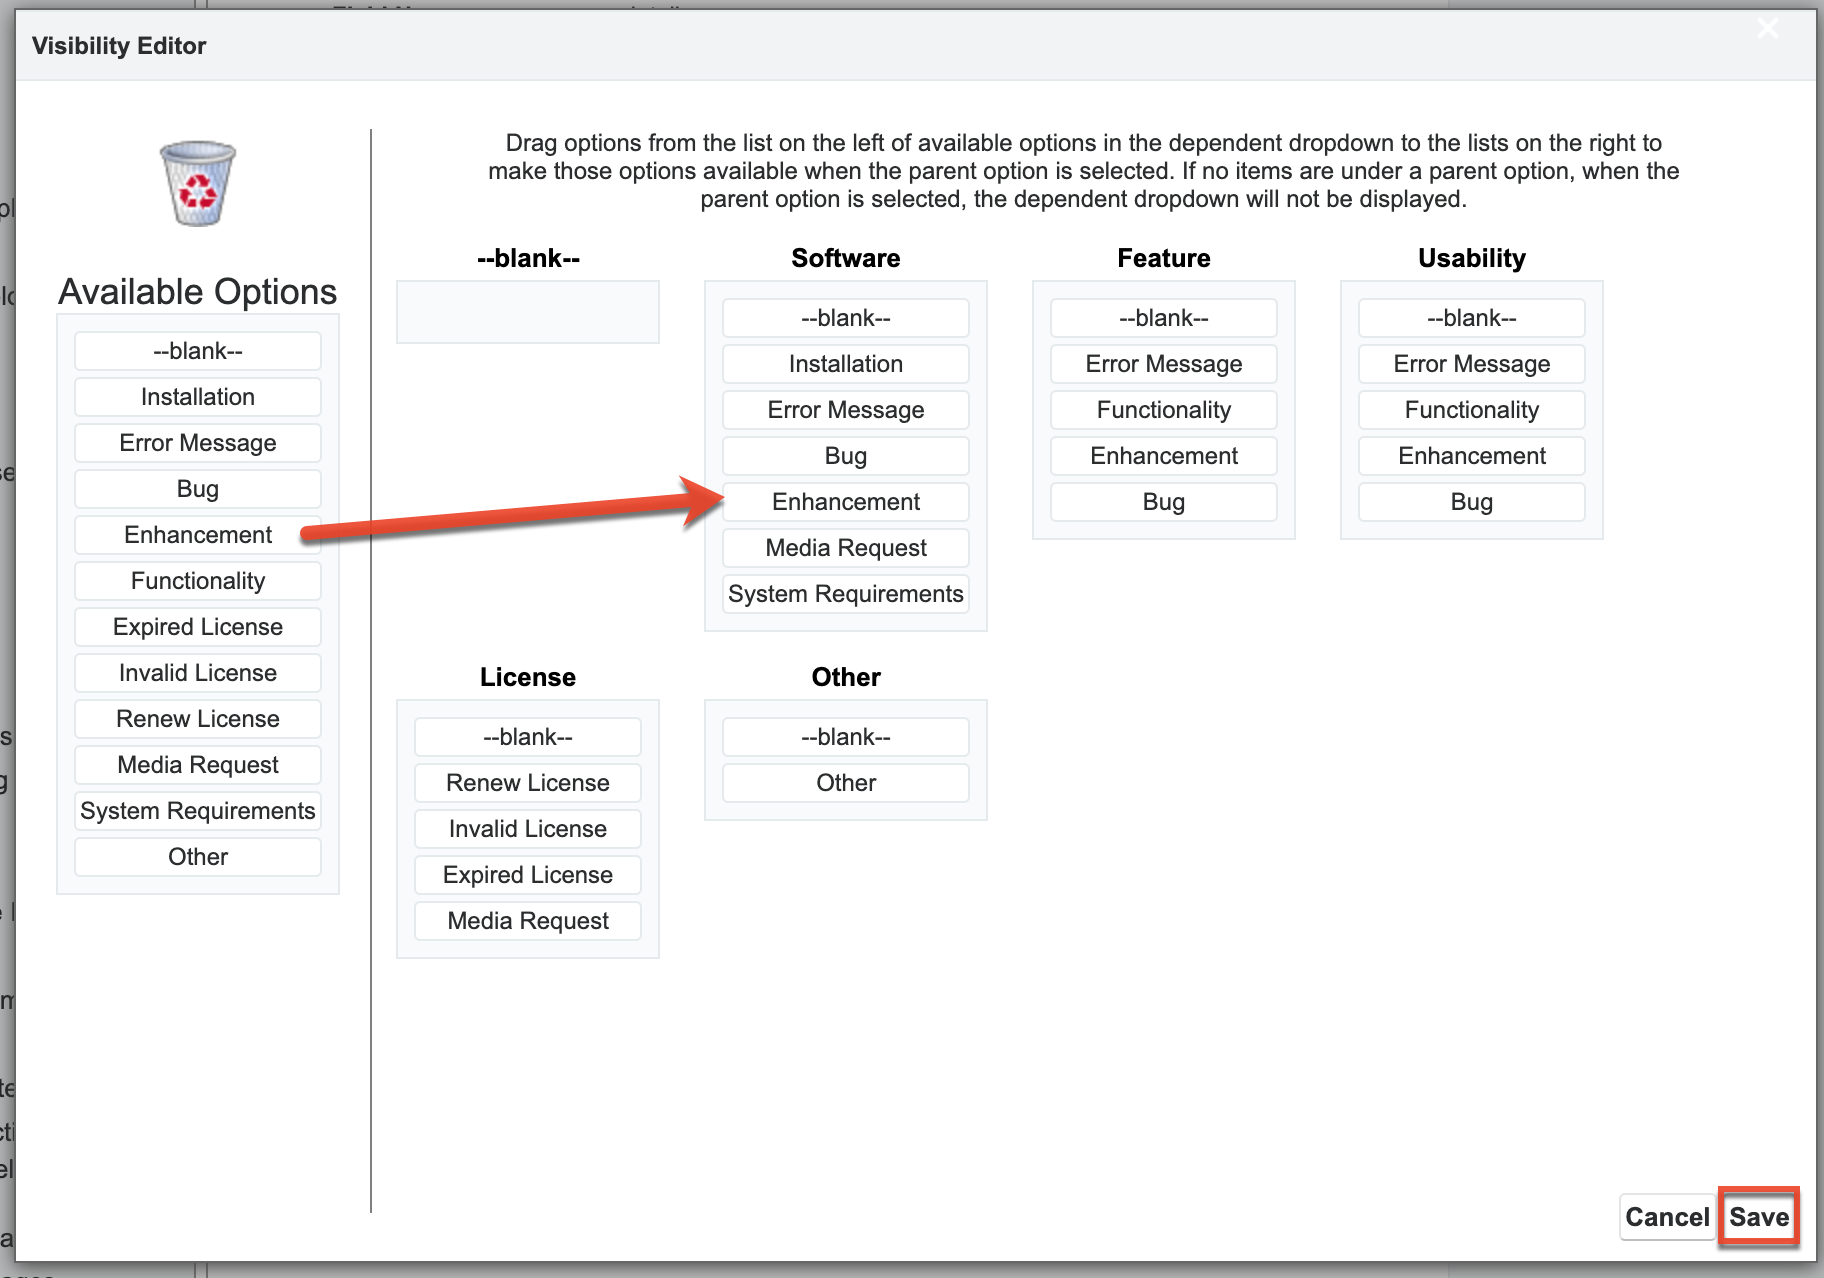
- Click "Save" in the Visibility Editor window, then click "Save" again in the Edit Field tab to save the dependency configuration.
- Finally, add both the parent (i.e., Case Reason) and dependent (i.e., Case Reason Detail) dropdown fields to the Case module's Record View layout and any other desired layouts. For a smooth user experience, it is best practice to place the fields adjacent to each other. For more information on adding fields to the Record View layout, please refer to the Studio documentation.
Application
After creating the dropdowns, configuring the dependency, and adding the fields to the record view, navigate to a case's record view to test the dependent dropdown. Select different values in the parent dropdown field and observe the list of options available in the dependent dropdown field changing. For this example, if you select "Usability" in the Case Reason field, then the Case Reason Detail field will show "Error Message","Functionality", Enhancement", and "Bug" as available options.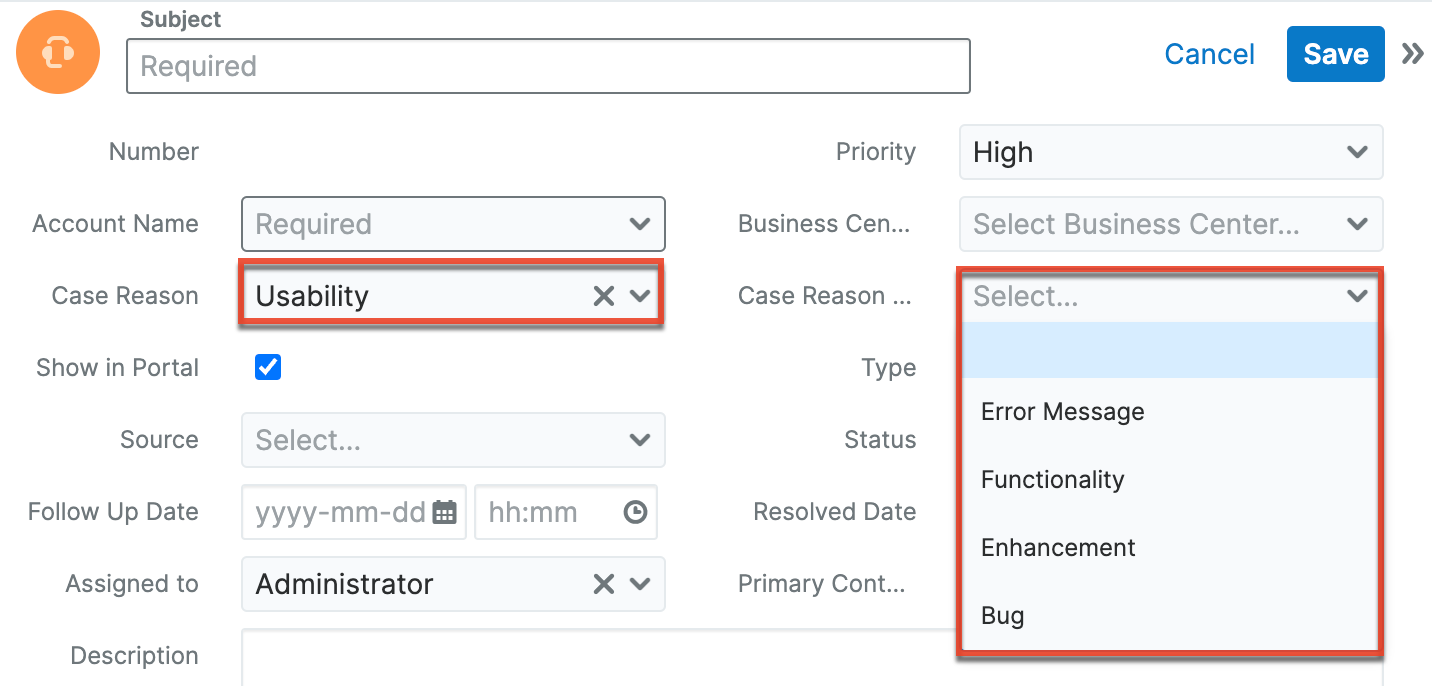
If you wish to change the available options in the dependent dropdown field at a later time, simply make the necessary changes as described in the Configuring the Dependency section of this article.