Knowledge Base
Overview
Sugar's Knowledge Base module provides the ability to create, maintain, and publish information in the form of articles. Knowledge base articles can cover a variety of topics such as troubleshooting or frequently asked questions. When used for internal purposes, articles can be accessed via the Sugar instance by Sugar users within your organization. When needed for external purposes, articles can also be published to the Sugar Portal, providing visibility for customers or other portal users.
Articles can be rated based on their usefulness by both internal and external readers to help you determine which articles should be improved or updated and which should be promoted as valuable information. As you work to improve articles, you can create revisions to keep a history of versions as well as to make changes without immediately affecting published content. Articles can also be localized to reach new audiences using a variety of languages. This documentation will cover information and actions specific to the Knowledge Base module. For instructions concerning views and actions which are common across most Sugar modules, such as creating, editing, and deleting accounts, please refer to the Working With Sugar Modules section of this page.
Please note that you will only be able to see account records as allowed by your team membership, user access type, and assigned roles. For more information on teams and roles, please refer to the Team Management and Role Management documentation in the Administration Guide.
Article Fields
The Knowledge Base module contains a number of stock data fields that come out of the box with Sugar. For information on using and editing various field types, refer to the User Interface documentation. The definitions below are suggested meanings for the fields, but the fields can be leveraged differently to best meet your organization's needs. Users with administrator or developer access have the ability to alter, add, or remove fields via Admin > Studio. For more information on configuring fields, please refer to the Studio documentation in the Administration Guide.
| Field | Description |
| Active Revision | Denotes the most up-to-date, unpublished revision of an article. This box is automatically set when a new revision is created for an unpublished article so that only the newest revision will have it checked. Only revisions with "Active Revision" checked will appear in the Knowledge Base list view. Note: If a revision is published, it will retain the Active Revision designation until a subsequent revision is published in its place. |
| Approved By | The Sugar user who is appointed to approve the article. Note: When setting an article's status to "Approved", the Approved By field will automatically be populated with your name. |
| Attachments | External files uploaded to the article which can be downloaded from the article via Sugar Portal. |
| Author | The Sugar user who owns the article. Note: The author defaults to the current user. |
| Body | The HTML content of the article. |
| Category | The category, or topic, the article belongs to. |
| Created By | The Sugar user who created the article. |
| Date Created | The date that a user created the article. |
| Date Modified | The last date that a user modified the article. |
| Description | A brief description of the article's content. |
| Expiration Date | The date on which the article information expired or will expire in the future. Note: The status for published articles will automatically change to "Expired" on the specified expiration date. |
| External Article | Indicates whether an article should be visible through the Sugar Portal. Note: This field must be in a checked state for an article to be visible through the Sugar Portal. |
| Integration Sync ID | The sync key field used by external integrations to identify Sugar records in the external application. See the Integrate REST API endpoints in the Developer Guide for more details on how to use this field. |
| View Count | How many times the published article has been viewed either via the Sugar instance or Sugar Portal. |
| Language | The language used in the article. |
| Modified By | The Sugar user who last modified the article. |
| Publish Date | The date the article was published or will be published in the future. Note: The Publish Date field will automatically default to today's date when an article's status is set to "Published". |
| Related Case | The case record that inspired and is associated with the article. Note: Creating an article from a case causes the case to automatically populate this field. |
| Status | The current status of the article (e.g., Draft, Expired, In Review, Published). Note: The Status field must be set to "Published" for an article to be visible through the Sugar Portal. |
| Tags | User-created keywords that can be used to identify records in filters, dashlets, and reports. Note: For more information on creating and using tags, please refer to the Tags documentation. |
| Teams | The Sugar team(s) assigned to the article. |
| Title | The name of the article. Note: This field will be visible to readers when the article is published. |
Article Statuses
When viewing an article's record view or the Knowledge Base list view, the Status field will show a different color for each status. Administrators have the ability to configure the status values via Admin > Dropdown Editor. For more information on configuring the status values, please refer to the Developer Tools documentation in the Administration Guide.
Please note that the below values are only guidelines for defining your status and that you can skip one or more statuses based on your organization's needs.
| Color | Status | Label | Description |
| White | Draft |  |
The article is currently undergoing changes. |
| Yellow | In Review |  |
The article is being reviewed by the designated approver. Note: When the status changes to "In Review", a notification email is automatically sent to the user who is designated in the Approver field. |
| Blue | Approved |  |
The article has been approved for publish. |
| Green | Published |  |
The article is live in the knowledge base. |
| Gray | Expired |  |
The article's expiration date is in the past. Note: The status of published articles will automatically change to "Expired" on the specified expiration date, but they will remain visible in the knowledge base. |
Sugar Portal and Articles
The Sugar Portal allows your customers and partners to read and vote on the usefulness of knowledge base articles.
Note: Only registered users of your Sugar instance's portal can log in to view and rate articles. For more information on enabling and configuring the portal and portal users, please refer to the Sugar Portal documentation. For information on using the portal, please refer to the Portal Deployment User Guide and Portal User Guide documentation.
To make an article visible in portal, enable the article's "External Article" checkbox, specify an Expiration Date for a future date, and ensure that the article's status is "Published".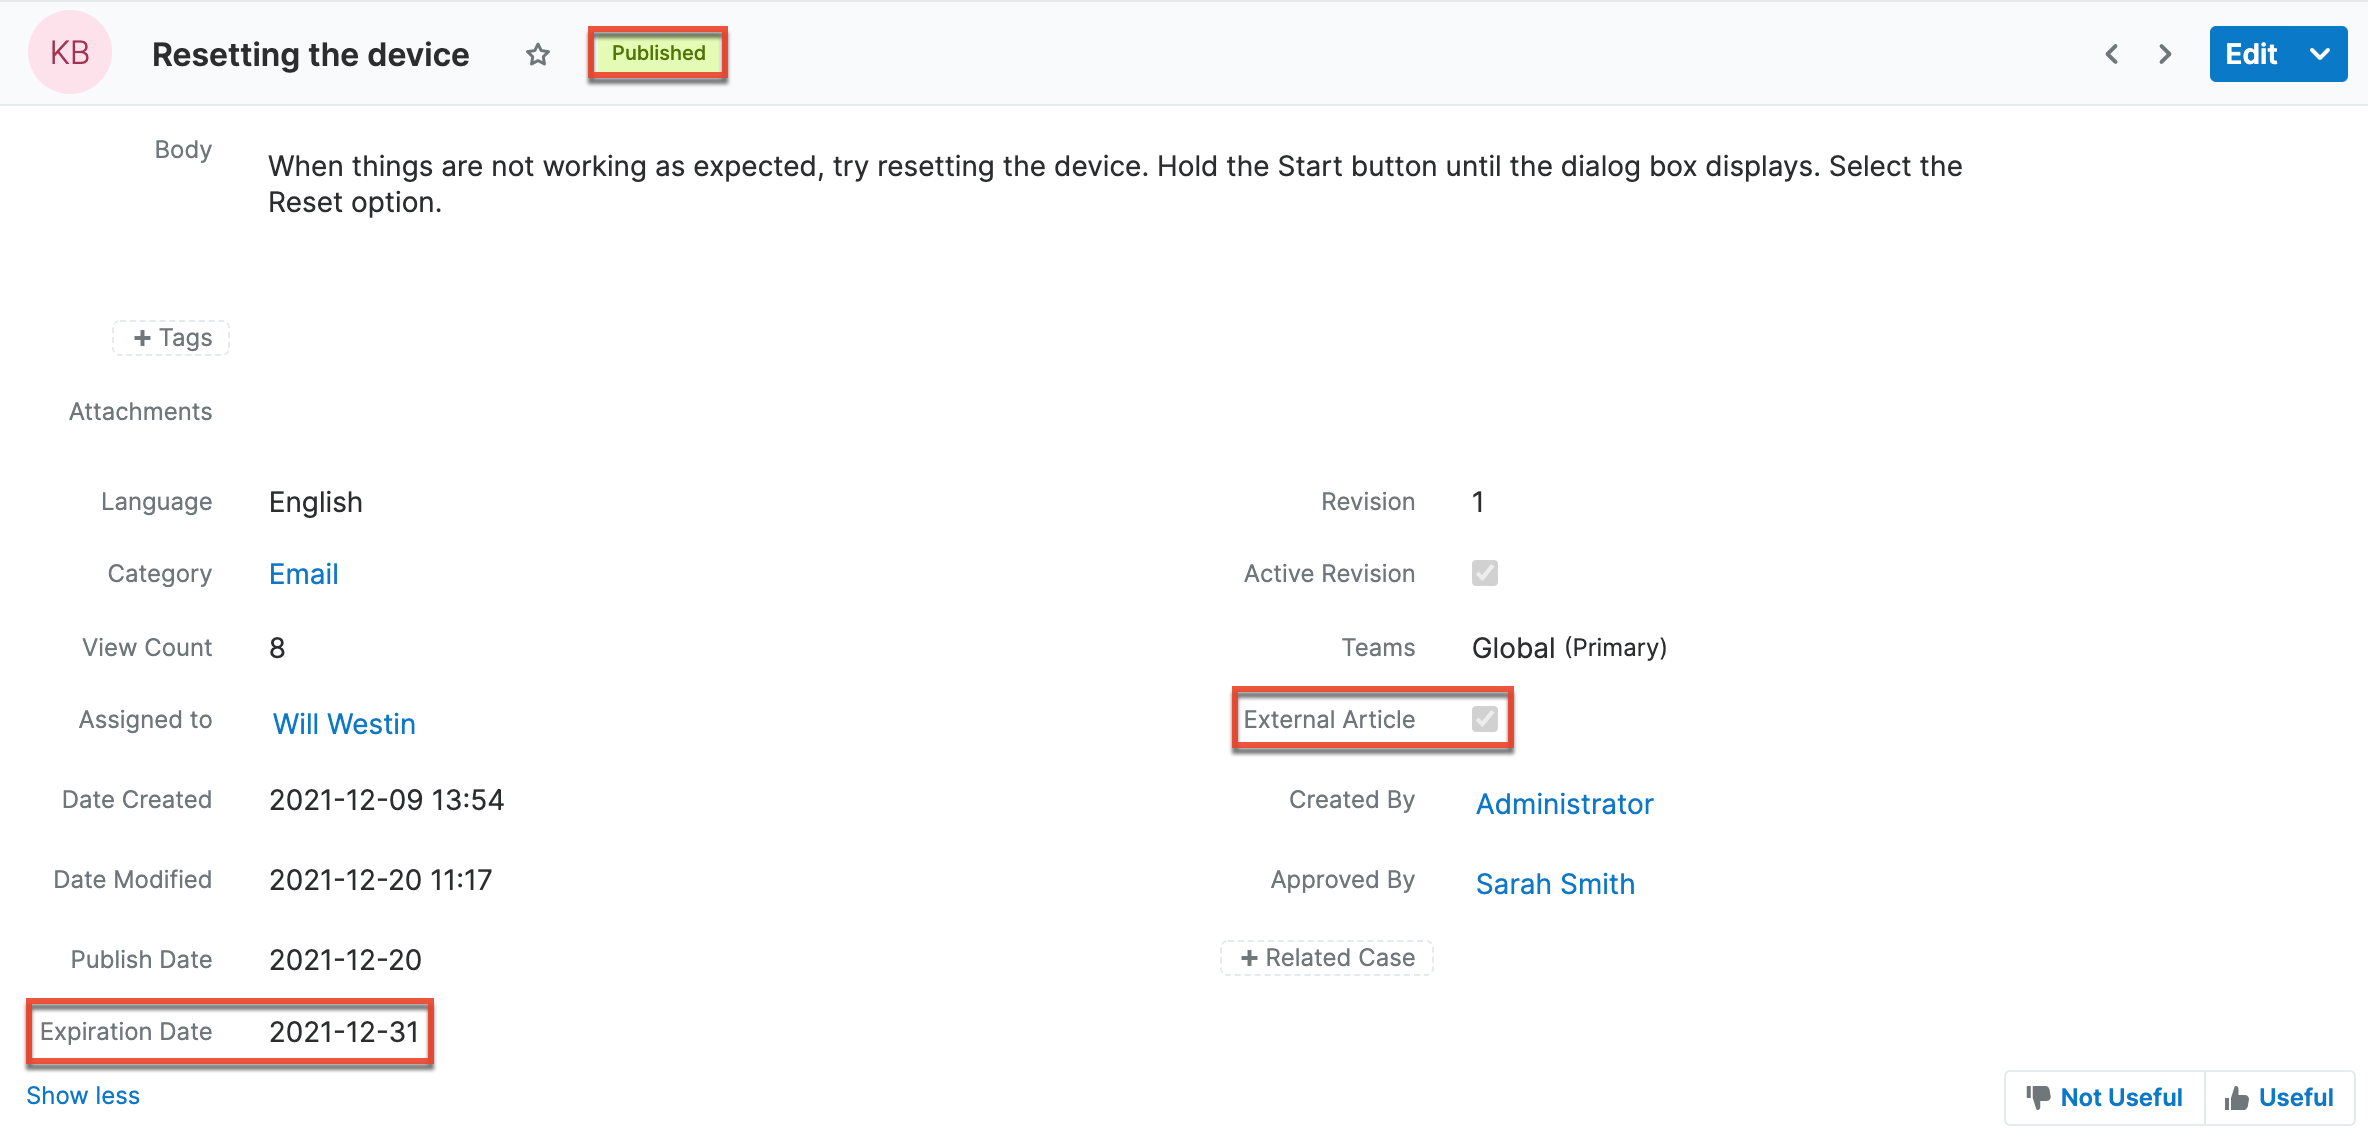
Publishing Articles
Publishing a completed article allows you to make it visible on the Sugar Portal for your customers and others outside of your Sugar users to view. For knowledge base consumers within your organization who are Sugar users, publishing also changes the article's status and designates that version as the active revision, making it available in the knowledge base list view until a subsequent revision is published. This enables your internal users to access knowledge base content within Sugar by browsing the Knowledge Base Categories & Published Articles dashlet, the Knowledge Base Search dashlet, or the Knowledge Base list view.
Articles can be published manually or scheduled to be published automatically on a future date. Publishing will check the article's Active Revision checkbox, making it available in the Knowledge Base list view even if a related revision was previously considered the active revision. Once an article has been published, the published version will retain the Active Revision designation when new revisions are created. Only when another revision is published in its place will the Active Revision designation be transferred. If an article is already published, publishing a related revision will also cause the original article's status to be changed to "Expired". For more information about revisions, please refer to the Article Revisions section of this page.
Publishing Articles Immediately
To publish an article, simply edit the Status field to "Published" and save the record. If you want the article to be visible in the Sugar Portal, make sure the External Article box is checked. The Publish Date field will automatically be set to today's date.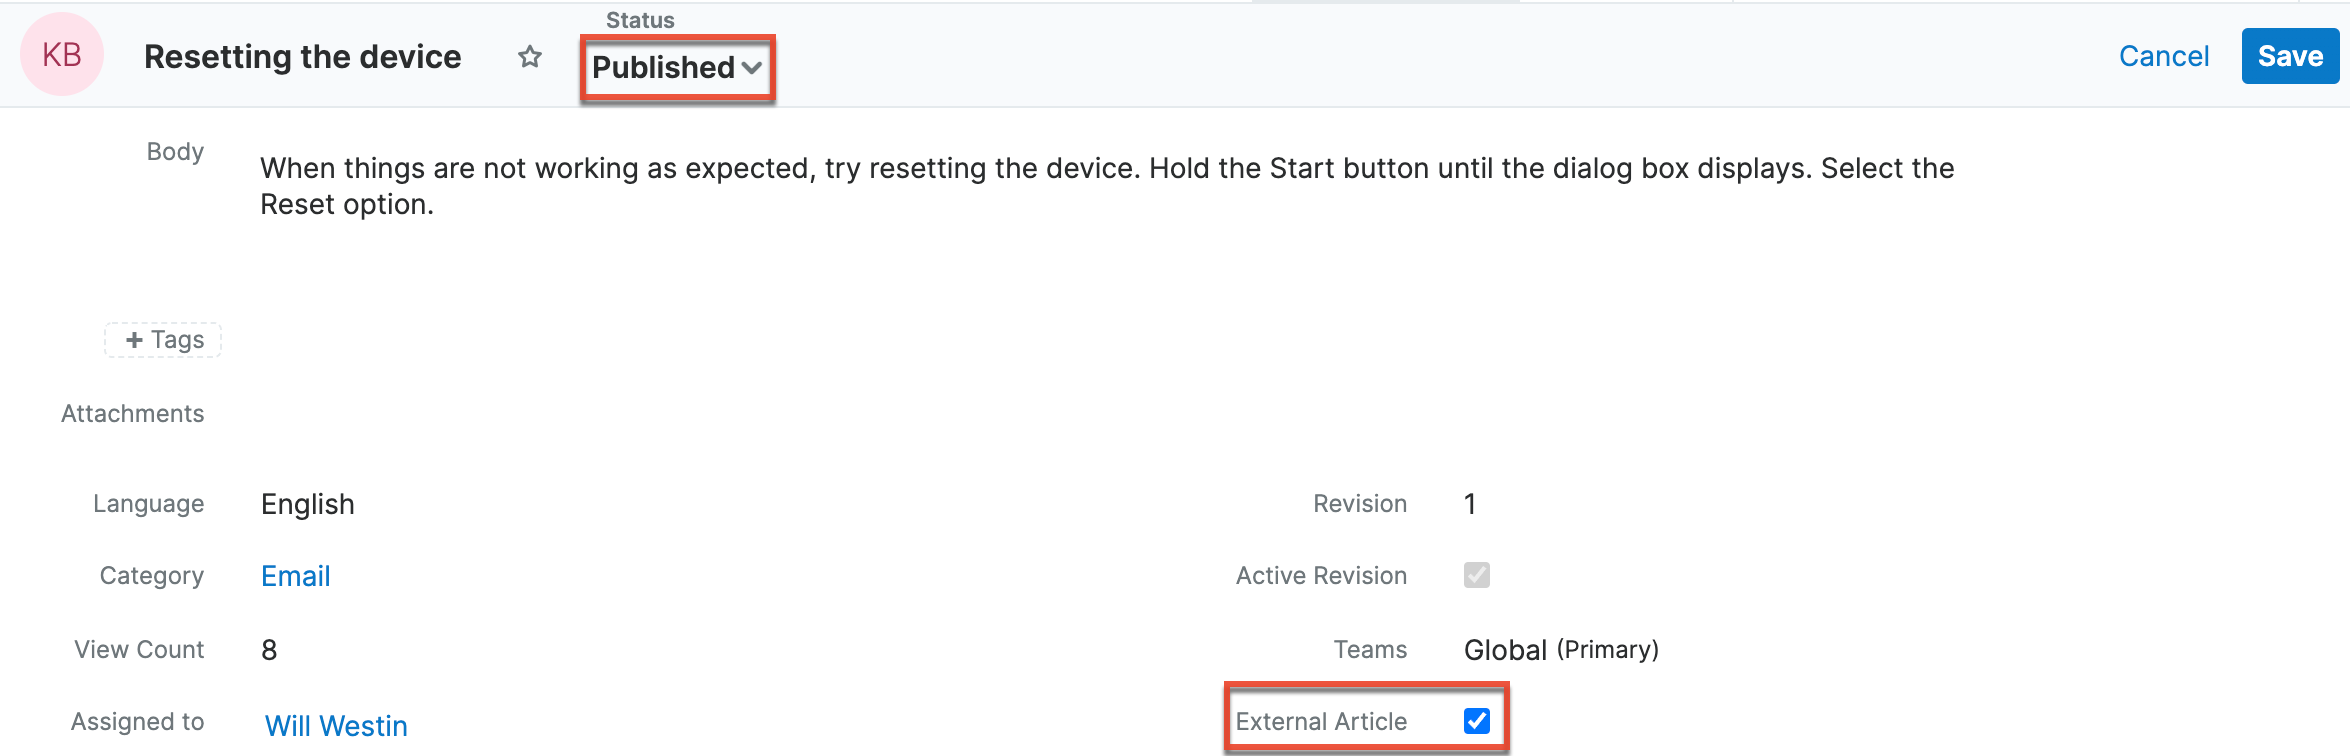
Scheduling a Future Publish
To schedule an article to publish in the future, set the Publish Date field to a date in the future, change the Status field to "Published", and save the record. If you want the article to be visible in the Sugar Portal, make sure the External Article box is checked. On the specified publish date, the article's status will change to "Published" and the article will automatically become visible.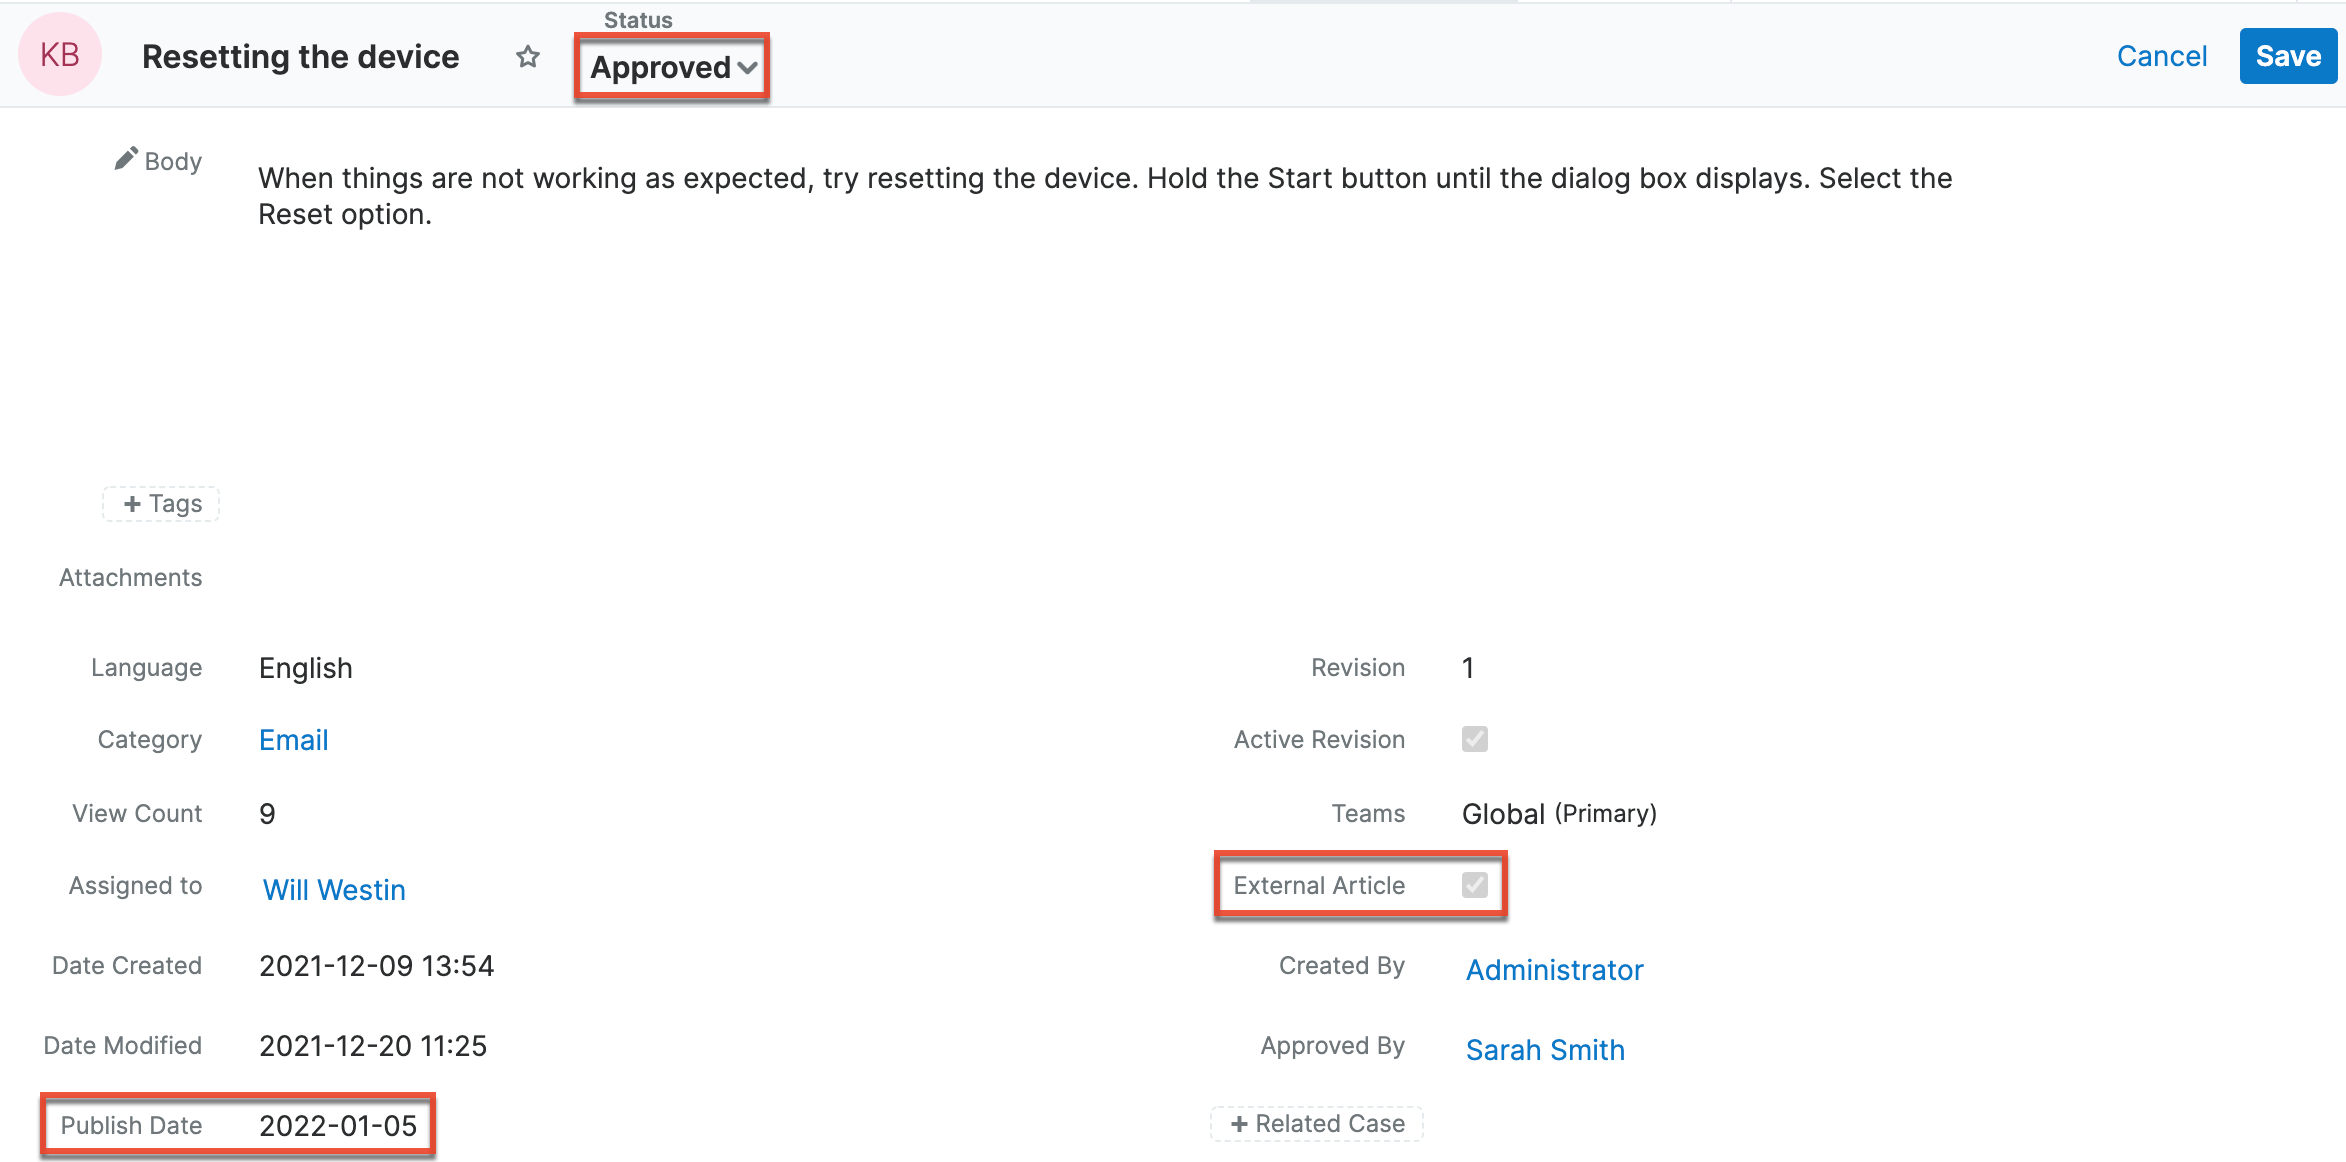
Viewing Published Articles by Category
While the Knowledge Base list view allows you to locate articles using traditional search, filter, and sorting, Sugar also allows you to navigate the hierarchical structure of categories to locate published articles using the Knowledge Base Categories & Published Articles dashlet or the Knowledge Base Search dashlet.
The Knowledge Base Categories & Published Articles dashlet can be added to the Knowledge Base list view and record view intelligence panes. When it is included on the Knowledge Base record view and you are viewing a published article, it will automatically open to display the current article. This is a convenient way to confirm the placement of a published article in your category hierarchy.
Folder icons represent categories while document icons represent articles. Blue folders indicate that a category contains child categories or published articles; clicking the blue folder will expand it to display the category's contents. White folders, on the other hand, may not be expanded since they indicate that the category has no child categories or published articles. To collapse an expanded category, simply click the open folder icon. Clicking an article's name will open the article in record view.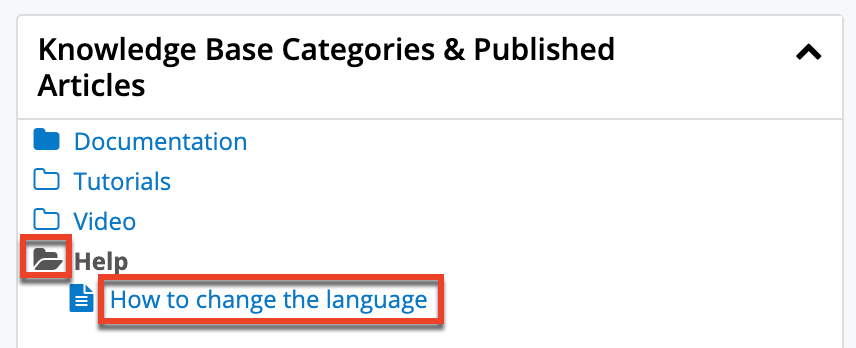
The Knowledge Base Search dashlet provides a similar view but also includes a search bar to allow you to quickly search published articles. See the Dashboards and Dashlets page for more information on this dashlet.
Creating Articles via Cases
Sugar allows you to create an article based on the details of a case record. This is useful when a resolution to a problem is documented in a case. Creating an article from such records enables you to make this information available without manually copying from the case. The new article's Title field is based on the case's Subject field, and the article's body is automatically populated with the case's number, subject, description, and resolution. The case will automatically be set in the new article's Related Case field. For more information on working with cases, please refer to the Cases documentation.
Use the following steps to create an article from a case record:
- Navigate to a case's record view.
- Select "Create Article" from the Actions menu.
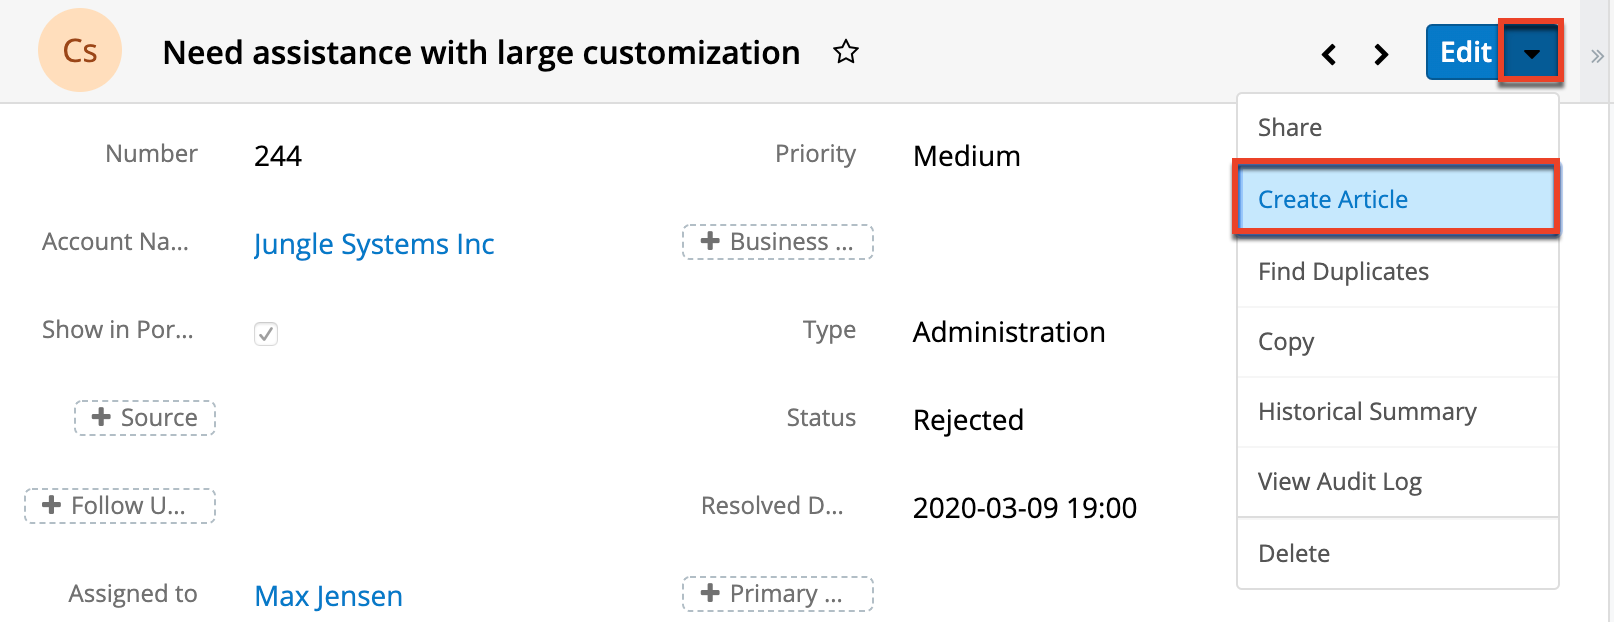
- Update the necessary fields and then click "Save".
Article Templates
Administrators have the ability to create templates to improve consistency or ease access to common or brand elements across your organization's knowledge base. Knowledge Base templates can contain text, HTML content, and images including embedded .jpg or .png image files. Existing templates can then be used by regular users when creating articles to improve article consistency and quality while reducing the amount of time they must spend. For more information on how administrators can work with article templates, please refer to the Knowledge Base Administration documentation in the Administration Guide.
Applying Templates to Articles
You can apply an existing template when creating or editing a Knowledge Base article. From the article's record view, click on the Templates button located in the editing toolbar for the Body field. A Search and Select drawer will appear where you can choose the desired template record. The selected template's content will then appear in the Body field of the knowledge base article.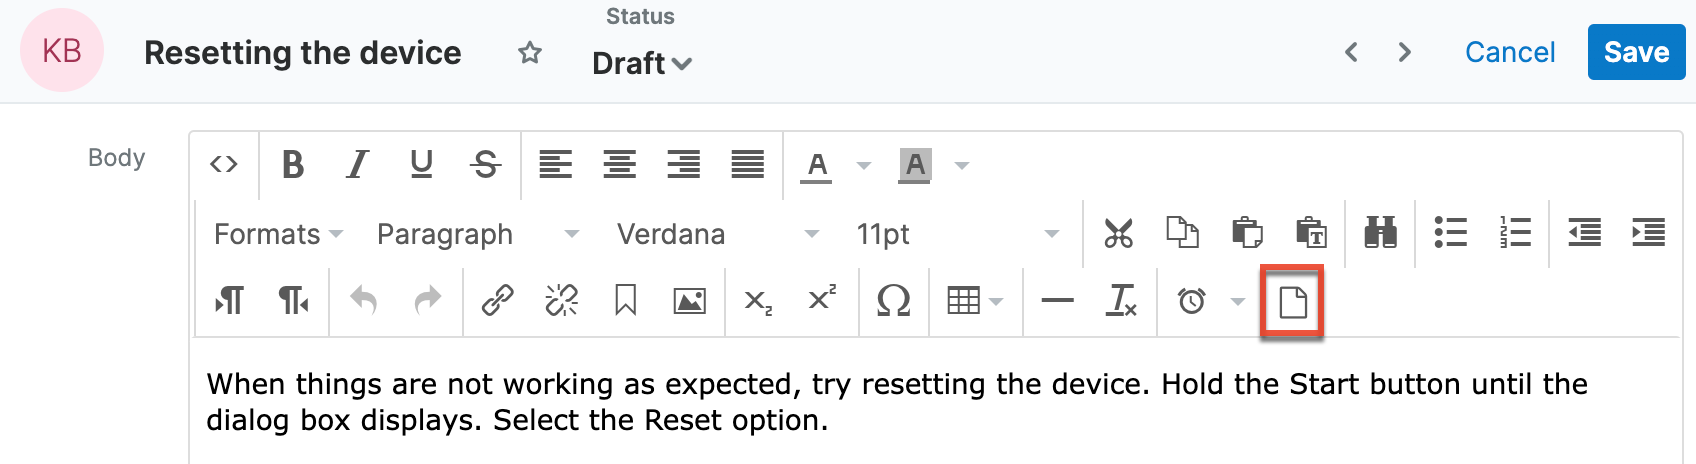
Note: If the Body field already contains content prior to selecting a template, you will receive a message requesting confirmation before the selected template can be applied. Select "Cancel" to disregard the template or "Confirm" to overwrite any existing content with the template's content.
Article Ratings
Reader feedback is important to gather and consider when working on knowledge base articles. In Sugar, both internal and external users have the ability to vote on whether an article is useful or not. Internal users will find the Useful and Not Useful buttons on the article's record view. Sugar Portal users will find the same icons when viewing the article in the portal. Each time a new revision is created, it starts with zero votes, effectively wiping the slate for your improved or updated content.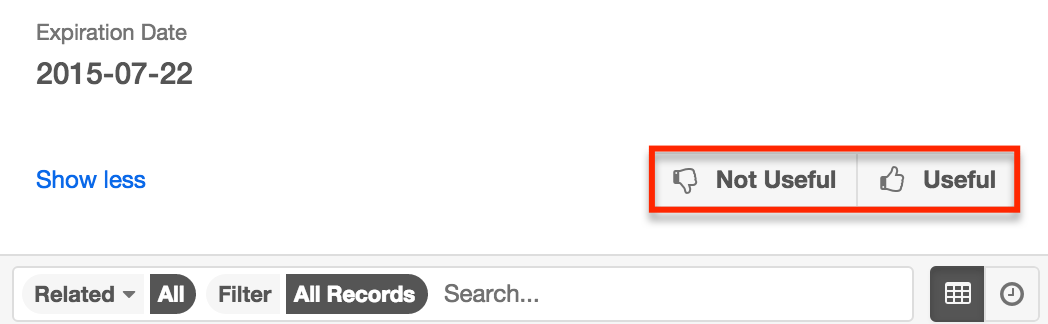
Viewing Article Ratings
As users vote an article as useful or not useful, the clicks are tallied within Sugar and can be viewed via a dashlet on the article's record view. The Usefulness for Articles dashlet may be added to the Knowledge Base record view's intelligence pane to display the aggregated usefulness of the current article. It totals the Useful and Not Useful votes that the article has received and shows the percentage of Useful votes on top of a visual depiction of the ratio. The red portion represents Not Useful votes while the Useful votes are shown in green. Hovering on the green or red portions displays the exact percentage and number of corresponding votes.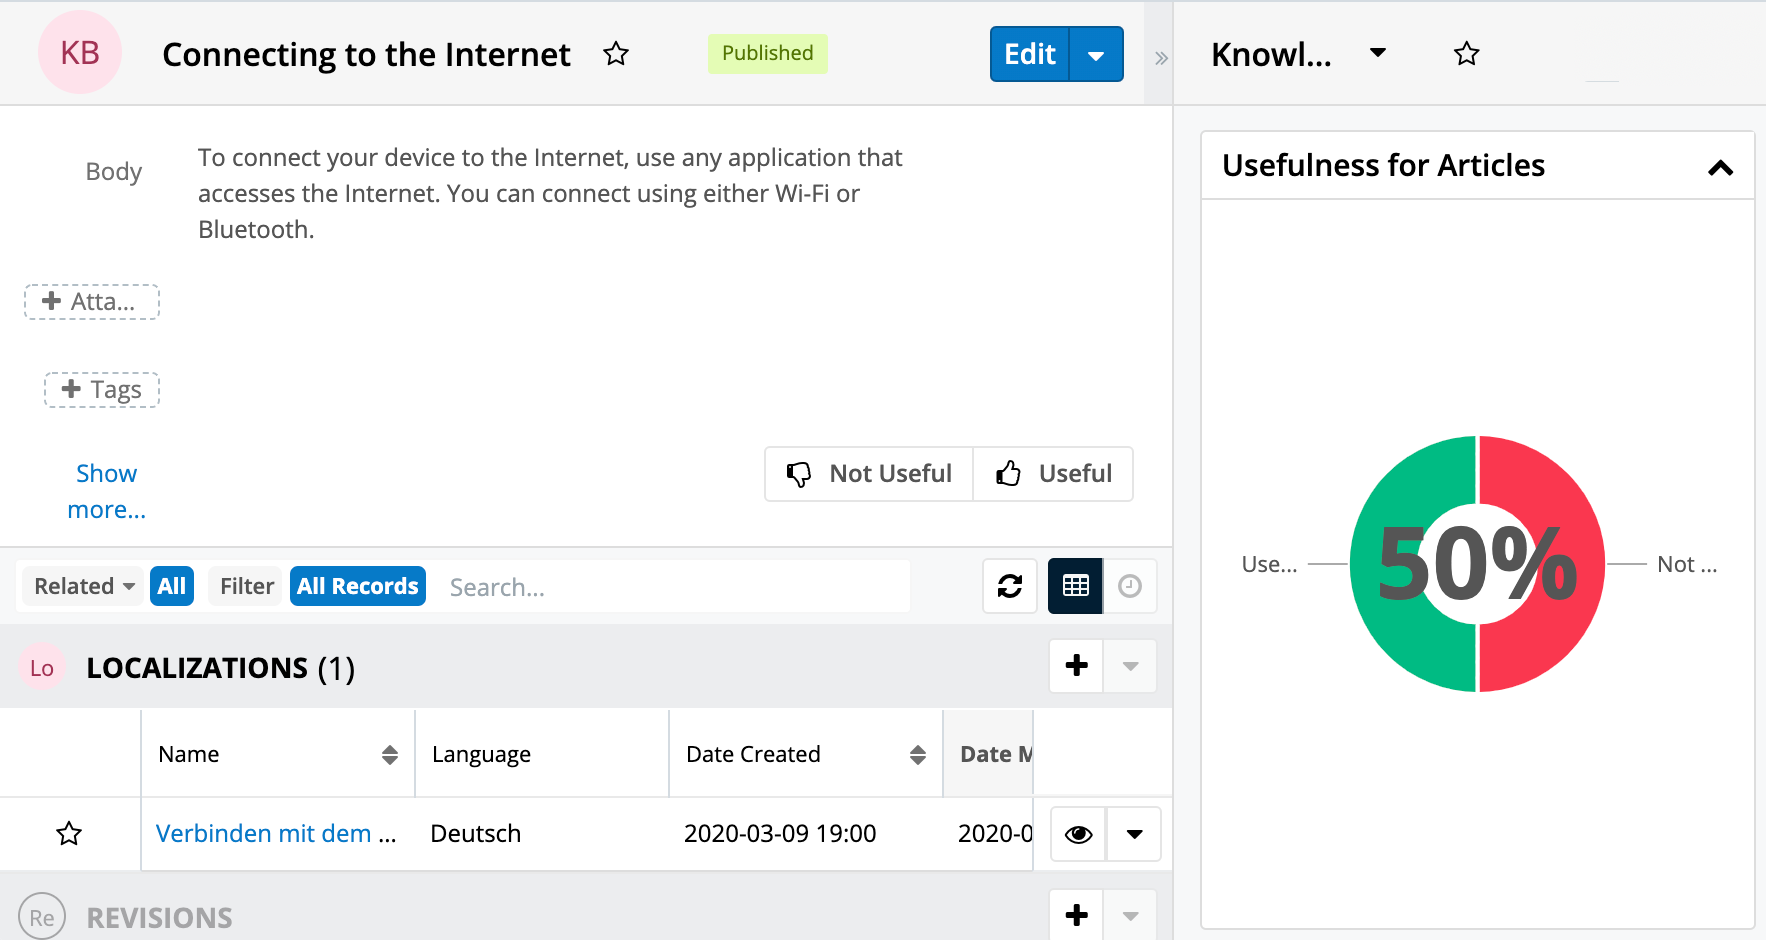
Viewing Useful Published Articles
The Most Useful Published Knowledge Base Articles dashlet displays a list of top-rated published articles based on usefulness ratings and view count. Article usefulness is tallied via clicks on the Useful and Not Useful icons. The view count is the total number of views an article has received as shown in the View Count field. This dashlet displays the top three articles in descending order according to their rating. Click "More most useful published knowledge base articles" at the bottom of the dashlet to see additional articles. To view the details of an article listed in this dashlet, click on the article's name to navigate to its record view.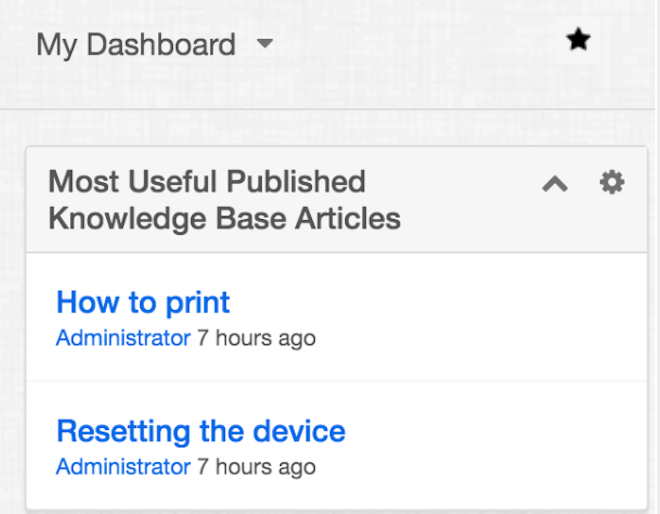
Article Attachments
Articles can include attached files which will then be available for download by the article's viewers. In an article's record view, one or more files can be uploaded to the Attachments field. To select multiple attachments at a time, hold the Ctrl or Shift key on your keyboard while selecting the files. Then, when users view the published article, they will have the option to download a single attachment by either clicking the pill that contains the name of the attached file or by clicking "Download".
When multiple attachments exist on a single article, users viewing the article will have the option to download a single attachment or all attachments at once. They may click the pill that contains the name of the single file for download or click "Download All" to download a .zip file containing all of the attachments to their computer.
Article Localizations
A localization is a copy of an article that has been adapted for a different audience, usually via translation to another language. Administrators must first add desired languages to the Knowledge Base module as described in the Knowledge Base Administration documentation. Once languages are configured in your instance, users may create localizations that will copy all populated fields from the original article except for the Status and Language fields. This allows users to re-write the article's contents in various languages to accommodate different target audiences.
Note: If an administrator deletes a language from the Knowledge Base module's Settings page, all localization articles associated with the deleted language will also be deleted.
Creating Localization Articles
A localization article can be created from the Knowledge Base list view, the article's record view, or the Localizations subpanel. There are many ways users can create a new localization:
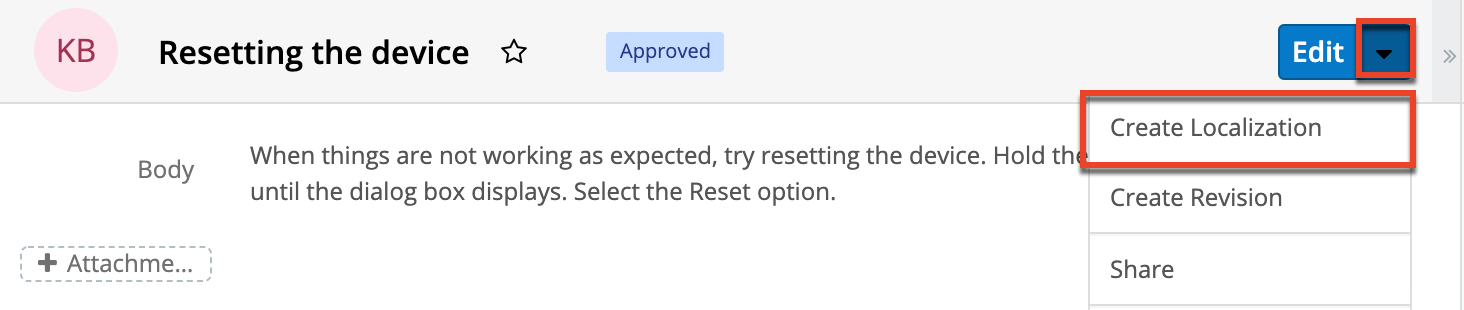
- To create a localization article from a Knowledge Base article's record view, click the Actions menu and select "Create Localization".
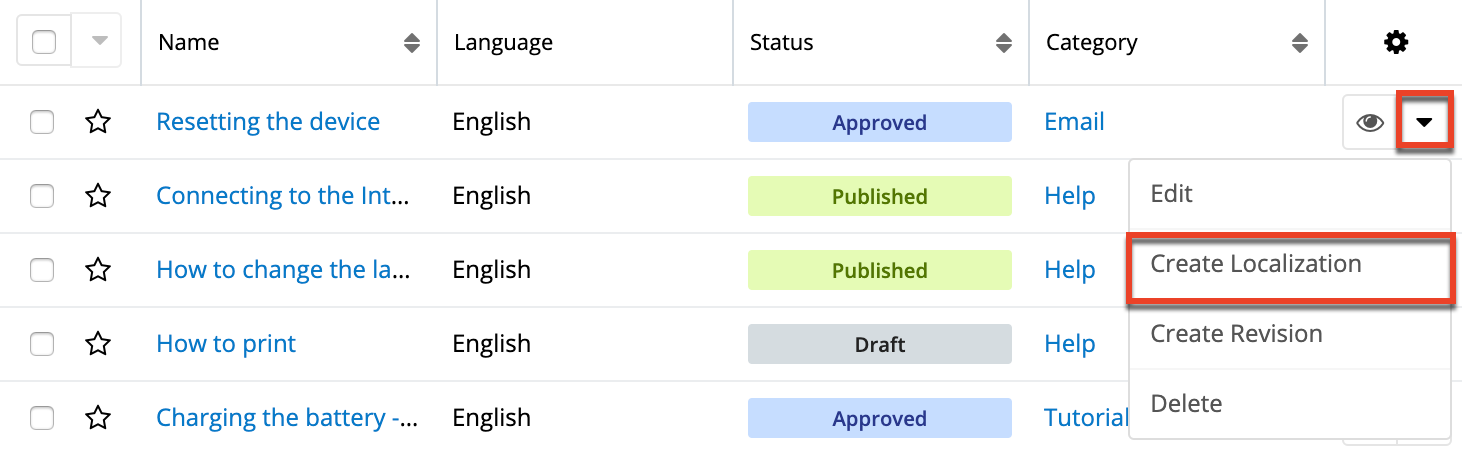
- To create a localization article from the Knowledge Base article list view, click the article row's Actions menu and select "Create Localization".
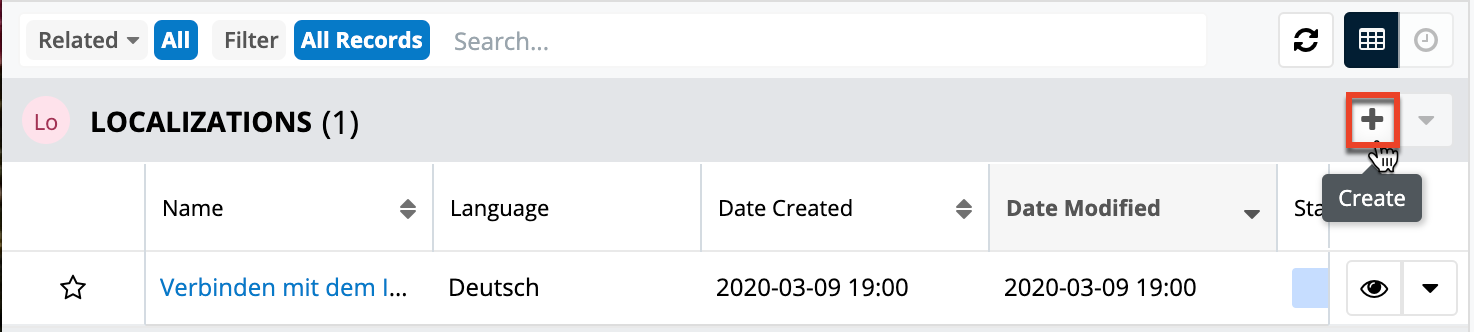
- To create a localization article from the Localizations subpanel on a Knowledge Base article's record view, click the Plus icon.
A drawer will appear with a copy of the original article details except for the Language and Status fields. The Status field will automatically be set to "Draft". Users should choose the appropriate language and, optionally, edit the status and any other desired field. Clicking "Save" will finalize the new localization article, and it will appear within the Knowledge Base list view and on the parent article's record view within the Localizations subpanel.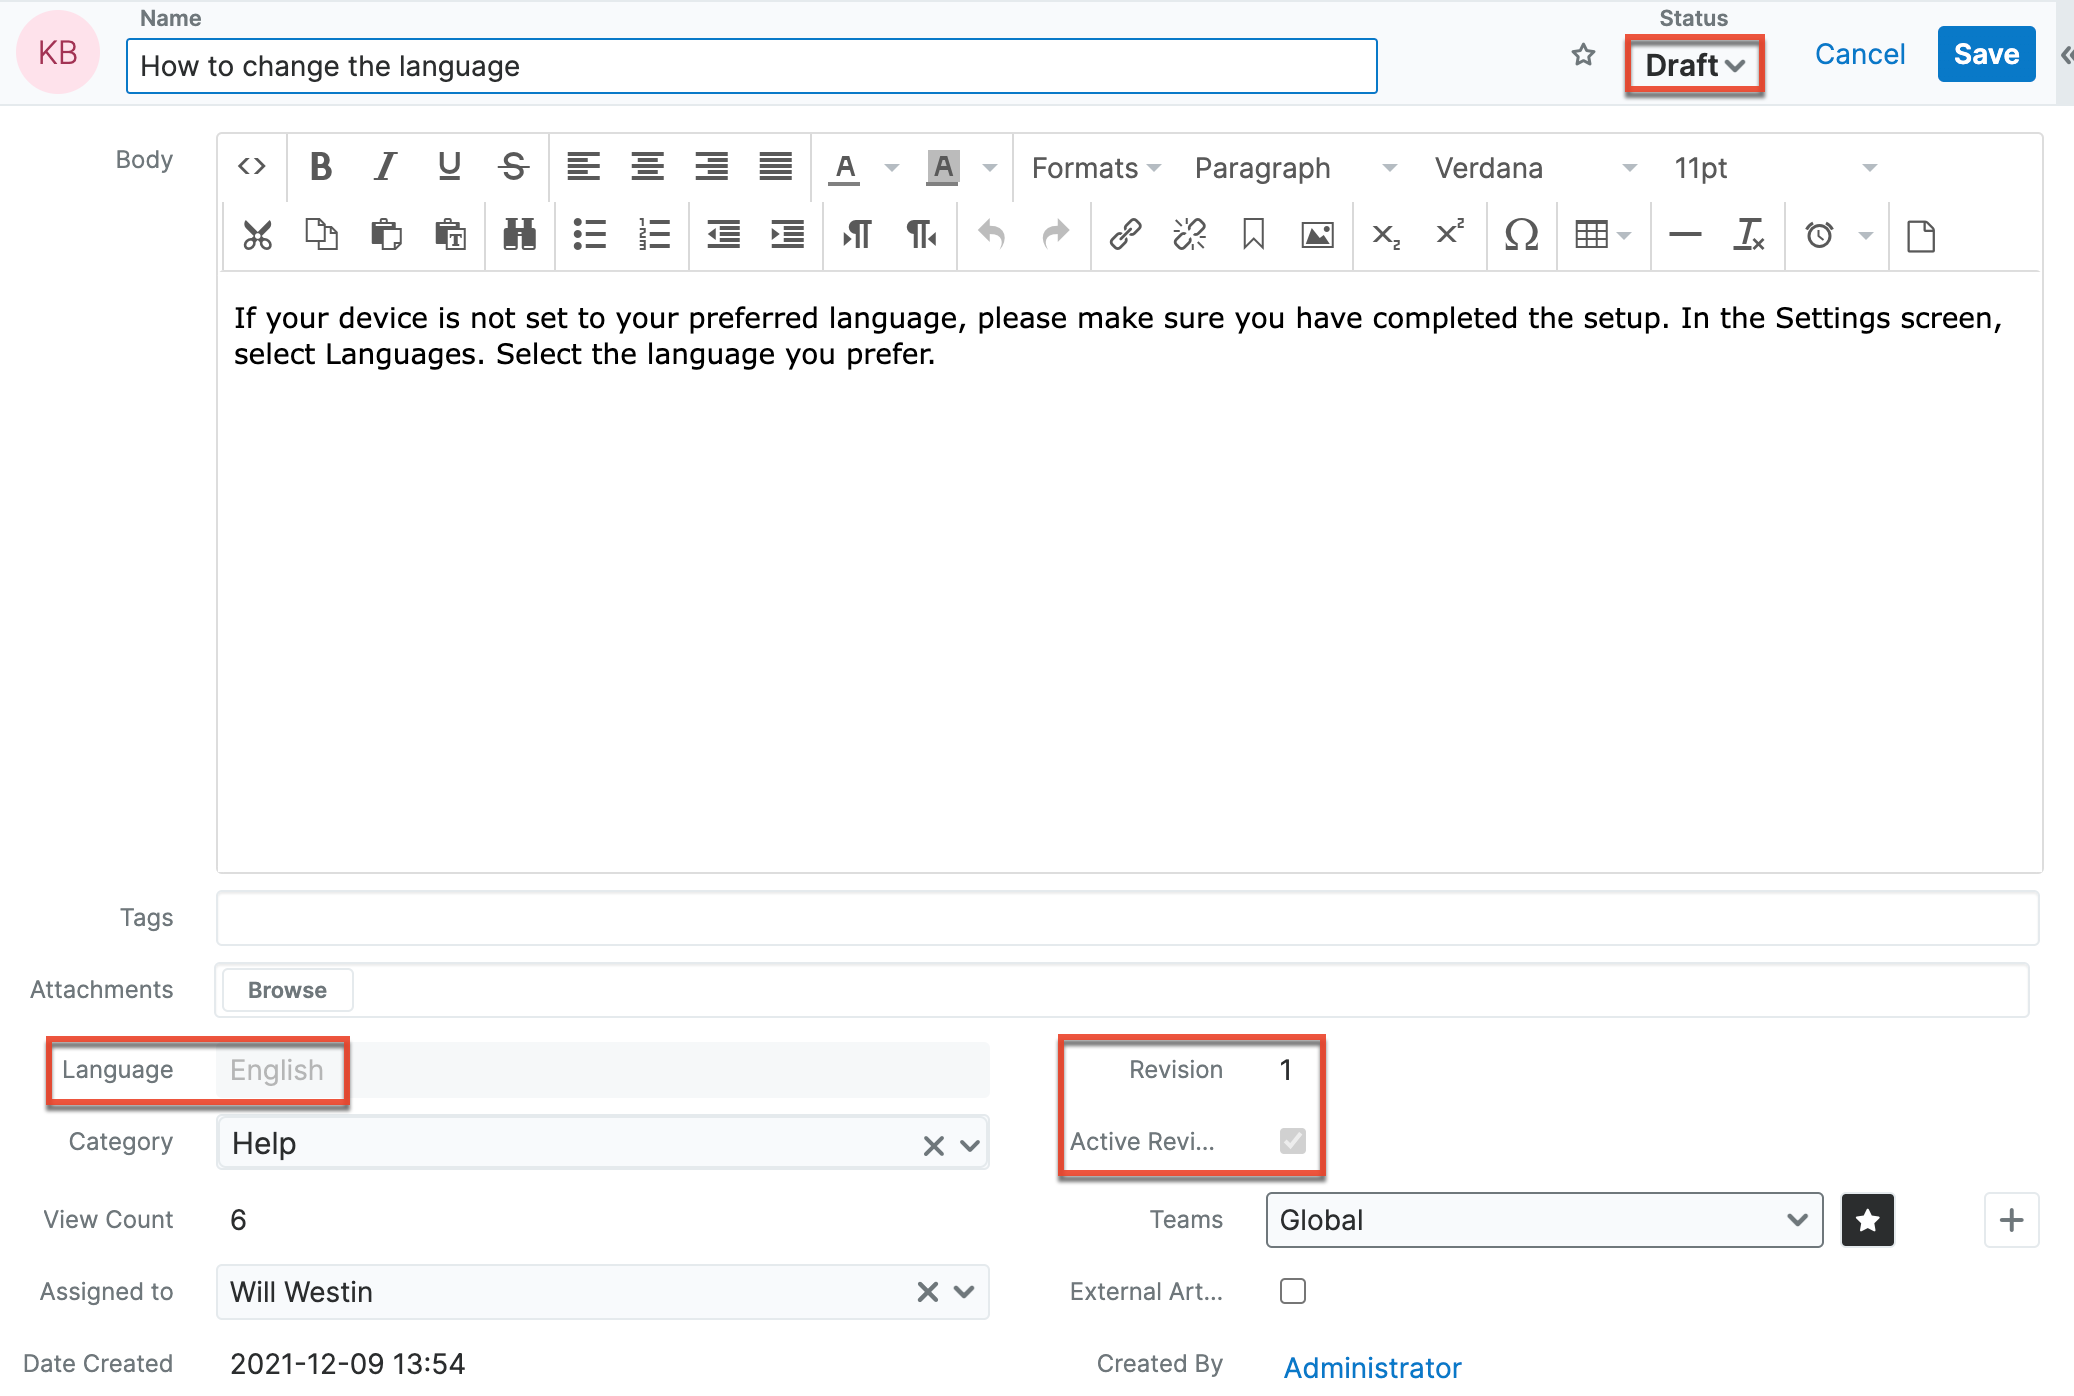
Localizations Subpanel
A localization article is a copy of an article that has been adapted for a different audience via translation to another language. The Localizations subpanel displays all localizations related to the article and allows the following operations to be performed: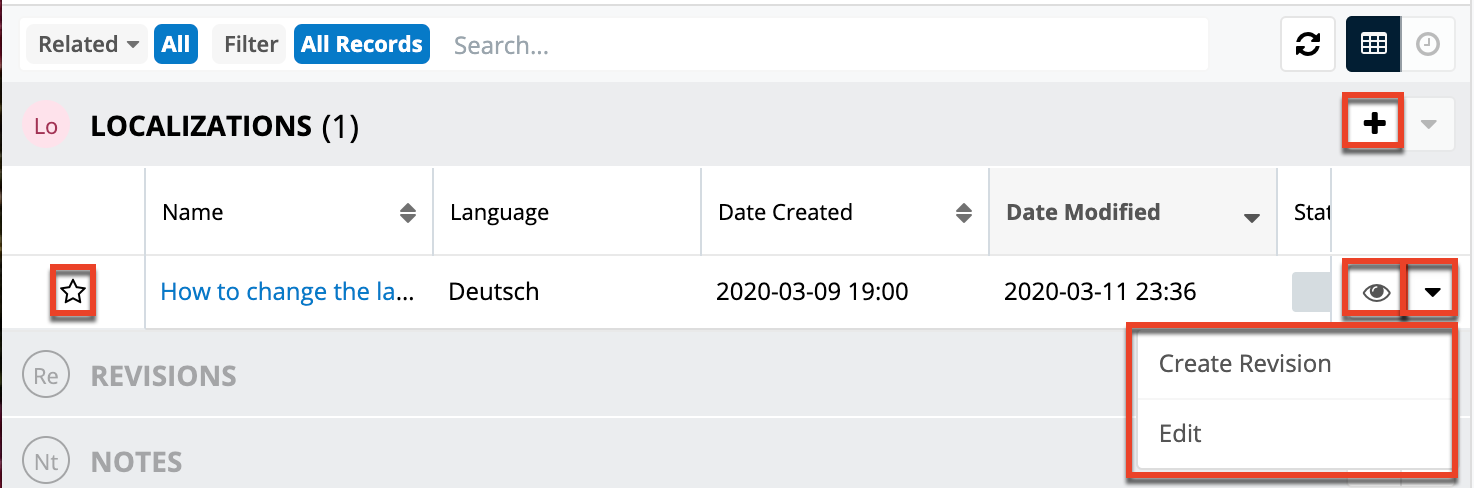
- Localization Details: To view the details of a related localization article, click the article's name in the subpanel to open it in record view.
- Record Count: Subpanel headers display the total count of related records (e.g., "5 of 6+") next to the module name. The count captures the number of localizations currently displayed with an additional, hyperlinked number (e.g., "6+") where there are more localizations than currently displayed. Click the hyperlinked number to see the total count of related records.
- Collapse or Expand: Click anywhere in the subpanel's header to collapse or expand it. Subpanels will remain collapsed or expanded on future visits to the module.
- Note: Administrators can choose to disable the sticky feature and collapse all subpanels by default via Admin > System Settings. For more information, please refer to the User Interface section of the System documentation in the Administration Guide.
- Column Widths: Place your cursor on the column divider and, when the double arrow cursor appears, click and drag the column to the desired size. Please note that the column width will not be preserved when you navigate away from the page.
- Column Sort: Click a column header to sort the subpanel's items by that value. Clicking the same header again will reverse the sorting order (e.g., from ascending to descending).
- Create a New Localization: Click the Plus button on the upper right of a subpanel to create a new localization for the article you are currently viewing.
- Note: Because creating a new related record opens a draw on top of the current record view, you should use the Cancel button to return to record view. Using the browser's back button will return you to the previous page.
- Favorites Designation: Click the star on the left of a record's row to toggle it as a favorite. A dark grey star indicates that the record is a favorite while a white star indicates it is not. For more information, please refer to the User Interface page.
- Hyperlink Fields: Blue field values, such as record names, may be clicked to open the record in record view. Record view provides a complete picture of the record and is described in detail on the User Interface page. Email addresses also appear in blue and can be clicked to compose an email to that recipient.
- Record Actions Menu: Click the triangle on the right of a record's row to access the Record Actions Menu which includes the following options:
- Preview: To preview a record by displaying its fields and activity stream in the right-hand side drawer, click the Eye icon to the far right of the record's row. For more information, please refer to the User Interface page.
- Create Revision: To create a new revision of the localized article, choose "Create Revision" from the actions menu on the far right of the record's row, then complete the record view layout and click "Save".
- Edit: To inline edit the record directly within the subpanel, choose "Edit" from the Actions menu on the right of the record's row and click "Save" to preserve the changes.
- More Records: By default, Sugar displays up to five records in each subpanel though administrators can alter the number via Admin > System Settings as described in the System documentation in the Administration. If additional related records exist, click "More <Module Name>..." (e.g., "More Accounts...") at the bottom of the subpanel to load the next set.
Published Articles in Other Languages Dashlet
The Published Articles in Other Languages dashlet displays all published localization articles related to the current article you are viewing. From this dashlet, you can view who created each localization and when they created it, as well as which language is related to each localization via the language code icon located to the right of the article's name. This two-letter icon corresponds with the language code your administrator has specified in the Settings. To access an article's record view, click on the article's name directly from the dashlet. 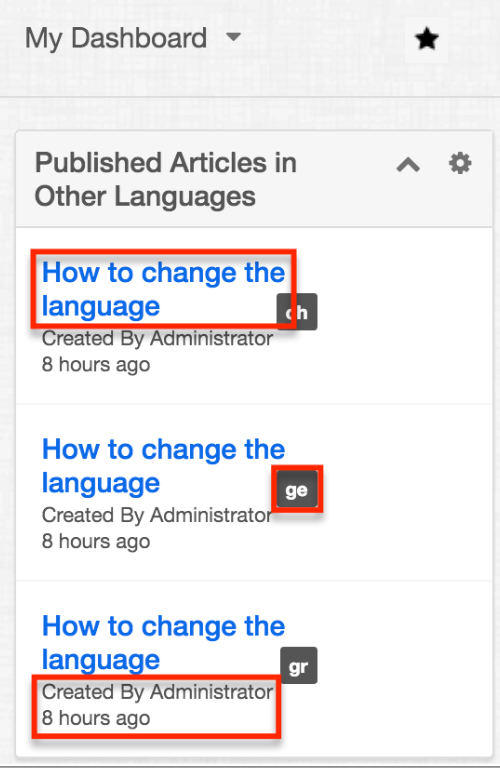
Article Revisions
As you improve or update your knowledge base content, Sugar allows you to create revisions. Revisions are a set of articles that are versions of the same content. They allow you to keep a history of past versions as well as to make content changes without affecting the published version. One revision of each set of related revisions will be designated as the active revision using the Active Revision checkbox. Only article revisions with the Active Revision field checked are displayed in the Knowledge Base list view while the others will only be visible in the Revisions subpanel. If an article is not yet published, creating a new revision will cause the Active Revision designation to transfer to the newest revision. Once an article has been published, the published version will retain the Active Revision designation when new revisions are created. Only when another revision is published in its place will the Active Revision designation be transferred. For more information about how publishing affects revisions, please refer to the Publishing Articles section of this documentation.
Creating Revision Articles
When a revision is created, it duplicates all fields from the original article except for the Status field, which will default to "Draft". Please note that the Date Created field of all revisions will match the date the original article was created. The Date Modified fields will, however, reflect the most recent edit of the particular revision. A revision can be created from the Knowledge Base list view, the article's record view, the Revisions subpanel, or the Localizations subpanel.
To create a revision from an article's record view, click the Actions menu and select "Create Revision".
To create a revision from the list view, click the record Actions menu and select "Create Revision".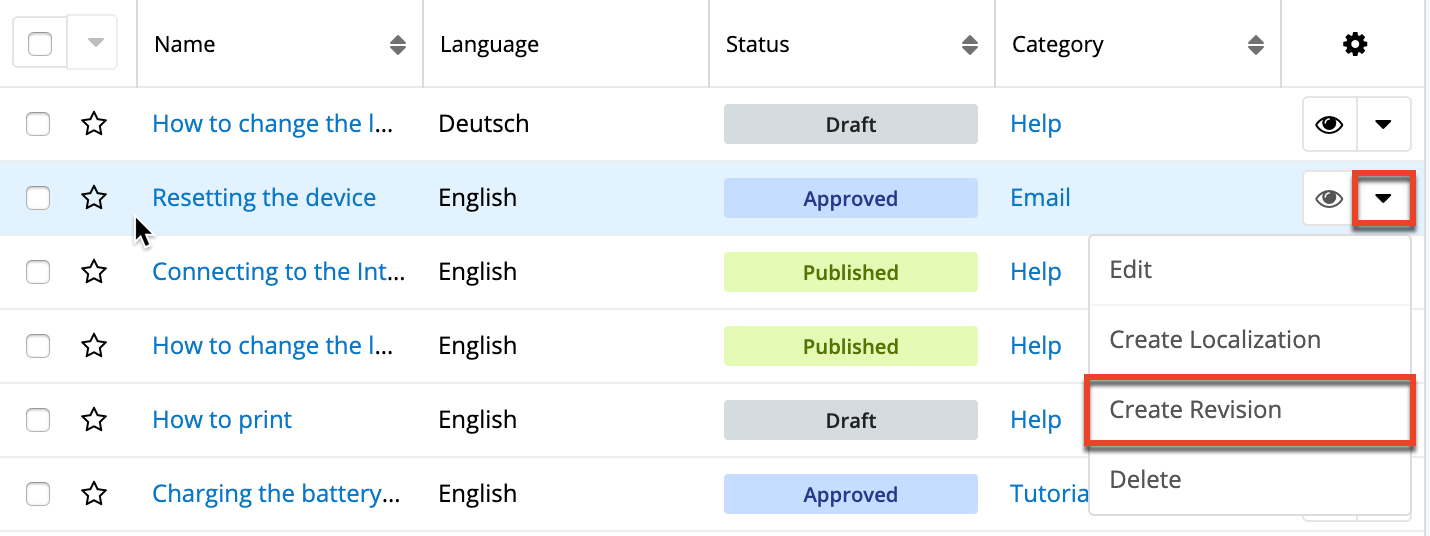
To create a revision from the Revisions subpanel, click the Plus icon.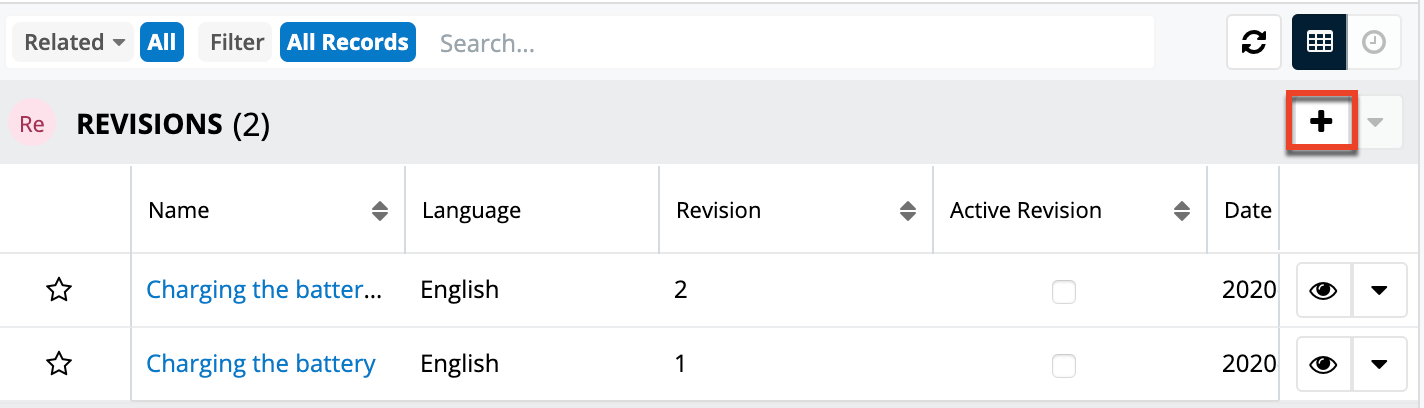
To create a revision from the Localizations subpanel, click the record Actions menu and select "Create Revision".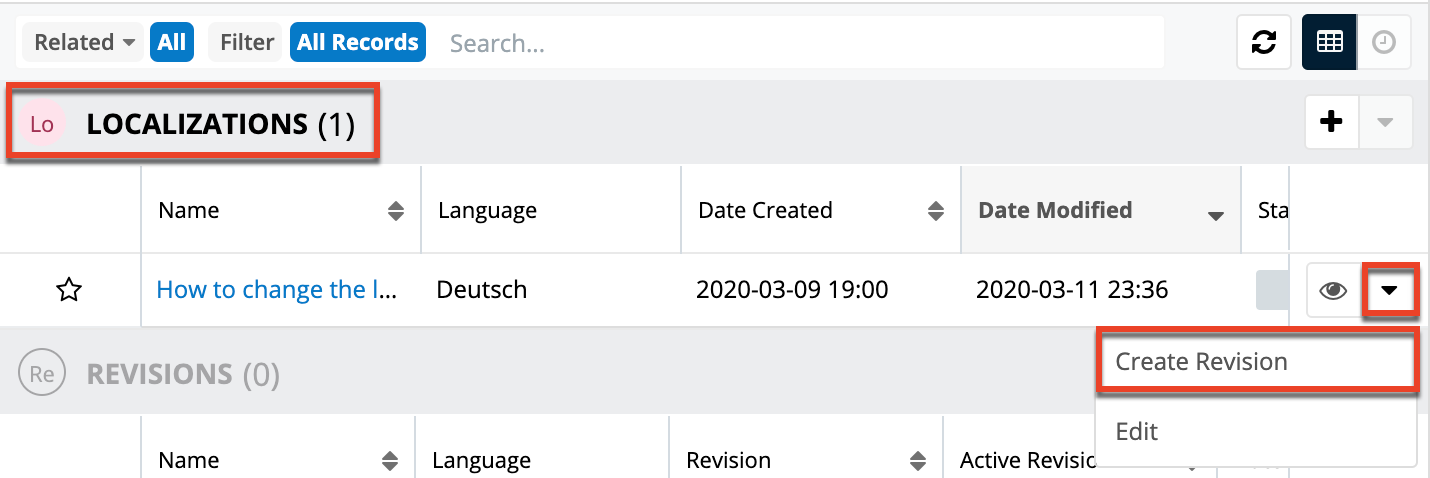
Deleting Revision Articles
Deleting an article from the Knowledge Base list view only deletes the active revision. Another revision, if available, is then promoted to be the active revision. In order to delete an article revision that is not marked as the active revision, you must click on its name in the revisions subpanel, then select "Delete" in the record view's actions menu.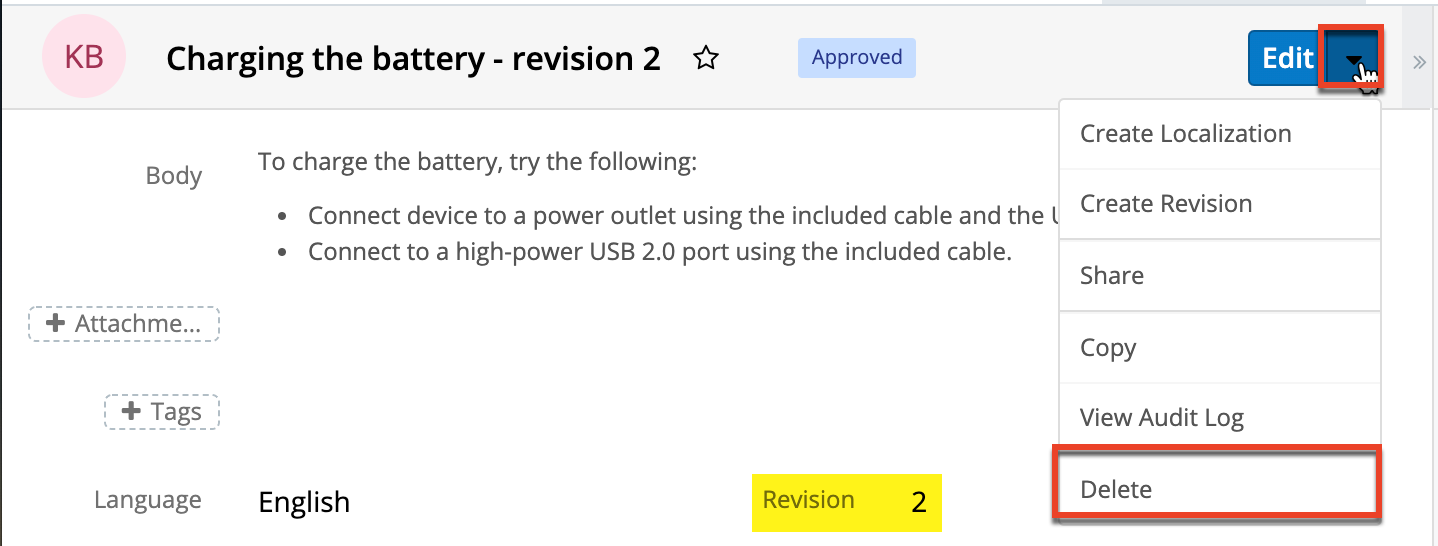
Revisions Subpanel
The Revisions subpanel is available on each article's record view and displays all revisions related to the article. The subpanel allows the following operations to be performed: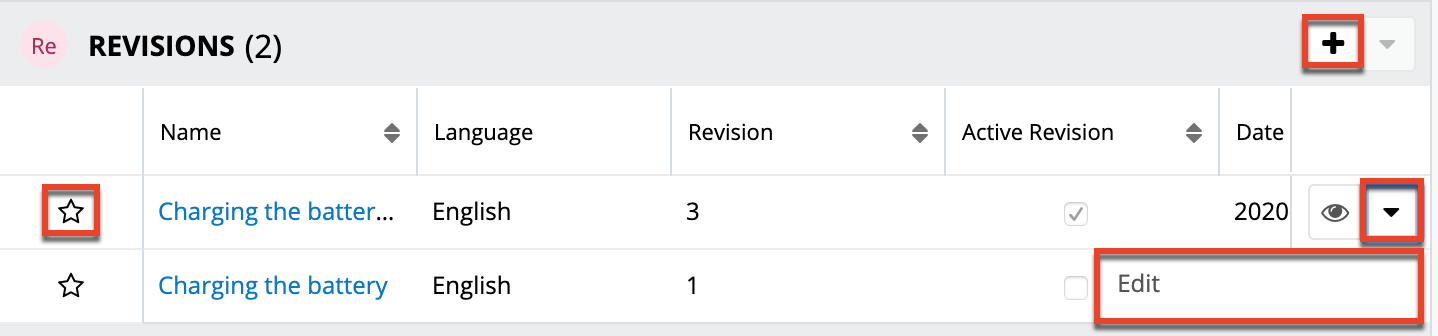
- Revision Article Details: To view the details of a related revision, click the article's name in the subpanel to open it in record view.
- Record Count: Subpanel headers display the total count of related revisions (e.g., "5 of 6+") next to the module name. The count captures the number of revisions currently displayed with an additional, hyperlinked number (e.g., "6+") where there are more revisions than currently displayed. Click the hyperlinked number to see the total count of related revisions.
- Collapse or Expand: Click anywhere in the subpanel's header to collapse or expand it. Subpanels will remain collapsed or expanded on future visits to the module.
- Note: Administrators can choose to disable collapse stickiness or to collapse all subpanels by default via Admin > System Settings. For more information, please refer to the System documentation in the Administration Guide.
- Column Widths: Place your cursor on the column divider. When the double arrow cursor appears, click and drag the column to the desired size. Please note that the column width will not be preserved when you navigate away from the page.
- Column Sort: Click a column header to sort the subpanel's items by that value. Clicking the same header again will reverse the sorting order (e.g., from ascending to descending).
- Create a New Revision: Click the Plus button on the upper right of the subpanel to create a new revision for the article you are currently viewing.
- Note: Because creating a new revision opens a draw on top of the current record view, you should use the Cancel button to return to record view. Using the browser's back button will return you to the previous page.
- Favorites Designation: Click the star on the left of a revision's row to toggle it as a favorite. A dark gray star indicates that the revision is a favorite while a white star indicates it is not.
- Record Actions Menu: Click the triangle on the right of a revision's row to access the Record Actions Menu which includes the following options:
- Preview: To preview a revision by displaying its fields and activity stream in the right-hand side drawer, click the Eye icon to the far right of the revision's row.
- Edit: To inline edit the revision directly within the subpanel, choose "Edit" from the Actions menu on the right of the revision's row and click "Save" to preserve the changes.
- Note: The new subpanel order will reset when the user's browser cache is cleared.
- More Records: By default, Sugar displays up to five revisions in each subpanel, though administrators can alter the number via Admin > System Settings as described in the System documentation of the Administration Guide. If additional related revisions exist, click "More {Module Name}..." (e.g., "More Emails...") at the bottom of the subpanel to load the next set of records.
For more information on revisions, please refer to the Revisions section of this documentation.
Article Categories
Categories provide a way to group knowledge base articles so that writers, as well as viewers, can easily locate desired articles and related topics. Each article can belong to one category, and a category can have many articles. Categories can also have child or parent categories, allowing for a hierarchical structure of categories and sub-categories. Categories can be viewed in the Categories list view, in the Knowledge Base Categories & Published Articles dashlet, and in the Knowledge Base Search dashlet. Clicking on a category's hyperlink in the Knowledge Base list view or an article's record view will open a drawer containing all articles belonging to that category, providing a convenient way to view and open articles. Alternatively, you can directly filter the Knowledge Base list view for a particular category. For more information about filtering list views, please refer to the Search documentation.
Categories List View
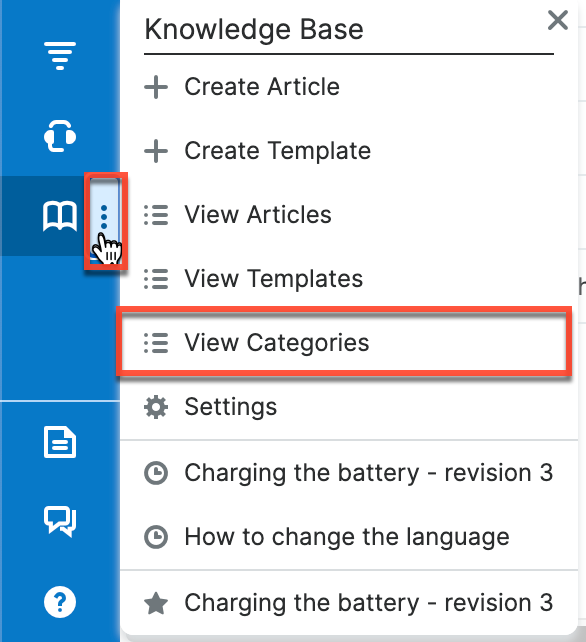
Click the three-dots menu in the Knowledge Base module tab then select "View Categories" from the menu to open the Categories list view.
In the Categories list view, you can view all knowledge base categories and their subcategories by expanding the Categories tree view or searching for categories by title in the search bar. Grey folder icons indicate that a category contains subcategories while white folder icons represent categories with no children. Clicking the grey folders, as opposed to the category name, will reveal its subcategories. You can perform actions on an individual category by clicking the triangle to the right of a category's row in the list view.
Each category's Record Actions menu allows you to perform the following operations:
| Menu Item | Description |
| Add Subcategory (Plus icon) | Create a new category as a child of this category. |
| Edit | Edit the name of the category. |
| Delete | Delete the category. |
| Move Down | Move the category down in the tree. |
| Move To | Move the category to a parent folder. |
| Move Up | Move the category up in the tree. |
Creating Categories
Categories and subcategories can be created from the Categories list view, and top-level categories can be created from the Category field within an article's record view.
Creating via Categories List View
Use the following steps to create a category from the Categories list view:
- Select "View Categories" from the Knowledge Base module tab's Actions menu.
- Click "Create" and enter the category name in the new row which appears. Press the Enter key to save.
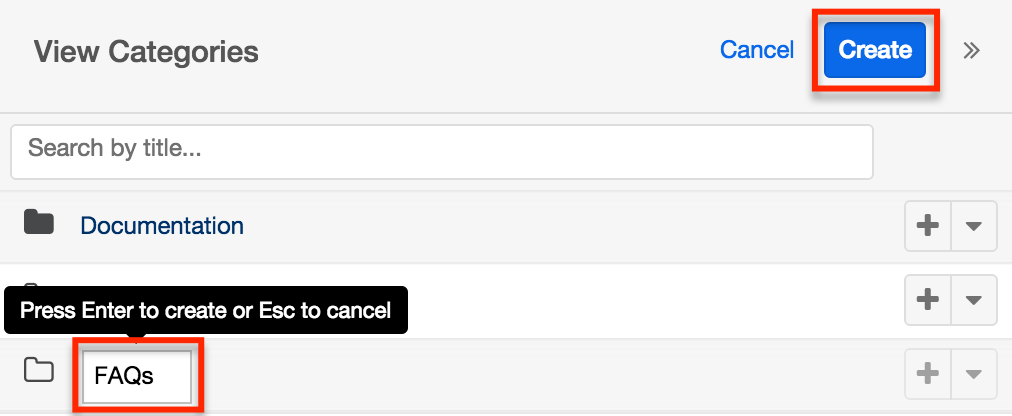
- To create a subcategory, select the "+" to the far right of the category's row and enter the name of the new child row which appears. Press the Enter key to save.

Creating via Category Field
Use the following steps to create a top-level category from the Category field while creating or editing a knowledge base article. Please note that this method does not allow for creating subcategories:
- Create a new article or edit an existing article in the Knowledge Base module.
- Click the Categories field and select "Create a category" in the bottom left corner of the dropdown.
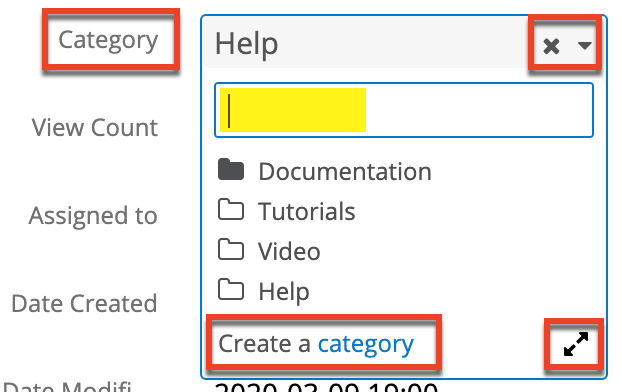
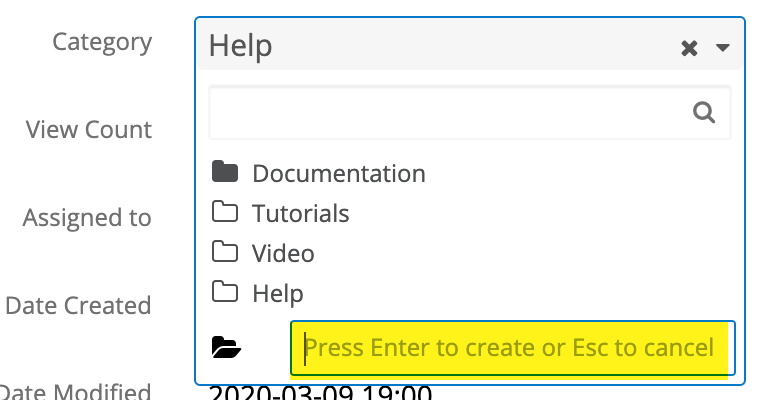
Alternatively, select the expand icon located in the bottom right corner to open the Search and Select Categories drawer and click "Create" in the top-right corner of the drawer that opens. - Type the desired category's name into the open text box which appears and press the Enter key to save the new category.
- Select the new category's name in the dropdown to select it for the current knowledge base article. If you do not wish to change the category of the current article, click outside of the Category field's dropdown.
Renaming Categories
Categories may be renamed via the Categories list view and the Categories field in an article's record view. To rename a category from the Categories list view, simply click the triangle to the far right of the category row and select "Edit". Type the new category name followed by the Enter key to save your change.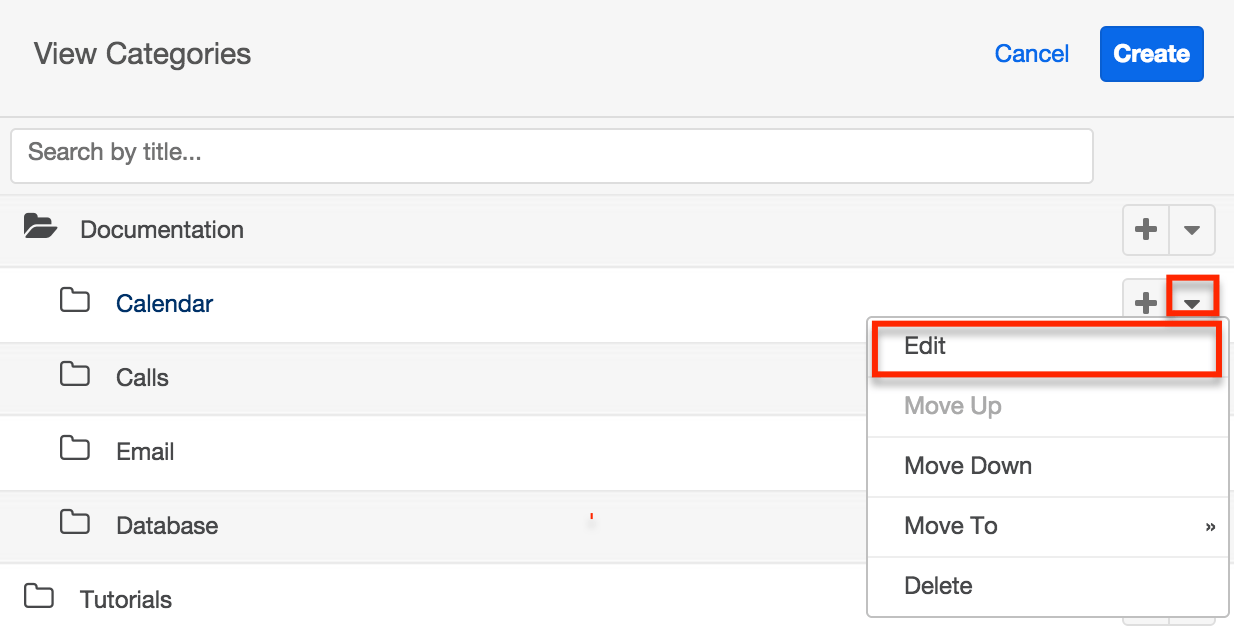
You can also rename categories while editing or creating an article. Click the category field to open the dropdown and select the Expand icon located in the bottom right corner. The drawer that opens allows categories to be renamed similarly to the list view. After renaming desired categories, you can click "Cancel" or select a category to relate to the current article.
Moving Categories
Users can change the order and hierarchy of categories via the Categories list view. Categories and subcategories can be moved up, down, or into a different folder. This can be accomplished through the drag-and-drop method or through the move options in the Record Actions menu.
Moving via Drag and Drop
To drag and drop a category to a new position in the Categories tree view, click and hold the category and drag it to the desired location. A category can be moved into a new position in the main tree view or into a different folder. A checkmark will appear beside the category name when the category is in a successful drop position.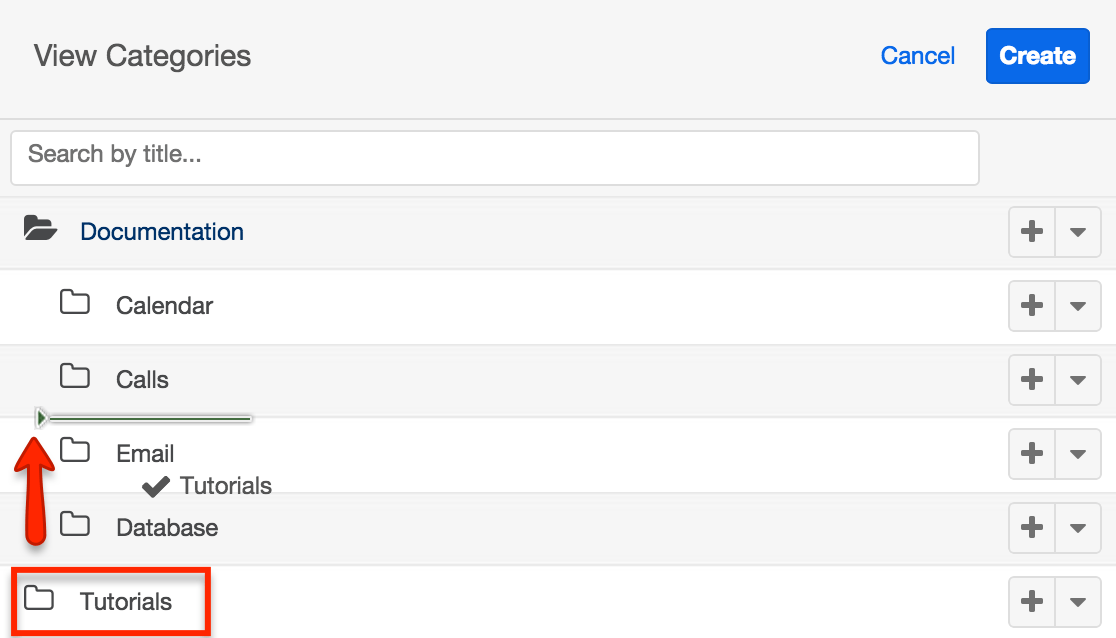
Moving via Record Actions Menu
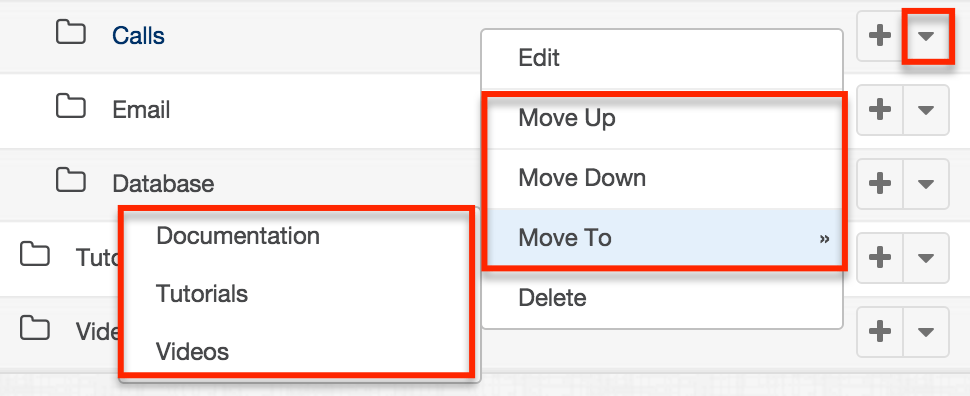
To move a category using the Record Actions menu, click the triangle located on the right of the category's row. The menu presents the following three options for moving categories:
- Move Up: Moves the category up one position within its current folder
- Move Down: Moves the category down one position within its current folder
- Move To: Moves the category to be the child of another category
Deleting Categories
Categories can be deleted via the Categories list view and the Category field in an article's record view. Use caution when deleting a category because it will not only delete the current category, it will also delete all of its subcategories. When a category is deleted, any articles belonging to the category will have empty Category fields. While the Category field is not required, it is useful for organizing articles. It is recommended to associated articles be assigned a new category using mass update prior to the deletion.
Note: When a parent category is deleted, all subcategories are automatically deleted as well.
To delete a category and its child subcategories from the Categories list view, simply click the triangle to the far right of the category row and select "Delete".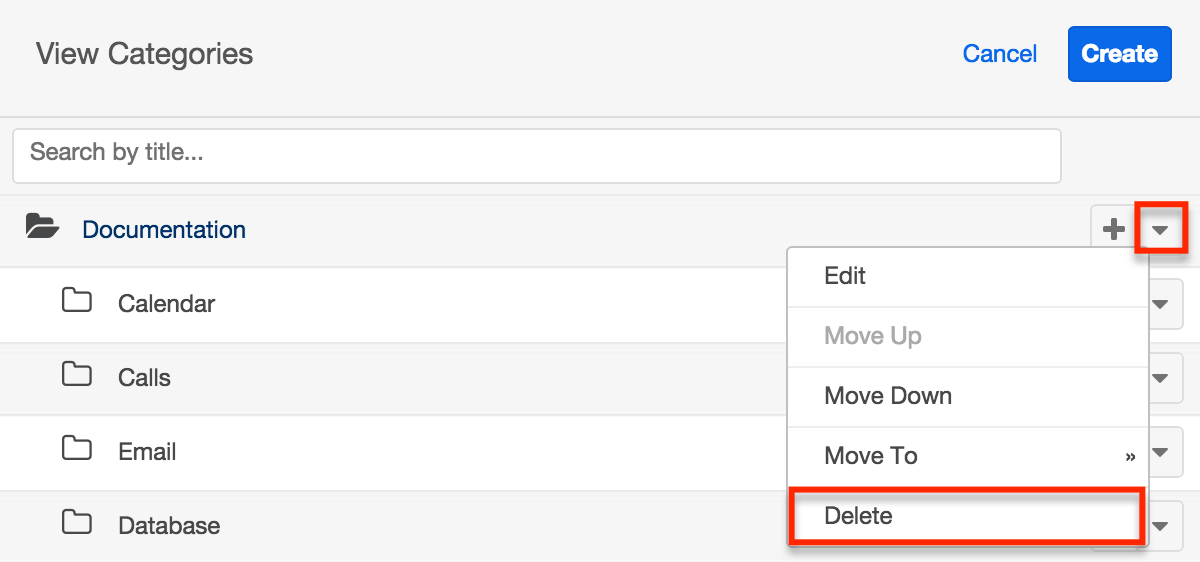
You can also delete categories while editing or creating an article. Click the category field to open the dropdown and select the Expand icon located in the bottom right corner. The drawer that opens allows categories to be deleted similarly to the list view. After deleting unwanted categories, you can click "Cancel" or select a category to relate to the current article.
Working With Sugar Modules
While the Knowledge Base module has some features that only apply to knowledge base records, it also uses the Sidecar user interface that most Sugar modules are based on. The following sections detail menus, views, and actions common to Sidecar modules and contain links to additional information within the page or links to the User Interface documentation.
Article Menus
The Knowledge Base module contains various options and functionality which are available via menus in the module tab, list view, and record view. The following sections present each menu and its options with links to more information about each option in the User Interface documentation or, for Knowledge Base-specific functionality, within this page.
Module Tab Menus
Click the Knowledge Base module tab in the navigation bar to access the Knowledge Base list view. You may also click the three-dots menu in the Knowledge Base module tab to display the Actions, Recently Viewed, and Favorites menus. The Actions menu allows you to perform important actions within the module. The Recently Viewed menu displays the list of articles you most recently viewed. The Favorites menu displays the list of Knowledge Base records you most recently marked as favorites. 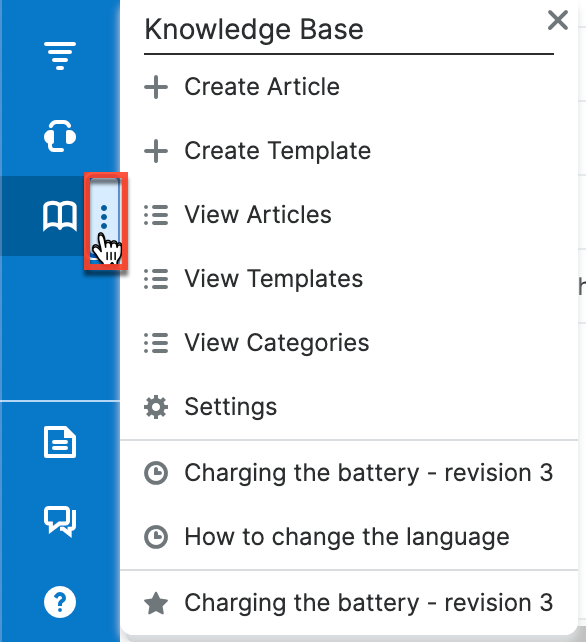
The module tab's Actions menu allows you to perform the following operations:
| Menu Item | Description |
| Create Article | Opens the record view layout to create a new article. |
| Create Template | Opens the record view layout to create a new template. Note: This option is only available to administrators. |
| View Articles | Opens the list view layout to search and display articles. |
| View Categories | Opens the list view layout to search and display categories. |
| View Templates | Opens the list view layout to search and display templates. Note: This option is only available to administrators. |
| Settings | Opens the Knowledge Base language-configuration settings. Note: This option is only available to administrators. |
For more information on module tab menus including reasons a module may not be included in the menu, see the User Interface documentation.
List View Menus
The Knowledge Base list view displays all knowledge base records and allows for searching and filtering to locate specific articles. You can view the basic details of each record within the field columns of the list view or click an article's name to open the record view. To access a module's list view, simply click the module's tab in the navigation bar.
List View Mass Actions Menu
The Mass Actions menu to the right of the checkbox option in the list header allows you to perform mass actions on all currently selected records. You can use the checkbox on each record's row to select individual article records or click the checkbox in the list header to select all records displayed on the current set of list view results.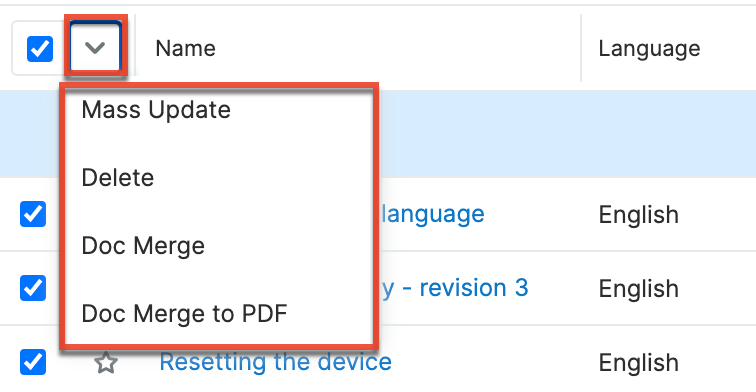
The Mass Actions menu allows you to perform the following operations:
| Menu Item | Description |
| Mass Update | Mass update one or more articles at a time. |
| Recalculate Values | Visible only if the module contains fields using Sugar Logic and only to System Administrators or users with Developer-level role access, this option will refresh the selected records' calculated values. |
| Delete | Delete this article. |
| Doc Merge | Select or create a DOCX template to merge record data into documents that will be accessible in the Doc Merge widget. |
| Doc Merge to PDF | Select or create a DOCX, XLSX, or PPTX template to merge record data into PDF documents that will be accessible in the Doc Merge widget. |
List View Record Actions Menu
The Record Actions menu to the far right of each record's row allows you to perform actions on the individual article directly from the list view.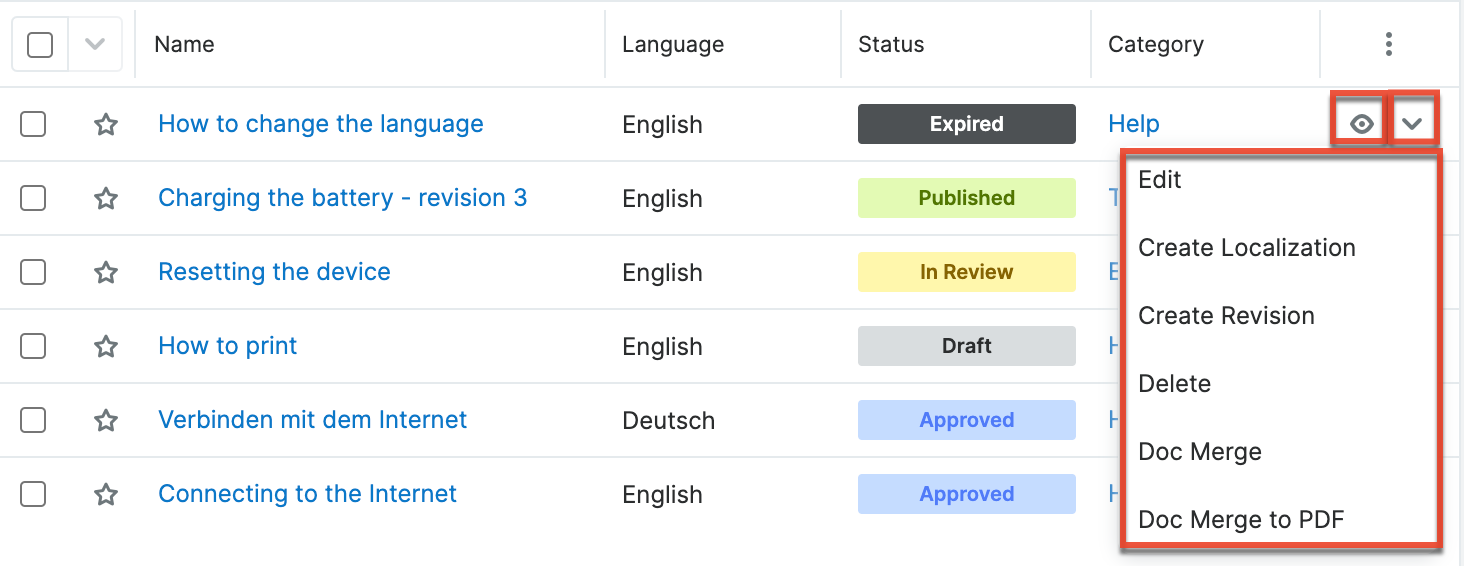
The list view's Record Actions menu allows you to perform the following operations:
| Menu Item | Description |
| Edit | Edit this article. |
| Follow | (Available if Activity Streams are enabled) Follow changes to this case/call/bug/etc. in your activity stream. |
| Create Localization | Copy this article in order to adapt it for a different audience via another language. |
| Create Revision | Create a new or corrected version of the original article. |
| Delete | Delete this article. |
| Doc Merge | Select or create a DOCX, XLSX, or PPTX template to merge record data into documents that will be accessible in the Doc Merge widget. |
| Doc Merge to PDF | Select or create a DOCX, XLSX, or PPTX template to merge record data into PDF documents that will be accessible in the Doc Merge widget. |
Record View Actions Menu
The Knowledge Base record view displays a single article in full detail including its fields, subpanels of related records, and activity stream. To access an article's record view, simply click a hyperlinked article name from anywhere within Sugar. The record view's Actions menu appears on the top right of the page and allows you to perform various operations on the current record.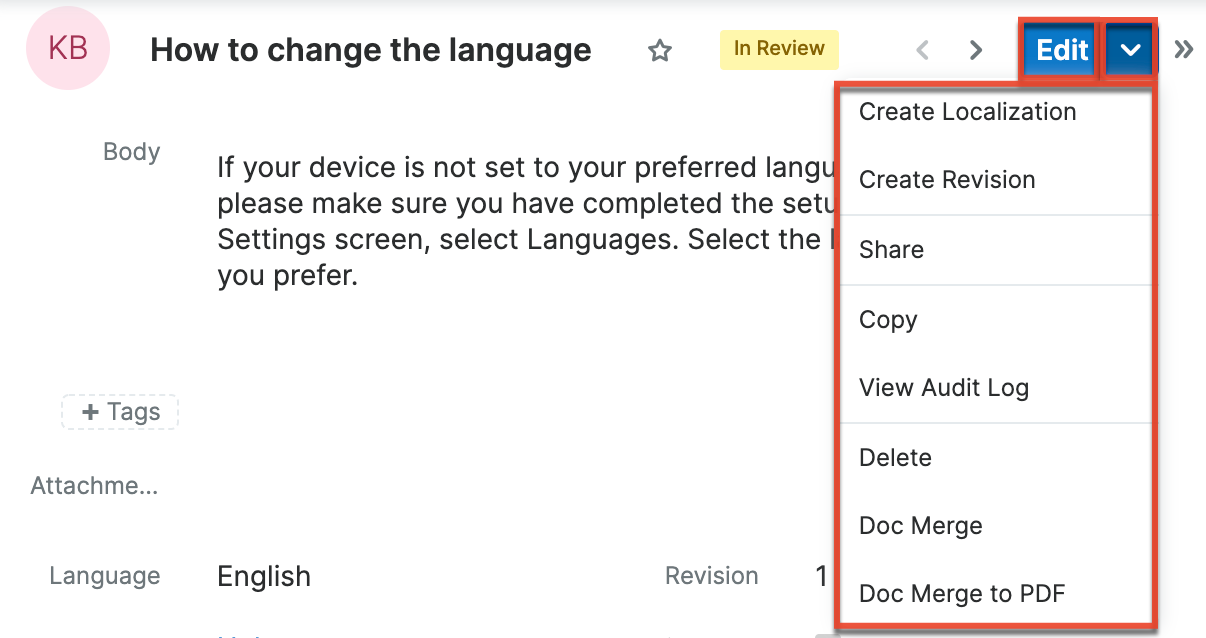
The Actions menu allows you to perform the following operations:
| Menu Item | Description |
| Edit | Edit this article. |
| Create Localization | Copy this article in order to adapt it for a different audience via another language. |
| Create Revision | Create a new or corrected version of the original article |
| Share | Share a link to this article via email. Note: To send emails through Sugar, users must first configure a default user email account via Emails > Email Settings. |
| Download PDF |
Download the record's information as a PDF file.
|
| Email PDF |
Email the record's information as a PDF attachment.
Note: To send emails through Sugar, users must first configure a default user email account via Emails > Email Settings. |
| Copy | Duplicate this article. |
| View Audit Log | View a record of changes to this article's fields. |
| Delete | Delete this article. |
| Doc Merge | Select or create a DOCX, XLSX, or PPTX template to merge record data into documents that will be accessible in the Doc Merge widget. |
| Doc Merge to PDF | Select or create a DOCX, XLSX, or PPTX template to merge record data into PDF documents that will be accessible in the Doc Merge widget. |
Common Views and Actions
In the table below, the left column contains links to the User Interface page covering topics that are applicable to all Sidecar modules. The right column has links to sections of the current page that cover topics specific to knowledge base articles.