User Interface
Overview
The user interface includes all of the visible elements users see and interact with while using Sugar including the headers, fields, subpanels, dashboards, etc. Knowing how to properly navigate around the application along with what the various layouts, options, and action items do in Sugar will be critical in managing your data in the system. This documentation covers the basics of Sugar's user interface as well as how to perform common tasks or operations in the application.
Sidecar Modules
This page covers the user interface that was introduced in Sugar 7 called "Sidecar", which applies to all modules except for Campaigns. For information on the Campaigns module user interface (legacy), please refer to the Legacy User Interface knowledge base article. Custom modules created in Module Builder will utilize the Sidecar user interface. Custom modules installed to an instance prior to Sugar 7 that were not created in Module Builder will continue to use the Legacy user interface upon upgrade to later versions.
Theme
Sugar offers two different theme options for viewing the application: light mode and dark mode. The selected theme is controlled by the Appearance setting in each user's profile. For more information on changing your user profile settings, please refer to the Getting Started documentation.
System Administrators can upload different logos for light vs dark mode. For more information, please refer to the System documentation in the Administration Guide. 
Navigation Bar
All pages within Sugar display a navigation bar spanning across the top of the screen. The navigation bar allows you to access the various modules (e.g., Accounts, Contacts, etc.), access your Home page, perform a global search, etc. You can configure the navigation bar via your user preferences to select which modules you want to display as well as their order. For more information, please refer to the Layout Options section of the Getting Started documentation.
The default navigation bar consists of the following options from left to right:
| Navigation Bar Item | Description |
| Home | Click the Sugar Cube icon on the upper left to access your Home page dashboards as well as your Activity Stream. |
| Module Tabs | Both stock and custom modules can be displayed in the navigation bar. Click the module name to open its list view or click the triangle to the right of each module name to display the Actions, Recently Viewed, and Favorites menus. |
| Global Search | Enter keywords into the global search bar to search for records across all Sugar modules. |
| Notifications | View system notifications (if any) by clicking the notification icon. The number shown indicates the count of unread notifications. |
| User Menu |
Click the user profile image to open the user menu which allows access to your profile, the Employees module, etc. Note: For instances that use SugarIdentity, certain fields (e.g., First Name, Last Name, Work Phone, Title) in the user's profile are read-only and can only be edited by administrators in SugarIdentity. |
| Quick Create | Click the Add button (plus icon) to open the Quick Create menu which allows you to create records from anywhere in Sugar. |
Home
You can access your Home page from anywhere in Sugar by clicking the Sugar Cube icon at the top left of every page. Sugar's home page houses full-page dashboards and your instance-wide activity stream (if enabled). Additionally, you can manage your dashboards and visit recent records from the Home page actions menu. For more information, please refer to the Home documentation.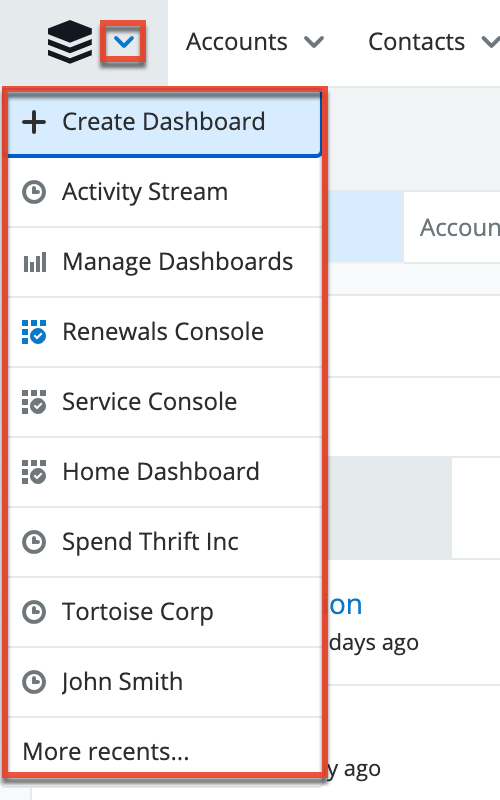
Module Tabs
Module tabs are located to the right of the Sugar Cube icon on the navigation bar at the top of any Sugar screen. To access a specific module's list view, simply click the module's name. You may also click the triangle to the right of the name to display the Actions, Recently Viewed, and Favorites menus. The Actions menu allows you to perform important actions within the module. The Recently Viewed menu displays the list of records you last viewed in the module. The Favorites menu displays the list of records you most recently marked as favorites in the module. 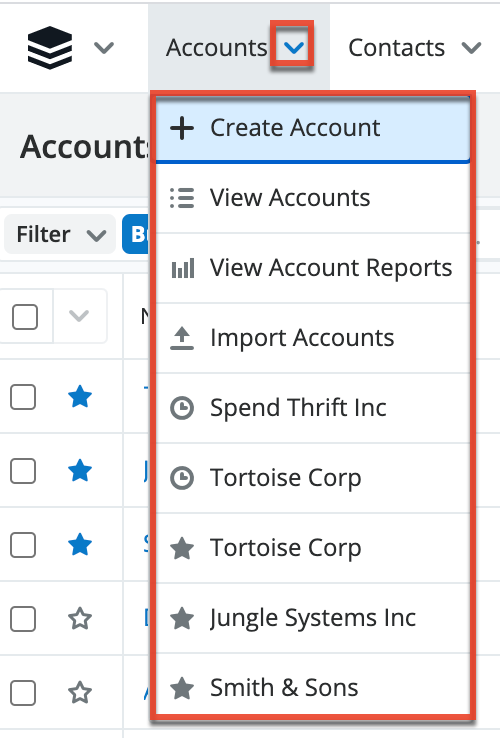
The number of displayed module tabs depends on your screen resolution as well as the size of your browser window. When your available modules do not fit within the navigation bar's width, clicking the three-dots menu to the right of the displayed modules allows you to select and navigate to the list view of the additional modules.
If you do not see a particular module tab in Sugar, please check the following:
- The module may be marked as hidden in your user preferences which will prevent the module tab from being displayed. Navigate to your user menu (upper right of Sugar), click "Profile", click the Advanced tab, and check the Layout Options section. If you see the module in the Hide Modules list, simply move it to the Display Modules list and click "Save". For more information on hiding and displaying modules, please refer to the Layout Options section of the Getting Started documentation.
- The administrator may have disabled the module for your entire Sugar instance. Reach out to your Sugar administrator to have the module displayed. For more information on displaying and hiding modules throughout Sugar, please refer to the Developer Tools documentation.
Global Search
Global search allows users to search for information across their entire Sugar database as opposed to restricting search within a specific module. The Global Search bar displays on the upper right of any Sugar page and utilizes full-text search to search throughout most fields and modules for an enhanced search experience. 
Clicking on the search bar will expand it across Sugar's navigation bar. To perform a search, type the search phrase into the search box, and the pop-up results will begin appearing once you enter at least one character. Click "View all results" at the bottom of the pop-up results to see and filter additional matches. To minimize the search bar, simply click anywhere outside of the search bar. For more information on using Global Search, please refer to the Global Search section of the Search documentation.
Once expanded, you will be able to access the Modules dropdown by clicking the down arrow on the far left of the search box. This allows you to restrict results to particular modules (e.g., Accounts, Contacts, etc.). For more information on configuring your global search, please refer to the Search documentation. Administrators can also enable or disable modules as well as control additional elements of global search via Admin > Search and Admin > Studio. For more information on these configurations, please refer to the Field Options section of the Studio documentation as well as the Search section of the System documentation.
Notifications
Sugar notifications relay key messages, warnings, and alerts that are relevant to the current user. The Notifications indicator is located in the top right corner of the screen next to the global search bar; the number displayed represents how many messages have a status of Unread. If you are logged in to Sugar using the Chrome or Firefox browser, the SugarCRM cube icon in your browser tab also displays the count of unread notifications. When the notification count changes, the icon's count will be updated within 5 minutes of the change or upon reloading the tab.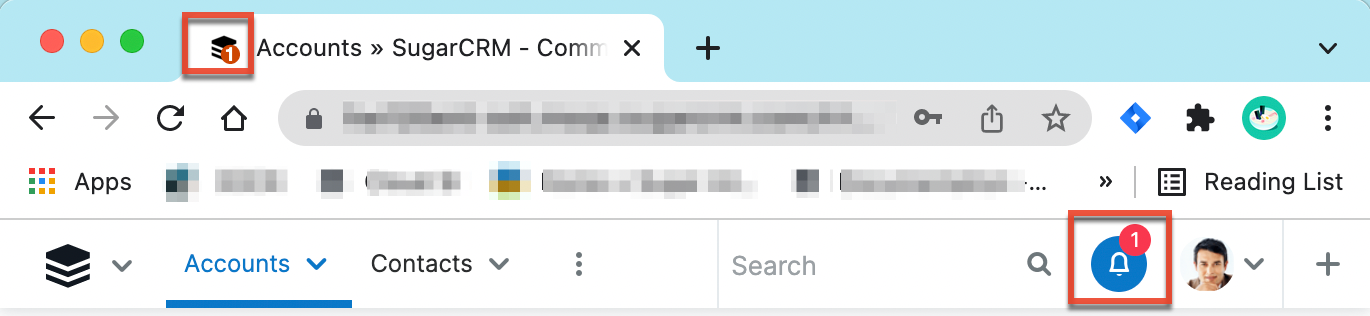
Clicking the notification icon in Sugar opens a dropdown menu displaying your most recent unread notifications. Click any notification to open it in record view, or click "View Notifications" to open the Notifications list view. A notification is automatically marked as read when it is opened in record view or previewed from list view. If you wish to toggle its status between Read and Unread, simply click the status field in list view, record view, or preview. To change the status of multiple notifications at a time (e.g., to mark several notifications as read), you can also mass update the records from list view.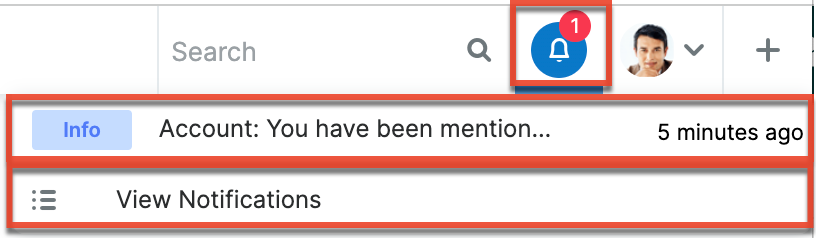
If a notification requires action within Sugar, a link may be included in the Description field, shown in record view or when previewing the notification. Clicking the link takes you to the related record or the area where action is needed.
Notification Severity Levels
Each notification can have one of four severity levels:
- Alert (Red): Indicates something is critically wrong with your Sugar instance and needs the attention of a system administrator immediately.
- Warning (Yellow): Indicates something in your Sugar instance needs your attention or the attention of a system administrator to be fixed.
- Information (Blue): Standard notification including reminders for upcoming meetings, calls, or tasks. Note that for a notification to appear, a newly created activity must be scheduled to begin at least one hour later than the time it was created.
- Success (Green): Indicates the successful completion of an action or configuration change.
User Menu
Your profile icon appears in the upper right of Sugar; clicking it displays the user menu where you can access your profile, the Employees page, and view important version information about your instance. To upload a photo for your profile image, please refer to the Getting Started documentation.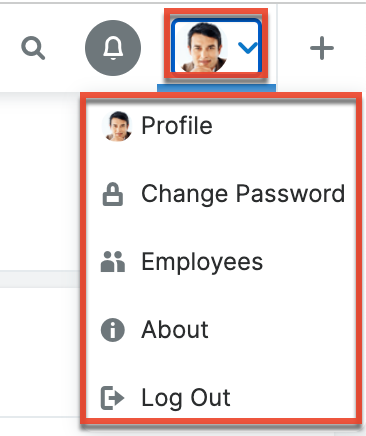
The user menu allows you to perform the following operations:
| Menu Item | Description |
| Profile |
View your user profile, change your password, and personalize various aspects of Sugar. Note: For instances that use SugarIdentity, certain fields (e.g., First Name, Last Name, Work Phone) in the user's profile are read-only and can only be edited by administrators in SugarIdentity. In addition, users will not be able to change or reset their password and will need to click the "Forgot Password?" link on the Sugar login screen to reset their password. |
| Change Password |
For instances that use Sugaridentity, the Change Password option will appear where you can change your Sugar password. |
|
Navigate to the Employees module to search and view employee records. Users with administrative privileges can also create and edit employees in the system. For instances that use SugarIdentity, certain fields (e.g., First Name, Last Name, Office Phone) in the employee's record are read-only and can only be edited by administrators in SugarIdentity. Note: Every user is listed as an employee; however, every employee may not be a user in Sugar. |
|
| Admin |
Navigate to the Admin page to configure and customize various aspects of your Sugar instance. Note: This option is only available if you are an administrator user or have or Developer-type role access. |
| About | Navigate to the About page to view your Sugar instance's version and build number and your assigned CRM solution licenses (e.g., Sugar Sell Advanced, Sugar Serve). You can also access links to different resources and view source code information. |
| Log Out | Log out of your current user session. You will be directed back to the Sugar login page for your instance. |
Quick Create
The Quick Create menu allows you to easily create new records from anywhere in Sugar. Simply click the Add button on the upper right of any Sugar page to access the menu. Please note that a maximum of ten modules may be enabled to display in the Quick Create menu. Administrators can configure which modules are enabled and the order in which they appear via Admin > Configure Navigation Bar Quick Create. For more information, refer to the Developer Tools documentation.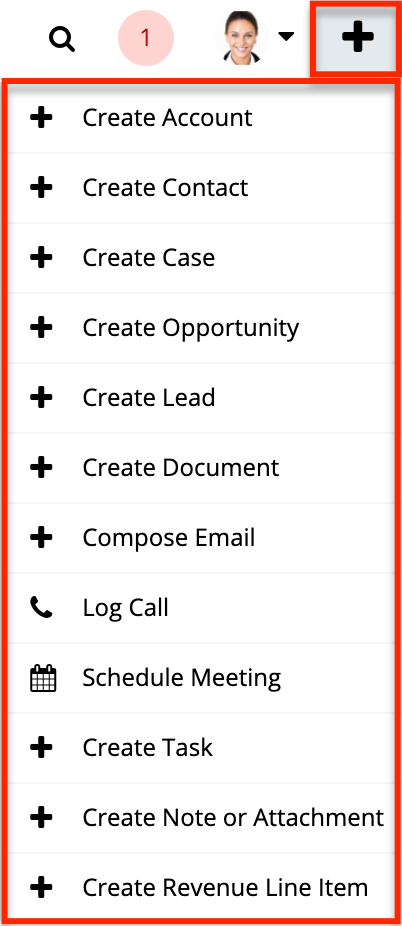
Clicking on an item in the Quick Create menu will open the record view form for the specific module. When using quick create while viewing an existing record where a relationship exists between the two modules, Sugar automatically relates the new record to the one being viewed. For example, if you are viewing an account, ABC Company, and create a new contact via quick create, the Account Name field in the new contact will automatically populate with "ABC Company", thus creating the link between the two records.
All required fields will indicate "Required" in the field and must be completed prior to saving. Once the necessary information is entered, click "Save". If you do not wish to create the record, simply click the Cancel button. Please note that administrators have the ability to configure the record view layout via Admin > Studio. For more information on configuring record view layouts, please refer to the Studio documentation.
Note: Because the Quick Create drawer overlays the page from where it is launched, using the browser's back button will appear to send you back two pages instead of to the previous view. To return to the previous view, use the Cancel button instead.
Footer
Sugar's footer displays the SugarCRM logo, Mobile link, Doc Merge link, Shortcuts link, Help link, as well as links to enabled third-party integrations. 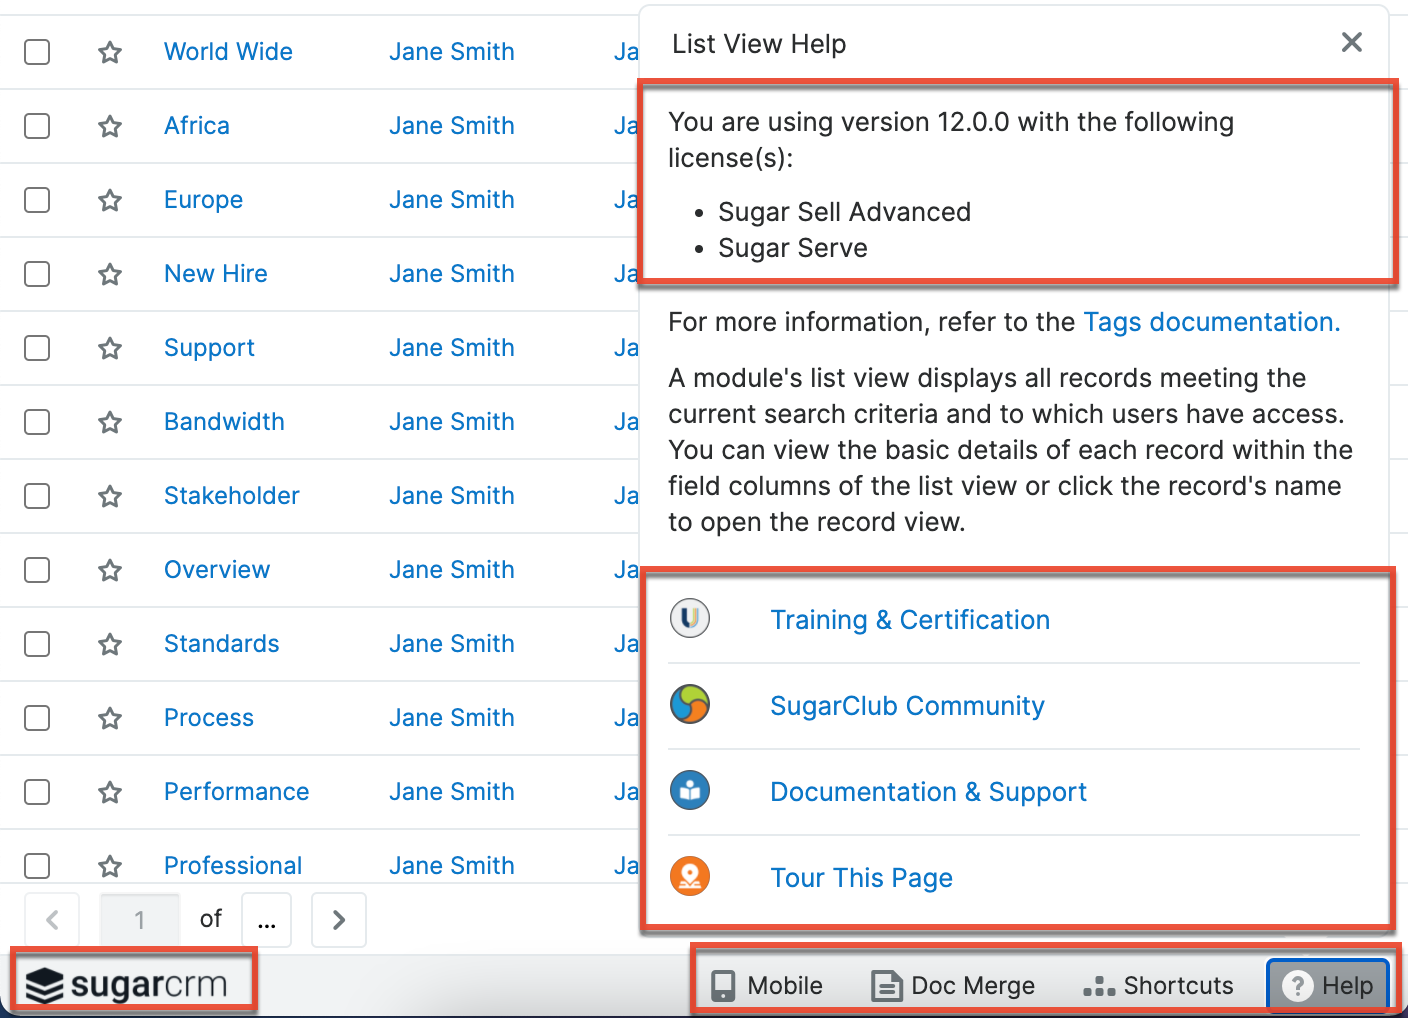
The following links are available in Sugar's footer:
- Logo: Click the logo on the bottom left of Sugar to return to your home page. Administrators can replace the SugarCRM logo with a custom logo via Admin > System Settings. For more information, please refer to the System Settings documentation.
- Widgets: Links for any installed third-party integrations will appear to the right of the SugarCRM logo.
- Mobile: When viewing Sugar via a touch-screen device, the Mobile link will appear allowing you to view Sugar's mobile site.
- Doc Merge: Access the Doc Merge widget, which includes a list of the current user's merged documents and the Template Assistant. Please refer to the Doc Merge documentation for more information.
- Shortcuts: Access the Keyboard Shortcuts help page to view the various shortcut keys available to use along with a description of the actions they perform. For more information regarding the Keyboard Shortcuts help page, please refer to the Accessibility documentation.
- Help: Click the Help link in the footer to quickly find information regarding your Sugar instance's version and your assigned CRM solution licenses (e.g., Sugar Sell Advanced, Sugar Serve). The help pane also provides a brief introduction to the current module and a link to its corresponding documentation. The following additional learning resources are available in the help pane:
- Training & Certification: Navigate to the SugarU space in SugarClub, where you can enroll in online classes, engage with live training, and get Sugar-certified.
- SugarClub Community: Engage, learn, and explore with others around the world in the SugarClub online community. Level up your Sugar knowledge and share your expertise with other users, Sugar partners, and Sugar employees.
- Documentation & Support: Navigate to the Sugar Support Site, where you can access the case portal and official product documentation.
- Tour This Page: Take a quick, in-app tour of key features on the current page. For more information, refer to the Tour section of the Getting Started documentation.
Field Types
Sugar records include a variety of field types that enable you to capture all of the different kinds of data that are important to your organization. While many fields are available for use on each module out-of-the-box, administrators and users with developer-level role access have the ability to add fields of these various types to modules via Admin > Studio as described in the Studio documentation. Studio may also be used to configure fields by, for example, making fields required, allowing them to be mass updated, making their values calculated, and specifying when they should be visible.
Descriptions and instructions for editing different field types are available in the following sections:
Action Button Fields
Action Button fields are buttons configured by your admin to provide shortcuts to common actions from record views. For more information on configuring Action Buttons, please refer to the Action Buttons documentation.
Checkbox Fields
Checkbox fields provide a boolean type typically used to answer a yes or no question. Click the box to toggle whether it is checked or not.
Comment Log Fields
The Comment Log field allows users to add messages, comments, or other text to a log appearing on the record view. To add an entry, click anywhere inside the field and type a message into the text area that appears. After saving the record, the message is appended to the end of the log with a link to the user that added the entry and the date and time the entry was created. Once saved, entries cannot be edited or removed.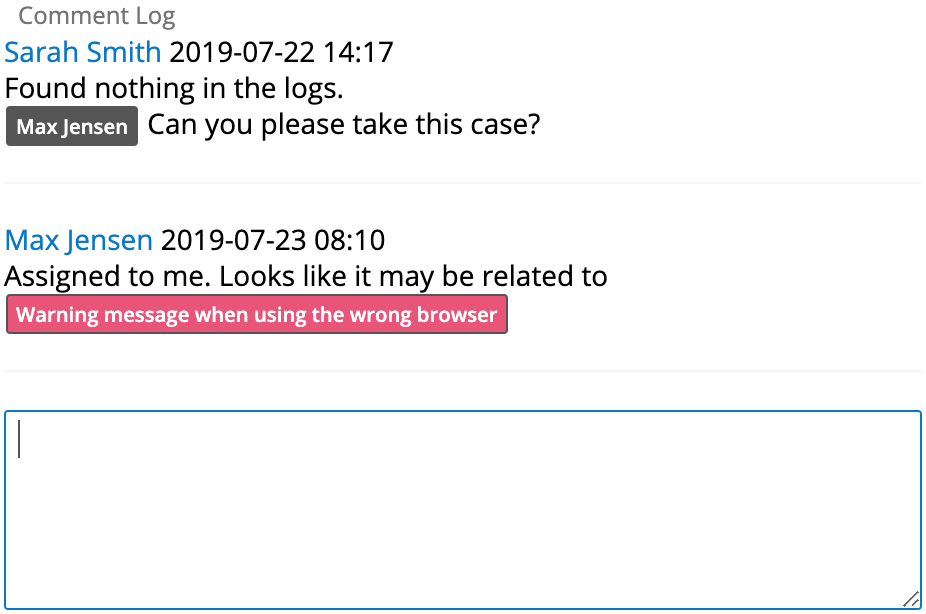
If the length of a comment log entry is longer than the maximum set by the admin in the system settings, the text will be cut off with a "Show more..." link that displays the remainder of the entry when clicked. Once the entry is expanded, a "Show less..." link is displayed that collapses the text so that only the configured number of characters are displayed again. See the System documentation in the Administration Guide for more information.
Note that Comment Log fields cannot be created in Studio; they exist automatically on many modules and can be added to the layout in Studio. This can be done by a system administrator or someone with Developer-level role access. On the Bugs and Cases modules, the Comment Log field is displayed by default. For more information on using Studio to add fields to a module's layout, refer to the Studio documentation.
Tagging Users in Comment Log Entries
When you mention users in comment log entries, you can insert a link to their employee record in the form of a clickable pill; the tagged user receives a notification in Sugar and an email notification if this preference is enabled in the user's settings. To tag a user, type the @ symbol followed by at least the first two characters of the first or last name. A list of matching users will appear below the text area; select the user you want to mention and the tag will be added to the entry. After saving, the tag is displayed as a clickable pill.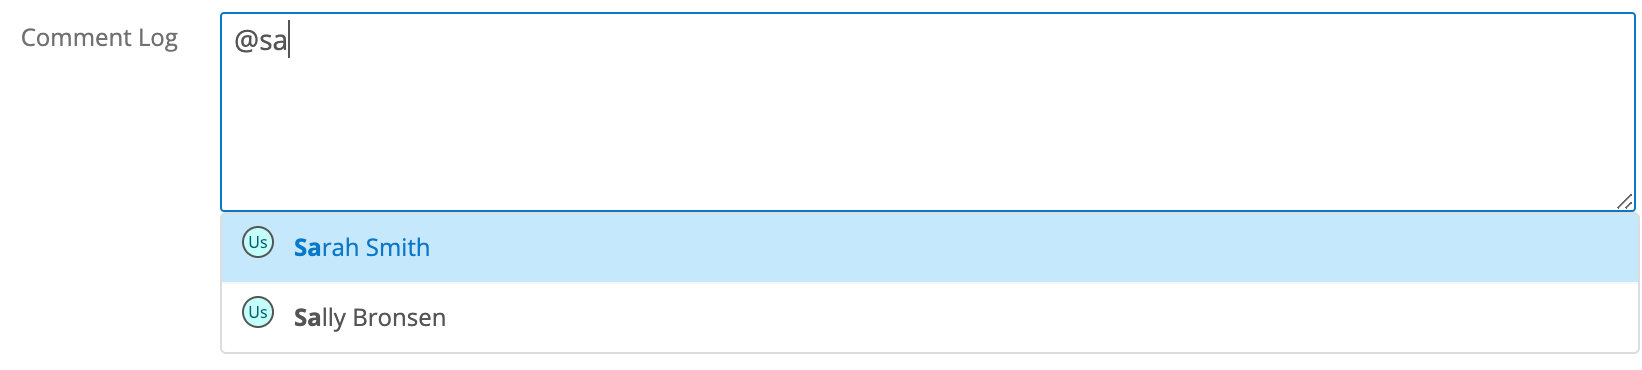
To filter by letters in the middle or end of the first or last name instead of the beginning, use the wildcard character (%) at the beginning of your criteria. For example, "@%en" would yield Sally Bronsen, Max Jensen, and Jim Brennan.
If the user you want to mention does not have access to the record, their name will be disabled in the list of results, labeled with "No access", and you will not be able to tag the user.
Linking to Records in Comment Log Fields
It is possible to link to Sugar records in comment log entries; the link will appear as a clickable pill. To link to a record, type the # symbol followed by at least two characters in the name of the record. A list of matching records will appear below the text area; select the record you wish to link to and the link will be added to the entry. Upon saving, the link will be displayed as a clickable pill.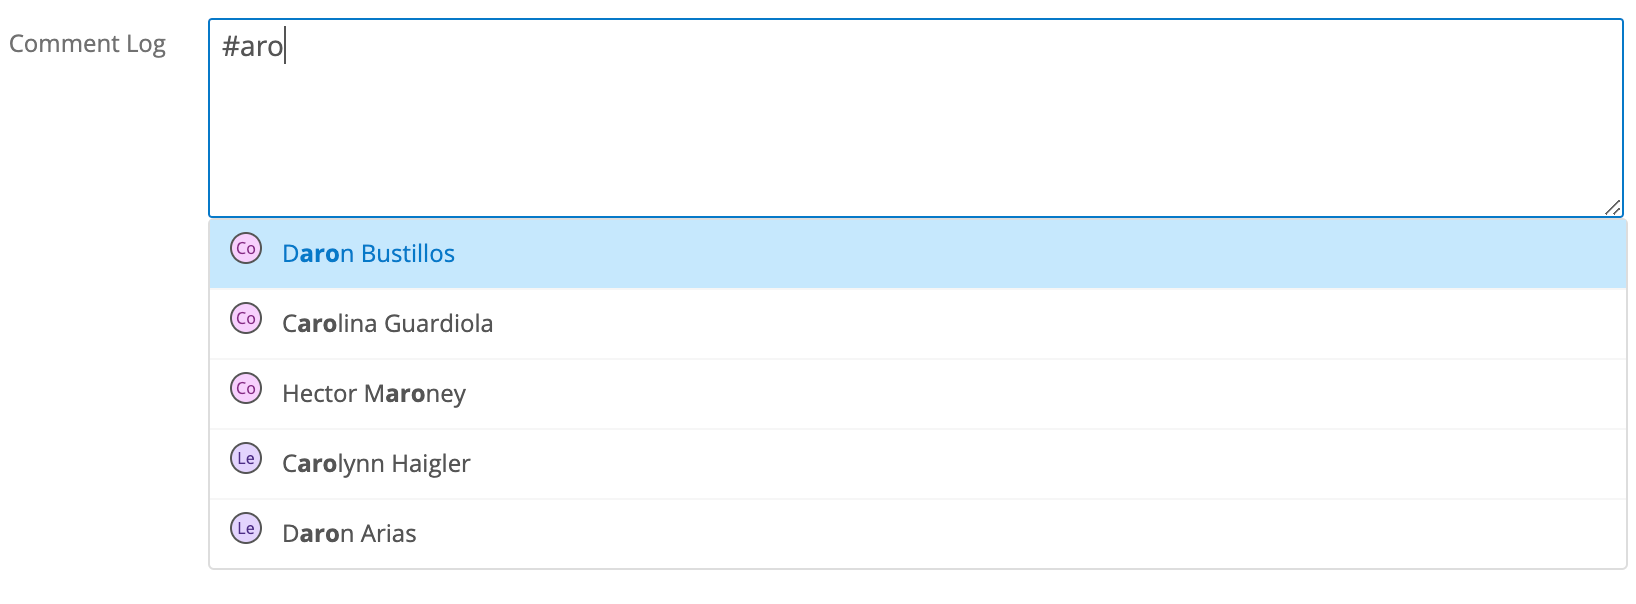
If you are viewing a comment log entry containing a link to a record to which you do not have access, the link will still be clickable but the text will say "No data available".
Date Fields
Date fields allow users to specify a particular date by either typing a date in the provided format or clicking the Calendar icon and selecting it via the date picker. Click the month and year (e.g., "January 2018") to select the desired month or use the arrows to navigate to the desired month. To set the year, click the month and year at the top of the picker, then click the year at the top of the picker, and then select the desired year. Once the month and year are set, click the desired date below to set the date and close the picker.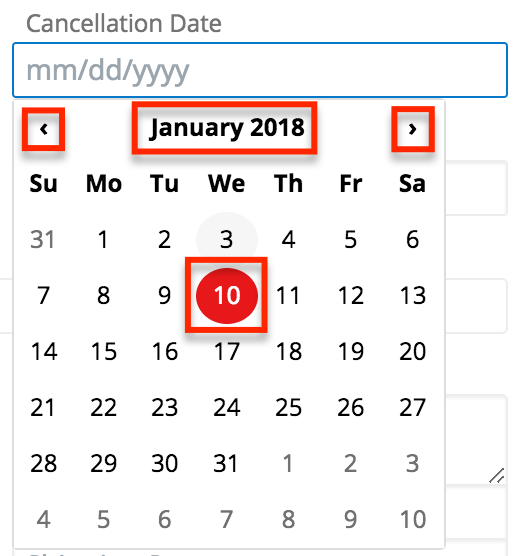
Datetime Fields
Datetime fields allow users to specify both a particular date and a time. The date portion is set just like a date field as described above. The time portion can be set by typing a time in the provided format or clicking the Clock icon and selecting it via the dropdown.
Dropdown Fields
Dropdown fields provide a list of values where only one value can be selected at a time. The list will be collapsed to only display the selected value except during editing, making it appropriate for longer lists of values. Click the selected value to see the full list. Clicking the desired value will replace it as the selected value.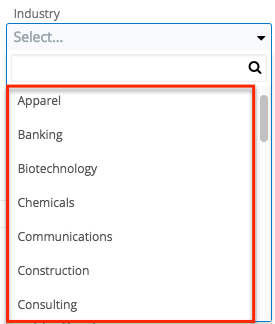
Email Address Fields
Email address fields contain one or more email addresses for a single record; email addresses are entered by clicking in the field and typing or pasting the address. The following options are available when editing an Email Address field:
- Add/Remove: Add additional email address fields by clicking the Add button. Click the minus button to remove the adjacent address.
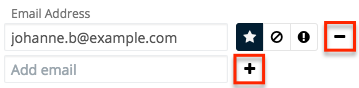
- Primary: A white star with a black background represents the primary email address on a record. This will be the default address that Sugar will find when the record is included in email campaigns and other send-message events performed within the application. On a given record, only one email address can be the primary one. If a record contains only one email address, it will be set to primary by default.

- Opted Out: The button with a slashed circle indicates whether or not an email address has been opted out from email marketing campaigns. Sugar automatically opts-out an email address when a recipient clicks the opt-out link in an email-type campaign message. When enabled, the button will have a black background. Administrators can configure whether new email addresses added to Sugar records default to opted-in or opted-out by using the "Opt-out new email addresses by default" option via Admin > System Email Settings.

When an opted-out email address is saved, the opt-out status is indicated by a blue circle with a line through it. Opted-out email addresses also display a Link button in record view. Clicking this button will copy a link to your computer's clipboard which you can send to the email address owner in order to request that they confirm their desire to receive marketing emails from your organization. When the copied link is visited in a web browser, Sugar will automatically set the email address to opted-in.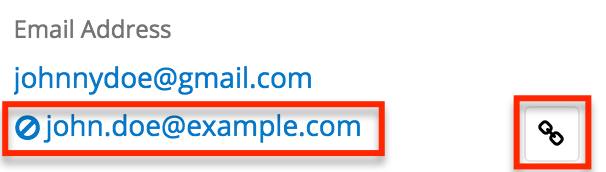
Please note that opted-out email addresses are only excluded from campaigns, so users can continue to send them transactional emails via the Emails module. For more information about email opted-out email addresses, refer to the Emails documentation. - Invalid: Invalid or undeliverable email addresses are represented by a black button with a white exclamation point. Sugar automatically marks email addresses as invalid if they are returned via the recipient's mail server during the distribution of an email campaign. Users can also manually toggle the invalid designation on and off by clicking the Invalid button next to the email address. Sugar will not permit users to send messages to invalid email addresses from anywhere within the application.

Flex Relate Fields
Flex relate fields require users to select first the module and then a record from that module to relate to the current record. The module selector works like a dropdown field (described above) while the record selector works like a relate field (described below). You can click the "x" to the right of the selected record's name (e.g., ABC Company) to clear out the value. Please note that a module may only have one flex relate field.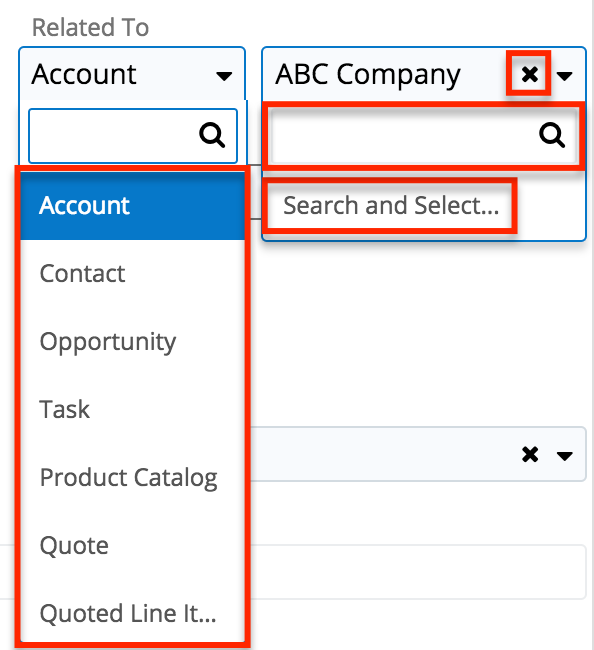
In most views, once saved, the field label changes to the selected module and the field value displays the selected record. In list view, however, the column maintains its field label and you can instead identify the record's module using the color-coded module icon next to the record name. Hovering over the icon reveals the module name. 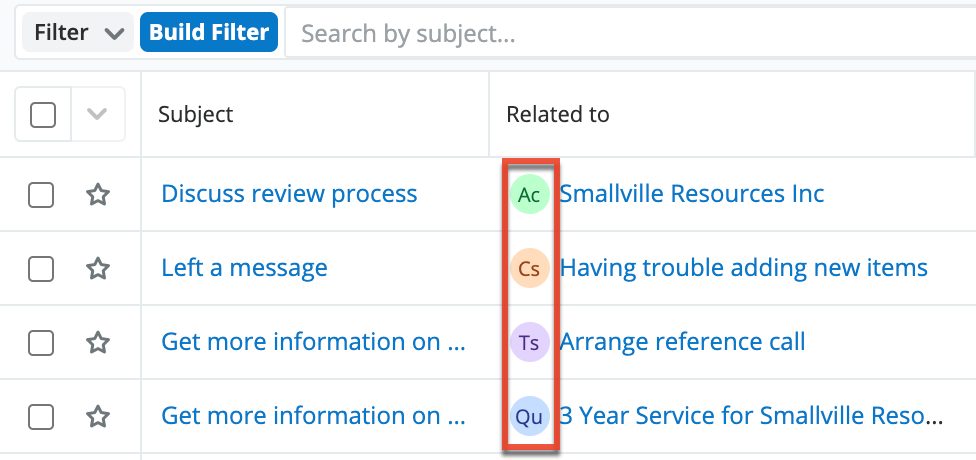
Iframe Fields
Iframe fields allow users to load content from an external website by entering a URL (https://example.com) in the field. Please note that Sugar will only load content from trusted domains that the system administrator has approved in Admin > Content Security Policy Settings. If you get an error indicating that the content has not been approved, please reach out to your administrator as they will need to update your system's Content Security Policy settings. If the CSP settings get updated while you are logged in to Sugar, you will need to refresh your browser for the changes to take effect in your session. 
Integer Fields
Integer fields allow users to enter whole number values (e.g., 850) by clicking on the field and typing. Administrators can specify a minimum and maximum value for the field via Admin > Studio. 
Multiselect Fields
Multiselect fields provide a list of values where one or more values can be selected at a time. The list will be collapsed to only display selected values except during editing, making it appropriate for longer lists of values. Click the blank space to the right of selected values to see additional options. Click the x on a selected value to deselect it.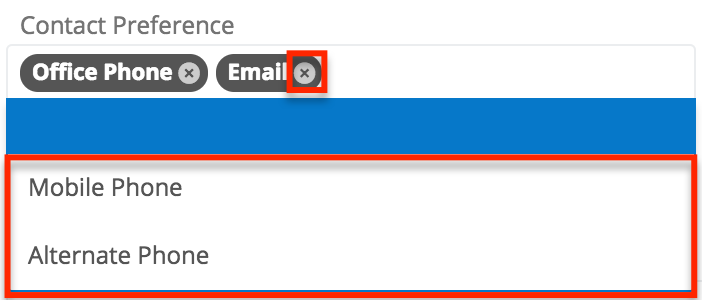
Radio Fields
Radio fields provide a list of values where only one value can be selected at a time. The entire list of all values will be displayed at all times, making it appropriate for shorter lists of values. Click the circle of the desired value, and any previously selected value will be deselected automatically. 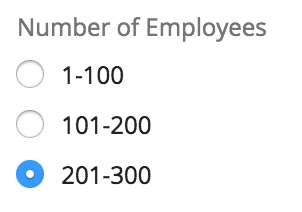
Relate Fields
Relate fields allow users to select a record from a single module. Both relate fields (which are visible via Admin > Studio > {Module Name} > Fields) and one-sided relationships (i.e., one-to-many and one-to-one) are represented by the same relate field user interface. Type the first few characters of the desired record and either select from the type-ahead results or click "Search and Select..." at the bottom for a more robust search.
Tags Fields
The Tags field allows users to enter keywords or phrases in order to connect Sugar records by common attributes that may not be defined via basic database fields. Once a new tag has been created, it can be re-used by any user in any module that contains a Tags field. To use the Tags field, click inside the field and type a word or phrase. Sugar will recommend existing tags as you type, but you can choose to ignore the recommendations and create an entirely new tag. For more information about tagging records in Sugar, please refer to the Tags documentation.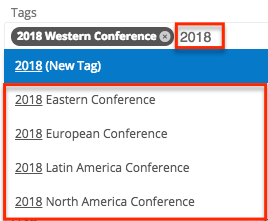
Teams Fields
The Teams field specifies which teams of users have access to view the record. An individual team selection works like a dropdown field which is described above. Click the Add button to add additional teams to the record or the minus button to remove a team. Click the star button to set the primary team. For more information on teams, please refer to the Team Management documentation. 
Note: If your administrator has enabled team-based permissions, you may also see a Lock button or a "Selected" box on the Teams field. Please refer to the Using Team-Based Permissions section of this page for more information.
Text Fields
Text fields allow users to enter a word or brief phrase by clicking into the field and typing. Text fields will accept any combination of characters (i.e., letters, numbers, spaces, and symbols) but have a 100-character limit by default. Administrators can edit the maximum character length restriction via Admin > Studio.
Text Area Fields
Text area fields allow users to enter large amounts of text by clicking on the field and typing. Please note that any hyperlinks (e.g., website, email) entered in the text area field will appear clickable once the record is saved. Clicking the hyperlink(s) within the field will open the link in a new tab for you to access the external company website, compose email, etc. 
Administrators can also modify the default display size of a text area field via Admin > Studio, but this will not limit the number of characters that can be entered by a user. Most browsers supported by Sugar will allow the user to resize an active text area field temporarily by dragging the bottom corner of the field to the desired width and height.
Creating Records
There are various methods for creating records in Sugar including basic creation, quick create, duplication, and import. The same record view layout opens when creating records by any of these methods and includes all of the relevant fields. Please note that administrators can configure the record view layouts to tailor them to your organization's needs via Admin > Studio. For more information on configuring layouts, please refer to the Studio documentation.
Basic Record Creation
The most common method of record creation is via the individual module itself using the Create button in the list view or the Create {Module} option in the module tab. For the Cases, Tasks, Leads, and Opportunities modules, you can also create records using the Create button in the tile view. This opens the record view layout in edit mode which allows you to enter all of the desired information.
The following steps cover creating a task via the Tasks module as an example:
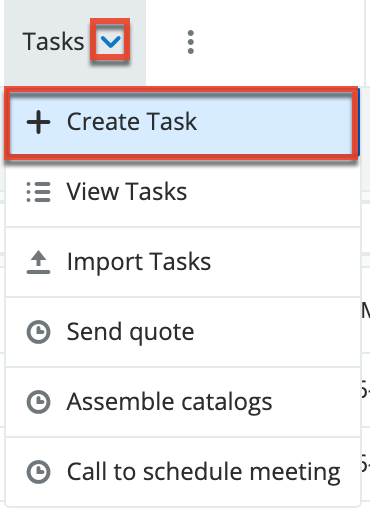
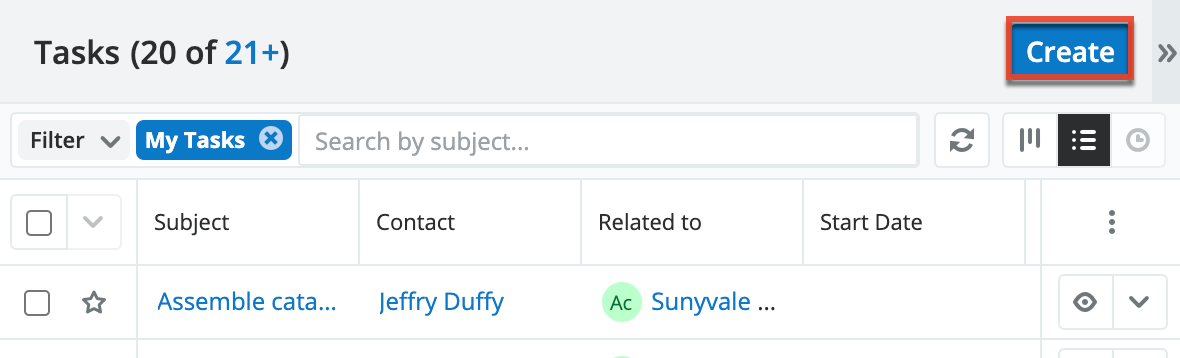
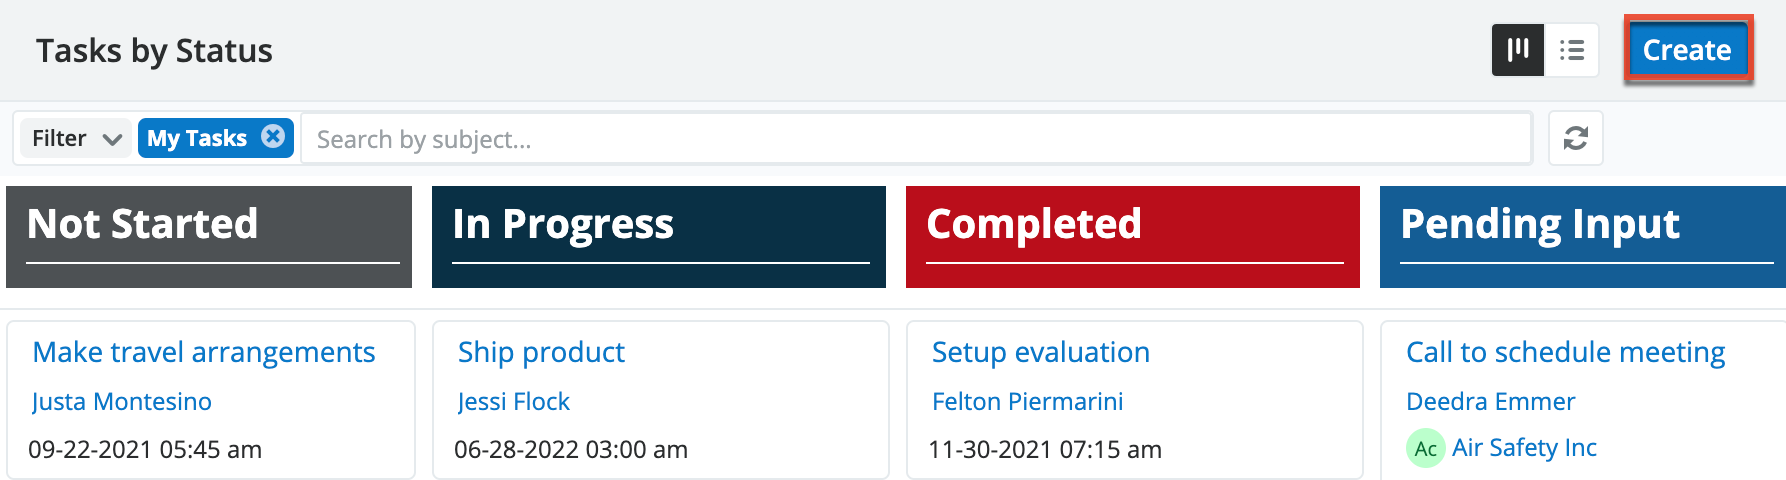
- Click the triangle in the Tasks module tab to open the Actions menu and select "Create Task". You can also click the Create button on the upper right of the Tasks list view or tile view.
- From Tasks module tab:
- From Tasks list view:
- From Tasks tile view:
- From Tasks module tab:
- Enter appropriate values for the fields in the record view layout. All required fields will indicate "Required" in the field and must be completed prior to saving.
- Once the necessary information is entered, click "Save".
Creating via Quick Create
The Quick Create menu allows you to easily create new records from anywhere in Sugar. Simply click the quick-create button on the upper right of any Sugar page to access the menu.
Note: Administrators have the ability to enable or disable a module in the Quick Create menu. Also, some modules are not available to be enabled. For more information, please refer to the Developer Tools documentation.
The following steps cover creating an account via Quick Create as an example:
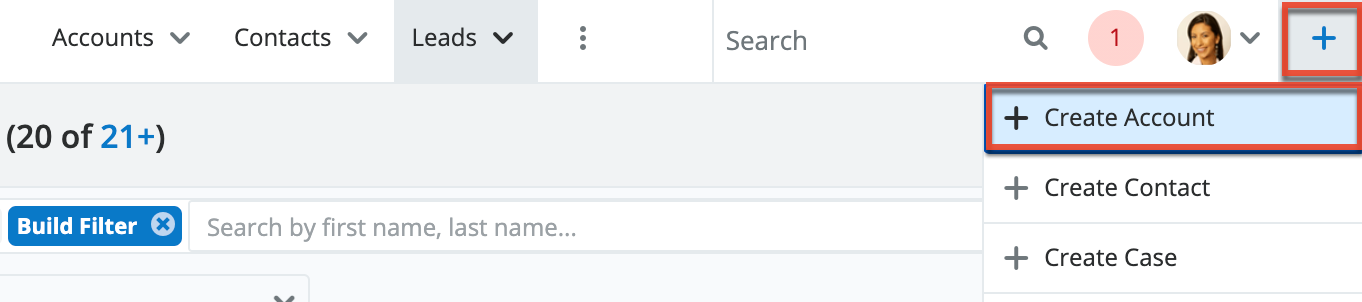
- Open the Quick Create menu on the upper right of any Sugar page and select "Create Account".
- Enter appropriate values in the fields in the record view form. All required fields will indicate "Required" in the field and must be completed prior to saving.
- Once the necessary information is entered, click "Save".
Creating via Subpanels
On record views, beneath a record's fields, subpanels appear that contain related records from various modules. You can create a related record as well as link an existing record directly from the subpanel.
Note: Administrators have the ability to disable a module's subpanels for the entire instance via Admin > Display Modules and Subpanels. For more information, please refer to the Developer Tools documentation.
The following steps cover creating a contact via a Contacts subpanel as an example:
- Click the Add button on any Contacts subpanel on a related module's record view.

- Enter appropriate values in the fields in the record view form. All required fields will indicate "Required" in the field and must be completed prior to saving.
- Once the necessary information is entered, click "Save".
Creating via Duplication
You can also create a new record by duplicating an existing record. The Copy option is useful if the record you are creating has similar information to an existing record. Please note that existing subpanel relationships for the original record will not carry over to the duplicate.
The following steps cover creating an account by duplicating an existing account as an example:
- Navigate to an account's record view.
- Click the Actions menu and select "Copy".
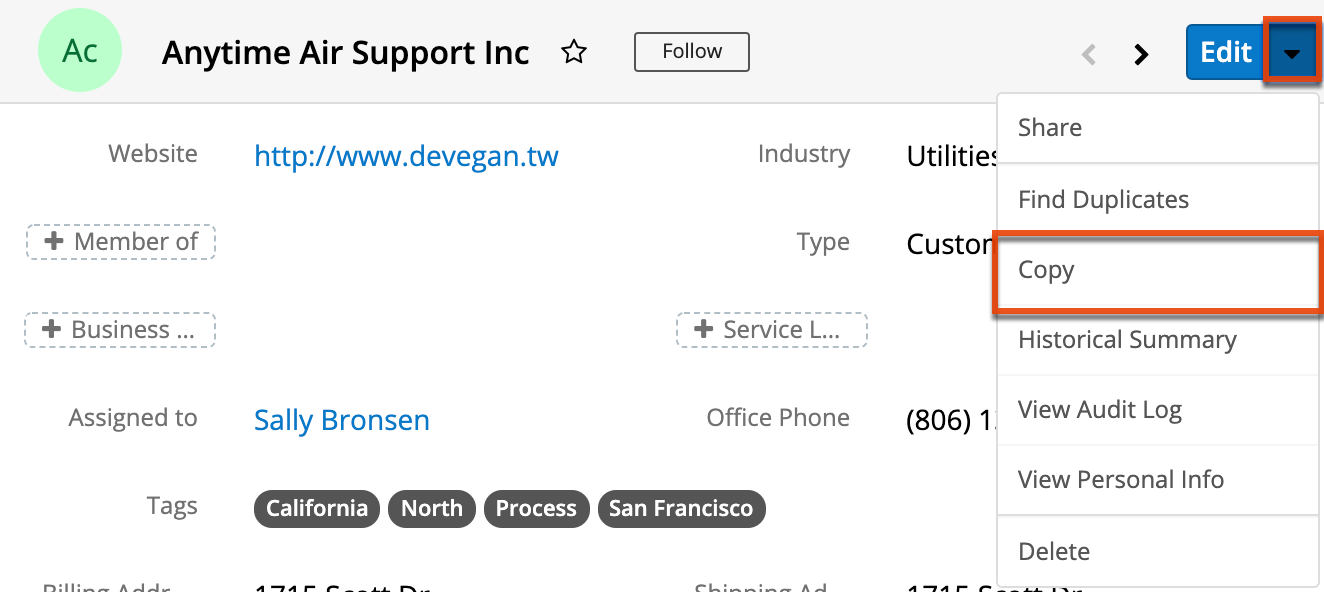
- The displayed record view is pre-populated with the original account's values. Update the necessary fields, then click "Save".
Importing Records
The import function allows you to push multiple records of a single module into Sugar using a .csv file instead of creating them one-by-one. For more information, please refer to the Import documentation.
The following steps cover importing accounts as an example:
- Click the triangle to access the Actions menu in the Accounts module tab and select "Import Accounts".

- In Step 1, select the import file and choose "Create new records only". Click "Next".
- In Step 2, confirm the import file properties. Click "Next".
- In Step 3, confirm the field mappings for the import. Click "Next".
- In Step 5, view the import results.
- The Created Records tab will show all of the new account records.
- The Duplicates tab will show any records in the file that were identified as duplicates of existing records and thus not imported.
- The Errors tab will show records that were not imported due to errors detected during import.
Viewing Records
Sugar records can be viewed from a variety of locations including via the module's list view, record view, Recently Viewed menu, dashlets, and reports. Please note that you will only be able to see records as allowed by your team membership, user access type, and assigned roles. For more information on teams and roles, please refer to the Team Management and Role Management documentation.
Viewing via List View
Each module's list view displays all of the module's records that meet the current search criteria. To access the list view, simply click the desired module tab. While list views only show key fields, you can click the record's name to open the record view and access additional details. For in-depth information about list views, please refer to the List View section of this page.
Viewing via Record View
Each record's record view displays thorough record information including all relevant fields followed by subpanels of related records belonging to various modules. The record view can be reached by clicking a record's name link from anywhere in the application. For in-depth information about record views, please refer to the Record View section of this page.
Viewing via Tile View
Tile view allows users to visualize and engage with records in an intuitive drag-and-drop interface. Users can drag a tile from one column to another to change its state, stage, or expected close date. Tile view is available for the Cases, Tasks, Leads, and Opportunities (with or without Revenue Line Items) modules. For in-depth information about using tile view, please refer to the Tile View section of this page.
Viewing via Recently Viewed
As you work, Sugar will keep track of which records you have recently viewed. Click the triangle on the right of any module's tab to see a list of the 3 records you most recently viewed in that module. You can also click the triangle to the right of the Sugar cube icon to see records recently viewed from across all Sugar modules. Clicking a record name within these lists will open it in record view.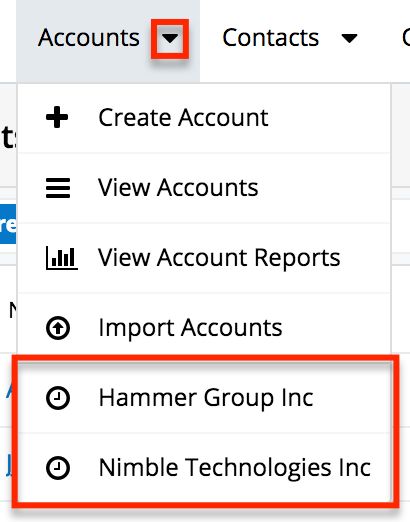
Viewing via Dashlets
Sugar Dashlets allow you to get a quick view of various records, activities, reports, etc. Dashlets may be added to your Home page or to the intelligence pane of any module's list view or record view. List View dashlets display lists of records and their desired fields. Clicking a record's name from any dashlet will open it in record view. For more information on using dashlets, please refer to the Intelligence Pane documentation.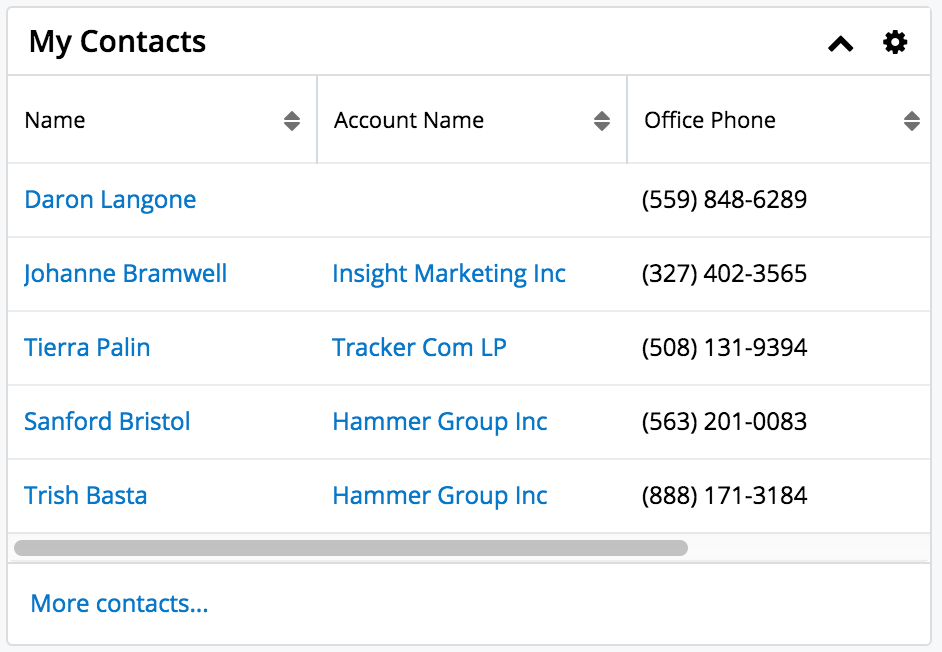
Viewing via Activity Streams
The activity stream allows you to see record changes and user posts relevant to records you are following in Sugar. Activity stream posts will display records when that record was modified or when a user mentions the record in their post. Clicking the record's name link will open its record view. You can also preview the record directly from the activity stream by clicking the Preview button to the right of the post. For more information on viewing records via the activity stream, please refer to the Activity Streams documentation.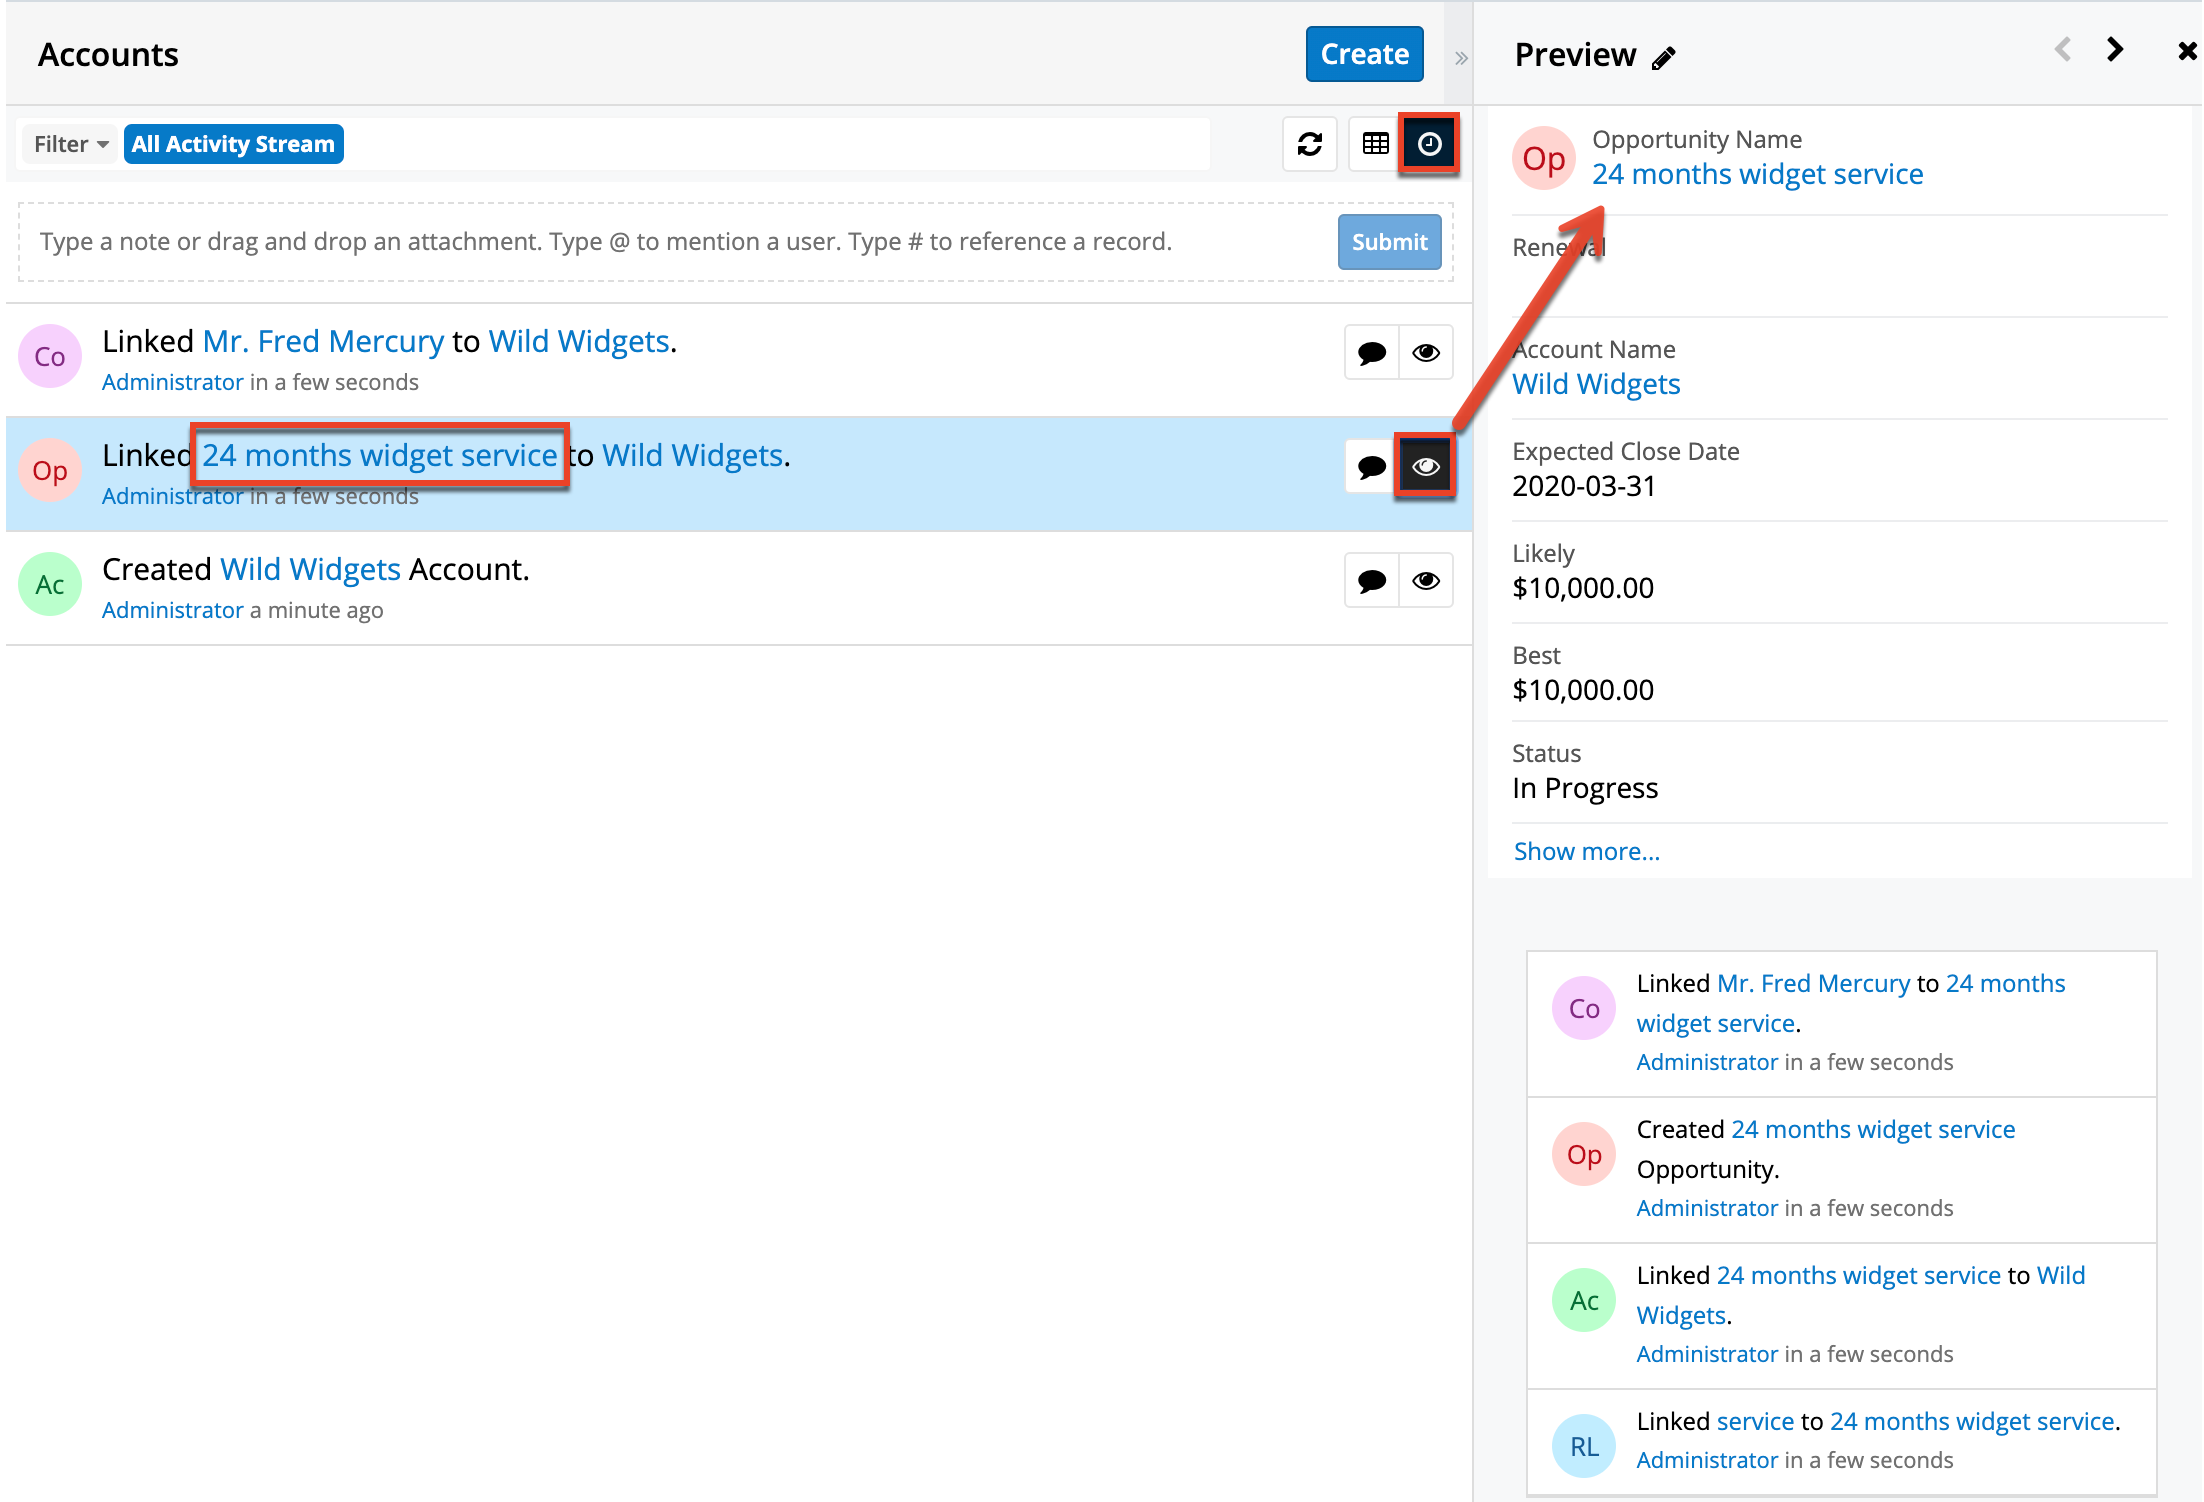
Note: Sugar's activity streams are disabled by default, but administrators can globally enable the functionality based on their organization's needs. For more information, refer to the System documentation in the Administration Guide.
Viewing via Preview
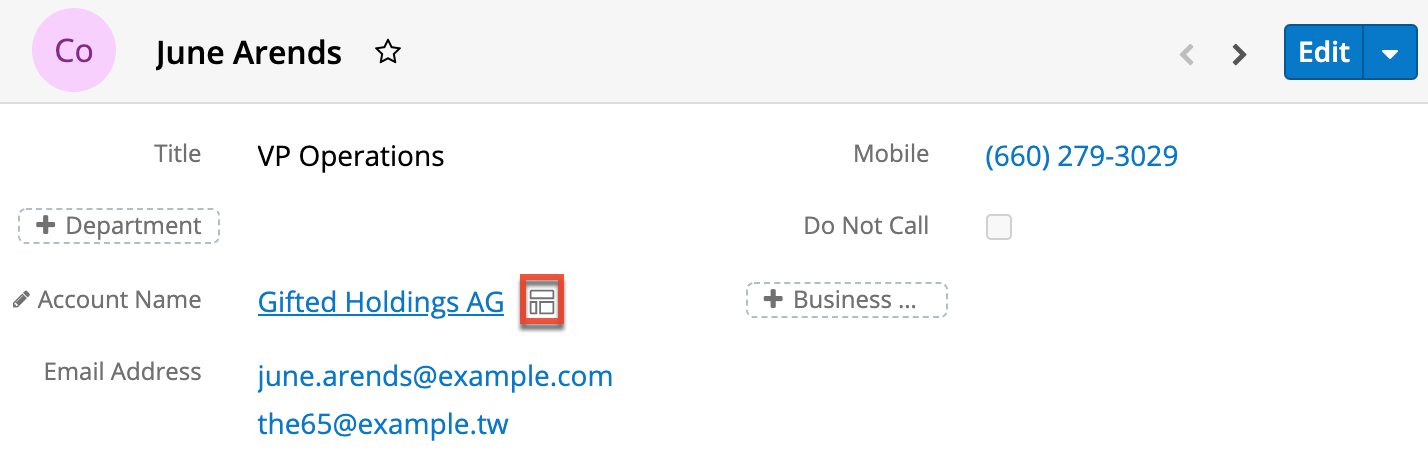
Record previews are accessible anywhere you see the Preview button (eye icon), usually to the right of a record's row. Click on the preview icon to expand or refresh the intelligence pane and view details about the record without leaving the current page. Record previews are available from list views, subpanels, duplicate search, Search and Select drawers, and activity stream posts.
In the preview, Sugar displays the topmost fields from the module's record view and the record's most recent activity stream entries in the intelligence pane. To view all of the fields that are on the record view, click "Show more...". From module list views, left and right arrow buttons at the top of the intelligence pane allow you to preview the next or previous record of the current list. To close a preview, simply click the "X" in the corner of the intelligence pane.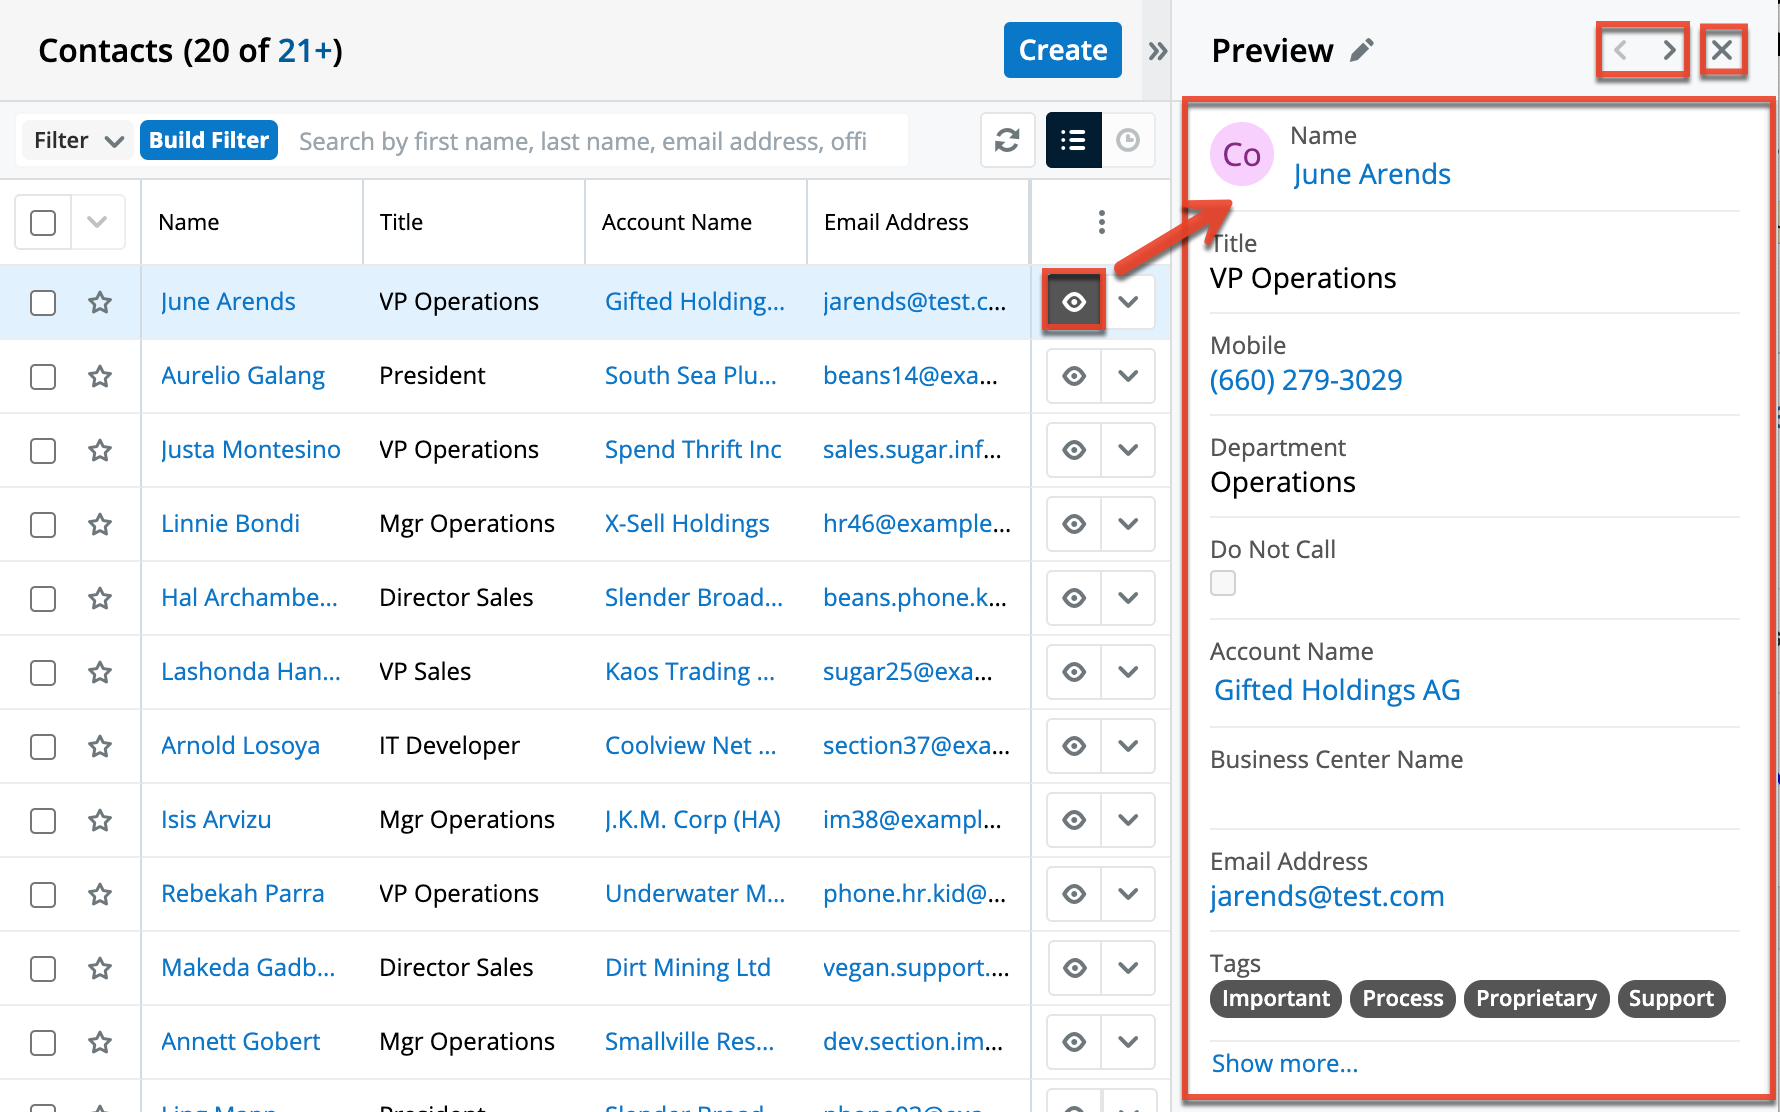
Viewing via Reports
The Reports module allows you to build, run, and manage reports to gather key record information. In addition to only displaying the fields and relationships you desire, reports can utilize complex filters to display specific subsets of your records. Once a report is run, you can click any record's name link in the results to open its record view. Please note that you can only directly access record views with Rows and Columns-type and Summation with Details-type reports as Summation-type and Matrix-type reports do not include hyperlinks in their display columns. For more information on using reports, please refer to the Reports documentation. 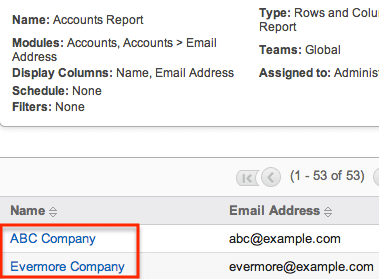
In addition to navigating to the Reports module and finding or building relevant reports, you can use the View {Module} Reports option to see only the reports based on the desired module.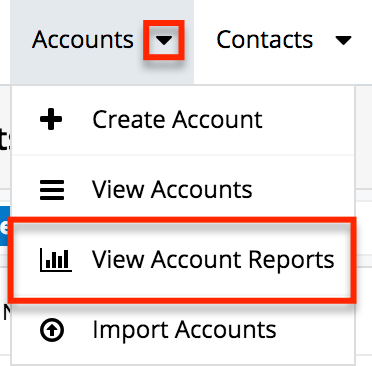
Please note that your ability to access reports may be restricted by a role. For more information on roles, please refer to the Role Management documentation. Check with your system administrator if you cannot access the Reports module.
Searching for Records
Each module's list view includes a list view search to help you easily locate records in a module-specific manner. Matching records will be displayed in the list view below. Global search allows users to search for information across their entire Sugar database rather than restricting searches to a specific module. Sweet Spot search allows users to search for information, modules, and common actions across their entire Sugar database by using a keyboard shortcut. In each of these three searches, Sugar automatically appends the wildcard character (%) to the end of your search phrase. This allows the system to retrieve all records that start with the keyword entered in the search. If you would like to broaden the search, you can use the wildcard at the beginning of your text as well (e.g., %services). This will pull up any record that has the word "services" in the name, regardless of how it starts or ends.
Global Search
For a brief introduction to global search, please refer to the Global Search section of this page. For in-depth information on both search methods as well as how wildcards are used in each method, please refer to the Search documentation.
Sweet Spot Search
The Sweet Spot feature allows you to quickly and conveniently search Sugar from anywhere within the application. Using the Sweet Spot feature, you can find and navigate to:
- The Home page Actions menu
- A module (e.g., Accounts, Bugs)
- Common actions in the modules' Actions menus (e.g., Create Account, View Account Reports)
- A specific record
- The user menu
You will only be able to see actions and records as allowed by your team membership, user access type, and assigned roles. If you are an administrator, you can also find and navigate to many of the sections on Sugar's Admin page.
To open Sweet Spot, use the appropriate shortcut key sequence for your operating system:
| OS | Shortcut |
| Mac OS X | shift+cmd+space |
| Windows | shift+ctrl+space |
| Linux | shift+ctrl+space |
Once the Sweet Spot opens, begin typing your query and the search results will update as you type. For more information on configuring Sweet Spot search, please refer to the Search documentation.
List View Search
List view search enables users to easily search by the record's name within an individual module and pull up matching records in the list view. The search also provides a Filter option allowing you to narrow your search further. See the Search documentation for more details on how list view search works and can be used in conjunction with filters.
To see all records to which you have access in a module, simply select the All "Module" (e.g., All Accounts) option in the filter and remove any text from the search bar: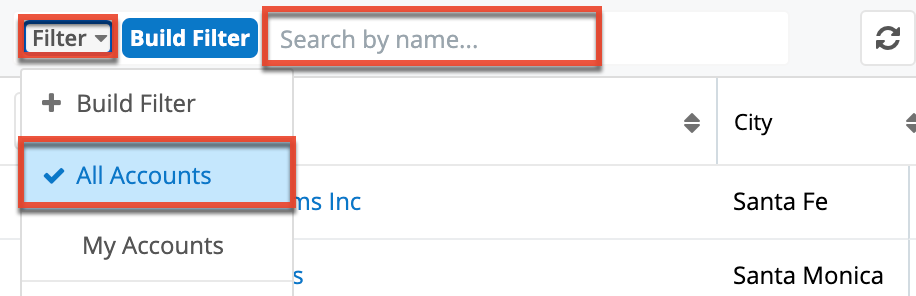
To clear an applied filter, click the "x" on the selected filter option (e.g., My Accounts) in the Search box; to clear a text query from the search, click the "x" on the right end of the search box:
To update the filtered list view with the most recent results, click on the Refresh button to the right of the search box: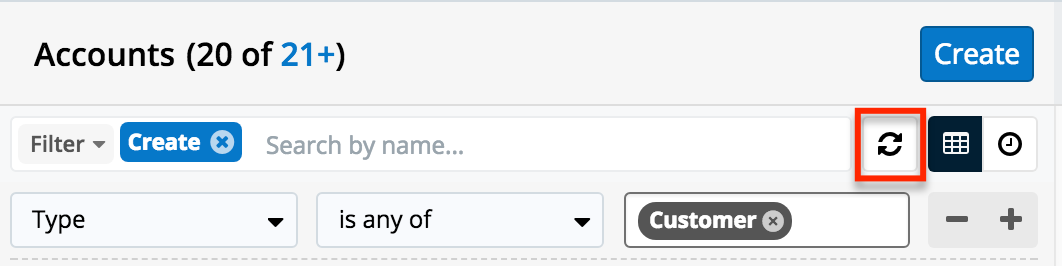
If you have an in-progress filter that you wish to minimize while you review the returned list results, use the collapse button next to the Save button to hide the filter panel temporarily while keeping the filter applied. 
If you have unsaved changes made to the filter, the Build Filter button will indicate this by adding the text "(Unsaved)" within the button. Simply click the blue Build Filter button to expand the filter panel again. Note that if the filter has been saved with a name, the button will instead show the filter's name. 
Please note that you will only be able to see records as allowed by your team membership, user access type, and assigned roles. For more information on teams and roles, please refer to the Team Management and Role Management documentation. Administrators can configure what fields appear on the List View Search via Admin > Studio for certain modules. For more information on editing layouts, please refer to the Studio documentation.
Creating a Filter
Users can also create new filters via the Build Filter option in the Filter list of the search bar. This allows users to add custom, complex filter options when searching in the module's list view. When you run a search using a created filter, the search will be preserved when you navigate away from the module. Returning to the list view will automatically display the results of your last filter. See the Search documentation for details on working with list view filters and an example of how to create one.
The list view will automatically display results matching your filters as you create and modify the criteria. To view the most recent matching records for an existing filter, click on the Refresh button to the right of the search box.
Note: When filtering a relate field using "is any of" or "is not any of", you can select up to 20 values.
List View
A module's list view displays all records meeting the current search criteria and to which users have access. You can view the basic details of each record within the field columns of the list view or click the record's name to open the record view. To access a module's list view, simply click the module tab (e.g., Accounts) in the navigation bar at the top of Sugar.
Note: Hovering over certain links (e.g., a linked account name or call subject) in the record's row of the list view will display a Focus icon. Clicking the icon will reveal a Focus Drawer dashboard displaying a 360-degree view of the linked record through a set of dashlets. For more information on focus drawers, refer to the Focus Drawer section of this documentation.
Please note that you will only be able to see records as allowed by your team membership, user access type, and assigned roles. For more information on teams and roles, please refer to the Team Management and Role Management documentation.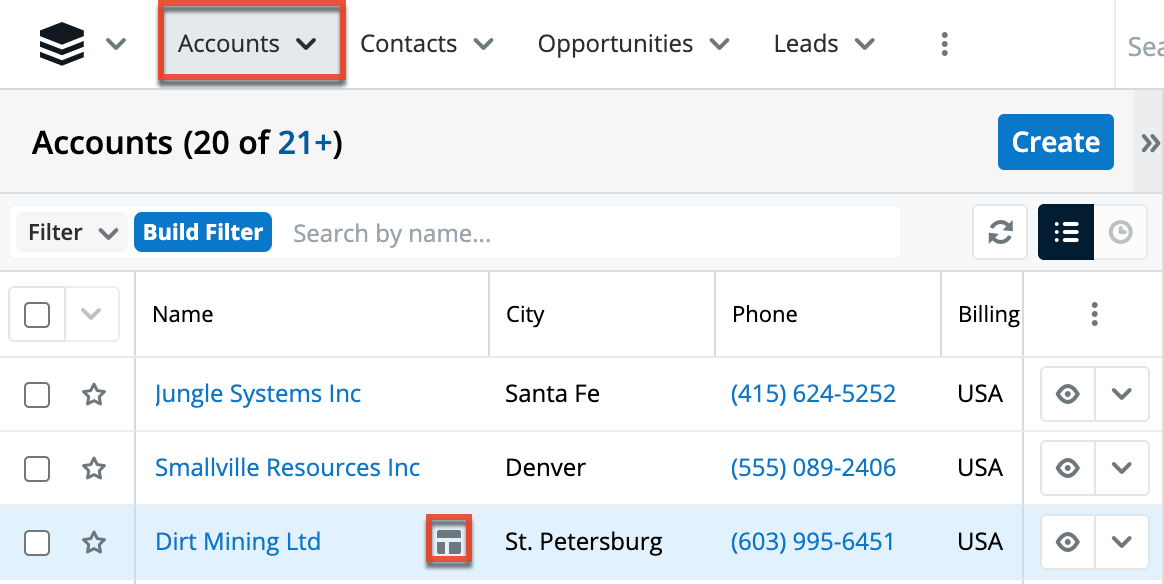
Users with administrator or developer access have the ability to change what fields are visible in the list view via Admin > Studio. For more information on editing layouts, please refer to the Studio documentation.
Total Record Count
The top of list view displays which set of records is shown on the current page and the total count of records (e.g., "1-20 of 945"), if calculated. If not calculated, the count will display the number on the page plus one, such as "21+" and can be clicked to calculate the actual total. In addition, it is also possible to calculate the record count using the pagination controls at the bottom of the list view. 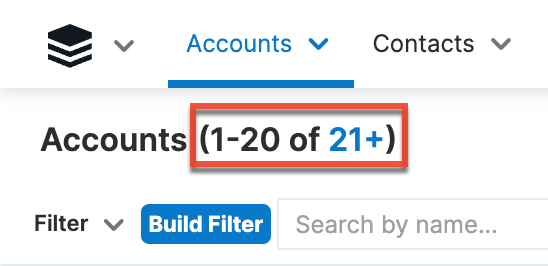
Please note that, by default, Sugar displays 20 records per page, but administrators can change the number of records displayed via Admin > System Settings. For more information, please refer to the System documentation.
Create Button
The Create button on the upper right of the module's list view allows users to easily create new record's in the module. Once you click the button, the module's record view layout opens where you can enter all of the relevant information to create the new record. Please note that administrators can configure the Record View layout via Admin > Studio. For more information on configuring layouts, please refer to the Studio documentation.
List View Search
To search for a specific record within a module or for a list of module records filtered by name, use the search bar located above any module's list view. Start typing a word into list view search and Sugar will retrieve all records that start with the given characters. 
List view searches also support the system wildcard character (%) to retrieve results that contain certain characters in their name or title. For more information about performing module-specific searches via list view, please refer to the Search documentation.
Refreshing Search Results
The list view's Refresh button provides a quick way to reload the results of any filtered or unfiltered list view without reloading the browser or losing any filter or search criteria you may have set. Simply click on the Refresh button to the right of the search box to load the most current list of matching records.
Checkbox Selection
Users can perform various types of actions on module records by first selecting the desired records from the module's list view. To select individual records from the list view, enable the checkbox on the left of each record row. The number of records you currently have selected, including those across multiple pages, is displayed in the message that appears below the list view's column headers.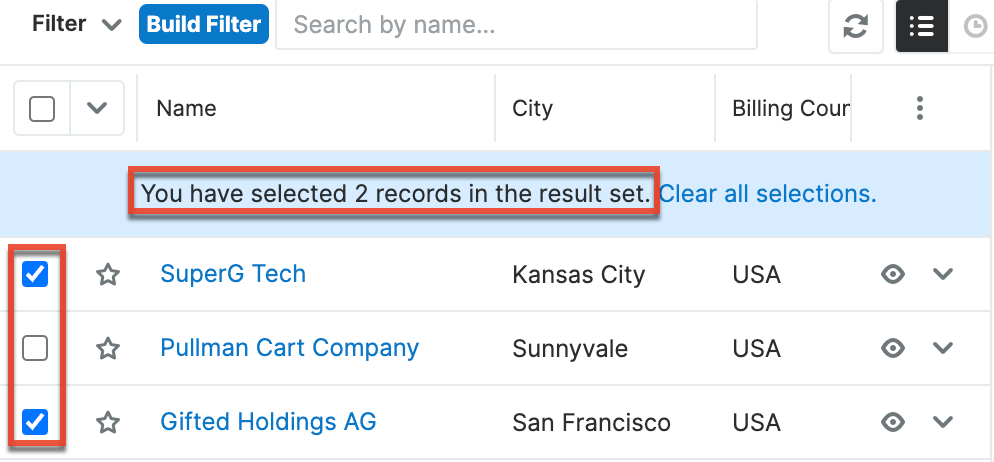
To select all records displayed on the current page, click the checkbox to the left of the Actions menu. The message across the top will indicate that you have selected all records on the page (e.g., 20). To select all records in the full list of search results, click "Select all records". 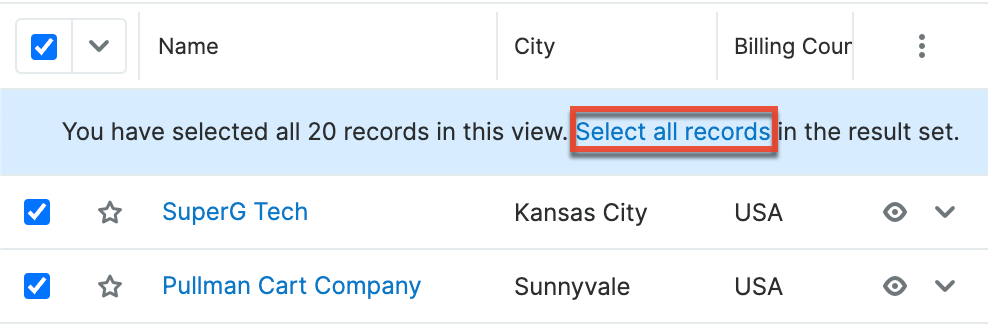
Your selections are preserved as you navigate through the pages of results so that you can select records on several different pages. Note that your selections are preserved even if the selected records are no longer displayed in the results because you updated the filter or search query.
If you only have records on the current page selected, you can clear all selections by clicking the checkbox to the left of the Actions menu. If you have records on multiple pages selected, the message at the top will provide a link to clear all selections instead. 
Mass Actions Menu
The Mass Actions menu to the right of the checkbox option allows you to perform various actions on the currently selected records. Please note that the actions available to perform will vary between each of the modules. To access the Mass Actions menu simply click the down arrow next to the checkbox option.
For more information on the actions available within a specific module, please refer to the list view section in the application guide pertaining to that module. The most common actions available in the Mass Actions menu are as follows:
| Menu Item | Description |
| For modules that include an Email field, send an email to one or more records' email addresses. | |
| Mass Update | Mass update one or more records at a time. |
| Add To Target List | Add the selected records to a target list to be included or excluded from a mass marketing campaign. |
| Merge | Merge two or more duplicate records. |
| Recalculate Values | Visible only if the module contains fields using Sugar Logic and only to System Administrators or users with Developer-level role access, this option will refresh the selected records' calculated values. |
| Delete | Delete one or more records at a time. |
| Export | Export one or more records to a CSV file. |
| Doc Merge | Select or create a DOCX template to merge record data into documents that will be accessible in the Doc Merge widget. |
| Doc Merge to PDF | Select or create a DOCX, XLSX, or PPTX template to merge record data into PDF documents that will be accessible in the Doc Merge widget. |
| Map 1 | For instances with Sugar Maps enabled, display this record or the selected records on a map. |
| Directions starting from Current User 1 | For instances with Sugar Maps enabled, plot driving directions on a map from your address to this record or all selected records. |
1 The Sugar Maps option is only available for modules that are enabled in Admin > Maps.
Favorite Designation
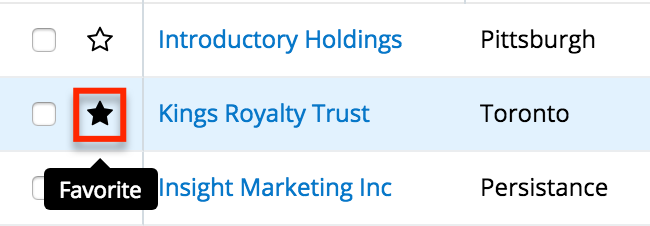
Users have the option to mark records as favorites via a module's list view. This allows users to designate records that are important or will be viewed often so that they can easily be accessed via the search filter's My Favorites option or from the module tab's Favorites option. In the module's list view, the star on the left of each record's row is blue once marked to indicate a favorite record. For more information on how to mark records as favorites, please refer to the Favoriting Records section of this documentation.
The following steps cover marking records as favorites via the Accounts list view as an example:
- Navigate to the Accounts list view by clicking the Accounts module tab.
- Use the List View Search to find the Account records you wish to mark as favorites.
- Mark the star icon on the left of each desired account's row.
- To remove the account as a favorite, click the star again to revert it to white.
Column Reordering
List view provides the ability to reorder columns by dragging and dropping the title of the column to the desired location. The new column order is saved to the database so that the order will remain for a user upon subsequent visits to the module, even if the browser cache is cleared. You can reset the column order back to the default view by clicking the three-dots menu to the far right of the list view column headers and selecting "Reset default view". Please note that this option only appears if the current column order differs from the default order. 
Column Resizing
Users can easily adjust the size of columns in list views per their viewing preference. Simply place your cursor on the column divider, and when the left-and-right arrow appears, click and drag the column to the desired size.
The set column width will be preserved when you navigate away from the page or resize your browser window. Sugar will render the preferred column size across sessions. You can reset the column width back to the default size by clicking the three-dots menu to the far right of the list-view column headers and selecting "Reset default widths". Please note that this option only appears if at least one of the column widths in the current list view is different from the default column width.
Changes to the column width made by administrators in Studio are only respected if the user has not resized the specific column in the list view. The column width set by the user will supersede the default column width configured in Studio until the user resets the list view back to the default widths. For more information on how admins can set column widths, please refer to the Studio documentation.
Note: Sugar enforces a minimum width for currency fields (e.g., Best, Likely, etc.) in list view columns to prevent the columns from being collapsed beyond this limit. 
Column Sorting
Sugar's list view provides users the ability to sort all of the current search results by a field column in either ascending or descending order. To sort by a field or switch the sort direction, click the column header noting that columns that allow sorting have an arrow that appears when hovering over the column header. You can click the column header again to reverse the sort order.
Note: List views may only be sorted by one column at a time and cannot be sorted by custom relate fields or the Tags field.
Column Selection
Sugar gives users the ability to personalize the list view by specifying which fields they want to be displayed in the list view. You can click the three-dots menu to the far right of the list view column headers to see the list of available fields. Click a field name to toggle whether or not it is included as a column in your list view. Please note that administrators have the ability to configure what fields are available to display in the list view via Admin > Studio. For more information on configuring fields to display in the list view, please refer to the Studio documentation.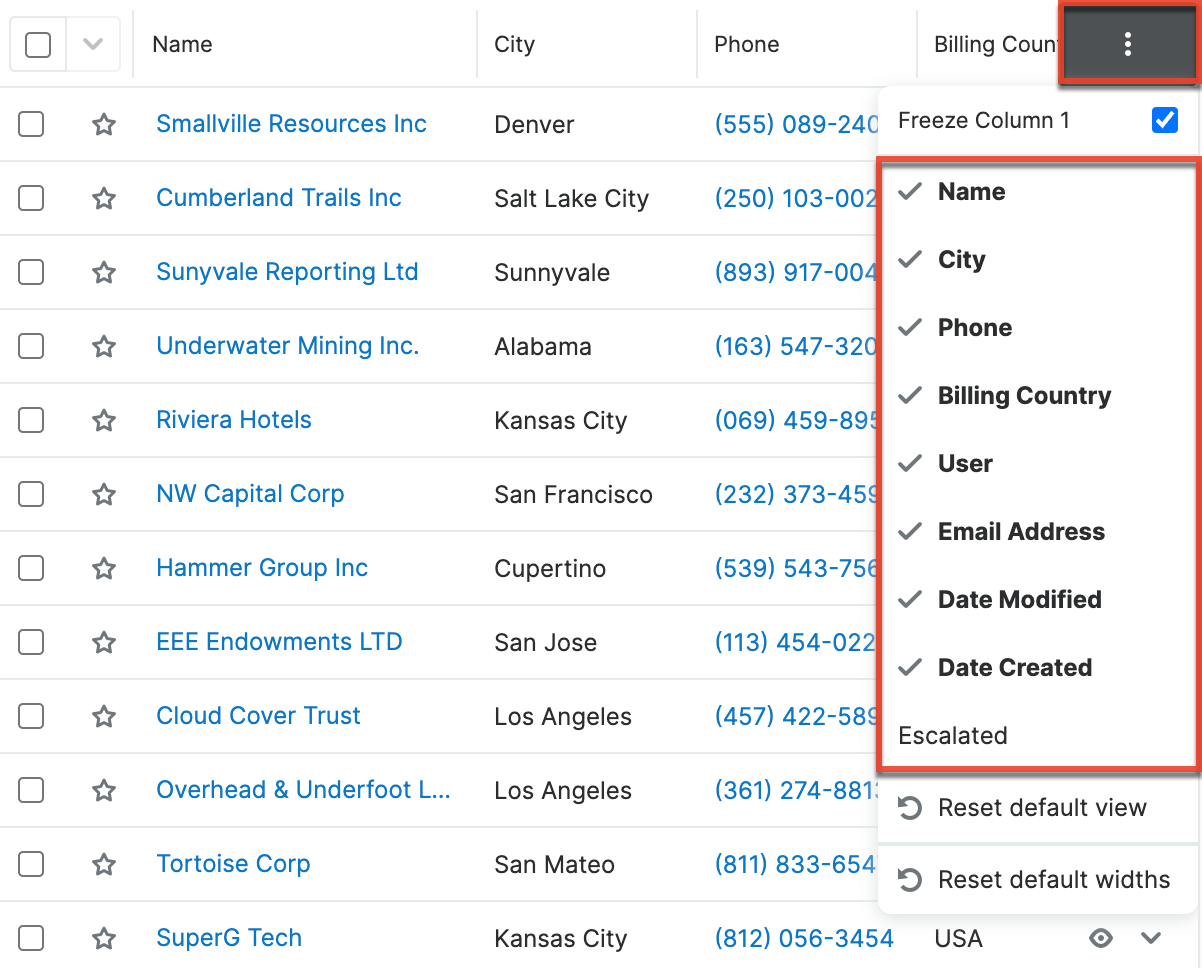
Column Freezing
Users can freeze the first column of list views so that the first column is always visible, even when scrolling horizontally. This is helpful to keep track of which record you are looking at when working in a list with many columns that require scrolling to see all the data in the row. For example, if you put the Name column first in the Accounts module and then scroll horizontally to see more fields, you will still be able to see which account you are looking at. 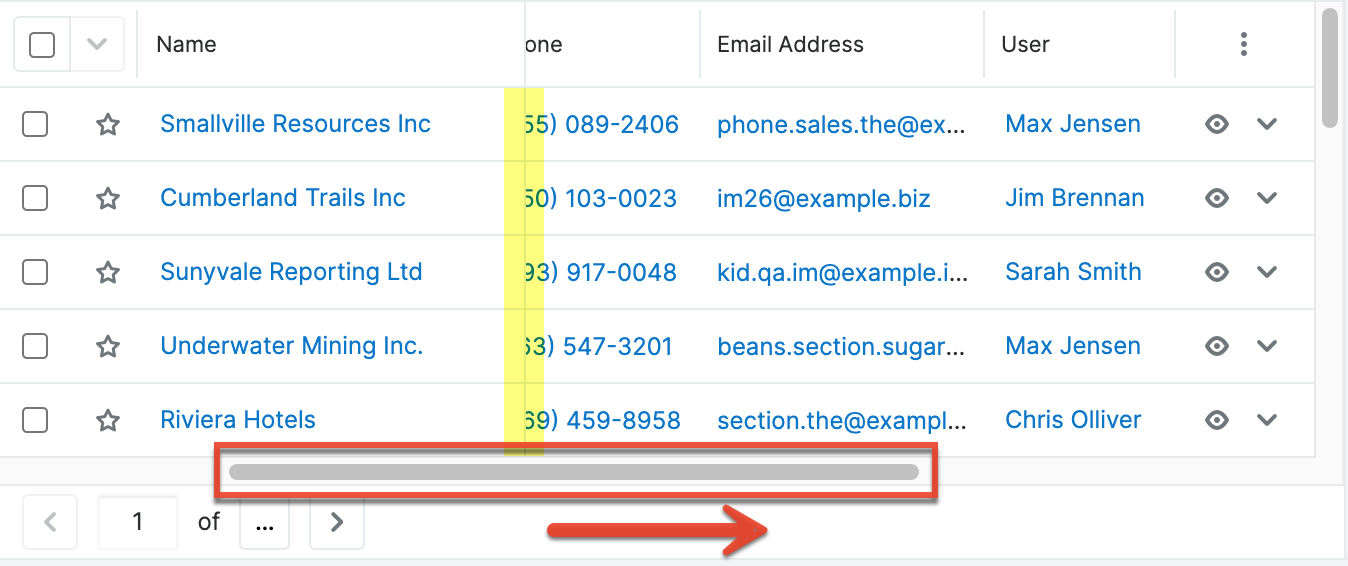
By default, the first column is frozen, but you can disable this for a specific list view by clicking the three-dots menu in the top right and disabling the Freeze Column 1 checkbox. 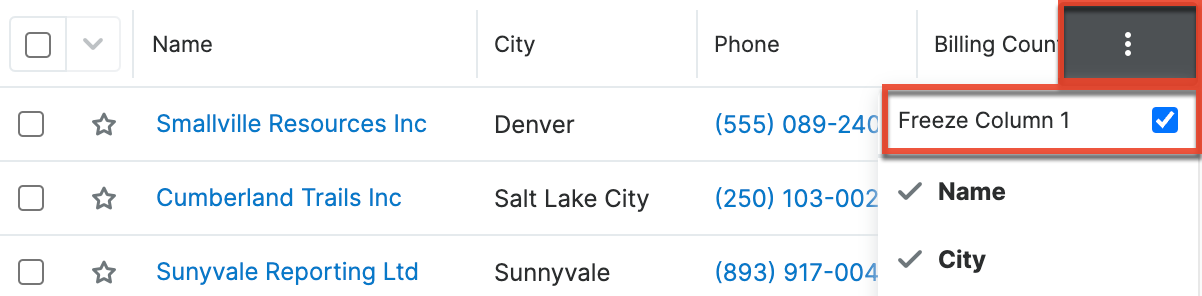
The frozen first column setting will be preserved for each list view when you navigate away from the page or start a new session but it can always be changed in the three-dots menu. Note that an admin can disable column freezing for the whole Sugar instance. See the System page for details on this system-wide admin setting.
Preview
Users can preview a record's details directly from the module's list view by clicking the Preview button to the far right of each record's row. Please refer to the Viewing via Preview section of this page for more information.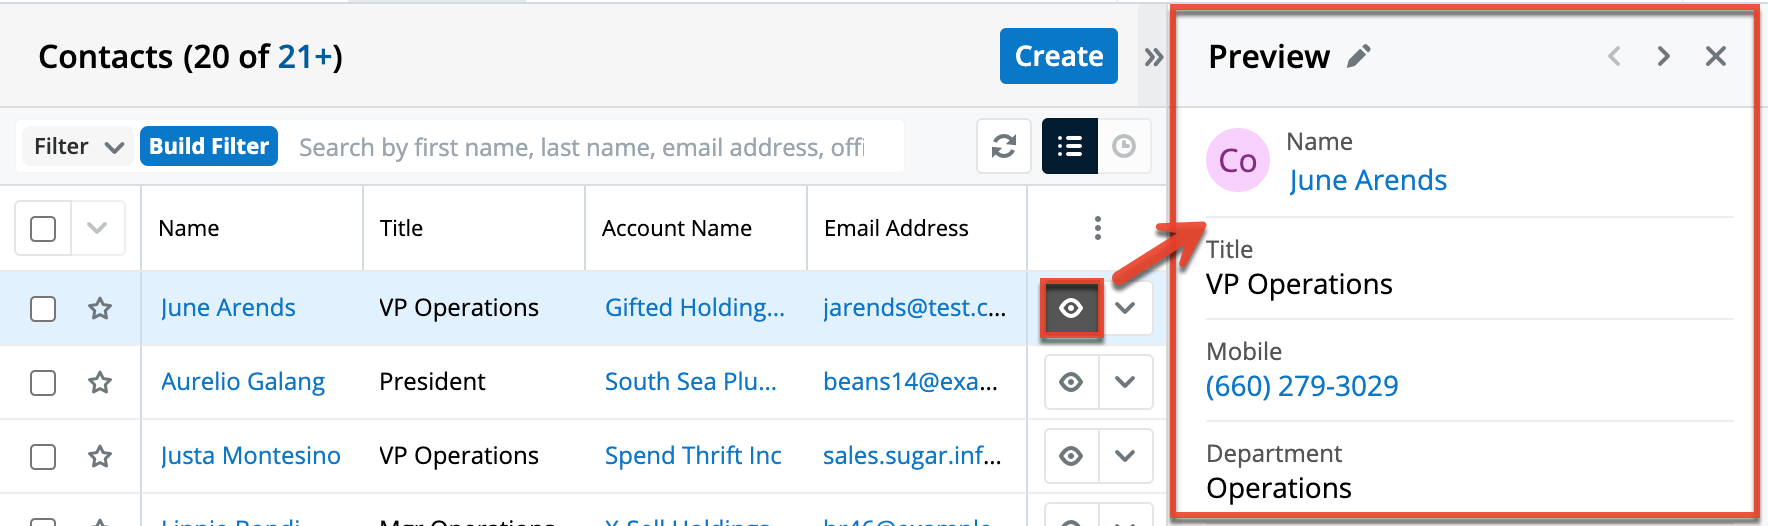
Record Actions Menu
The Record Actions menu to the right of each record's Preview button allows users to edit, follow, delete, etc. specific records directly from the list view. For example, users have the ability to inline-edit the display column fields directly from the list view by clicking the triangle next to the Preview icon then selecting "Edit".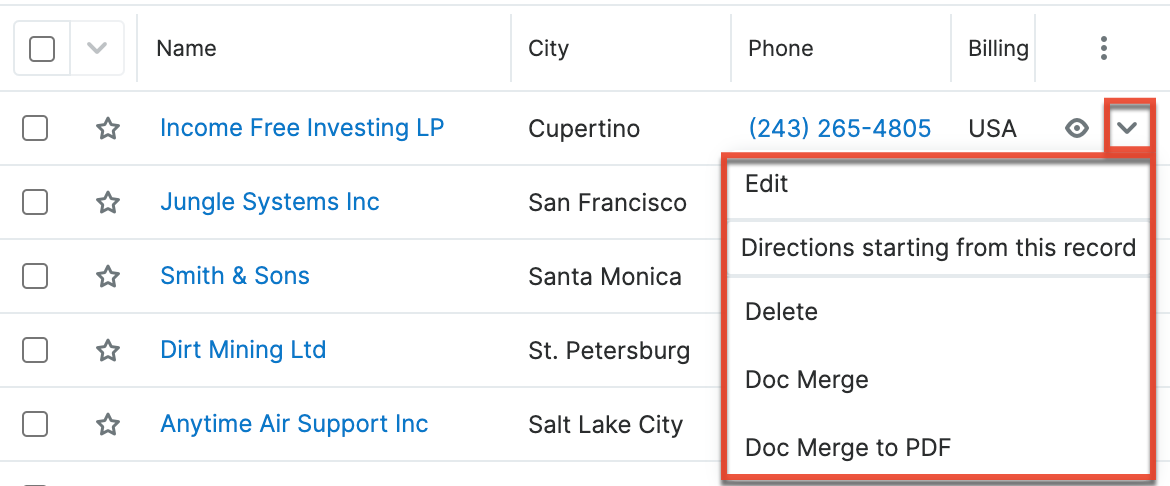
The options in the Record Actions menu allow you to perform the following operations:
| Menu Item | Description |
| Edit | Edit this record. |
| Follow | (Available if Activity Streams are enabled) Follow changes to this record in your activity stream. |
| Directions starting from this record | For instances with Sugar Maps enabled, plot driving directions on a map from this record to another record or records. Note: This option is only available for modules that are enabled in Admin > Maps. |
| Delete | Delete this record. |
| Convert | For the Leads module, convert this lead. |
| Doc Merge | Select or create a DOCX, XLSX, or PPTX template to merge record data into documents that will be accessible in the Doc Merge widget. |
| Doc Merge to PDF | Select or create a DOCX, XLSX, or PPTX template to merge record data into PDF documents that will be accessible in the Doc Merge widget. |
Pagination
The list view loads results meeting the current search criteria and breaks the results up into pages for easy consumption. Use the pagination controls at the bottom of the view to navigate between pages of results or calculate the total record count. Click the arrows to go forward or backward one page or enter a page number to jump to a specific page. Note that if you refresh, sort, search, or filter while viewing a page other than the first, you will return to the first page of results since the result set may have changed.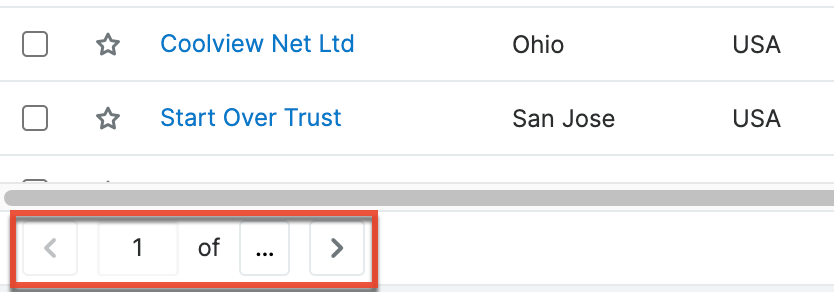
You can click the ellipsis button in the pagination controls to calculate the number of pages and therefore the record count at the top of the view. Once calculated, the ellipsis is replaced with the page count; the record count at the top of the view is also updated at this time. Note that the page and record count calculation is always performed the first time you navigate to a page other than the first page.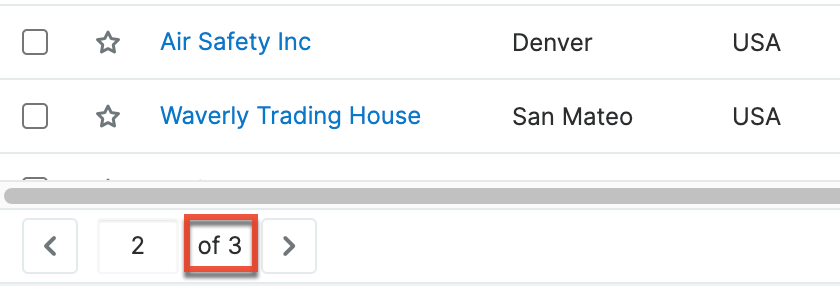
By default, Sugar displays 20 records per page, but administrators can change the number of records displayed via Admin > System Settings. For more information on changing the number of displayed records, please refer to the System documentation.
Activity Stream
The module's activity stream displays user posts made directly via the module as well as record posts relevant to the module record. To view the module's activity stream, simply click the Activity Stream button to the right of the list view's search bar. For more information on how to add posts to the activity stream, please refer to the Activity Streams documentation.
Note: Sugar's activity streams are disabled by default, but administrators can globally enable the functionality based on their organization's needs. For more information, refer to the System documentation in the Administration Guide.
You can add comments to posts using the comment button to the far right of each post. You can also preview the record referenced in record posts by clicking the Preview button to the right of each post. The activity stream can be filtered to only display certain messages (e.g., Messages for Create, Messages for Update, etc.) by clicking "Filter" above the post input box and selecting the desired message type. You can also refresh the activity stream to view its latest entries by clicking the Refresh button to the right of the filter area.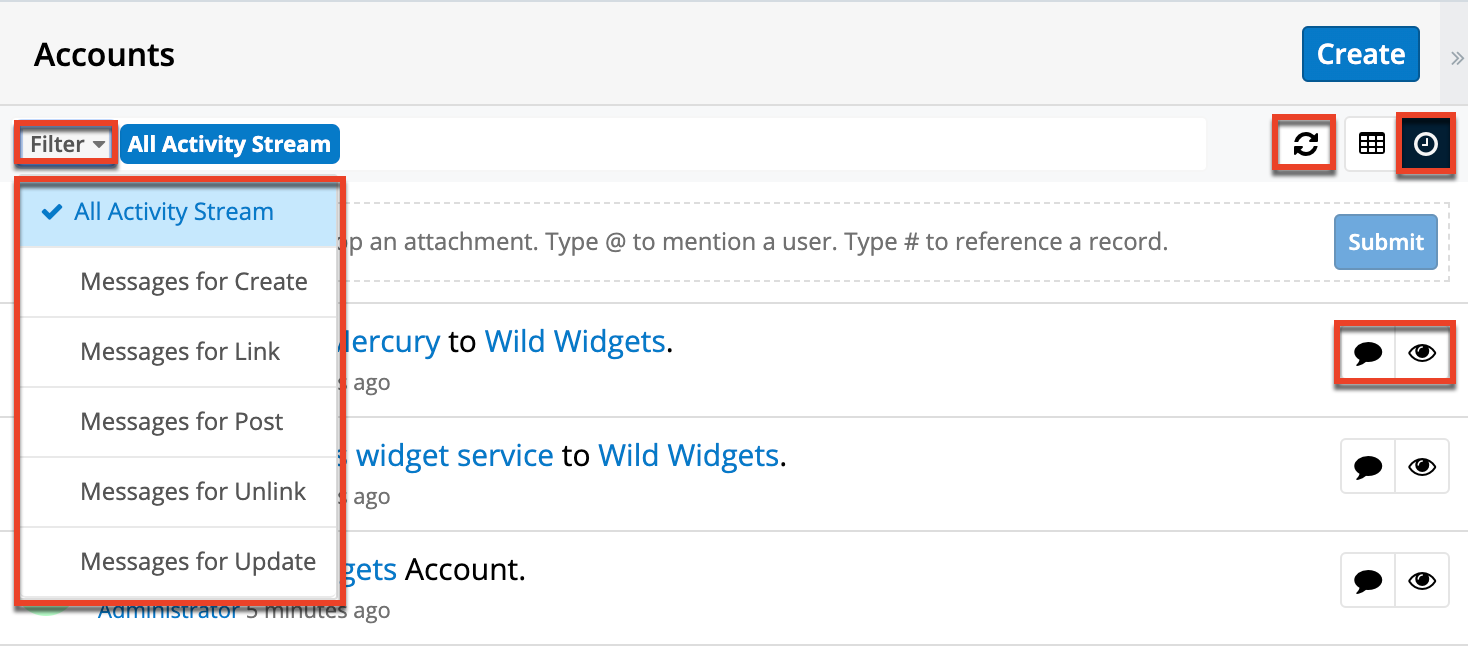
Dashboards
To the right of list views, the intelligence pane displays dashboards when not displaying a record preview. Dashboards are sets of dashlets configured for the specific list view to display useful Sugar data. An out-of-the-box default dashboard will likely be initially displayed on your list view intelligence pane. Sugar admins are able to create and push custom default dashboards to your views. You may also create personal dashboards using the dashlets and configurations that best suit your business needs. All dashboards can also be shared with teams of users who can then pull the dashboards to their views as desired. Ensure the intelligence pane is expanded using the arrow button at the top right of the list view. For more information, refer to the Dashboards and Dashlets documentation. 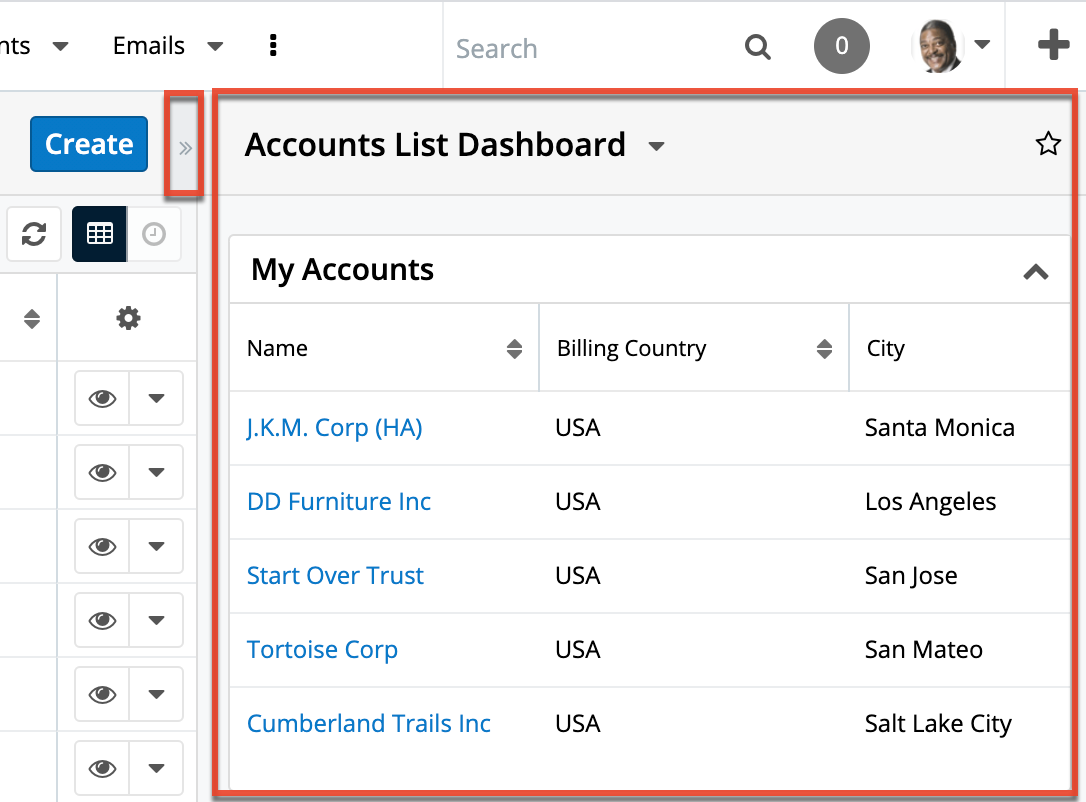
Record View
The module's record view displays thorough information regarding the record such as name, email address, phone number, etc. Beneath the fields, you can toggle between viewing a record's subpanels of related records (e.g., Opportunities, Leads) and the record's activity stream. The record view can be reached by clicking a record's link from anywhere in the application including from the module's list view.
Please note that you will only be able to view a record according to your team membership, user type, and role restrictions. In addition, if you can view a record but do not have the required license type to view a particular field on that record, the field value is replaced with a pill containing the text "License Required":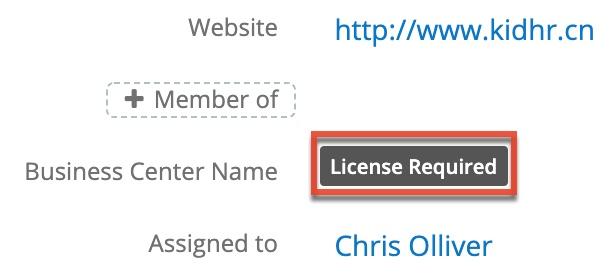
For more information on teams, roles, or license types, please refer to the Team Management, Role Management, and User Management documentation.
Some modules' record view may be customized based on either the logged-in user's role or by an available dropdown field's value. A role-based record view layout appears as static to the user and only changes depending upon the role of the logged-in user. A dropdown field-based layout is dynamic and will change depending on if the selected value in a dropdown has a customized layout. Each time a selected value prompts a change to the layout, an alert appears with the option to click "Cancel". Doing so will change the dropdown value back to what was selected previously and will revert the layout change. The alert will disappear without action required from the user, the user may continue working in the new layout, and any fields that were edited but now hidden by the new layout will retain their changes.
Users with administrator or developer access have the ability to change the record view by configuring the layout via Admin > Studio. For more information on editing layouts, please refer to the Studio documentation.
Note: Hovering over certain links to Sugar records (e.g., a linked account name) in the record view will display a Focus icon. Clicking the icon will reveal a Focus Drawer dashboard displaying a 360-degree view of the linked record through a set of dashlets. For more information on focus drawers, refer to the Focus Drawer section of this documentation.
Favorite Designation
Users have the option to mark records as favorites via the module's record view. This allows users to designate records that are important or will be viewed often so that they can easily be accessed via the search filter or from the module tab. In the module's record view, the star to the right of the record's name is dark gray once favorited. 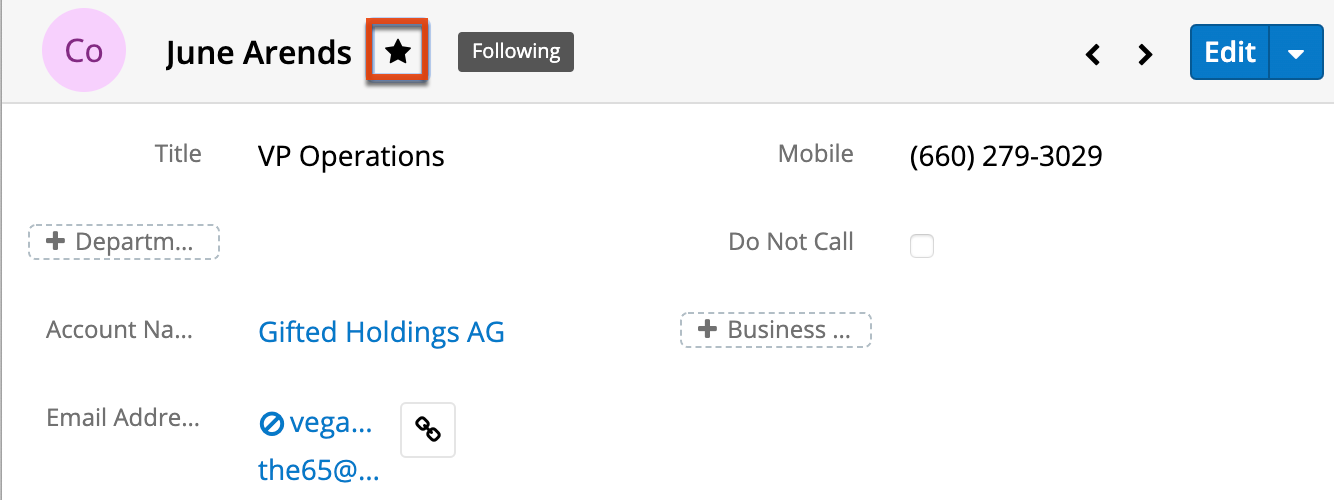
Following Designation
Users can also choose to follow changes to specific records that they have access to in Sugar by clicking the Follow button to the right of the record's name. The ability to follow records allows each user to personalize their activity stream by specifying which records' posts should appear on the activity streams displayed on their Home page and in module list views. Please note that you will automatically follow the records that you create as well as records that are assigned to you. You will not, however, automatically follow records you import. Should a user lose access to a record in Sugar, they will automatically stop following that record. For instructions for toggling the Following button on a record view, please refer to the Following via Record View section of this documentation.
Next or Previous Record
On the upper right of the record view, there are two buttons that allow you to page through each record in the module's list view's current search results. Clicking the Left arrow button displays the previous record of the current search results while clicking the Right arrow button displays the next record of the current search results.
Actions Menu
The Actions menu on the top right of each module's record view allows you to perform various actions (e.g., edit, copy, delete) on the current record. 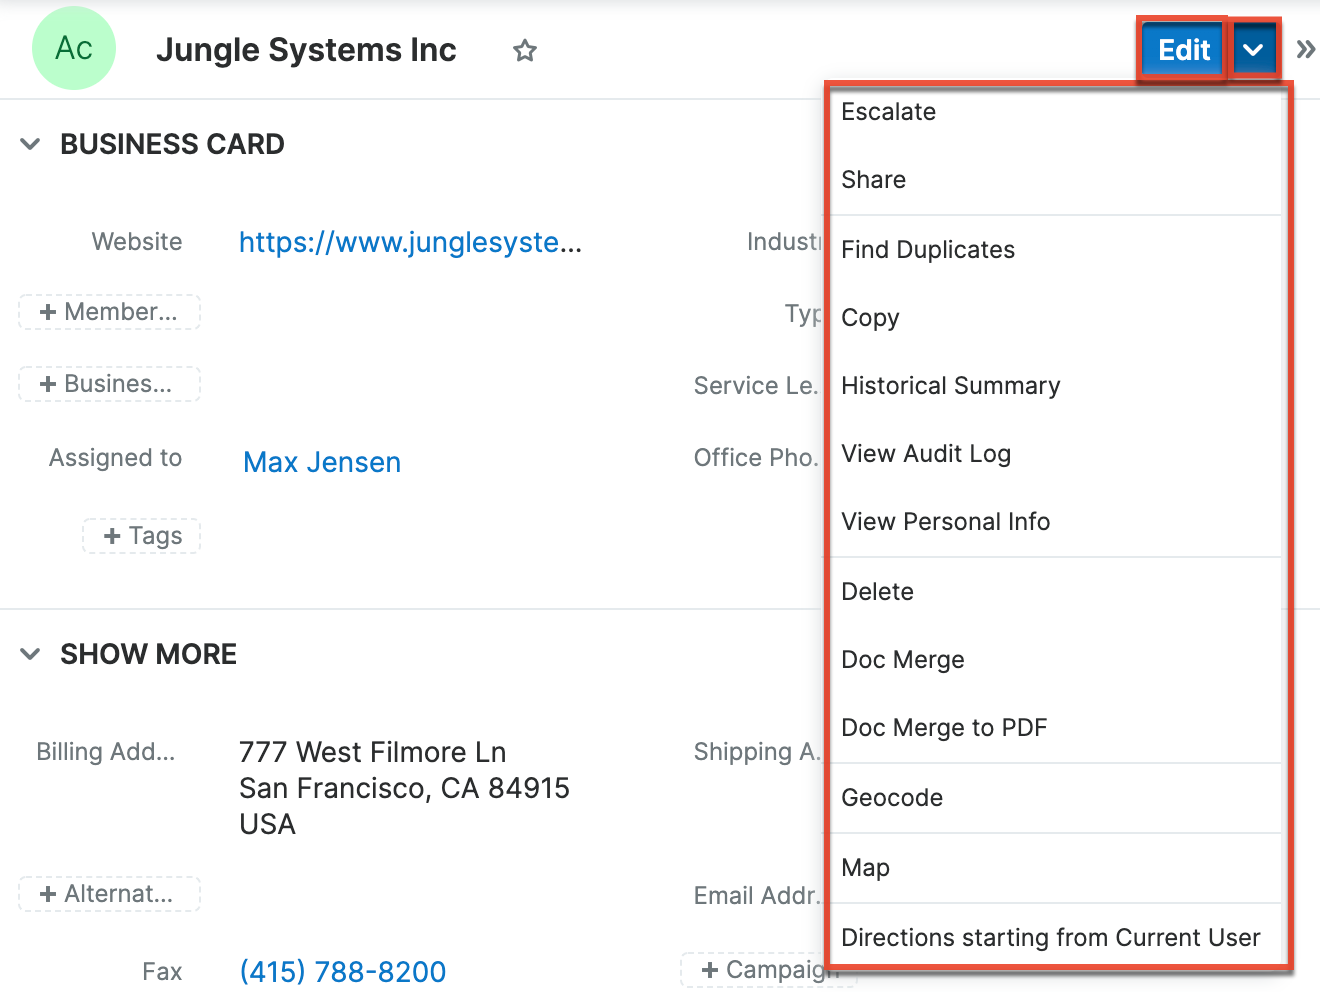
Please note that certain options (e.g., Convert Lead) in the Actions menu can vary between the various modules and some custom options may have been added by your administrator via an Action Button. The following sections will cover the most common action items across the modules. For more information on a specific action not listed below, please refer to the record view actions menu section for the specific module's documentation in the Application Guide.
| Menu Item | Description |
| Edit | Edit this record. |
| Share | Share a link to this record via email. |
| Download PDF | Download record information as a PDF file. |
| Email PDF | Email record information as a PDF attachment. |
| Find Duplicates | Locate potential duplicates of this record. |
| Copy | Duplicate this record. |
| Historical Summary | View a historical summary of activities (e.g., calls, meetings related to this record). |
| View Audit Log | View a sequence of changes made to this record. |
| View Personal Info | Display this record's fields which an admin has designated as personal information. |
| Delete | Delete this record. |
| Doc Merge | Select or create a DOCX, XLSX, or PPTX template to merge record data into documents that will be accessible in the Doc Merge widget. |
| Doc Merge to PDF | Select or create a DOCX, XLSX, or PPTX template to merge record data into PDF documents that will be accessible in the Doc Merge widget. |
| Geocode 1 | For instances with Sugar Maps enabled, manually set this record's location on a map. |
| Map 1 | For instances with Sugar Maps enabled, display this record or the selected records on a map. |
| Directions starting from Current User 1 | For instances with Sugar Maps enabled, plot driving directions on a map from your address to this record or all selected records. |
1 The Sugar Maps option is only available for modules that are enabled in Admin > Maps.
Show More
The record view typically displays a few key fields (e.g., website, mobile phone, office phone) on the business card panel with the option to view more fields by clicking the "Show more..." link on the bottom left. Please note that administrators can configure the fields that appear on the business card panel via Admin > Studio > Layouts > Record View. For more information on editing layouts, please refer to the Studio documentation. 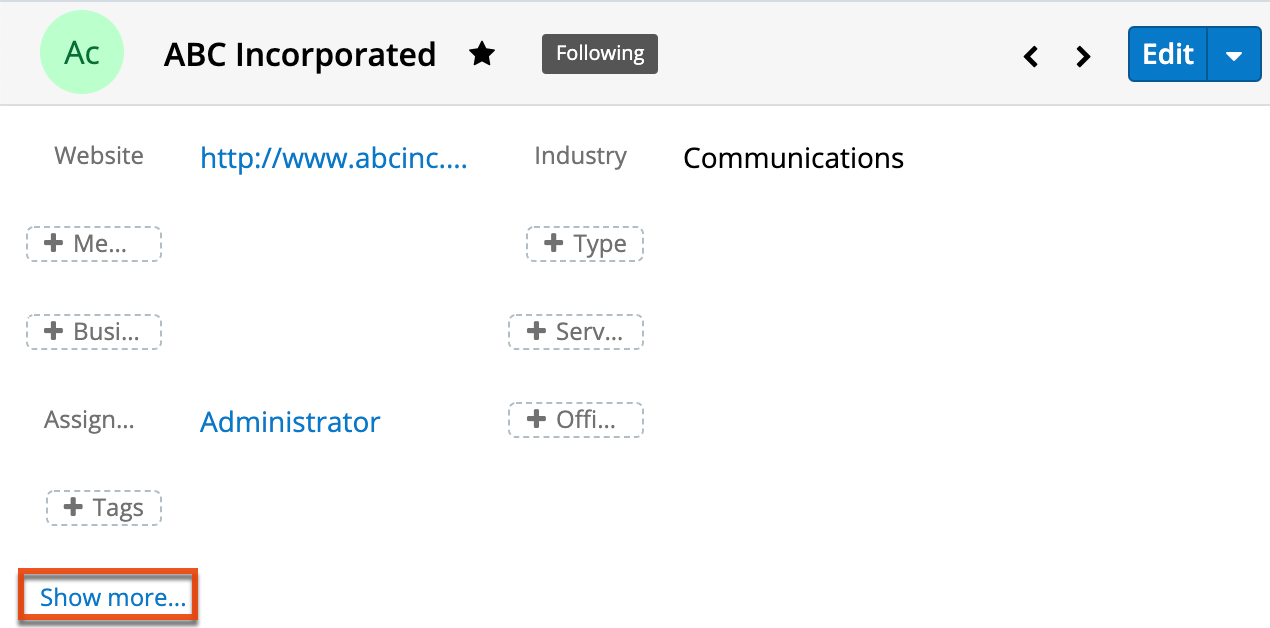
Subpanels
Beneath the module record's fields are subpanels containing related records from various modules (e.g., Contacts, Leads, Opportunities). You can create a related record or link an existing record directly from the subpanel. Once the records appear within the subpanel, users can preview the record's detail and edit the record's data directly from the record view. Please note that the subpanels are viewable when you access the Data View section of the module's record view.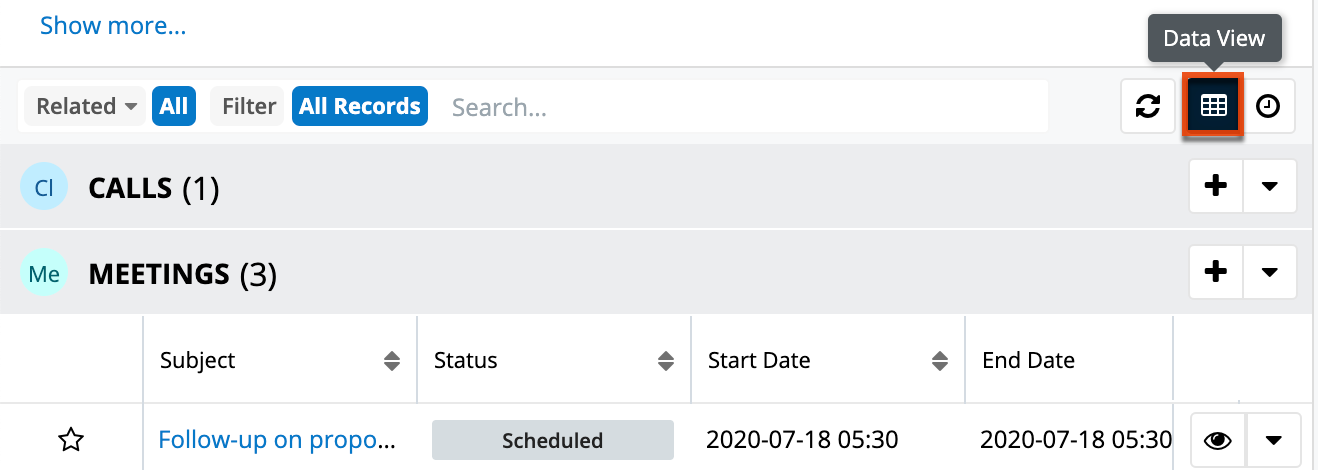
Note: Administrators may choose to disable a module's subpanels for the entire instance via Admin > Display Modules and Subpanels. For more information, please refer to the Developer Tools documentation.
Related Record Subpanels
Subpanels under a module's record view contain its related records. Each relationship between two modules has a type, and that type determines if the relationship produces a field or a subpanel for each side. When a record of the primary module can be related to only one record of a second module (i.e., 1-1 or M-1 relationships), the relationship is displayed as a field on the primary module. When the record can be related to multiple records of a second module (i.e., 1-M or M-M relationships), the relationship is displayed as a subpanel instead since subpanels can hold many records.
For example, an account may be related to multiple contacts, so the related contacts are displayed in a subpanel on the account record. Administrators or users with developer-level role access may choose to change a subpanel's title and included fields by configuring the layout via Admin > Studio to provide visibility to the most important fields. For more information on modifying subpanels, please refer to the Studio documentation.
Related-record subpanels provide the following information and capabilities: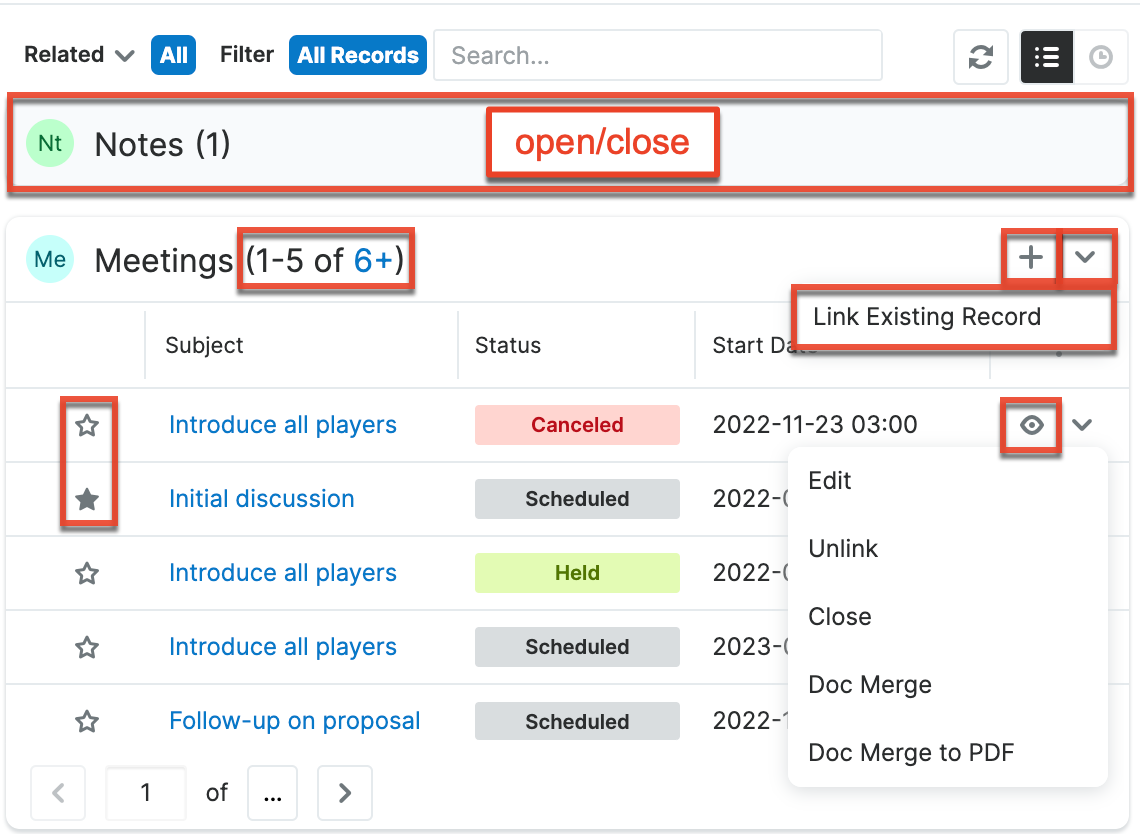
- Record Count: Subpanel headers display which set of records is shown on the current page and the total count of records (e.g., "1-5 of 11"), if calculated. If not calculated, the count will display the number on the page plus one, such as "6+" and can be clicked to calculate the actual total. In addition, it is also possible to calculate the record count using the pagination controls at the bottom of the subpanel.
- Collapse or Expand: Click anywhere in the subpanel's header to collapse or expand it. Subpanels will remain collapsed or expanded on future visits to the module.
- Note: Administrators can choose to disable the sticky feature and collapse all subpanels by default via Admin > System Settings. For more information, please refer to the System documentation.
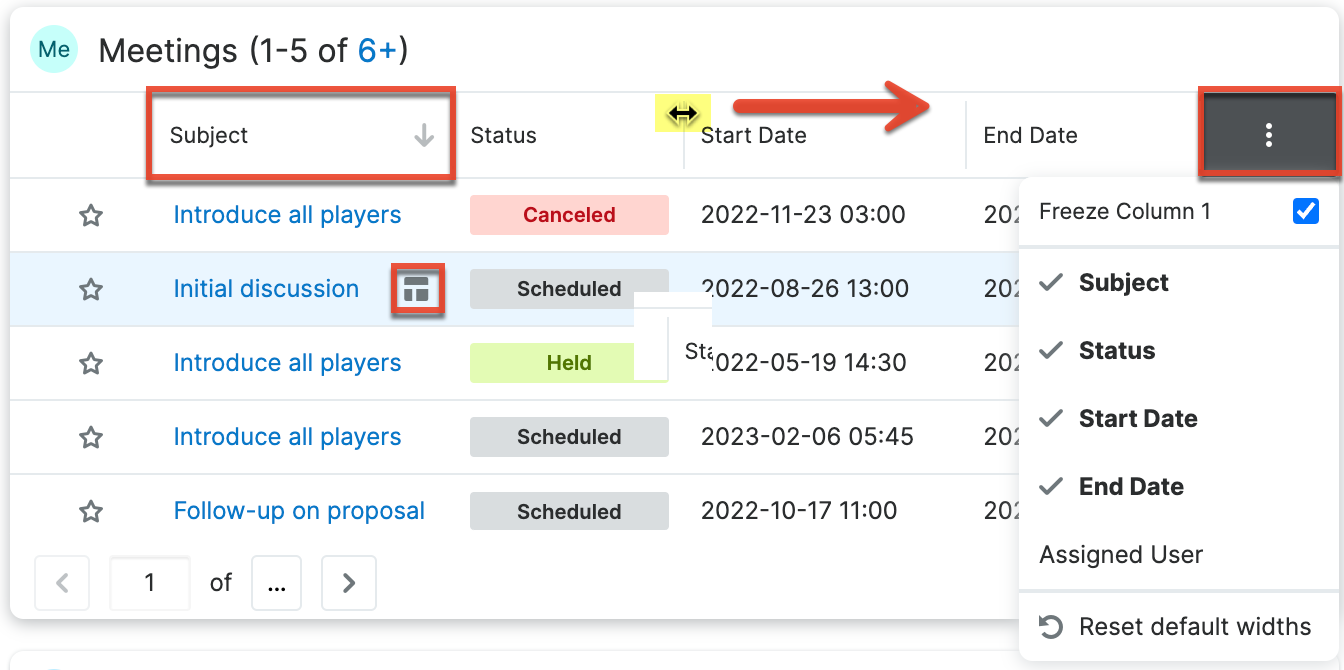
- Column Widths: Place your cursor on the column divider and, when the double arrow cursor appears, click and drag the column to the desired size. The column width will be preserved when you navigate away from the page. You can restore the default column widths by selecting "Reset default widths" from the three-dots menu.
- Note: Sugar enforces a minimum width for currency fields in list view columns to prevent the columns from being collapsed beyond this limit.
- Column Sort: Click a column header to sort the subpanel's items by that value. Clicking the same header again will reverse the sorting order (e.g., from ascending to descending).
- Column Display: You can also click the three-dots menu to change the list of fields that display as column headers.
- Note: The list of available fields/columns is determined by the default vs hidden fields set in Admin > Studio.
- Frozen First Column: If you wish to turn off the frozen first column, which keeps the first column visible when scrolling horizontally within the subpanel, click the three-dots menu and disable the Freeze Column 1 checkbox.
- Create a New Linked Record: Click the Add button on the upper right of a subpanel to relate a new record to the record you are currently viewing. Please note that the Link Existing Record option is not available when the relationship is required in the related module (e.g., in an account's Opportunities subpanel).
- Note: Because creating a new related record opens a drawer on top of the current record view, you should use the Cancel button to return to record view. Using the browser's back button will return you to the previous page.
- Link Existing Record: Click the triangle to the right of the Add button then select "Link Existing Record" to relate existing records to the record you are currently viewing.
- Note: Because linking an existing record opens a drawer on top of the current record view, you should use the Cancel button to return to record view. Using the browser's back button will return you to the previous page.
- Favorites Designation: Click the star on the left of a record's row to toggle it as a favorite. A dark-gray star indicates that the record is a favorite while a white star indicates it is not. For more information, please refer to the Favoriting Records section of this page.
- Hyperlink Fields: Blue field values, such as record names, may be clicked to open the record in record view. Record view provides a complete picture of the record and is described in detail in the Record View section of this page. Email addresses also appear in blue and can be clicked to compose an email to that recipient.
- Focus Icon: Hovering over certain links (e.g., meeting subject or a linked account name) in the record's row will display a Focus icon. Clicking the icon will reveal a Focus Drawer dashboard displaying a 360-degree view of the linked record through a set of dashlets. For more information on focus drawers, refer to the Focus Drawer section of this documentation.
- Record Actions Menu: Click the triangle on the right of a record's row to access the Record Actions Menu which includes the following options:
- Preview: To preview a record by displaying its fields and activity stream in the right-hand side drawer, click the Preview button (eye icon) to the far right of the record's row. For more information, please refer to the Viewing via Preview section of this page.
- Edit: To inline edit the record directly within the subpanel, choose "Edit" from the Actions menu on the right of the record's row and click "Save" to preserve the changes.
- Unlink: To delete the relationship between the two records, choose "Unlink" from the Actions menu on the far right of the record's row. This removes the relationship but does not delete the record itself. Please note that the Unlink option is not available when the relationship is required in the related module (e.g., in an account's Opportunities subpanel).
- Additional Options: Some modules may have additional options available that are covered in the individual module's documentation.
- Pagination Controls: By default, Sugar displays up to five records per page in each subpanel though administrators can alter the number via Admin > System Settings as described in the System documentation. If additional related records exist, use the pagination controls at the bottom of the subpanel to navigate between pages or calculate the total number of records.
Filtering Subpanels
While in Data View, all of the related records will be displayed beneath the record's fields. Users have the ability to search for records that appear in the subpanels as well as filter the view to only display a specific module (e.g., Leads, Contacts). To locate a record by name, enter the keyword into the Search bar, and the subpanel(s) with the matching record(s) will appear below.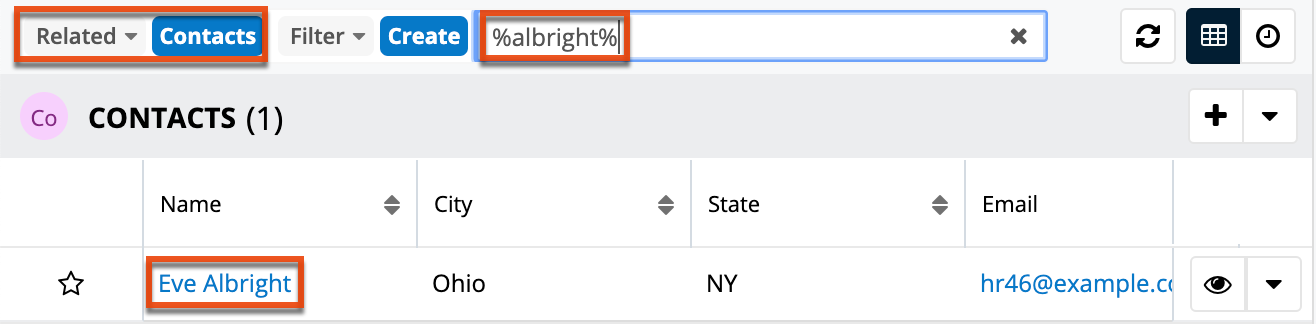
To filter, simply click the Related option to the far left of the Search bar and select the module whose subpanel you wish to view. Filter and search may be combined to only display matching records within a selected module. To see all subpanels to which you have access, simply select "All" in the Related options and remove any text from the search bar. When you run a search using a saved or created filter, the search will be preserved when you navigate away from the page. Returning to the page will automatically display the results of your last filter. Please note that search strings entered in the open Search box are not preserved when navigating away.
When a Sidecar module (e.g., Contacts, Leads, Tasks) is selected from the Related options, you have the option to filter the related subpanels further using one of the available options (e.g., My Favorites, Recently Created). Please note that you can also create custom filters for related Sidecar modules. Once the related module (e.g., Contacts) is selected, either click the Filter option and select "Create" or click "Create" to the right of the Filter option. For more information on creating a related records filter, please refer to the Creating a Related Records Filter section of the Search documentation.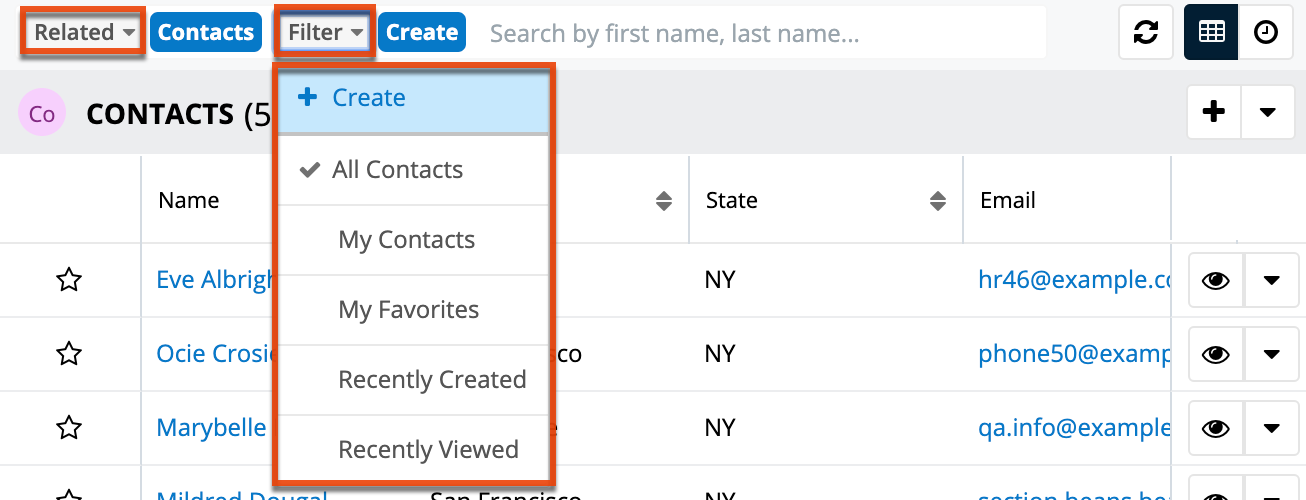
Reordering Subpanels
Users can easily move subpanels to a new location on the record view by dragging and dropping the subpanel's header. The new subpanel order is saved to the database so that the order will remain for a user upon subsequent visits to the module, even if the browser cache is cleared.
Refreshing Subpanels
To refresh the results of a filtered or unfiltered subpanel view, simply click on the Refresh button to the right of the search box. This will reset the current view of expanded subpanels with the most current results that match your search and filter criteria. Please note that subpanel results in a collapsed state are not affected by the Refresh button.
Activity Stream
The record view's activity stream displays user posts and record posts specific to the individual module record. To view the record's activity stream, simply click the Activity Stream button below the record's fields. Users can view all posts in the record view's activity stream even if they do not follow the record in Sugar. Please note that you must follow the record if you wish to view the record view posts via the Home page or List View activity stream. For more information on how to add posts to the activity stream, please refer to the Activity Streams documentation. You can add comments to posts by clicking the Comment button to the far right of each post, entering your comment, then clicking "Reply". You can also preview the record referenced in the record post by clicking the Preview button. The activity stream can also be filtered to only display certain messages (e.g., Messages for Create, Messages for Update) by clicking "Filter" above the post input box then selecting the desired message type.
Note: Sugar's activity streams are disabled by default, but administrators can globally enable the functionality based on their organization's needs. For more information, refer to the System documentation in the Administration Guide.
Action Buttons
In addition to the buttons shown on records in this section, your admin may have added customized buttons to provide shortcuts to common actions that are unique to your organization. Action Buttons may appear on the record, the record's header, or both. For information on configuring and adding Action Buttons to record views, please refer to the Action Buttons documentation.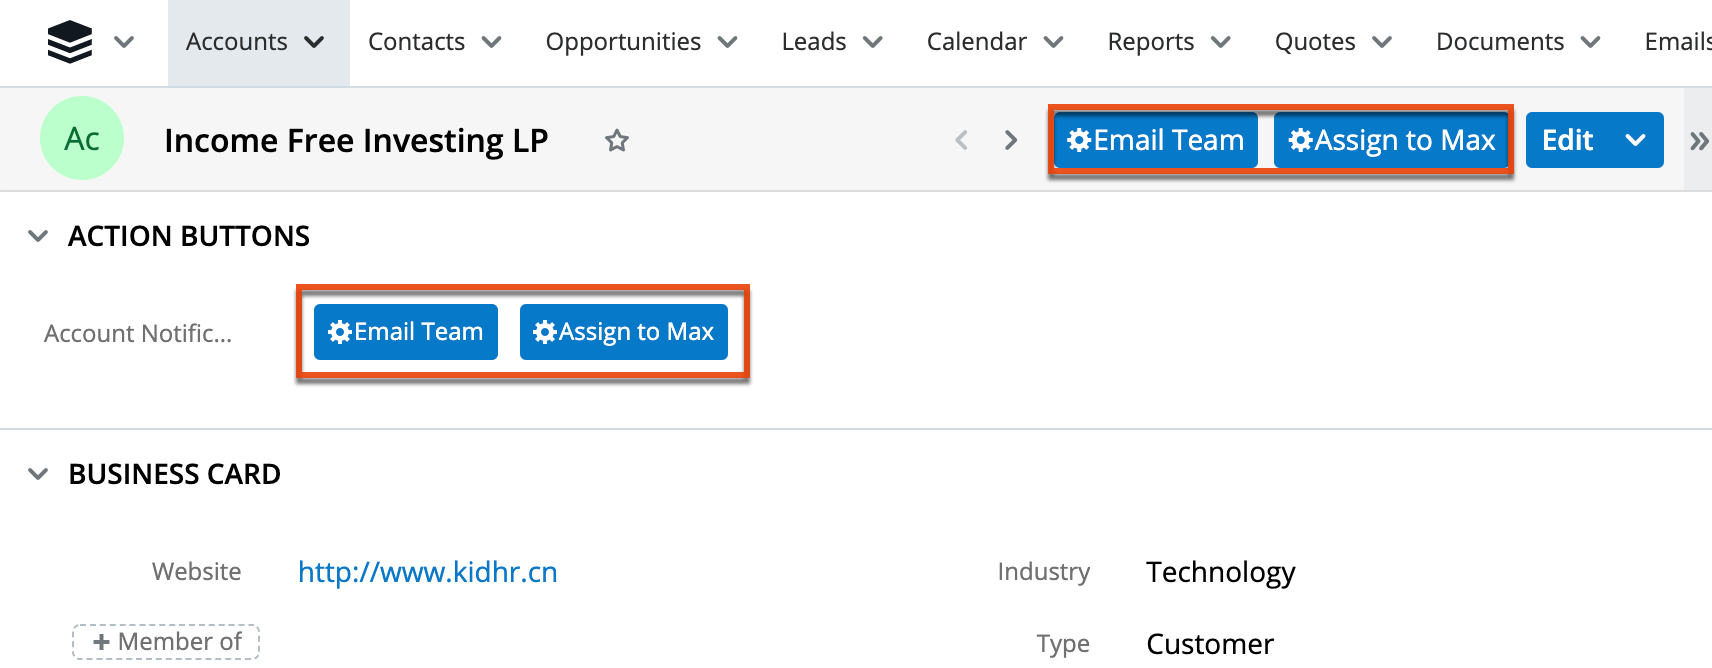
Dashboards
To the right of record views, the intelligence pane displays dashboards when not displaying a related record preview. Dashboards are sets of dashlets configured for the specific record view to display useful Sugar data. An out-of-the-box default dashboard will likely be initially displayed on your record view intelligence pane. Sugar admins are able to create and push custom default dashboards to your views. You may also create personal dashboards using the dashlets and configurations that best suit your business needs. All dashboards can also be shared with teams of users who can then pull the dashboards to their views as desired. Ensure the intelligence pane is expanded using the arrow button at the top right of the record view. For more information, refer to the Dashboards and Dashlets documentation. 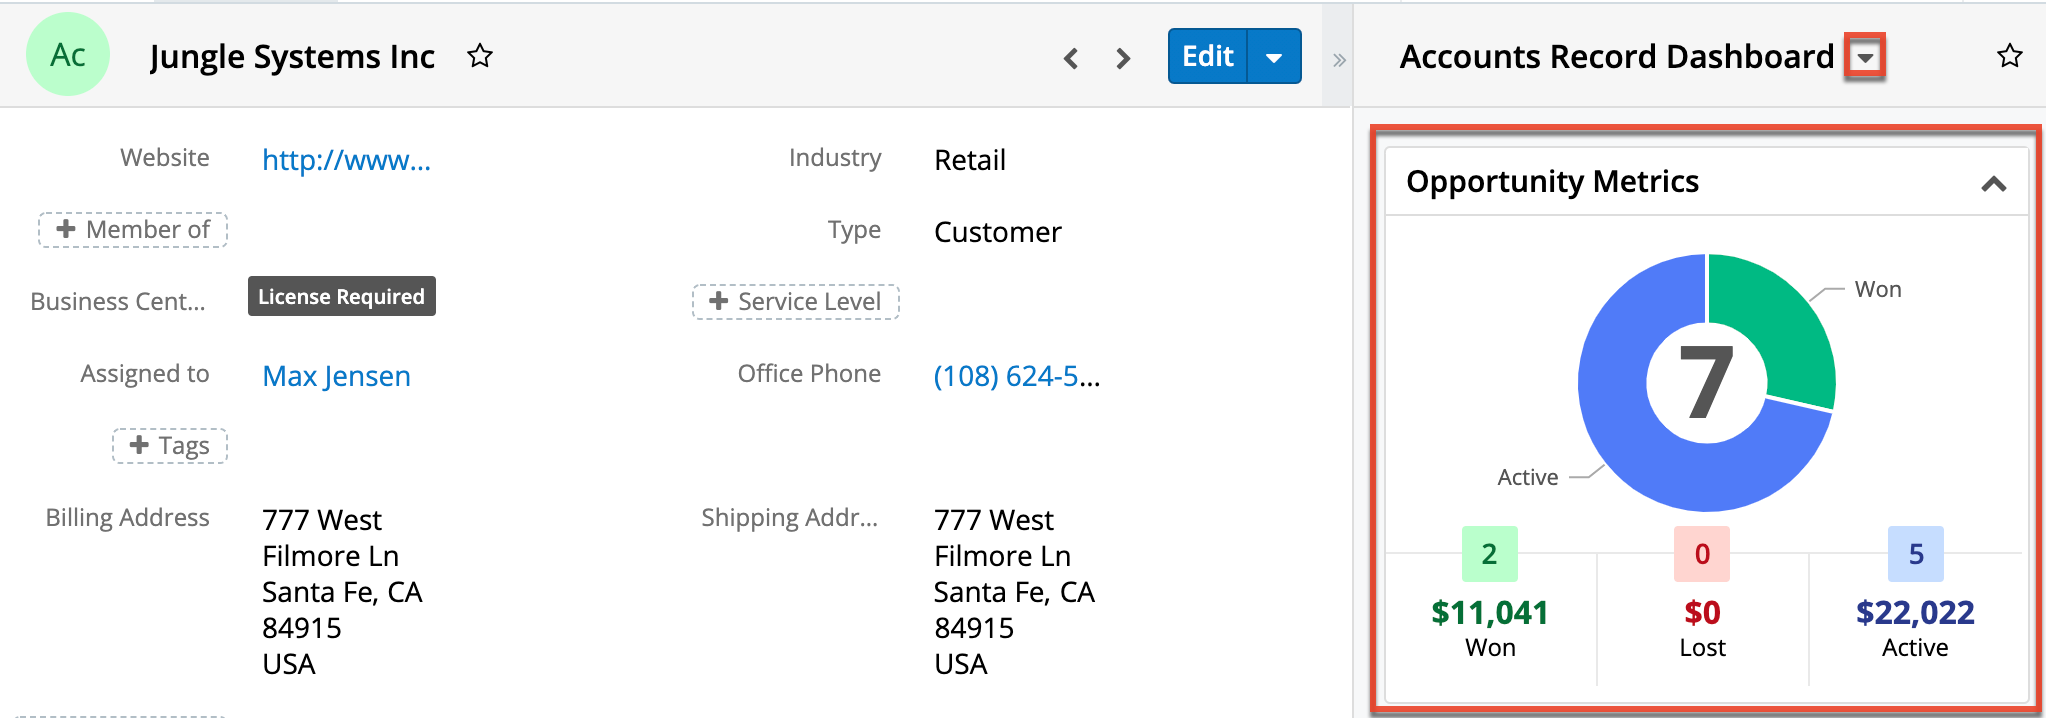
Tile View
For cases, tasks, leads, and opportunities, a unique tile view is available that displays records in an intuitive drag-and-drop interface. To access tile view, navigate to the Cases, Tasks, Leads, or Opportunities list view and click on the Tile View icon next to the search bar.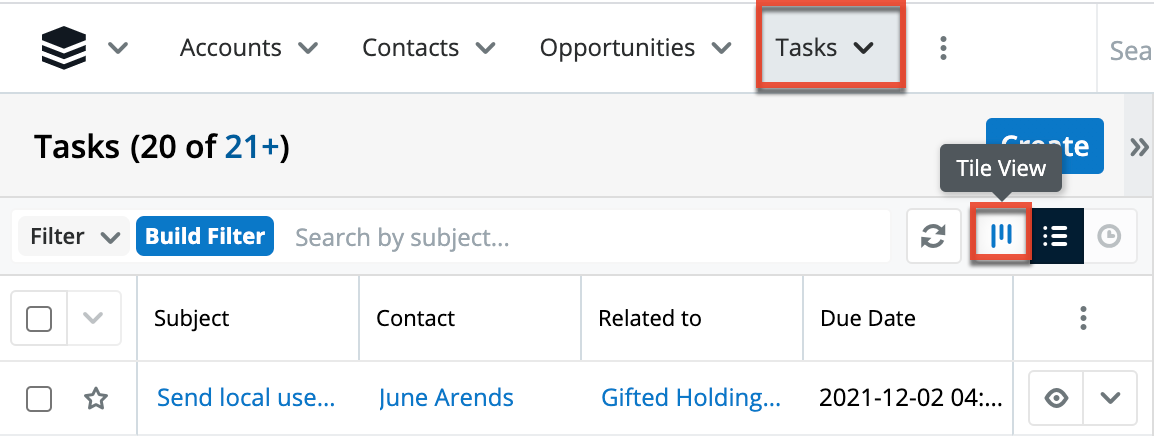
New records can be created from the tile view by clicking the Create button on the upper right. You can also edit any records displayed in the tile view by clicking the record's name/subject link within the tile or by dragging a tile from one column to another to change its stage, status, or expected close date depending on the current layout. For information on configuring Tile View layouts, refer to the Tile View Settings documentation in the Administration Guide.
Working With Records in Tile View
Tile view offers users an alternative way to view and interact with cases, tasks, leads, and opportunities. In the tile view, records will be grouped in vertical columns that represent the record stages or the group-by option configured by your administrator.
Note: For opportunity records, users can toggle between two group-by options because there is an always-on "Opportunities by Time" option. For more information on using tile view with opportunities, refer to the Opportunities documentation.
To further refine the tile view, users can filter the visible tiles by utilizing the standard Sugar filter options. Simply create or select a stock or saved custom filter (e.g., My Favorites, My Team's High-Value Opps) and the tile view display will update in real-time. If a filter (e.g., saved, ad-hoc) has already been applied to the module's list view (e.g., Opportunities), then that same filter will be automatically applied to the tile view and vice versa. Please note that the filter will continue to apply as you toggle between the tile view tabs, switch between the module's list view and tile view, navigate away from the module and then return again, or close your browser tab then return to the module again in a new tab. You can also use the search bar to refine the display by a keyword or phrase. For more information on using filters, refer to the List View Filters section of this page.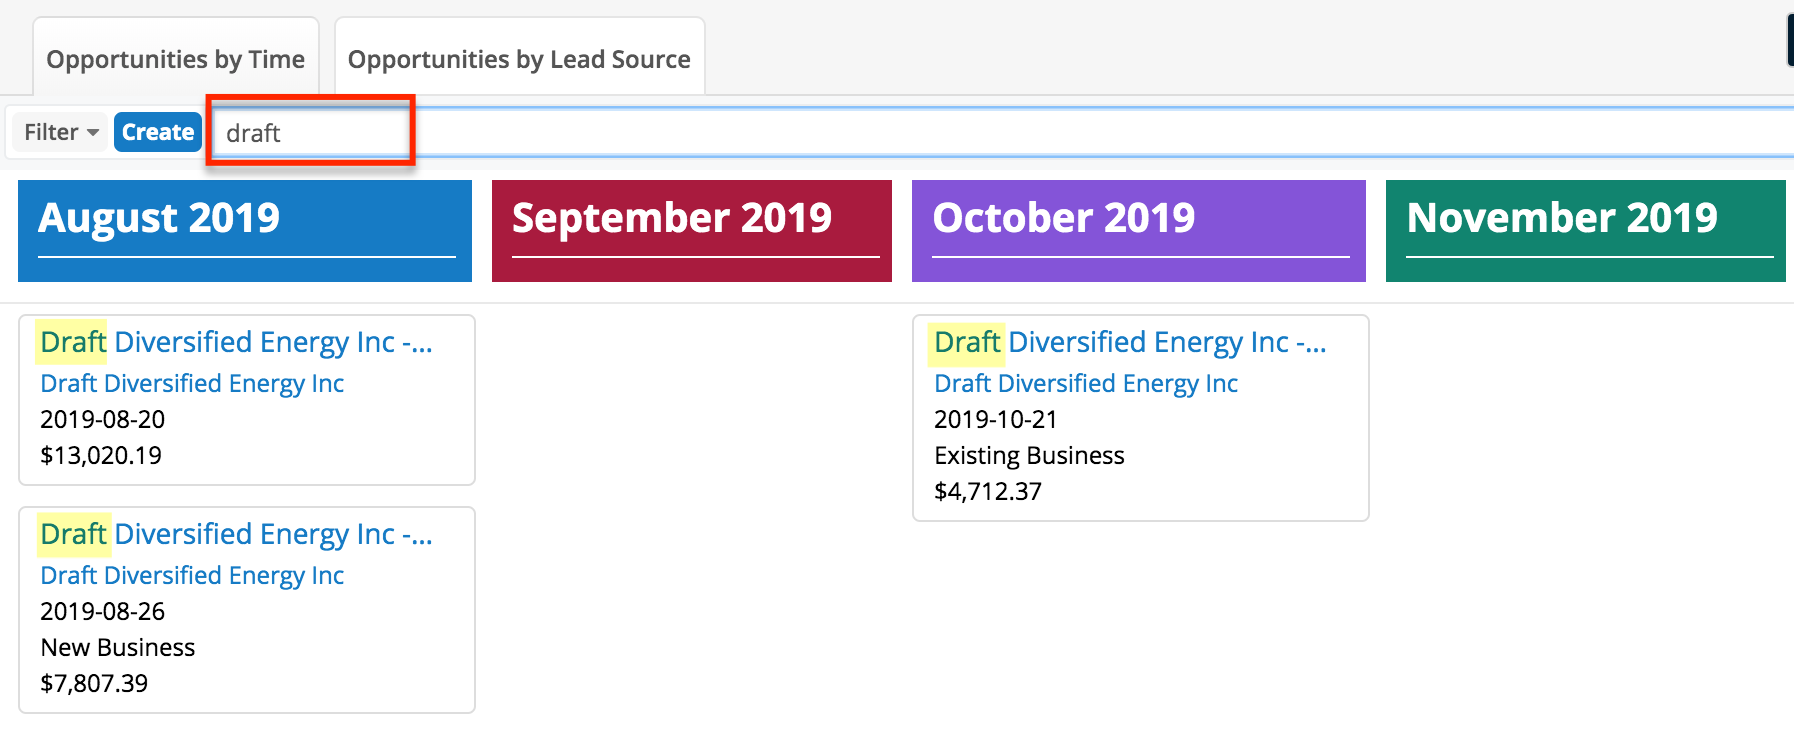
Note: The yellow highlighting in this image has been added for effect and will not appear in the application.
Click and drag a tile from one column to another to change its stage, status, or expected close date depending on the current layout. As an example, the following screenshot illustrates how to change the expected close date of an opportunity from a day in August 2020 to the last day of September 2020. Simply click on the tile and drag it into the appropriate column: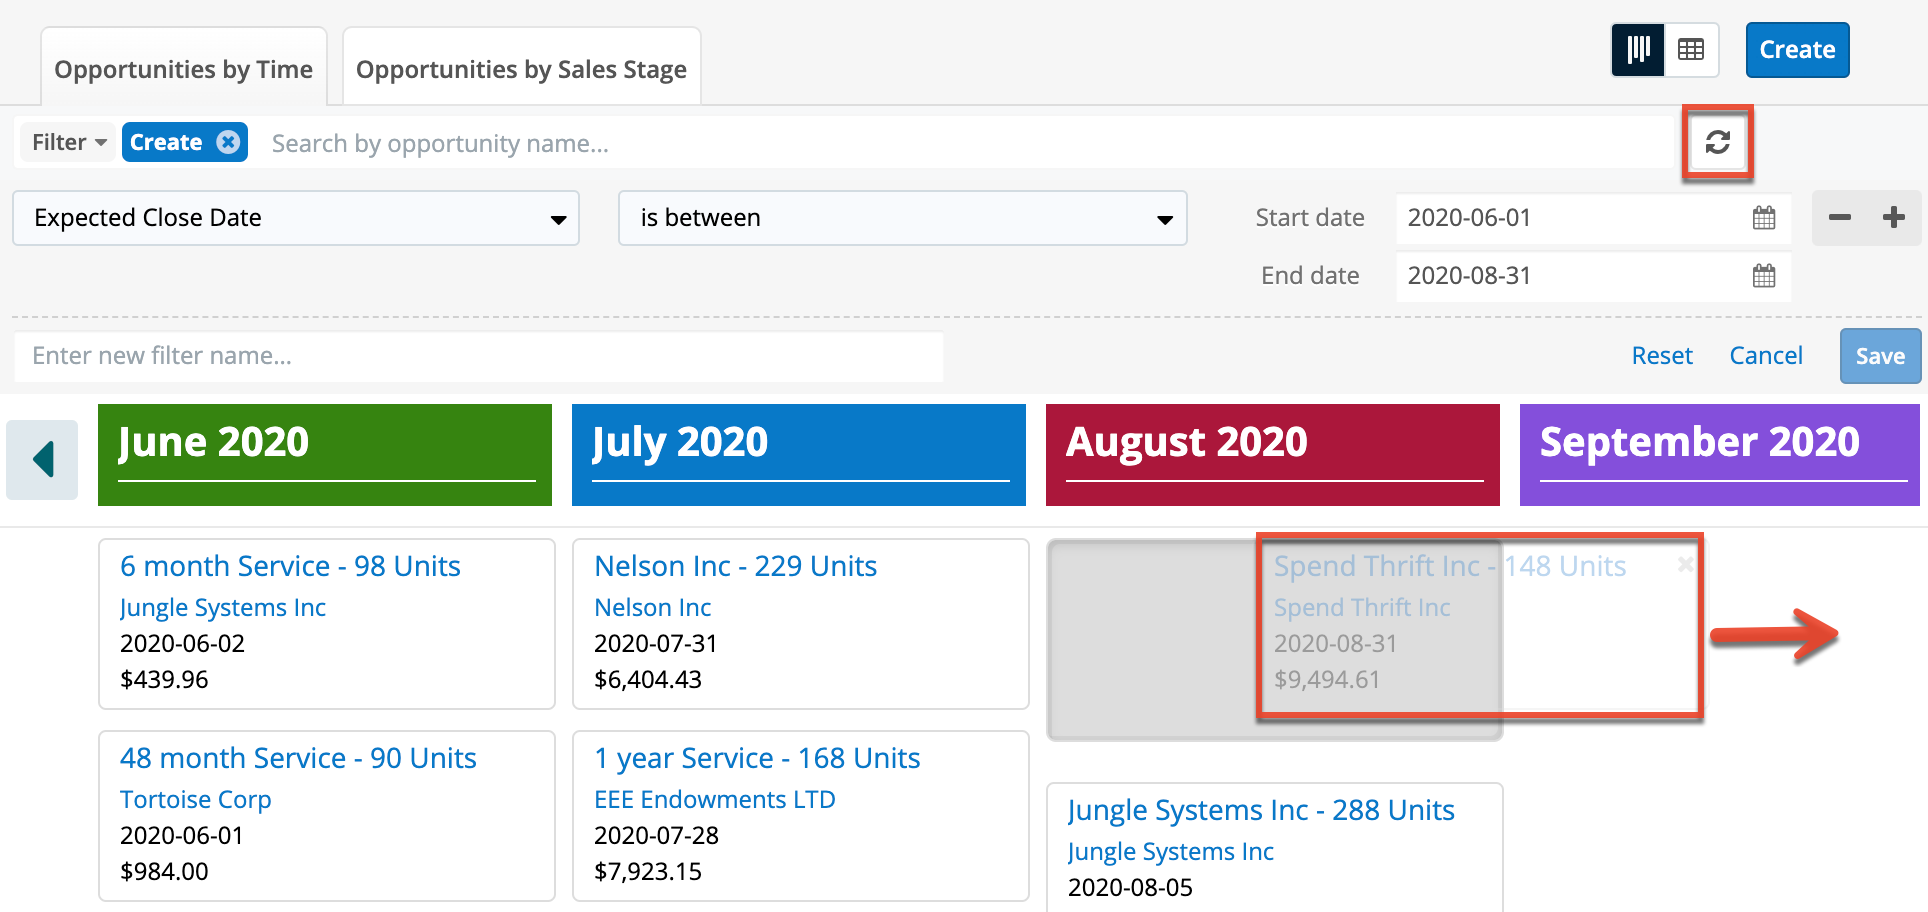
For opportunities with multiple revenue line items, the expected close date will change for all of the open related line items. For more information on using tile view with Revenue Line Items enabled, refer to the Opportunities documentation.
The tile view's filter Refresh button which appears to the right of the search box allows the user to quickly reapply filters after making changes to the displayed records without having to reload the browser. Simply click on the Refresh button to bring the tile view up-to-date with the most recent edits. In the image above, the tile view is filtered to only display records with expected close dates between June 2020 and August 2020, so once you drag the tile from "August 2020" to "September 2020" and click the Refresh button, the September 2020 column will no longer display any records.
Intelligence Pane
Intelligence panes display on list views, record views, and to the right of the Home page activity stream. They provide users with valuable record information via dashboards as well as showing previews of Sugar records.
Dashboards
Most intelligence panes have out-of-the-box default dashboards with a set of commonly used dashlets. Admin users may also have created default dashboards that are pushed to teams of users. In addition, individual users can create their own personal dashboards with whichever dashlets they wish to use. Any dashboard can also be shared with additional teams who can then pull the dashboard into their intelligence panes for use.
Please refer to the Dashboards and Dashlets documentation for in-depth documentation about using dashboards as well as information about commonly used dashlets.
Previews
Users can preview a record's details by clicking the Preview button to the far right of a record's row or activity stream post. The preview appears in the intelligence pane to the right of the Home page's activity stream and on list views and record views. The preview displays the fields that have been configured by your Administrator in Studio > Layouts > Preview View and the record's most recent activity stream entries. For more information on editing preview layouts, please refer to the Studio documentation.
Viewing Previews
There are various options available for viewing previews in Sugar including via the list view, record view, and activity stream. Previewing allows users to easily view key information regarding a record directly from the intelligence pane without navigating away from the current page. Users can mark a record to follow or unfollow via the preview by clicking the Follow or Unfollow button within the record's details. Clicking the hyperlinks (e.g., account name, website, email address) within the preview allows you to access the record view, external company website, compose email, etc.
Note: Hovering over certain links to Sugar records (e.g., a linked account name) in the intelligence pane will display a Focus icon. Clicking the icon will reveal a Focus Drawer dashboard displaying a 360-degree view of the linked record through a set of dashlets. For more information on focus drawers, refer to the Focus Drawer section of this documentation.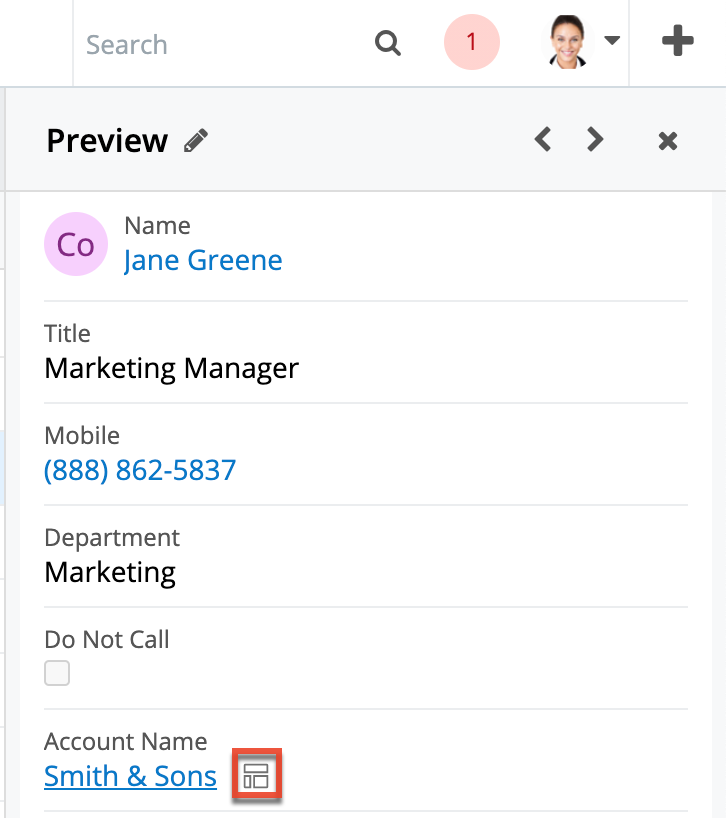
Previewing From List Views
Users can view a record's topmost fields directly from the module's list view by clicking the Preview button to the far right of each account's row. The intelligence pane will display the record's details with key information regarding the record as well as any related activity stream information. 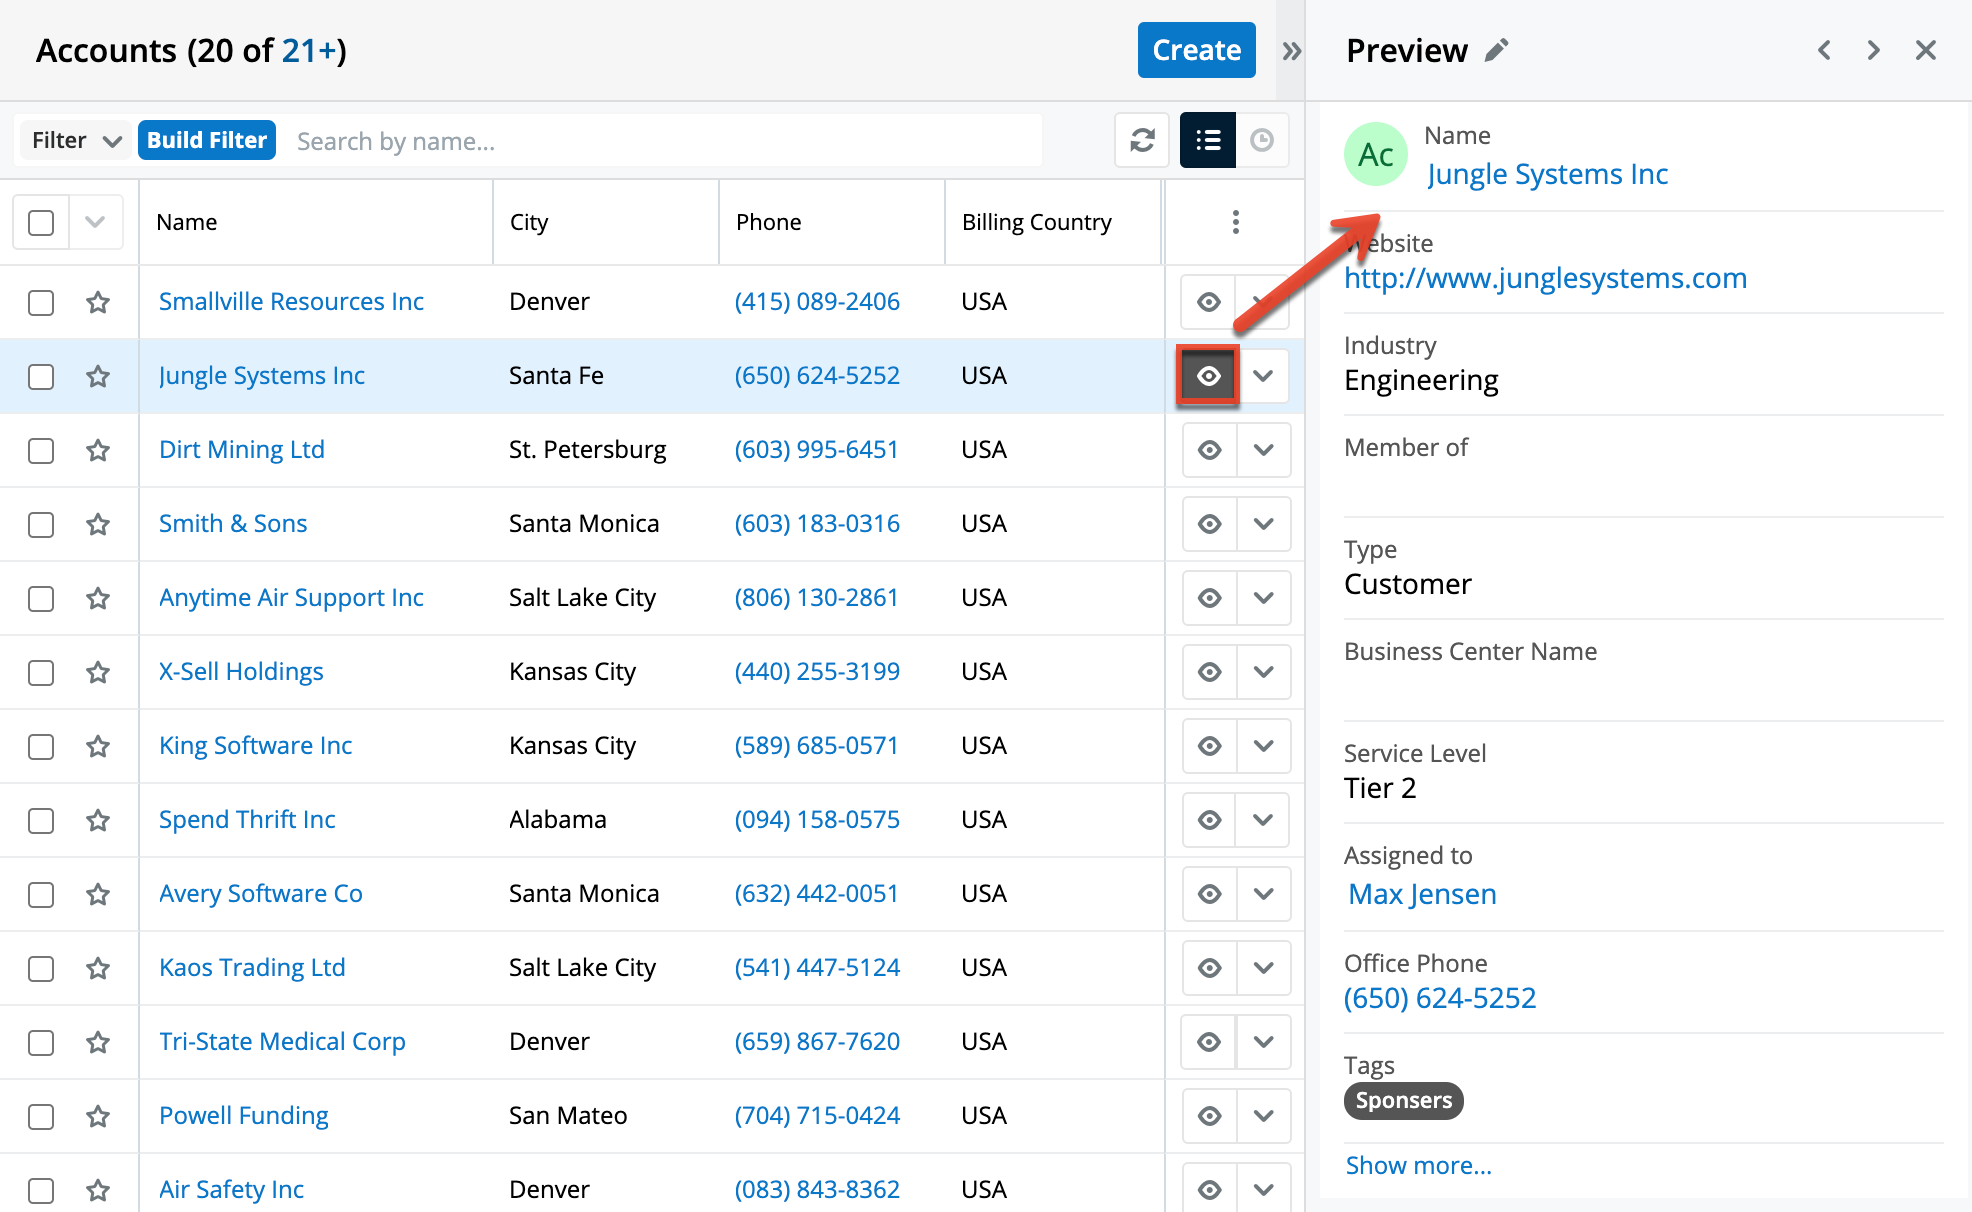
Previewing From Record View
Users can also view a record's details from the module's record view by clicking the Preview button to the far right of each record row in the subpanel. The intelligence pane will display the record's details with key information regarding the record as well as any related activity stream information. 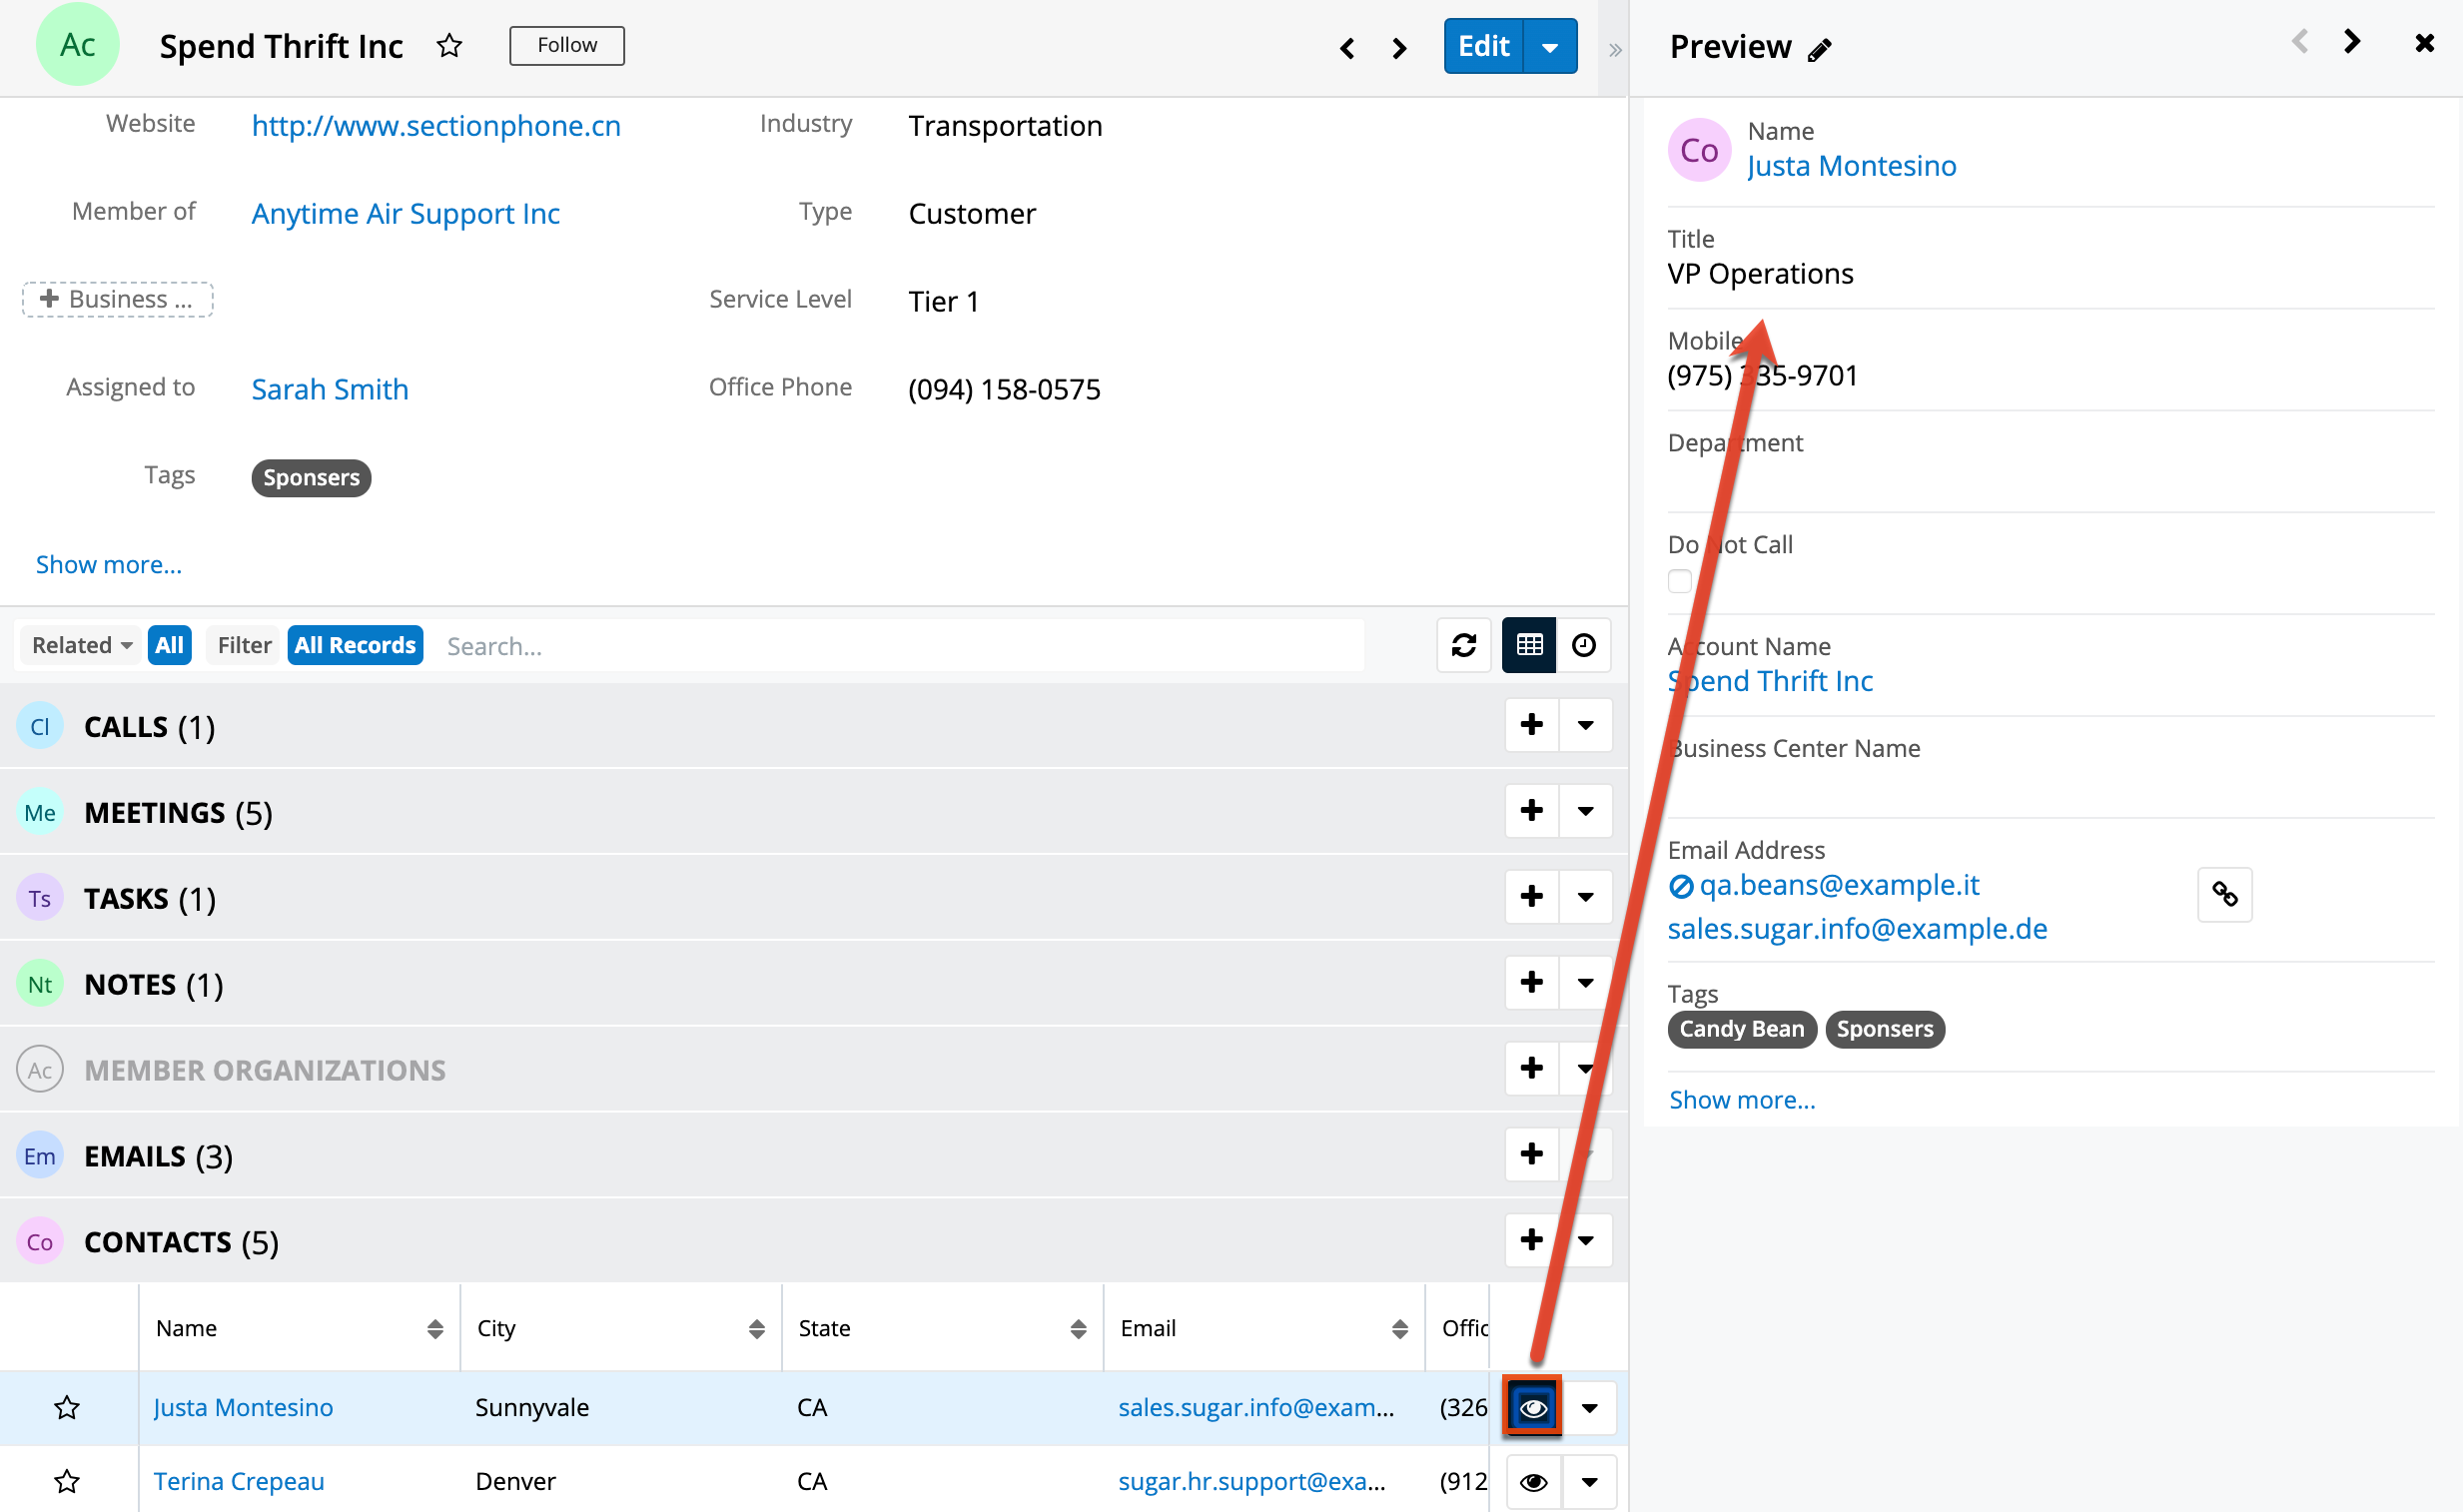
Previewing From Activity Streams
In addition, you can also preview the record referenced in activity stream posts from the Home page, list view, and record view activity stream by clicking the Preview button to the right of each post. Please note that preview is only available for Create, Update, Relate, and Un-relate-type posts in the activity stream. For more information about previewing activity stream posts, please refer to the Previewing Posts section of the Activity Streams documentation.
Note: Sugar's activity streams are disabled by default, but administrators can globally enable the functionality based on their organization's needs. For more information, refer to the System documentation in the Administration Guide.
The intelligence pane displays the topmost fields from the module's record view and the record's most recent activity stream entries. 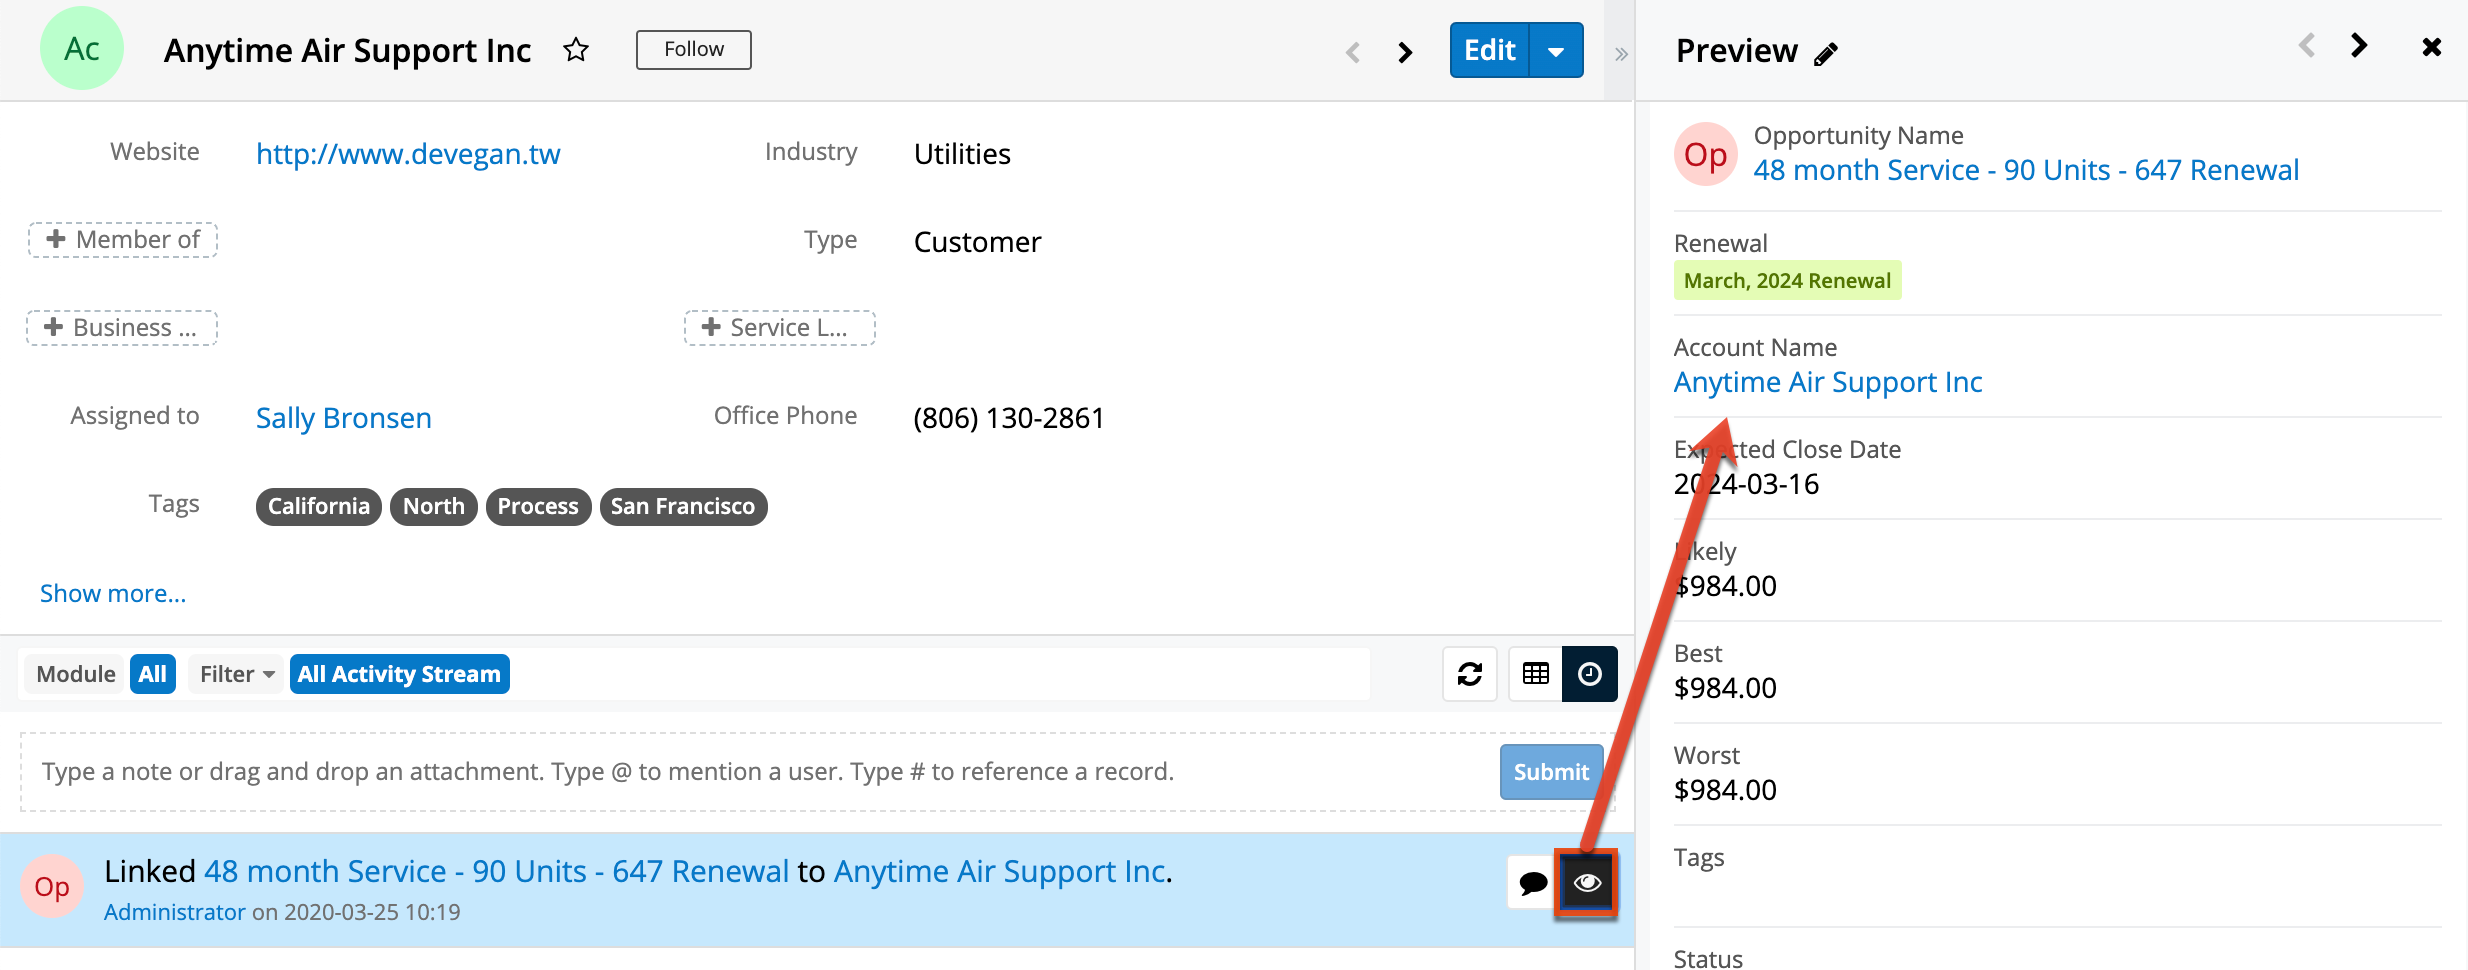
Previewing From Global Search
Users can view a record's details directly from the View All Results page for Global Search by clicking the Preview button to the far right of each record's row. The intelligence pane displays the topmost fields from the module's record view and the record's most recent activity stream entries. For more information on previewing via the View All Results page, please refer to the Search documentation. 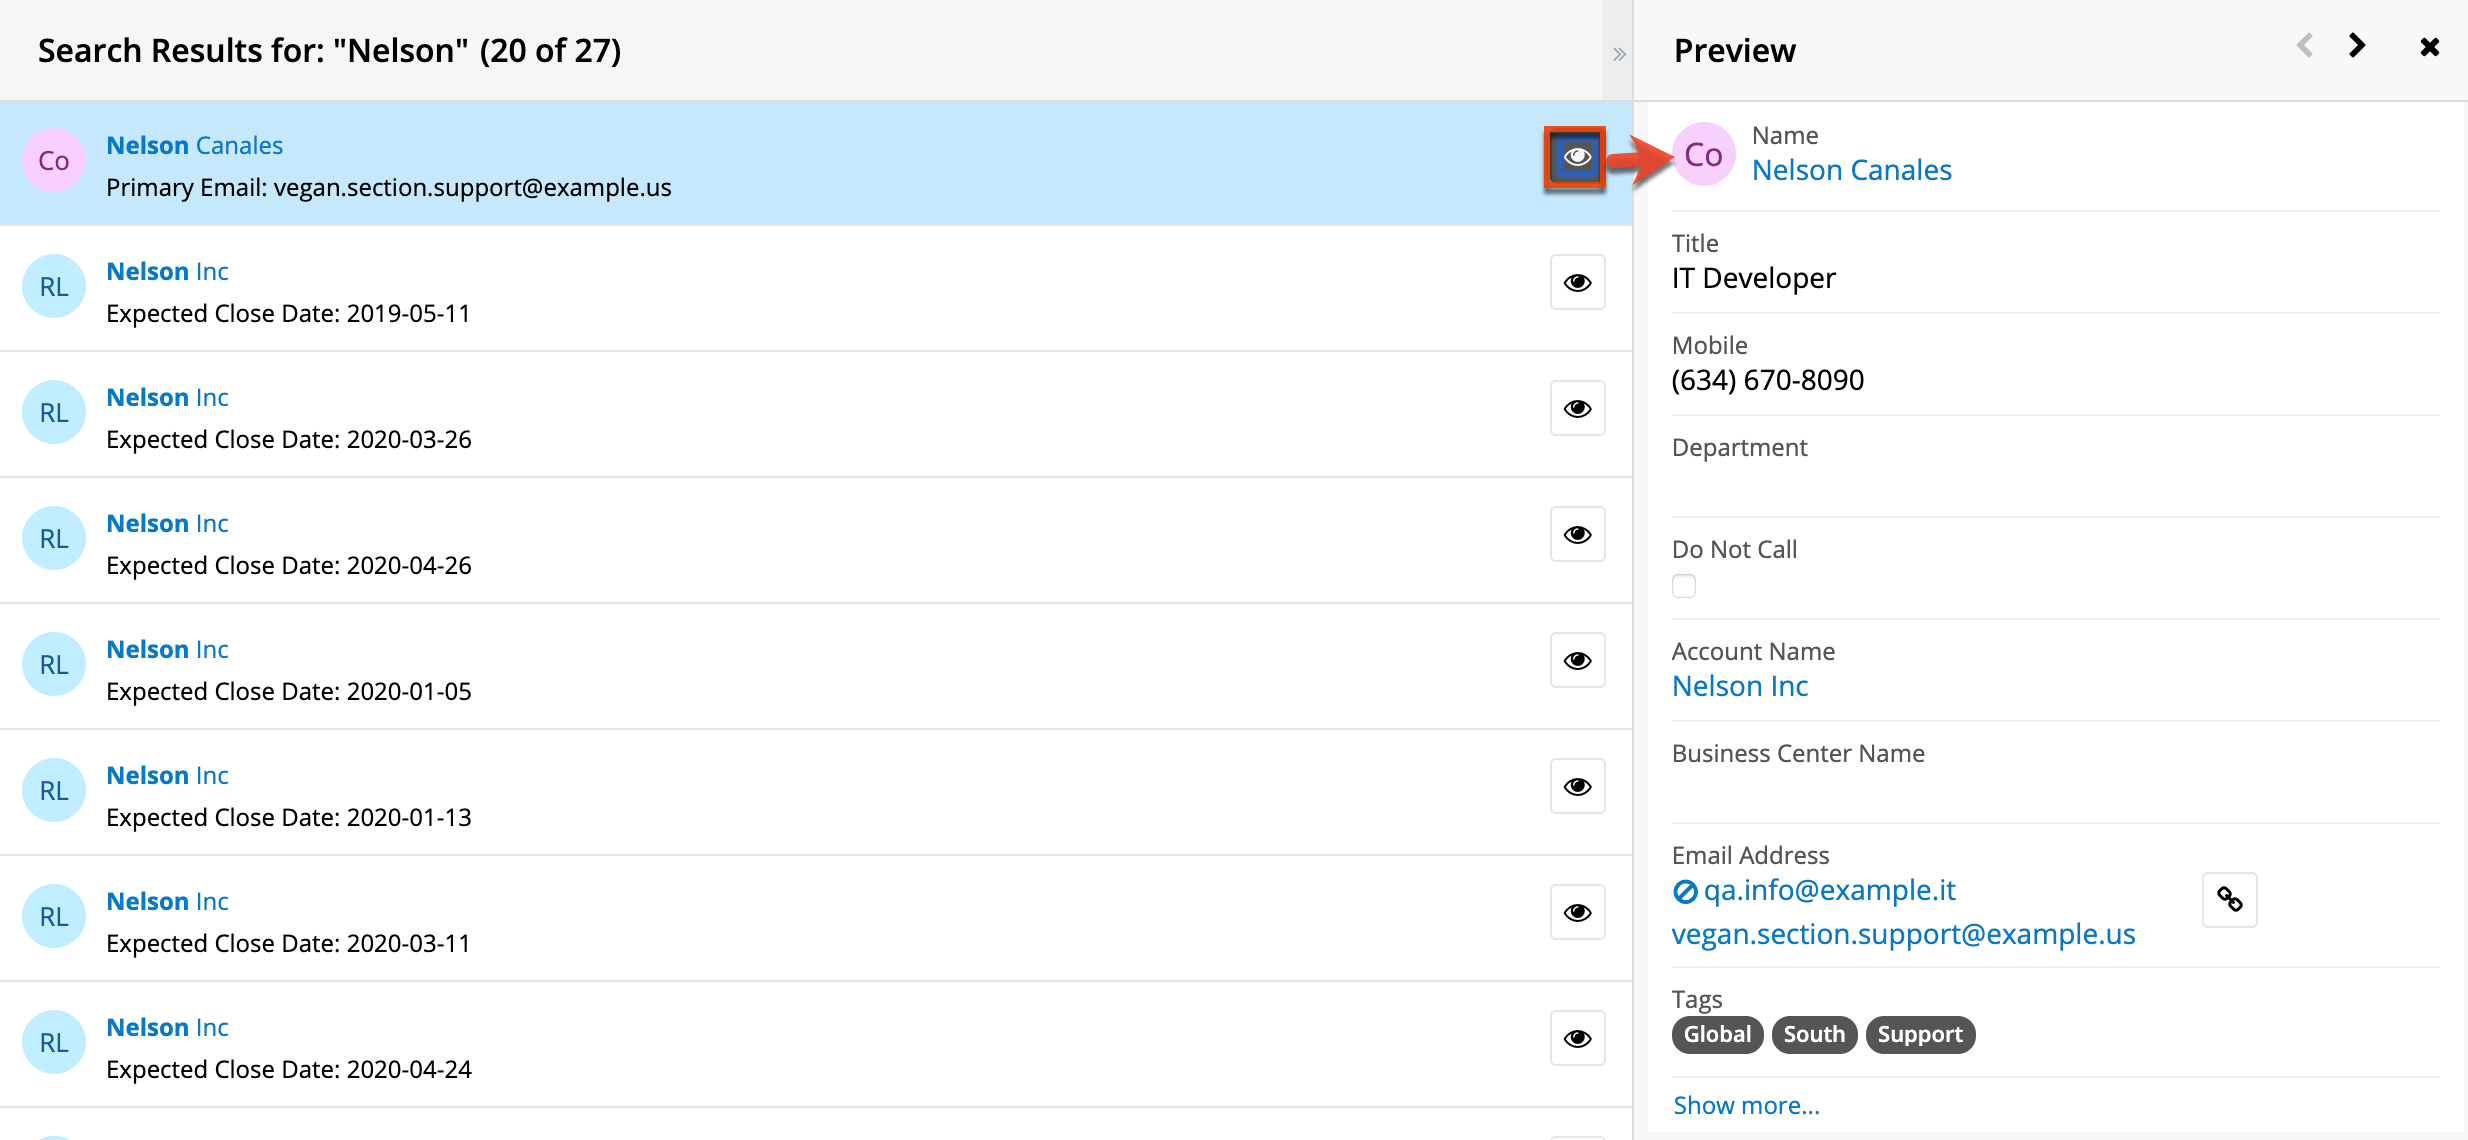
Show More
In the preview, Sugar displays the topmost fields from the module's record view. To view all of the fields that are on the record view, click "Show more...". Please note that administrators can configure what fields appear on the business card panel via Admin > Studio > Layouts > Record View. For more information on editing layouts, please refer to the Studio documentation. 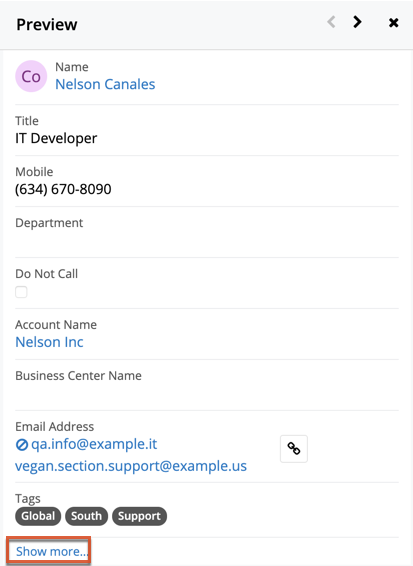
Previewing a Record's Activity Stream
When previewing a record via the intelligence pane, you can also view any related activity stream posts which will appear below the record's detail. Please note that you cannot create new posts or comment on posts via the activity stream when previewing a record. For more information on creating posts and commenting on posts, please refer to the Activity Streams documentation. 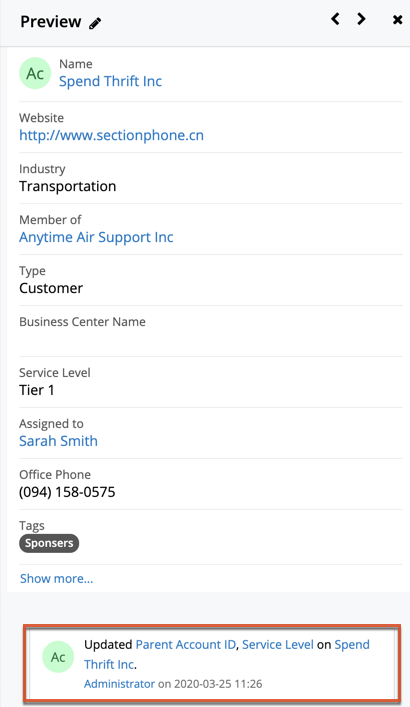
Note: Sugar's activity streams are disabled by default, but administrators can globally enable the functionality based on their organization's needs. For more information, refer to the System documentation in the Administration Guide.
Previewing Next and Previous Records
Above a previewed record in the intelligence pane, there is a Left and Right arrow button that allows you to scroll through the previous and next records. Clicking the Left arrow button displays the previous record's preview while clicking the Right arrow button displays the next record's preview. When previewing from the module's list view, you can scroll through the list view's current search results. When previewing a related module record from a module's record view, you can scroll through the list of related records in the specific subpanel. 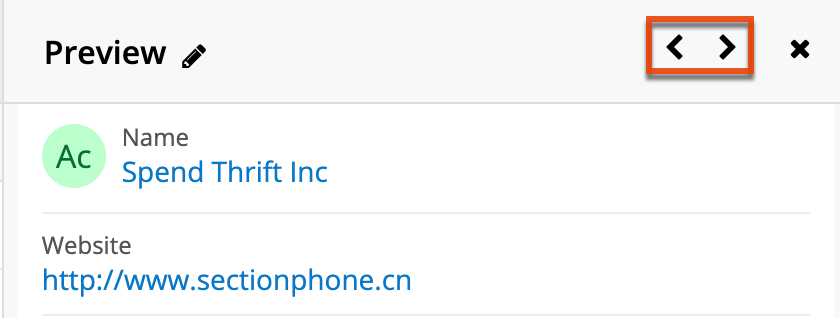
Closing a Preview
If you no longer wish to preview the records, you can simply close the preview by clicking the "X" on the upper right of the intelligence pane. Please note that the dashboard view will display again on the intelligence pane once you close the preview. 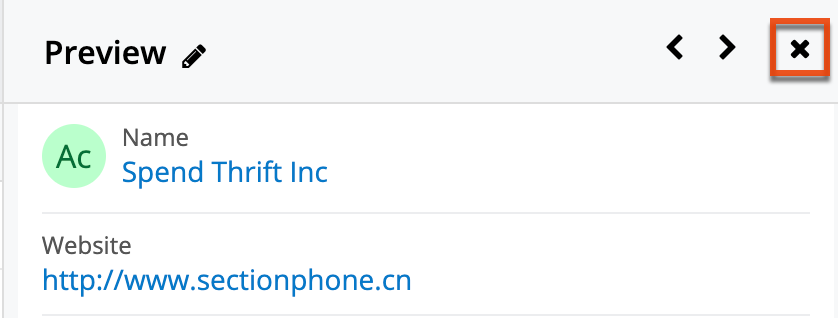
Focus Drawer
When hovering over most links to Sugar records (e.g., a linked account name, case subject, meeting subject, email subject) across Sidecar modules, a Focus icon will appear to the right of the link. Clicking the icon will open a Focus Drawer dashboard displaying a 360-degree view of the linked record through a set of dashlets containing relevant information such as the record's related records, related activities (e.g., calls, meetings), purchase history, and active subscriptions. Please note that the out-of-the-box default dashboard contains a set of pre-defined dashlets which can be configured by the dashboard owner and system admin users. For more information on out-of-the-box default dashboards, refer to the Dashboards and Dashlets documentation.
The Focus icon appears for links to Sugar records in the following views:
- List view and record view for supported Sidecar modules
- Record previews in intelligence panes
- Related record subpanels
- Supported dashlets (e.g., Active Tasks, History, Planned Activities, and Record View dashlets) on the Home page, List View, Record View, and Focus Drawer dashboards
- Renewals Console
- Service Console
If you do not belong to one of the designated teams for the linked module's Focus Drawer dashboard or if the linked Sidecar module record (e.g., Documents) does not have a stock Focus Drawer dashboard defined, you can create a new one by opening the focus drawer and clicking the "+ Create Dashboard" button.
Please note that the Focus icon will not appear if you are restricted from accessing the particular module linked to the Focus Drawer dashboard based on your assigned role and/or team permissions. For more information on managing dashboards, refer to the Dashboards and Dashlets documentation.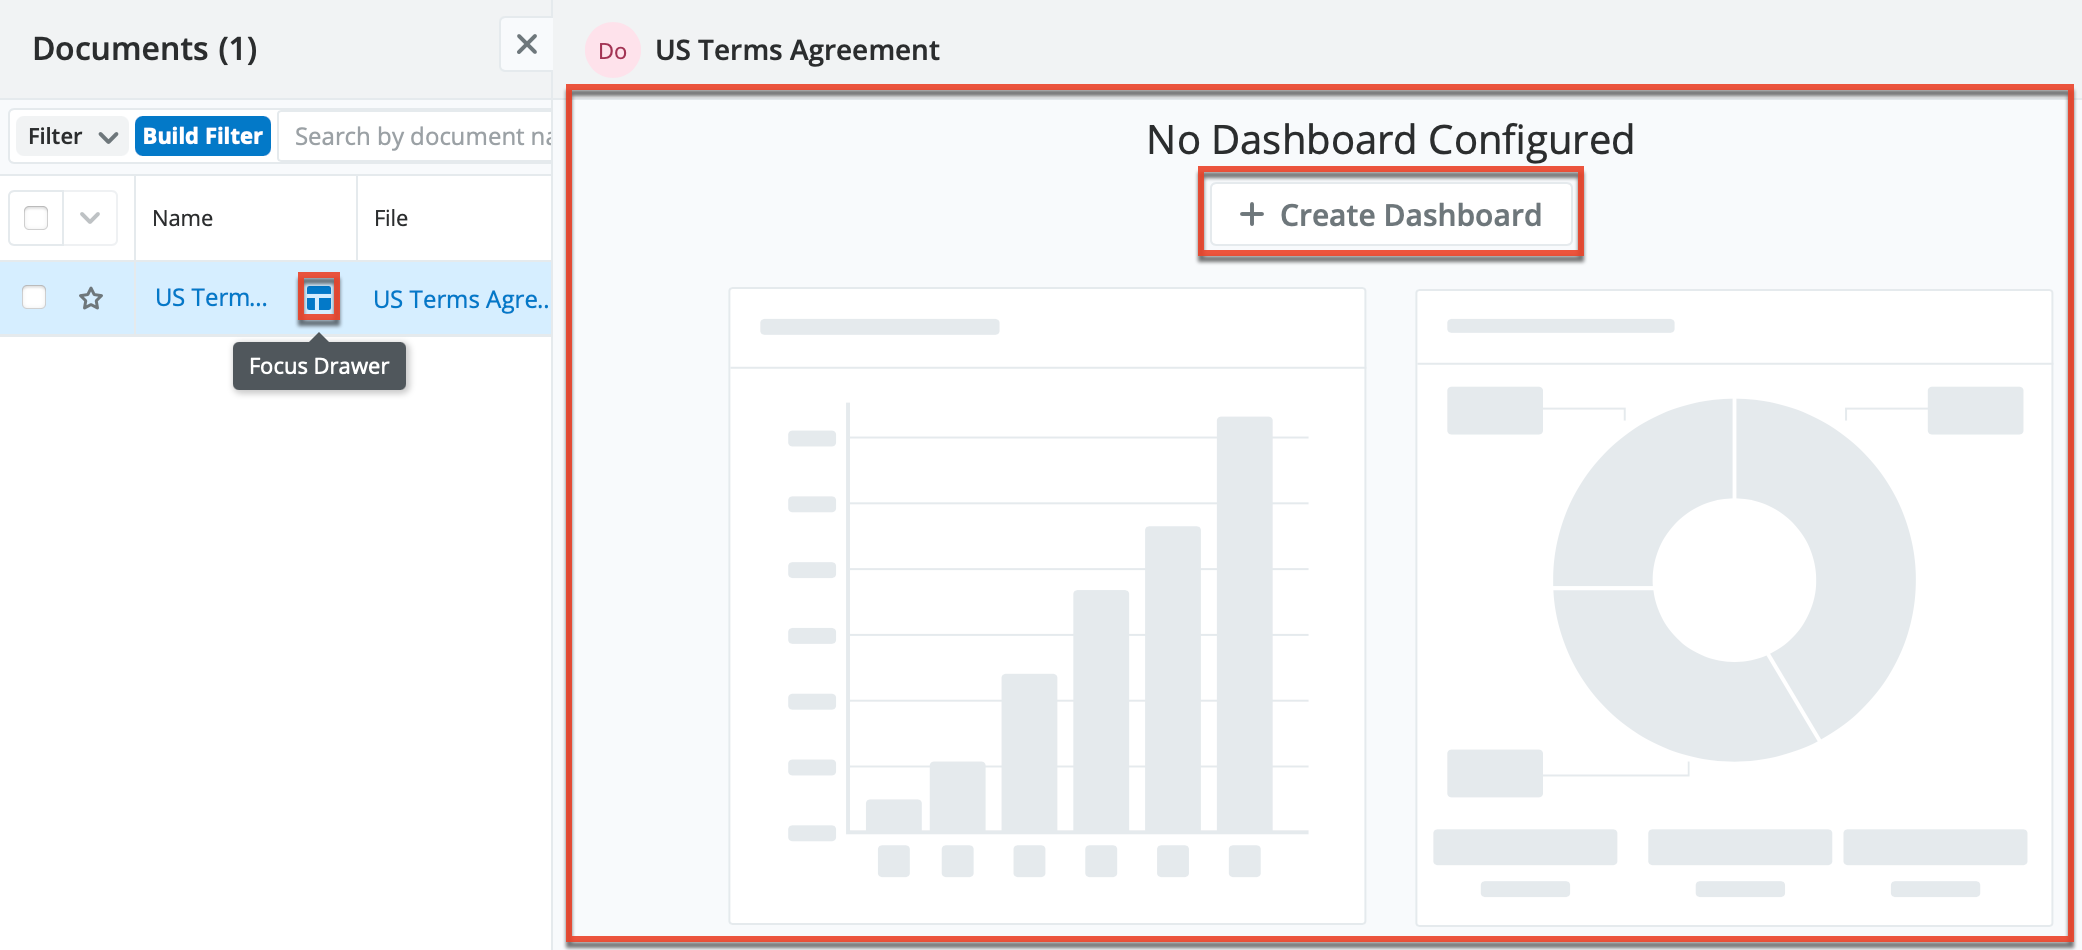
Using Focus Drawers
When you click the Focus icon for a linked record (e.g., Smith & Sons), the focus drawer will open and the header will display a breadcrumb with the module icon and record name as well as the current dashboard's name (e.g., Accounts Focus Drawer) to the far right of the header. Dashboard owners can rename the dashboard if desired by clicking the dashboard's name or hovering over the name and clicking the pencil icon. You can also mark the dashboard as a favorite by clicking the star icon to the right of the dashboard's name.
Note: To close a focus drawer, simply click the X icon at the top left of the drawer or press your Escape (Esc) key.
The Focus Drawer dashboard appears beneath the header and contains the dashlets which allow users to view and obtain pertinent information related to the record without having to navigate away from the current view. Please note that the dashlets displayed in the dashboard will vary between each Sidecar module's focus drawer dashboard. Some common dashlets that can appear in the dashboard are: Record View dashlet, Timeline dashlet, Active Subscriptions dashlet, Purchase History dashlet, and Comment Log dashlet. For more information on other commonly used dashlets, refer to the Dashboards and Dashlets documentation. Only the dashboard owner and system admin users have the ability to edit the dashlets, delete the dashlets, add additional dashlets, and rearrange the dashlets within the dashboard.
While the focus drawer is open, you can click the up or down arrow to the left of the drawer to quickly switch the header and contents of the drawer and view details related to the next or previous record in a list view. The up and down arrow will only be active when the initial focus drawer is opened from a list such as a module's list view, related record subpanel, list view dashlet, etc. 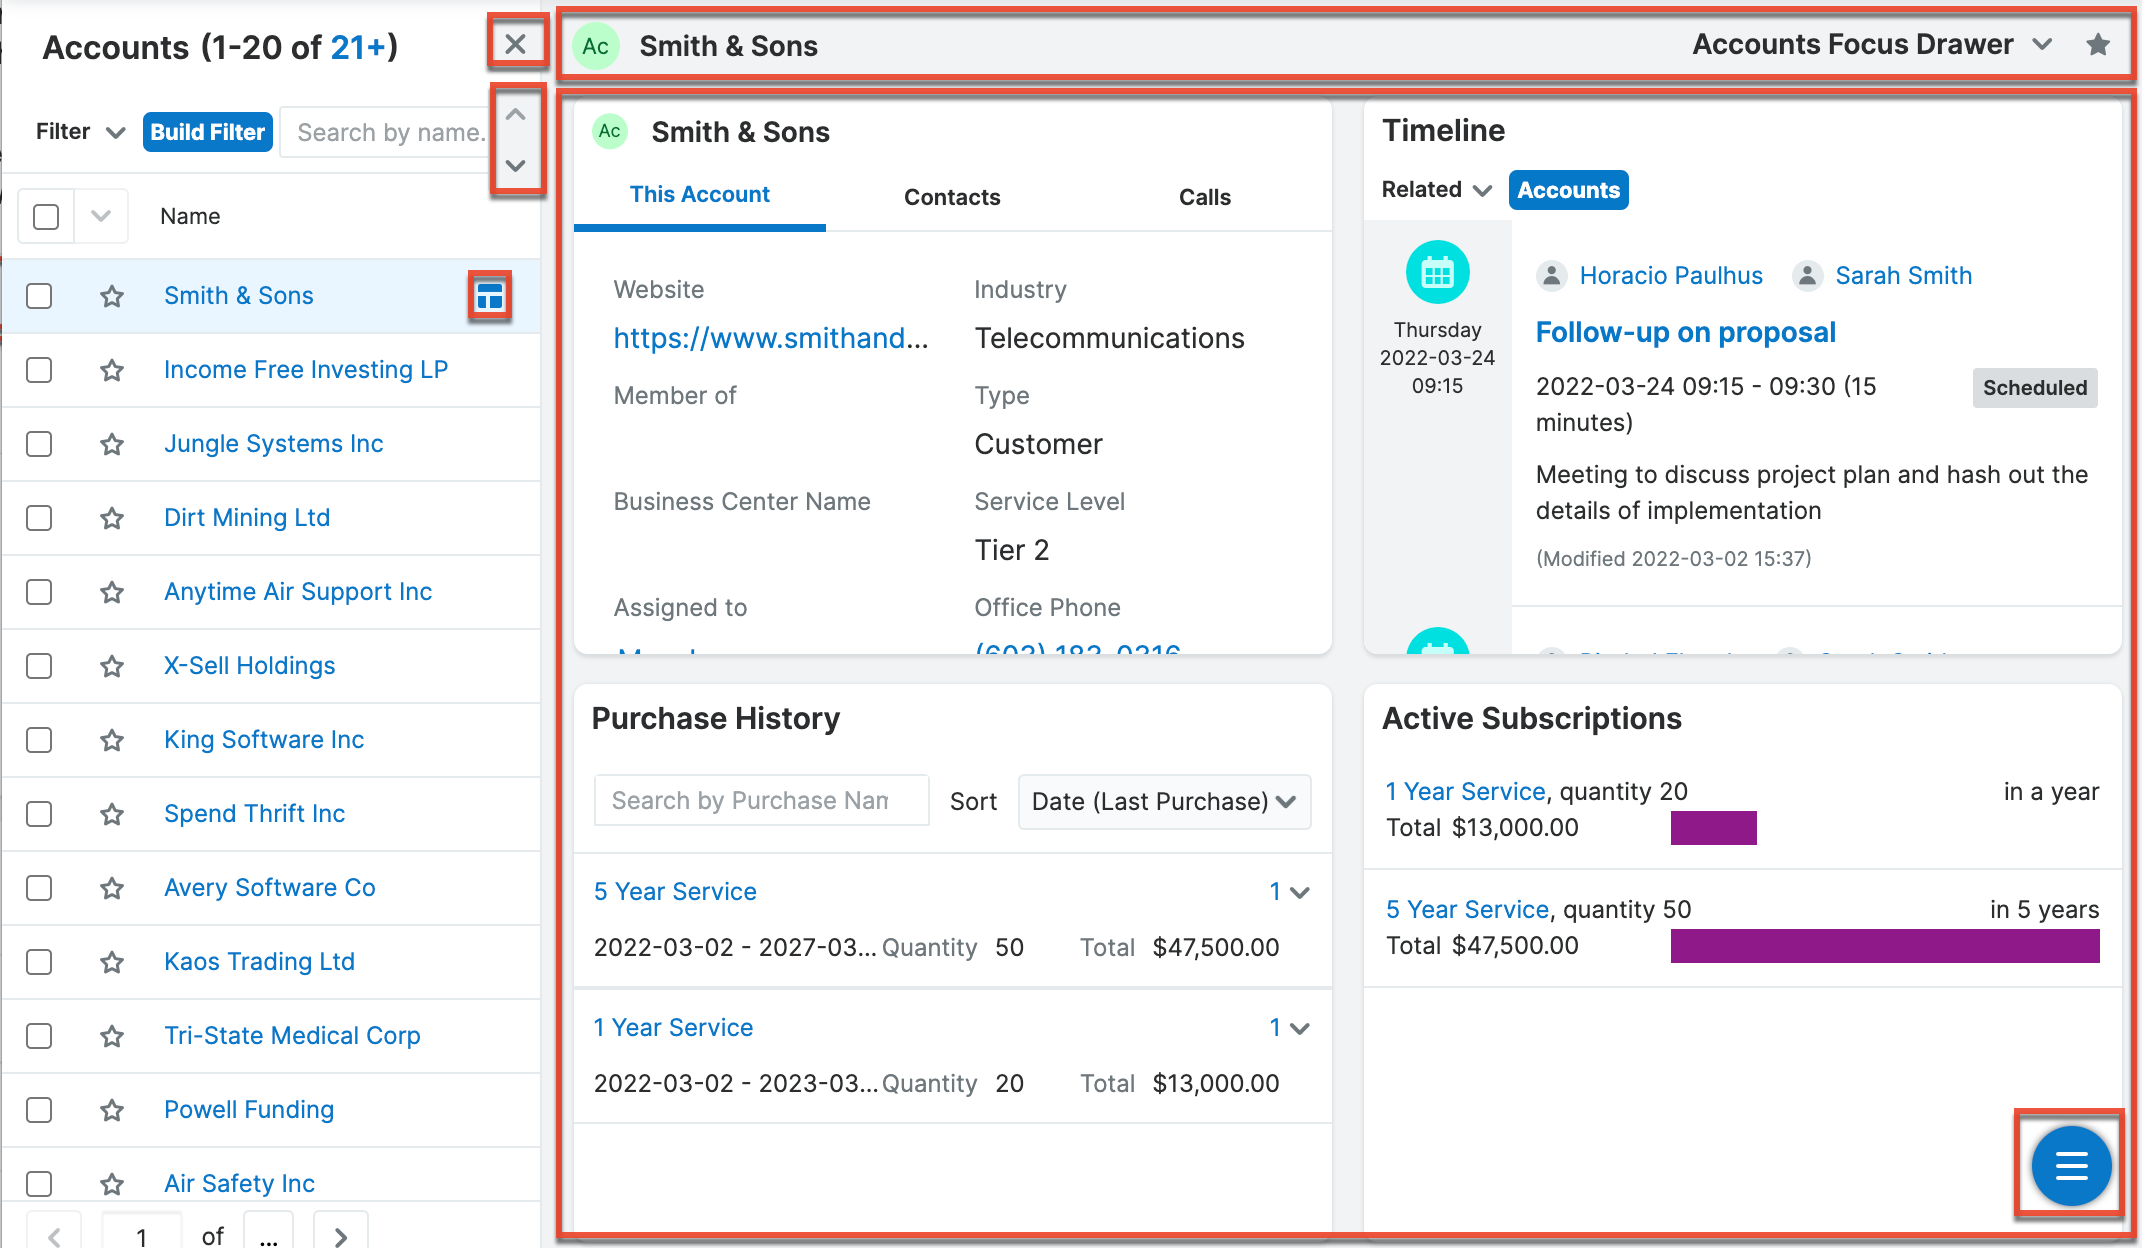
You can also create a new Focus Drawer dashboard. Simply click the floating actions button on the current dashboard and select the Create Dashboard option or duplicate the current dashboard and personalize it as desired. The new Focus Drawer dashboard will automatically appear in the current view, but you can easily switch between the custom and default dashboard(s) by clicking the triangle next to the current dashboard's name (e.g., My Accounts Focus Drawer) on the Focus Drawer header.
You can also view and manage the dashboard records from the Dashboards list view by clicking the Manage Dashboards option from the dashboard selection list. Please keep in mind that the last-viewed dashboard will appear in the focus drawer the next time it is opened for the linked module.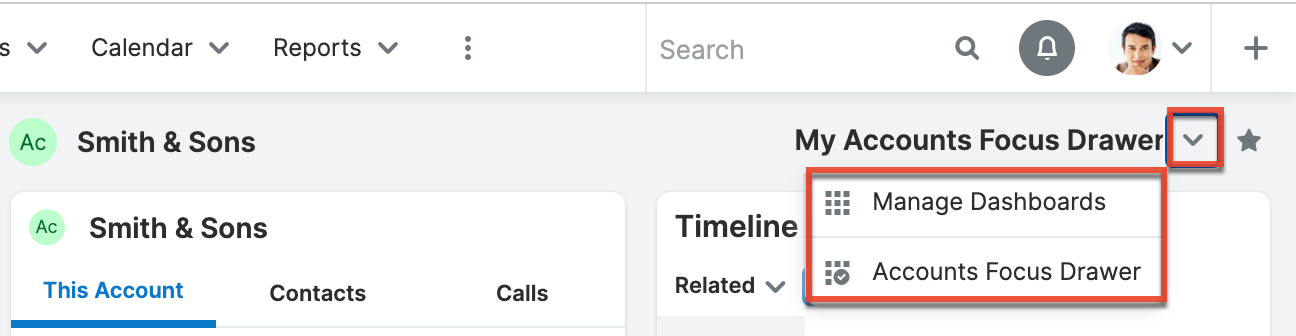
Note: Focus Drawer dashboards can only be deleted by the dashboard owner and system admin users.
Drilling Through Focus Drawers
When viewing a Focus Drawer dashboard, you can click on even more Focus icons to drill into records related to the original one. You can continue drilling this way through multiple layers of focus drawers. Each time you click a Focus icon from within the dashboard, a new breadcrumb will get added to the breadcrumbs list in the Focus Drawer header to give you a clear picture of where you are at in the drillthrough. To navigate backward, click the breadcrumb containing the record's name that you wish to go back to.
Keep in mind the following behavior when drilling through multiple focus drawers:
- The first and current breadcrumbs are always shown in the Focus Drawer header regardless of how many intermediate breadcrumbs there are.
- When there are more breadcrumbs than can fit in the header, the intermediate breadcrumbs will collapse into a three-dots overflow menu, which you can click to reveal the list of hidden breadcrumbs.
- Clicking on a previous record's breadcrumb will replace the focus drawer content with that record's dashboard content and all breadcrumbs to the right of the clicked breadcrumb will be removed from the Focus Drawer header.
Note: If you click the Focus icon for a linked record during drillthrough and there is no Focus Drawer dashboard configured for the record's module, the breadcrumb will show with the module icon and record name, but the dashboard's name will be blank until the dashboard is created.
Editing Records
Records may be edited at any time to modify or add information. Edits can be made via record view or list view as detailed below. For instructions on how to edit the various field types, please refer to the Field Types section.
Please note that your ability to edit records in Sugar may be restricted by a role. For more information, please refer to the Role Management documentation. Check with your system administrator if you do not see the edit options.
Editing Inline via Record View
Users can edit individual fields in record view without entering the full edit mode by clicking the field name or value. If a field that supports inline editing is not empty, a pencil icon appears when you hover over it. If the field is empty, the field's label is displayed as a clickable pill with a plus icon next to it. You can click on the pencil or pill to begin editing the field. After entering your desired values, click "Save" to preserve your changes to one or several fields. 
Editing via Record View
You can edit many fields at once via the record view by clicking the Edit button on the upper right of the page. Once the record view layout is editable, update the necessary fields, then click "Save" to preserve your changes.
Editing Inline via Subpanels
Beneath the record's fields are subpanels containing related records from various modules. You can edit individual fields (e.g., Email, Office Phone) for records directly within the subpanel without entering the full edit mode. Simply click the Actions menu to the far right of the record's row and select "Edit" or double-click on the row to open the inline editing mode. You can activate multiple rows for editing by double-clicking on each row that you want to edit.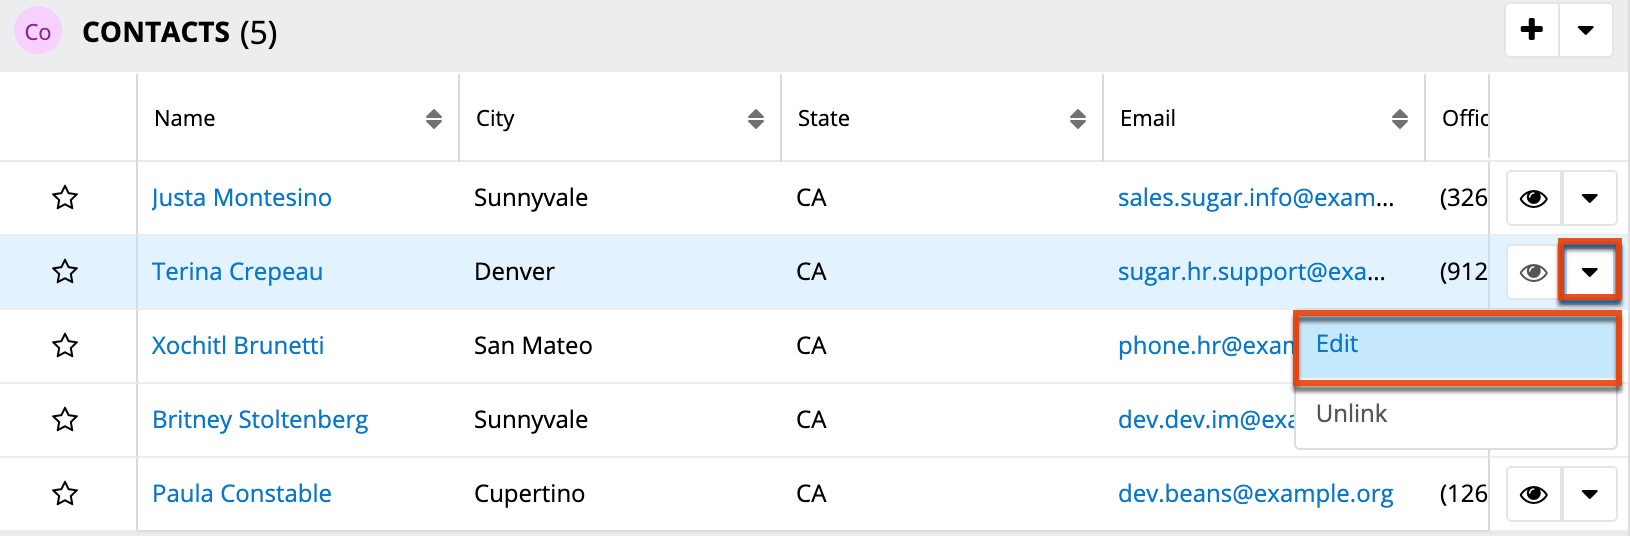
The fields on the record's row will become editable and allow users to type or select a new value. You can click the double arrow icon on the upper right of the page to expand the subpanel list view's width to make editing easier. Click "Save" on the right side of the row to preserve your changes, or click "Cancel" on the left side of the row to close editing mode without saving.
Editing Inline via List View
You can also edit individual fields on a module's list view without entering the full edit mode. Click the Record Actions menu to the far right of the record's row and select "Edit" or double-click on the row to open the inline editing mode. You can activate multiple rows for editing by double-clicking on each row that you want to edit.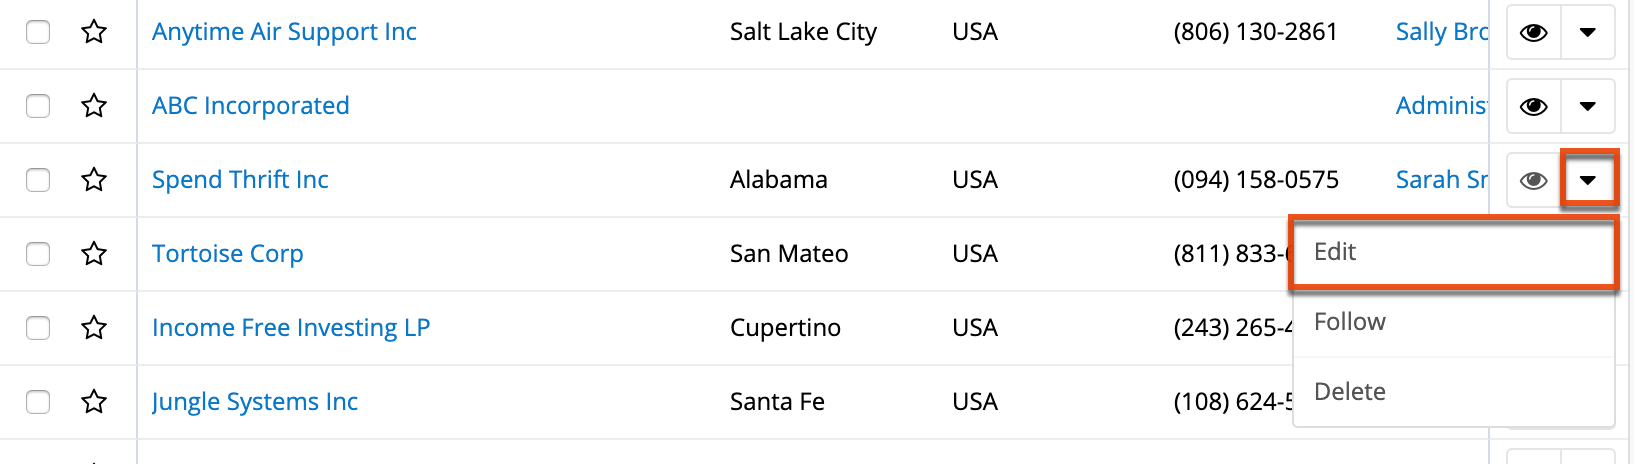
The fields on the record's row will become editable and allow users to type or select a new value. You can click the double arrow icon on the upper right of the page to expand the list view's width to make editing easier. Click "Save" on the right side of the row to preserve your changes or click "Cancel" on the left side of the row to close editing mode without saving. After saving, please refresh the page to have any list view filters be applied to the new record's values.
Note: Text area fields are not inline-editable from list views.
Editing via Preview
Users have the option to edit fields directly in a record's preview when previewing from the module's list view or related-record subpanel. Please note that the preview edit feature is enabled by default, but administrators can disable this feature via Admin > System Settings based on their organization's needs.
To edit a record via the list view preview, navigate to a module's list view and click the Preview button to the far right of a record's row in order to open the preview. 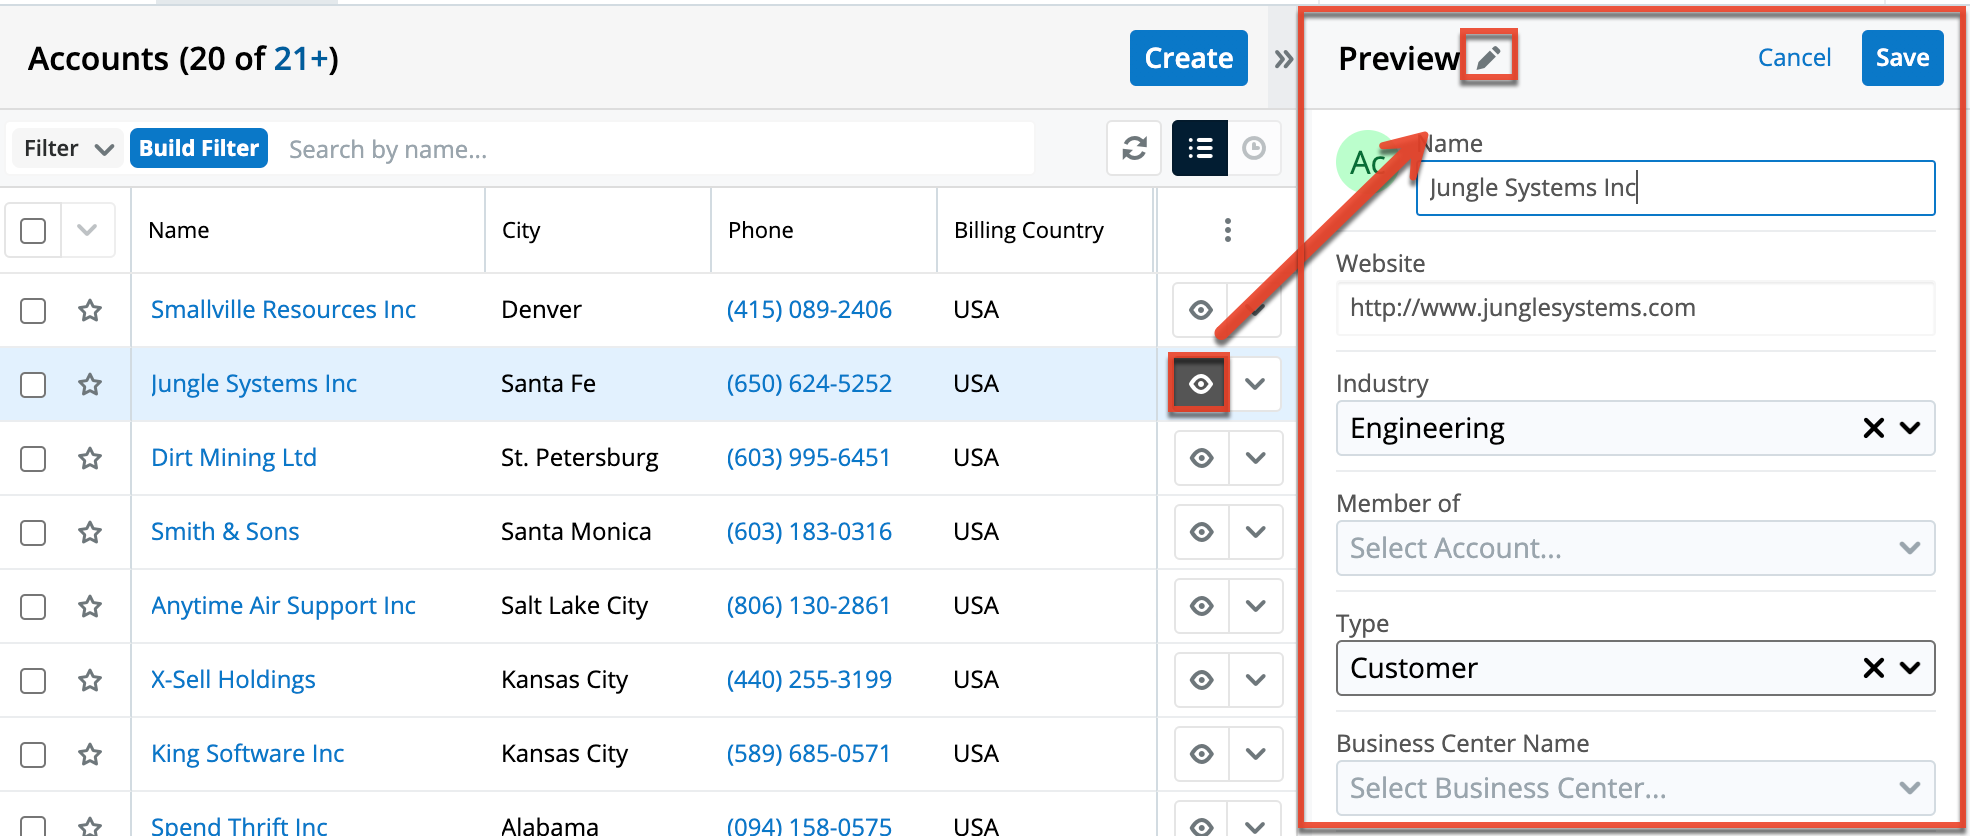
To edit a record via the subpanel preview, navigate to a module's record view, scroll down to the subpanel area beneath the record's details, and click the Preview button to the far right of the desired record's row to open the preview.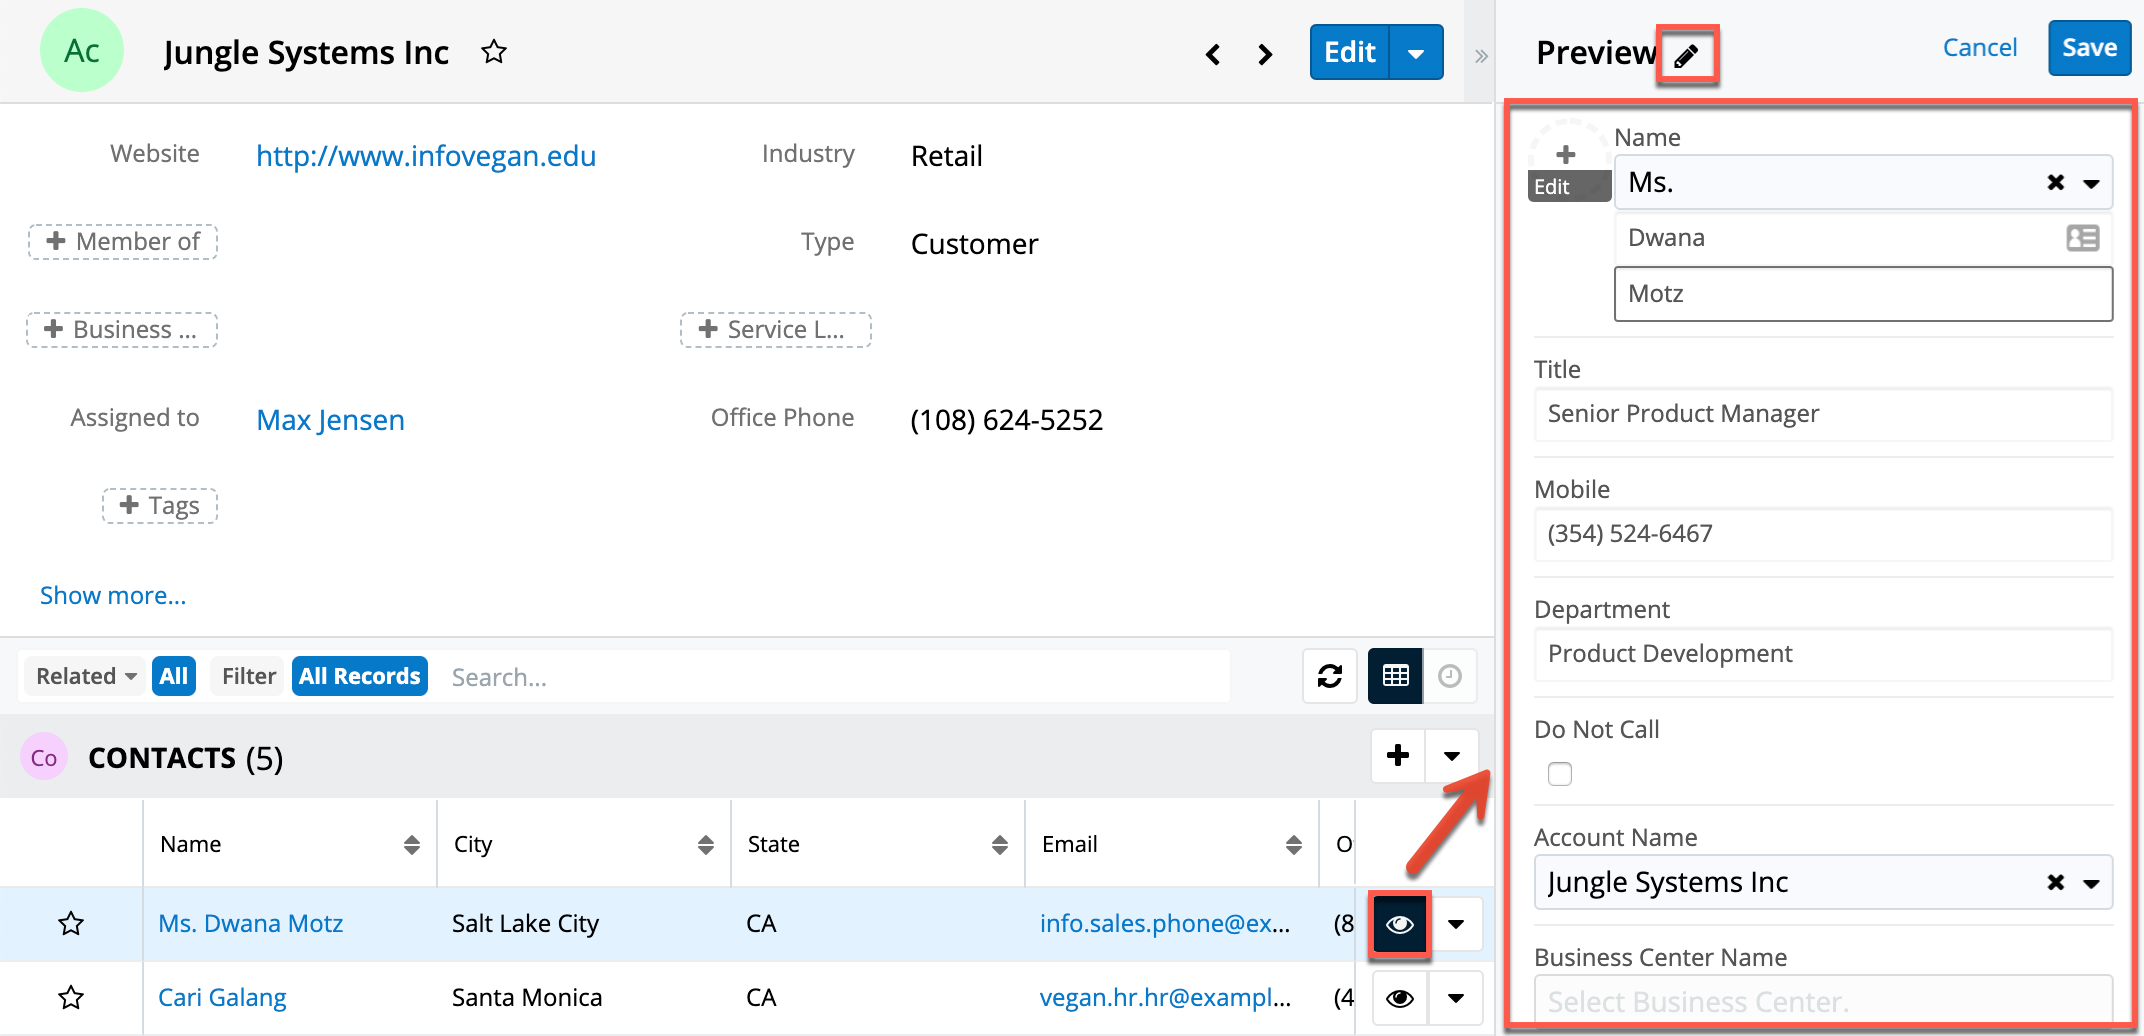
To edit the record's fields, simply click the pencil icon in the Preview header. The fields on the record's preview will become editable and allow you to type or select a new value. Click "Save" to preserve your changes.
Editing via Tile View
For the Cases, Tasks, Leads, and Opportunities modules, a unique tile view is available that displays records in an intuitive drag-and-drop interface. Users have the option to edit any records displayed in the tile view by dragging and dropping tiles among columns or by clicking the record's name/subject link within the tile. Clicking the tile will open the record view layout where you can update the necessary fields then click "Save" to preserve the changes. For more information on how to use tile view, refer to the Tile View section of this page.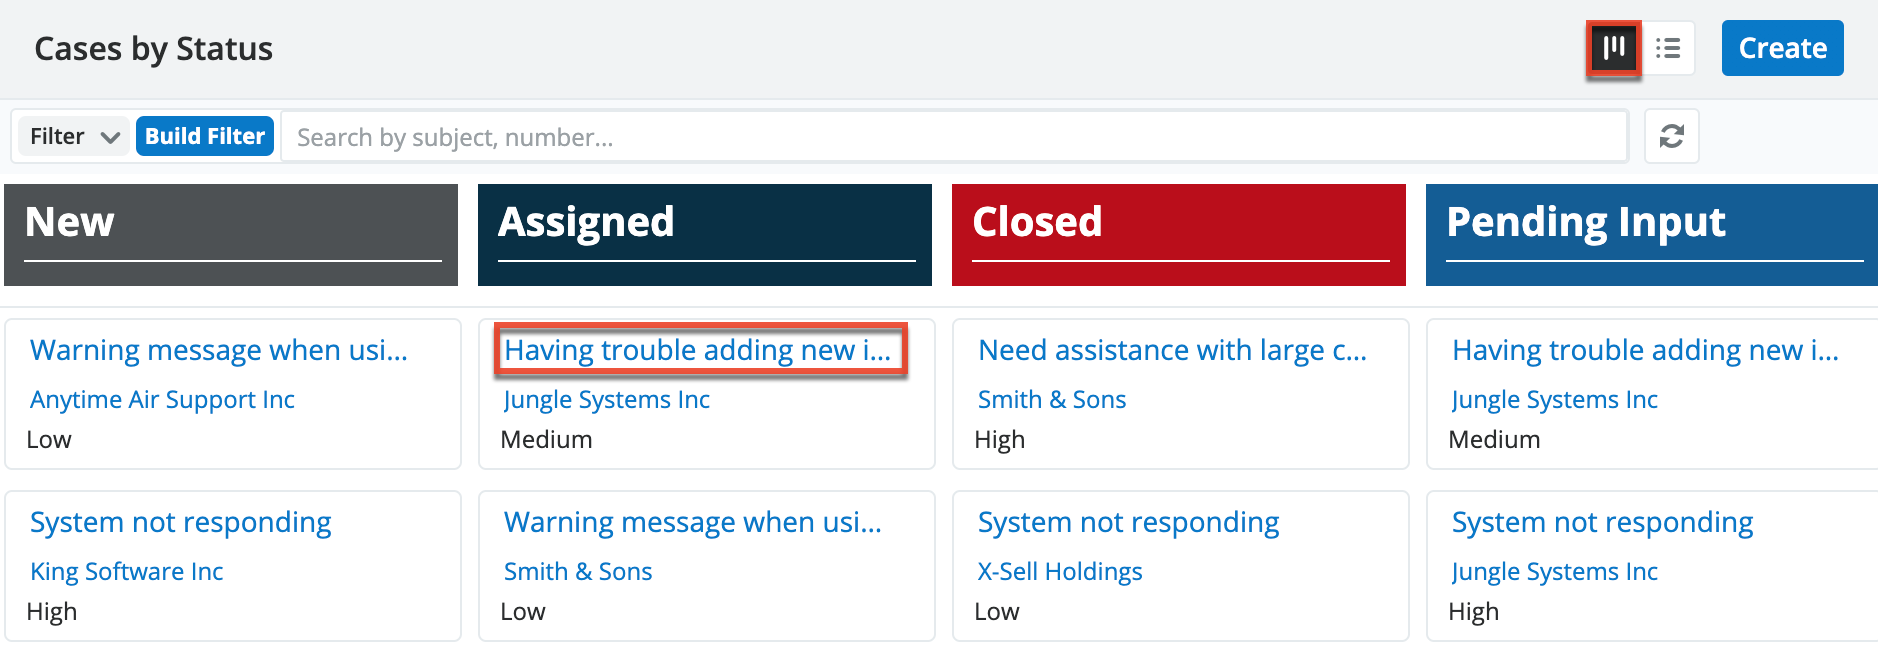
Mass Editing via List View
Mass Updating allows you to apply the same changes to multiple records at once. Administrator users or users with developer-type role access can control which fields are available during mass update via Admin > Studio. Fields with the following data types can be made available for mass updating:
- Checkbox
- Date
- Datetime
- Decimal
- Dropdown
- Encrypt
- Float
- Iframe
- Integer
- Multiselect
- Phone
- Radio
- Relate
- Text
- URL
For more information on configuring the mass update fields, please refer to the Studio documentation. After using list view search to locate the desired records, you can choose individual records or use the Select All option to modify all of the current results. Using the Select All option will allow you to update up to 1000 records at a time. If you wish to update more than 1000 records or update a specific group of records from the list view, use filters to perform the updates in smaller batches.
Please note that your ability to mass update may be restricted by a role. For more information on roles, please refer to the Role Management documentation. Check with your system administrator if you do not see the Mass Update option.
The following steps cover mass updating account records as an example:
- Navigate to the Accounts list view by clicking the Accounts module tab.
- Use the list view's list view search to identify accounts you wish to modify.
- Select the desired accounts then choose "Mass Update" from the Actions menu.
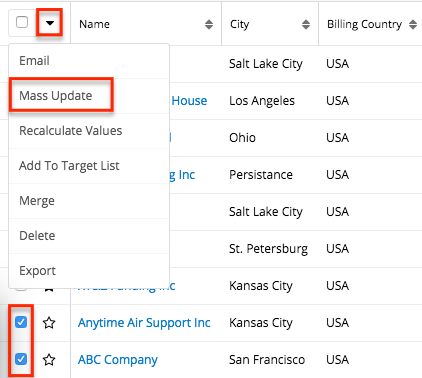
- The Mass Update panel will appear below the search bar. Set values for the field(s) you wish to alter. The following options may be available in the Mass Update panel:
- Add Row/Remove Row: To mass update several fields at once, click the Add button to the right of the row.
- Append {Field}(s): When mass updating a field that may contain multiple values (e.g., Tags, Teams), Sugar will display a checkbox labeled "Append {field}(s)", where {field} is the name of the field you have selected. This option is enabled by default to prevent loss of data by adding the new values to any existing data in the updated field. Disable the checkbox if you prefer to overwrite any existing data in the updated field.

- These additional options appear when mass updating the Teams field:
- Set as Primary Team: Use the star icons to specify which team, if any, should be set as the primary team on the updated records. A primary designation is required when the Append Team(s) option is disabled.
- Add Team/Remove Team: Specify multiple teams by using the Add and Remove buttons adjacent to the Team selection field.

- Click "Update" to save the changes to all of the selected account records.
Note: If your administrator has enabled team-based permissions, you may also see a Lock button or a "Selected" box on the Teams field. Please refer to the Using Team-Based Permissions section for more information.
Deleting Records
If a record is invalid or should no longer appear in your organization's instance, it may be deleted from either the record view or list view. Deleting via the record view allows you to delete the current record while the list view allows for deleting one or more records at a time. Deleting a record will not delete its related records and will only remove the relationship, so you may wish to also delete any related records to avoid orphaned records.
Please note that your ability to delete in Sugar may be restricted by a role. For more information on roles, please refer to the Role Management documentation. Check with your system administrator if you do not see the Delete options.
Deleting via Record View
The following steps cover deleting an account via record view as an example:
- Navigate to an account's record view.
- Select "Delete" from the Actions menu.
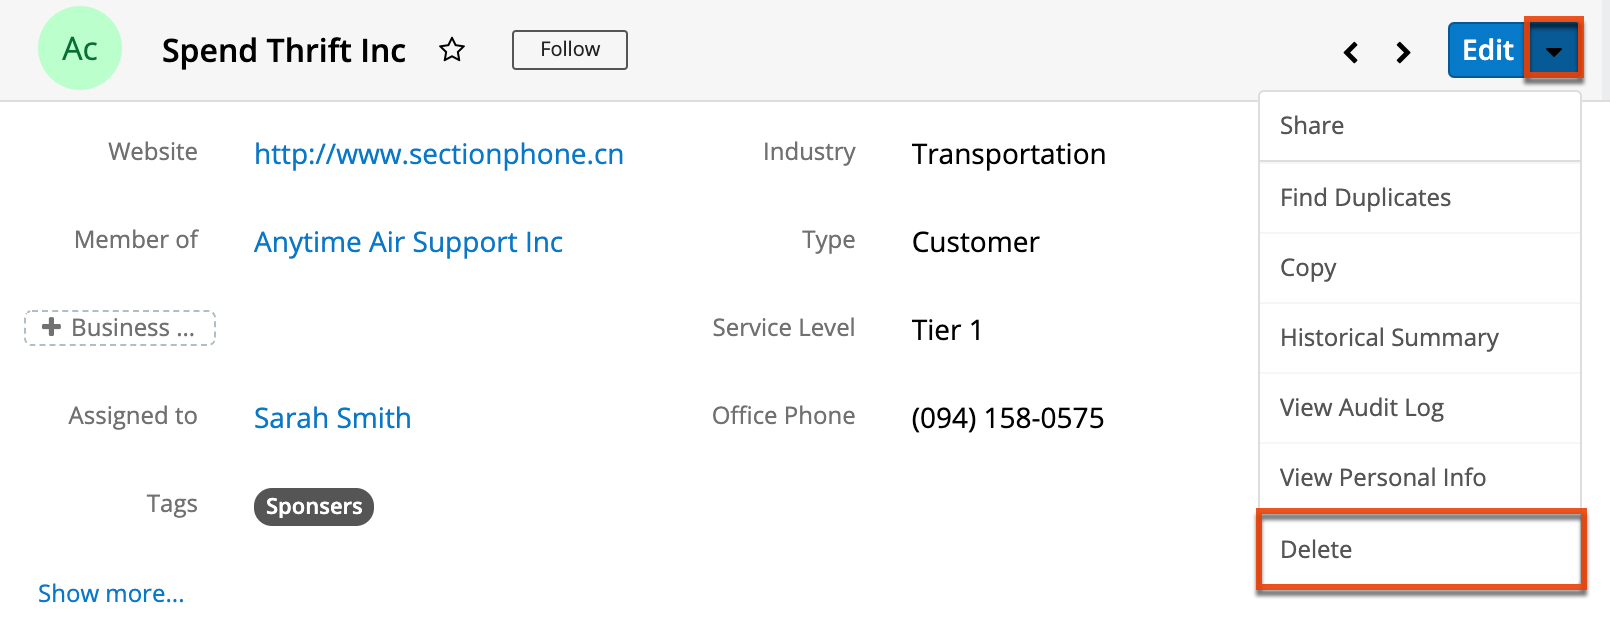
- A pop-up message will display asking for confirmation. Click "Confirm" to proceed.
Deleting via List View
The following steps cover deleting an account via list view as an example:
- Navigate to the Accounts list view by clicking the Accounts module tab.
- Use the List View Search to find the Account record you wish to delete.
- Click the Record Actions Menu to the far right of the record's row and select "Delete".
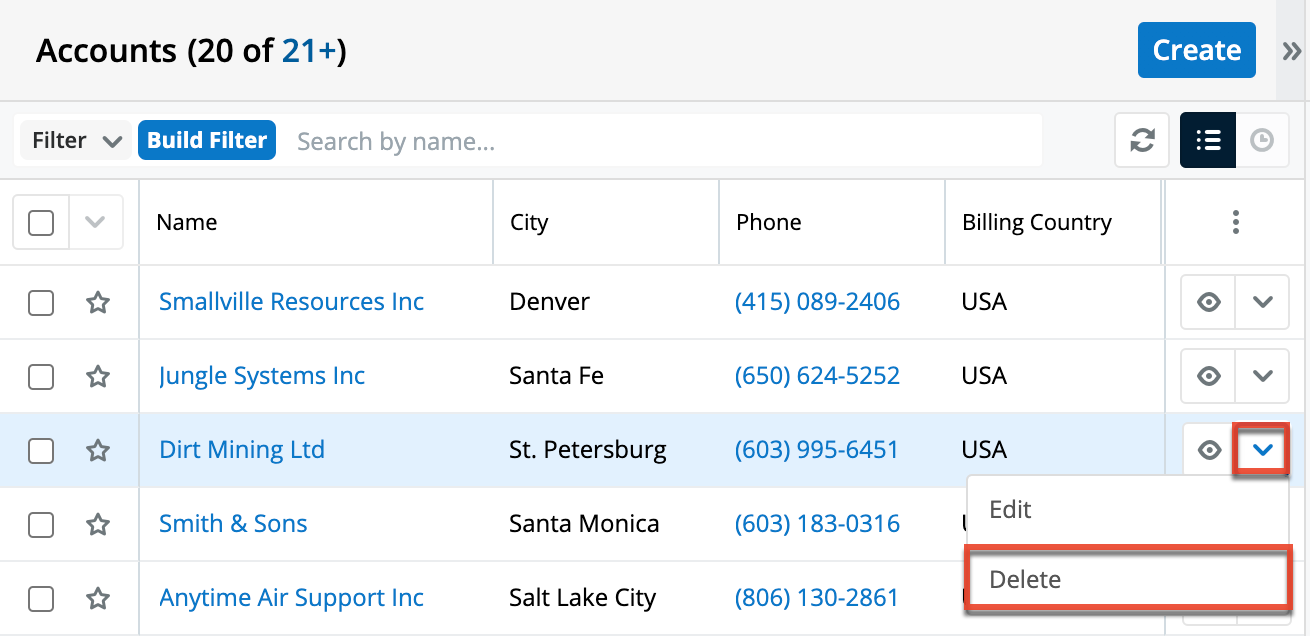
- A pop-up message will display asking for confirmation. Click "Confirm" to proceed.
Mass Deleting via List View
The following steps cover deleting one or more account records via the list view as an example:
- Navigate to the Accounts list view by clicking the Accounts module tab.
- Use the List View Search to find the Account records you wish to delete.
- Select the desired account records then choose "Delete" from the Actions menu.
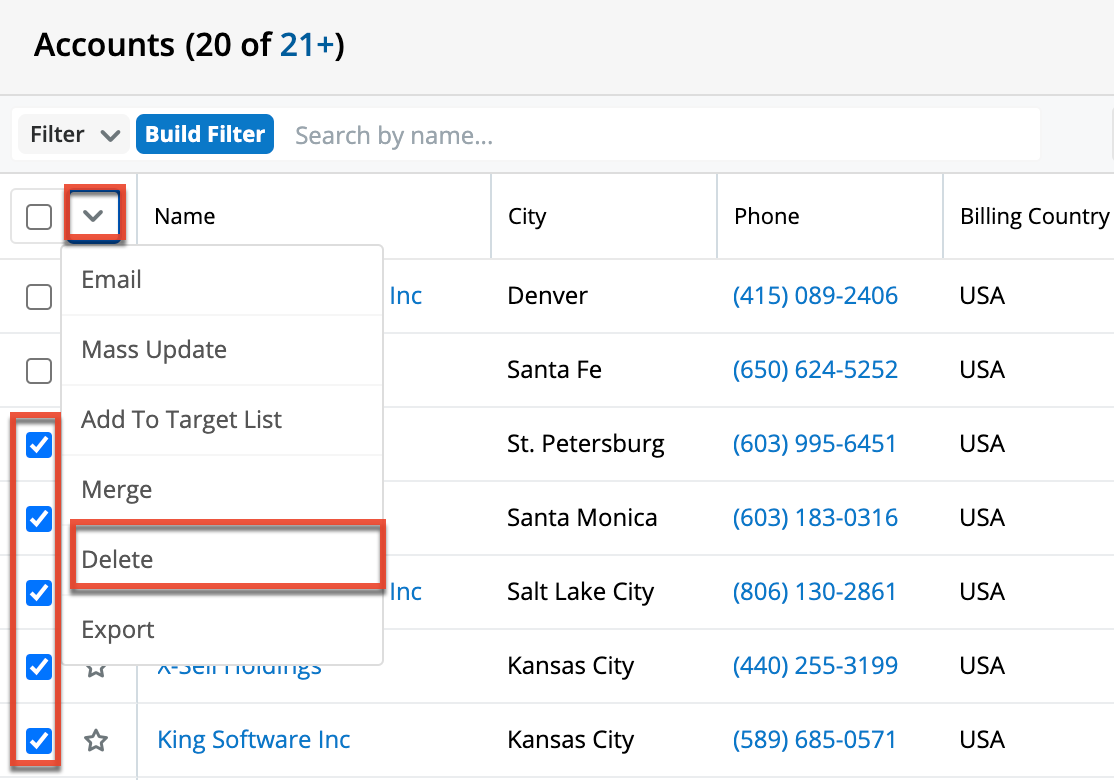
- A pop-up message will display asking for confirmation. Click "Confirm" to proceed.
You can also use the Select All feature in the list view, which will allow you to easily select the first 1000 records in the result set. If you wish to delete more than 1000 records or delete a specific group of records on the list view, please use the filter option in list view search to perform the deletions in smaller batches.
Emailing Records
Sugar allows users to compose and send outbound emails to records that include an Email Address field such as accounts, contacts, leads, and targets as well as any custom person- or company-type modules which include an email address field. The sections below cover the various ways to send emails to records. Accounts, contacts, leads, and targets may also be emailed via campaigns; more information about emailing these records via campaigns can be found on the respective product guide pages.
Note: Before users can send email messages from Sugar, please complete the required configurations described in the Emails documentation. The logged-in user must have at least one outgoing email account successfully configured in the Emails module.
Once an email is successfully sent by a method other than workflows or campaigns, the email record will appear in the History dashlet and Emails subpanel on the record's record view. For more information on sending emails from your own account, please refer to the Emails documentation. 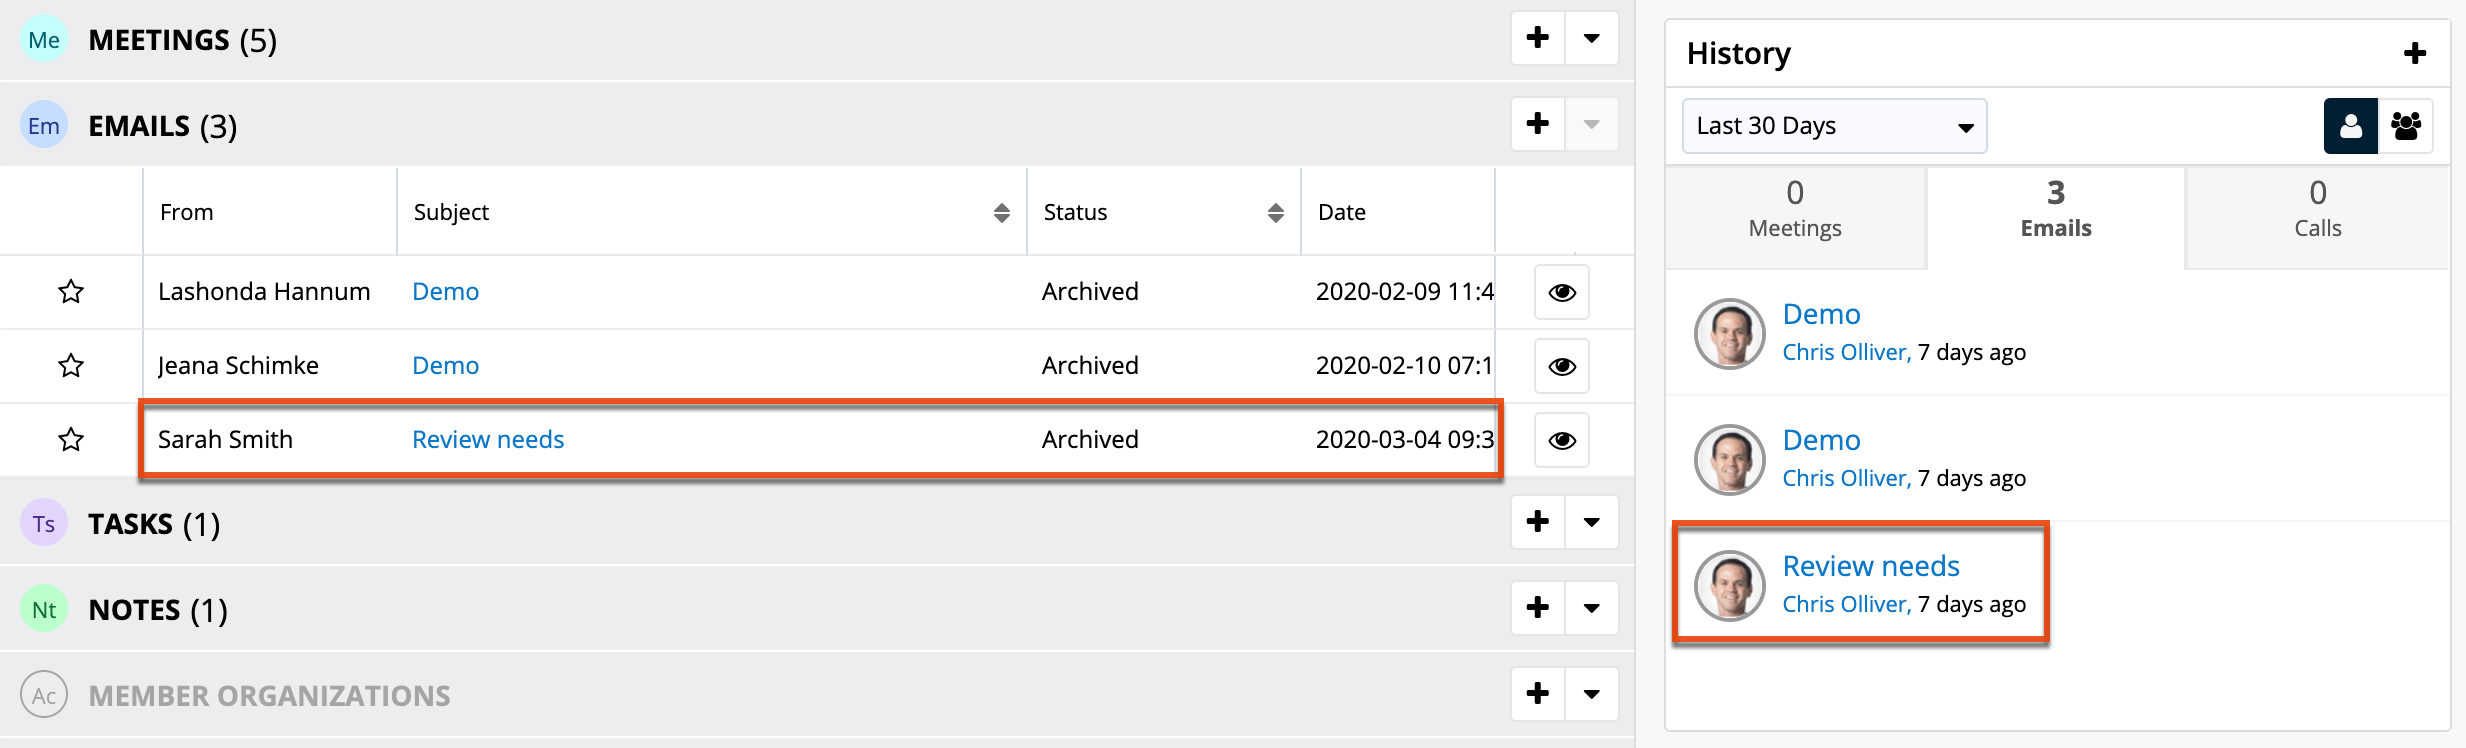
Emailing via List View
For modules that include an Email field, the Email option in the list view's mass actions menu enables users to send an email message to one or more records at a time from the module's list view. Simply select the desired record(s) from the list view then choose "Email" from the list view Mass Actions menu. The Compose Email window will open allowing you to enter all relevant information (e.g., subject, body). Please note that the email will be sent to the selected record's primary email address on file.
The following steps cover composing and sending an email from the Accounts list view as an example:
- Navigate to the Accounts list view by clicking the Accounts module tab.
- Find and select the accounts in the list view that you would like to send an email to.
- Choose "Email" from the Mass Actions menu.
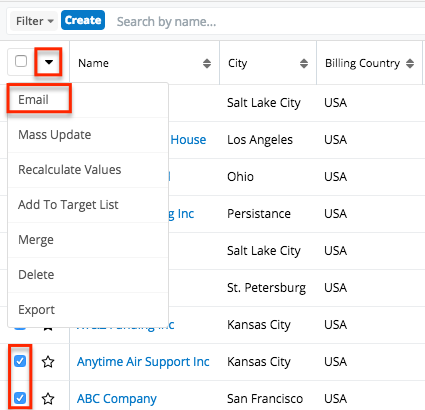
- In the Compose Email window, enter the subject and body of the email message, edit the recipient fields (optional), then click "Send".
After sending the message, the email record will appear in the Emails subpanel and History dashlet of each related record.
Emailing via Quick Create
Quick Create provides an easy way to send an email from Sugar to the recipient associated with the record you are viewing. Quick Create for email messages can be accessed from the Quick Create menu on the navigation bar, from any Emails subpanel, or by clicking on a linked email address in Sugar list views or record views.
- Quick creating via Quick Create menu: Use "Compose Email" in the Quick Create menu to relate a message to the record you are currently viewing and automatically populate the message's "To" field with the record's name and primary email address. If you use the Compose Email quick-create option from any other page, simply insert the desired recipient(s) manually as explained in the Working With Recipient Fields section of the Emails documentation.
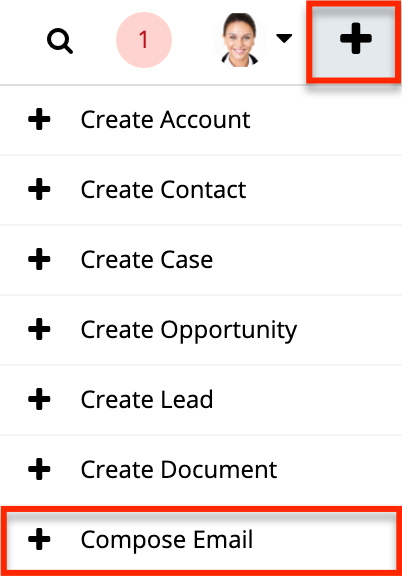
- Quick creating via email address: The Quick Create view will also open if you click on a hyperlinked email address inside the Sugar application. For example, email addresses displayed in list views, dashlets, intelligence panes, and record views can be clicked to expose the Quick Create email compose view pre-filled with the clicked email address.
- Quick create from an email address in list view:
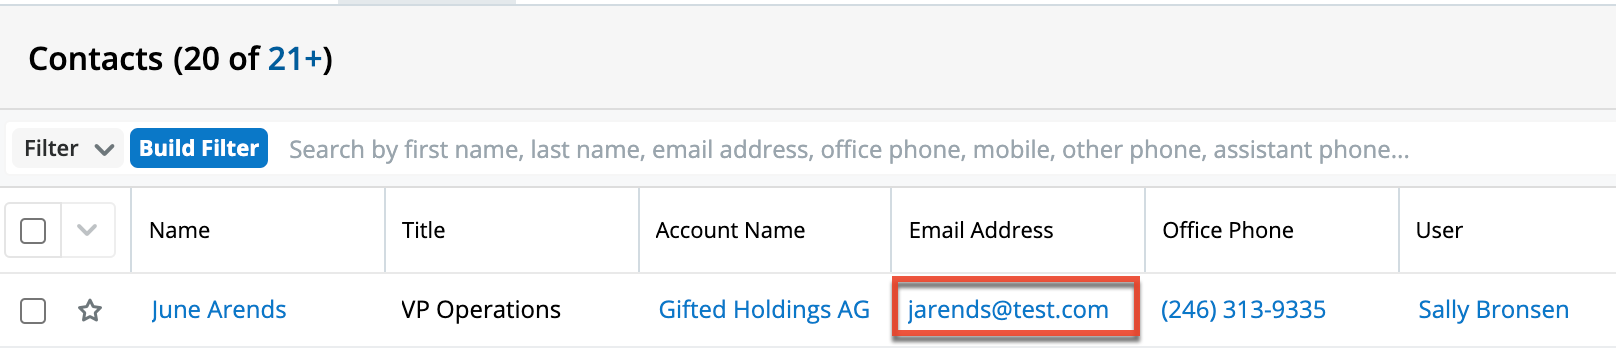
- Quick create from an email address on the record view:
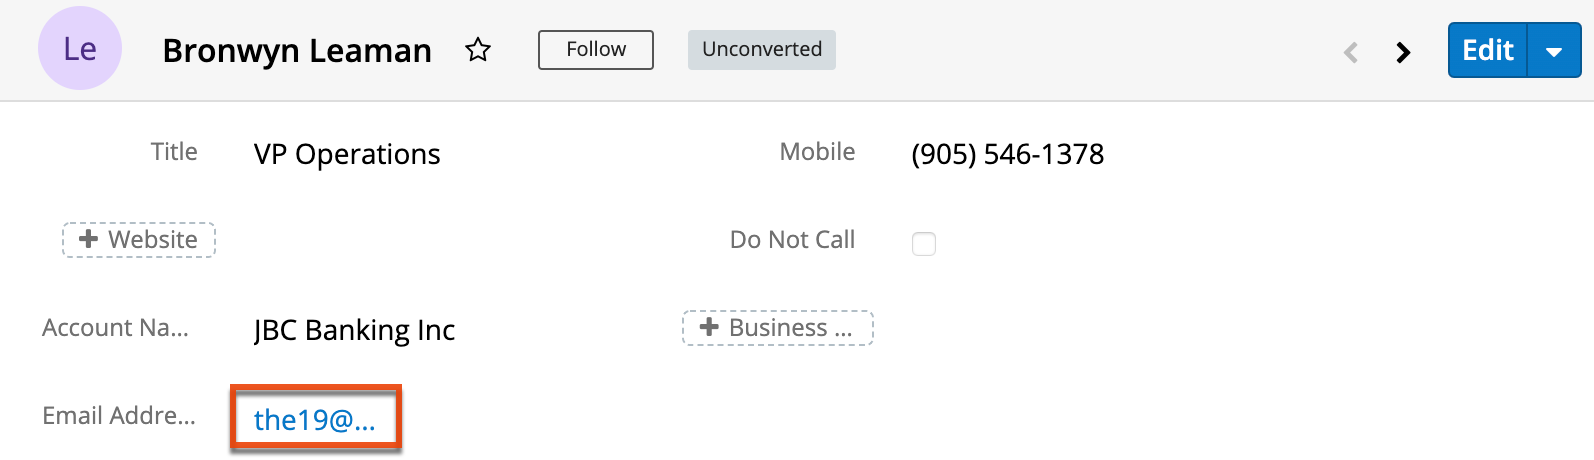
- Quick create from an email address in list view:
- Quick creating via Emails subpanel: Click the Create (+) button on the Emails subpanel to compose an email to the record's primary email address and automatically relate the message to the record you are viewing.
Note: Legacy modules contain an Activities subpanel instead of an Emails subpanel.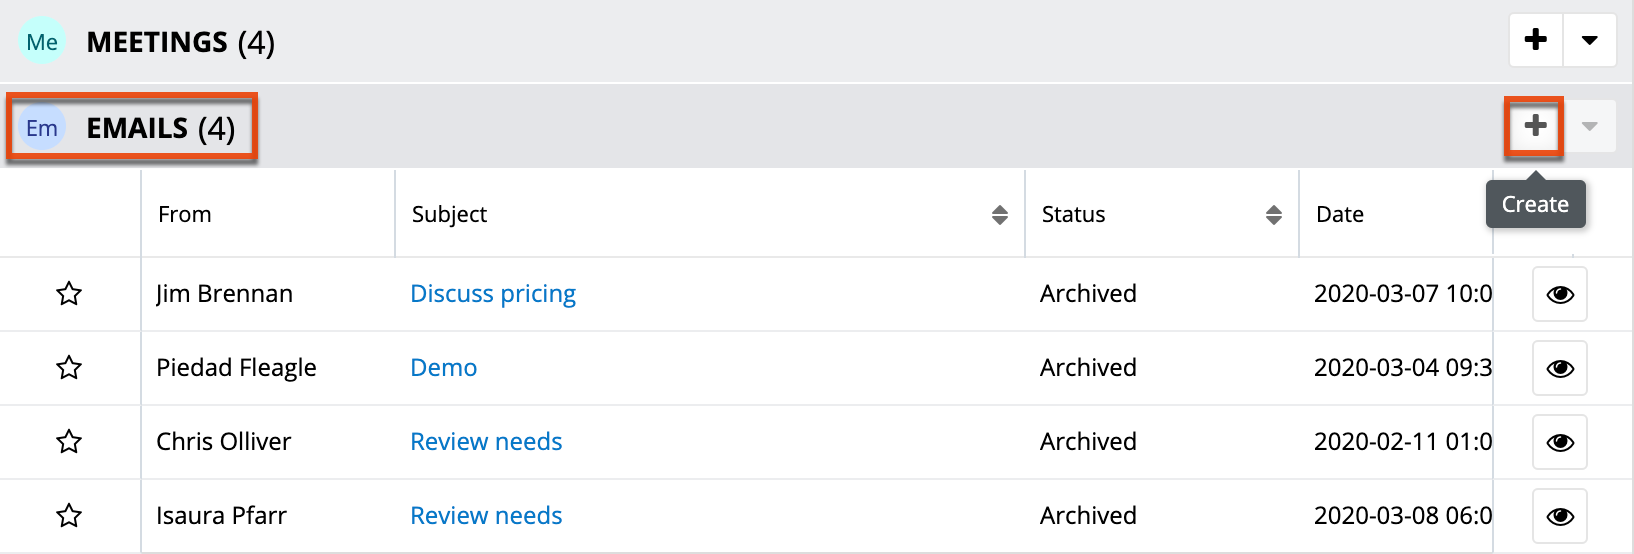
To edit or override a default email recipient on Quick Create, click on the name above the Subject field and the area will transform into the standard From/To/Cc/Bcc form.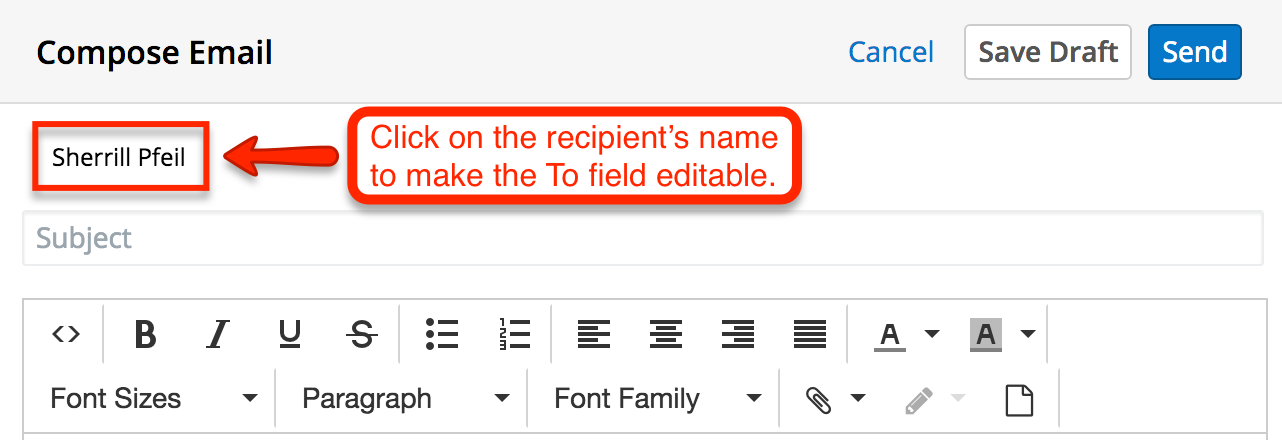
For more information on editing recipients, please refer to the Working With Recipient Fields section of the Emails documentation.
Emailing via the Emails Module
Users can compose and send messages directly from the Emails module by clicking the Compose Email button on the Emails list view or by selecting "Compose Email" on the Emails module tab menu. This opens up the compose layout, which allows you to enter all of the relevant information for the email.
Use the following steps to compose an email via the Emails module:
- Click "Compose Email" on the Emails module list view or the Emails module tab menu:
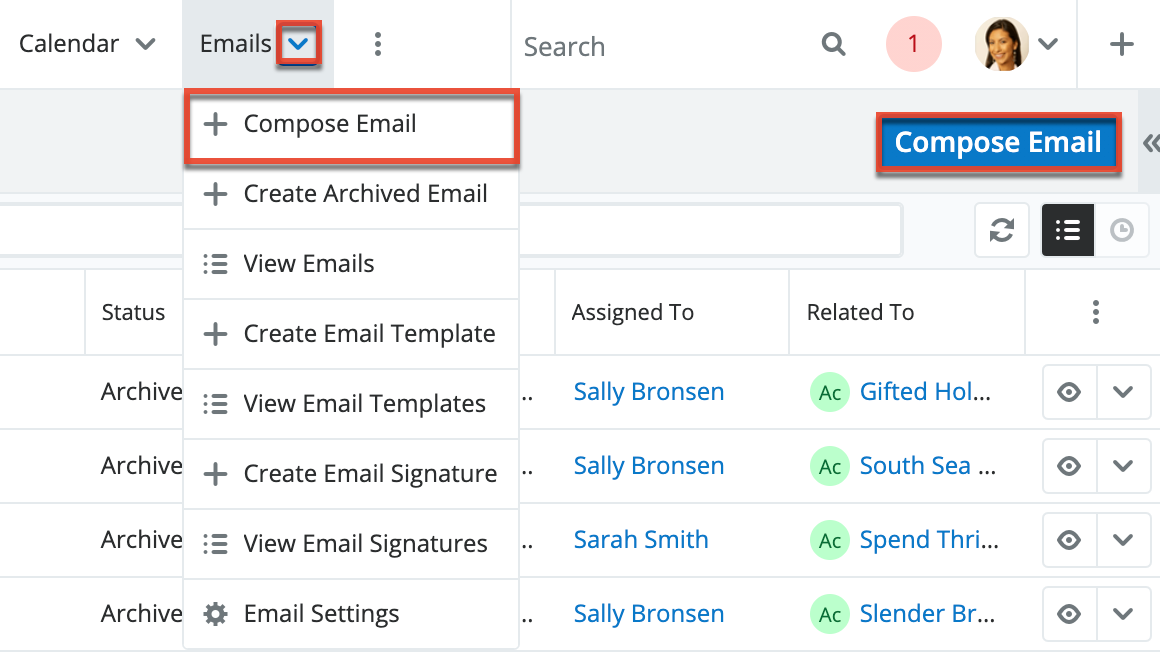
- Enter appropriate values for the fields in the layout. All required fields are marked as such and must be completed prior to saving.
- Once the necessary information is entered, click "Send" to deliver the message to the recipients specified in the To, CC, and BCC fields. Alternatively, click "Save Draft" to navigate away from a message without sending it. Email records in a draft state are only visible to the email's assigned user and the administrator.
For more detailed information about sending email messages, please refer to the Emails documentation.
Emailing via Workflows
Sugar's Workflows module is available to administrators and users with developer-type role access. With each workflow, a set of conditions triggers a combination of actions and email alerts, including the ability to send emails to Sugar records that include an email address. Workflows can send simple emails or can utilize alert email templates built to include relevant data pulled from the record as well as your organization's design and branding. For more information, please refer to the Workflow documentation.
Emailing via SugarBPM
SugarBPM is available to administrators and users with developer-type role access. Process definitions created in SugarBPM may contain Send Message events that include the ability to send emails to Sugar records that have an email address. Send Message events utilize templates created in the Process Email Templates module. Templates may include relevant data pulled from the record as well as your organization's design and branding. For more information, please refer to the Process Email Templates documentation.
Exporting Records
Exporting downloads all fields for the selected records to your computer as a CSV (comma-separated values) file. This may be useful when needing to use Sugar data with other software such as Microsoft Excel or to update existing records by exporting, making changes, then importing the altered records back into Sugar. For more information on updating existing records via import, please refer to the Import documentation. Due to PHP memory limitations on the server, there may be occasions when the application times out while exporting a large number of records. If you encounter an error when performing this action, we recommend selecting the records in smaller batches.
Records may be exported from the module's list view by first locating and selecting the checkboxes of the desired record. Then, select "Export" from the Mass Actions menu. You can also export Rows and Columns-type reports if you wish to employ more complex filter criteria and have greater control over which fields will be included. For more information on exporting records, please refer to the Export documentation.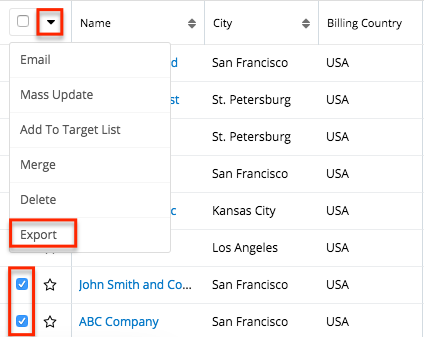
Please note that your ability to export accounts from Sugar may be restricted by a role. For more information, please refer to the Role Management documentation. Check with your system administrator if you do not see the Export option.
Using Team-Based Permissions
In Sugar, teams are typically used to control which groups of users can access a record. Using team-based permissions, however, an administrator may choose to extend the purpose of teams to control who can perform certain operations on the record (e.g., edit, delete). When enabled, regular users can use a record's Teams field to grant access such as viewing, editing, exporting, importing, and deleting permission to specific users or user groups.
An administrator must first enable team-based permissions and configure roles and users for this feature. For more information, please refer to the Role Management documentation. Once the roles are applied to users, any user who can edit the Teams field in the enabled module can grant extra access to teams of users.
If you are not an administrator and you are not sure if team-based permissions are enabled for a module, simply navigate to a record view, click "Edit", and look for a lock button next to the Teams field: 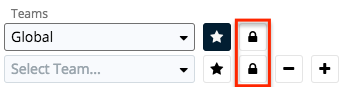
If you do not see a lock button, reach out to your system's administrator to discuss whether team-based permissions are appropriate for your organization's business needs.
Note: Legacy interface modules also support team-based permissions but use a checkbox labeled "Selected" next to the Teams field to indicate whether or not the team's members have extra access to the record.
Team-based permissions have no effect on users who have not been assigned to roles that are configured with "Owner & Selected Teams" access. For more information, please refer to the Record Operation Definitions section. For information on using team-based permissions on a record, please refer to the Role Management documentation.
To grant extra access to a record for all members of a team who have role permission, click the lock button next to the team's name. This will enable additional permissions according to the guidelines in the table below. To control an individual user's access to a record, add that user's private team to the record's Teams field and then enable or disable additional permissions according to the guidelines in the table below. Please note that extra access will only be granted to users who have a role that restricts their access to "Owner & Selected Teams" as described in the Role Management documentation.
| Team Setting | Appearance | Button | Description |
| Additional Permissions Enabled | A black button with an open lock | Members of this team have extra access to this record or fields within the record as controlled by their roles | |
| Additional Permissions Disabled | A white button with a closed lock | Members of this team have no additional team-based permissions as controlled by their roles |
In the following example, members of team East have standard team access to the record (at a minimum, view permission), while Jim and members of team West have view permission plus extra access to do things such as working with restricted fields, and editing, deleting, and exporting the record. Note that a user can be an explicit or implicit member of a selected team, and if they are part of both a selected team and a non-selected team for a record, they will be granted extra access. 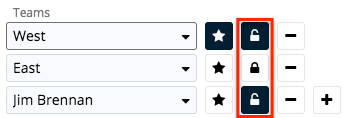
Note: Changes made to the selected state of teams on an existing record are audited in the record's audit log.
Locked Fields
Occasionally, you may see a lock icon (not to be confused with the Lock Button used for team-based permissions) near one or more fields on a record in Sugar. The lock icon indicates that the adjacent field is temporarily locked from editing for all users. Locked fields occur as a result of SugarBPM settings that have been configured by your system's administrator. When a record becomes involved in a process that has locked fields, that record will respect those field locks until the record is no longer participating in the process.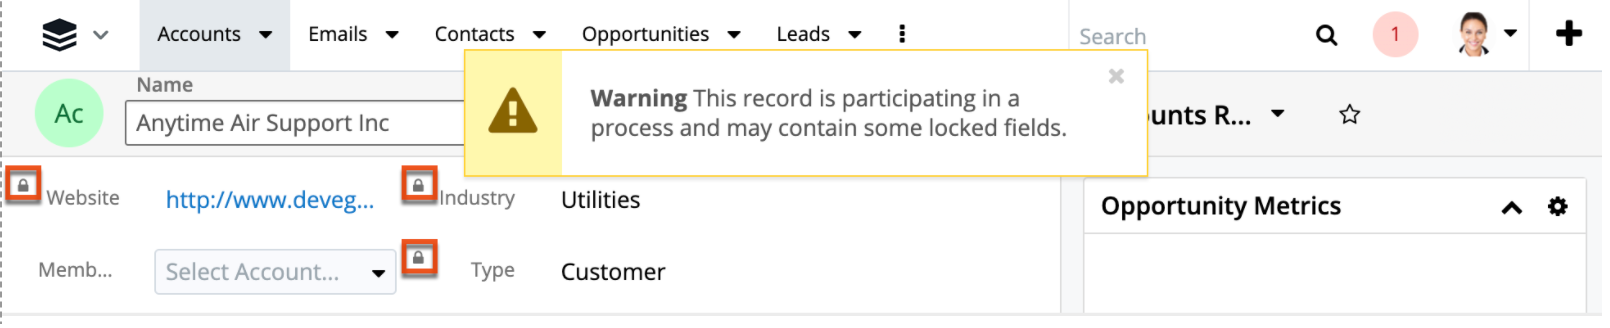
Locked fields are enforced in Sugar for imports, mass updates, and record merging. Please note that records containing one or more locked fields cannot be edited via list view regardless of whether the locked fields appear in the list view's columns. To edit the record's unlocked fields, you must navigate to the record view, which you can do by clicking on the record's link in the alert box or as you typically would in Sugar.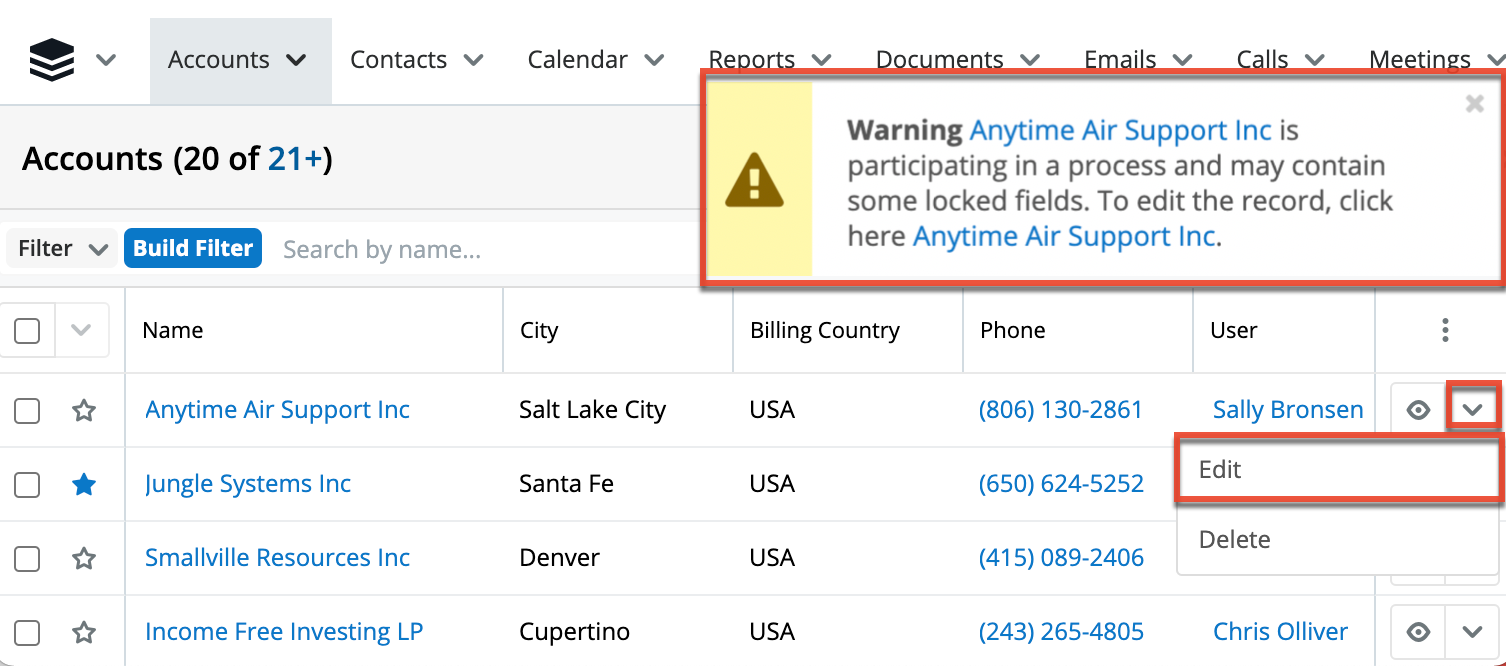
Recalculating Calculated Values
Administrators or users with developer-level role access to a module may see an additional option in the list view's Actions menu: "Recalculate Values". This option appears only for modules that contain one or more calculated fields. For more information on calculated fields, please refer to the Studio documentation.
This utility allows administrators to recalculate affected field values following the addition or alteration of a calculated field in Studio. The Mass Actions menu option allows you to recalculate field values for up to 1000 records at a time. To update more than 1000 records, perform the recalculations in multiple batches as needed.
Note: This action will not appear unless the user is an administrator or has developer-level access to the module and there is at least one calculated value in that module. Please note that your ability to recalculate values may be restricted by a role. For more information on roles, please refer to the Role Management documentation. Check with your system administrator if you do not see the Recalculate Values option.
The following steps cover recalculating values for records from the Accounts list view as an example:
- Navigate to the Accounts list view by clicking the Accounts module tab.
- Use the list view's List View Search to identify accounts you wish to update.
- Select the desired accounts then choose "Recalculate Values" from the Actions menu.
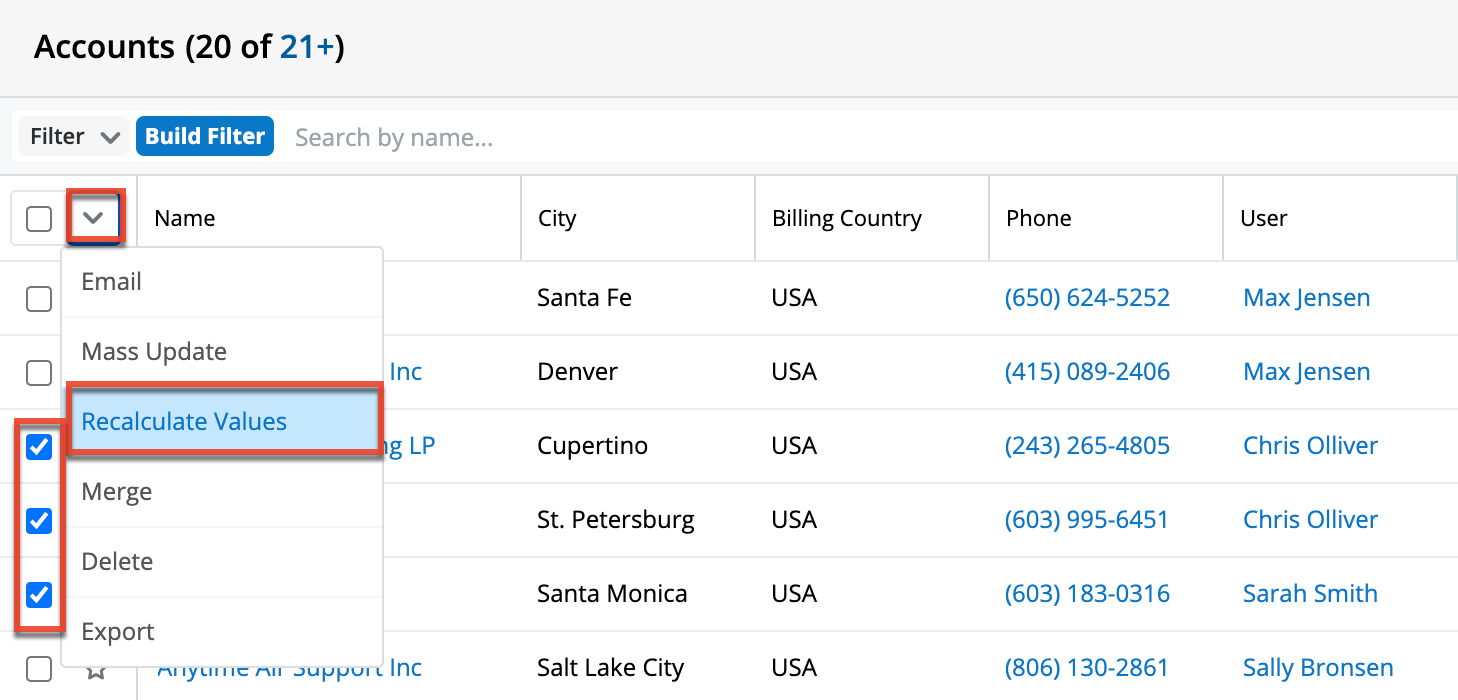
Finding Duplicate Records
Between multiple users working in Sugar, importing new records, and converting leads, it is possible for duplicate records to be accidentally put into the system. Before creating a new record, the best practice is to first check that the record does not already exist in Sugar. You can identify duplicate records for cleanup using list view search from the module's list view.
Searching for records with similar names or other information can turn search into a powerful, duplicates-finding tool. A wizard is also available for finding potential duplicates and may be used as shown below. If duplicate records are detected, you can perform a merge per the Merging Records section of this documentation.
Please note that your ability to use the Find Duplicates action may be restricted by any role which prevents editing records. For more information on roles, please refer to the Role Management documentation. Check with your system administrator if you do not see the Find Duplicates option.
The following steps cover locating duplicate accounts using the Find Duplicates option from the Accounts record view as an example:
- Navigate to an account's record view.
- Choose "Find Duplicates" from the Actions menu.
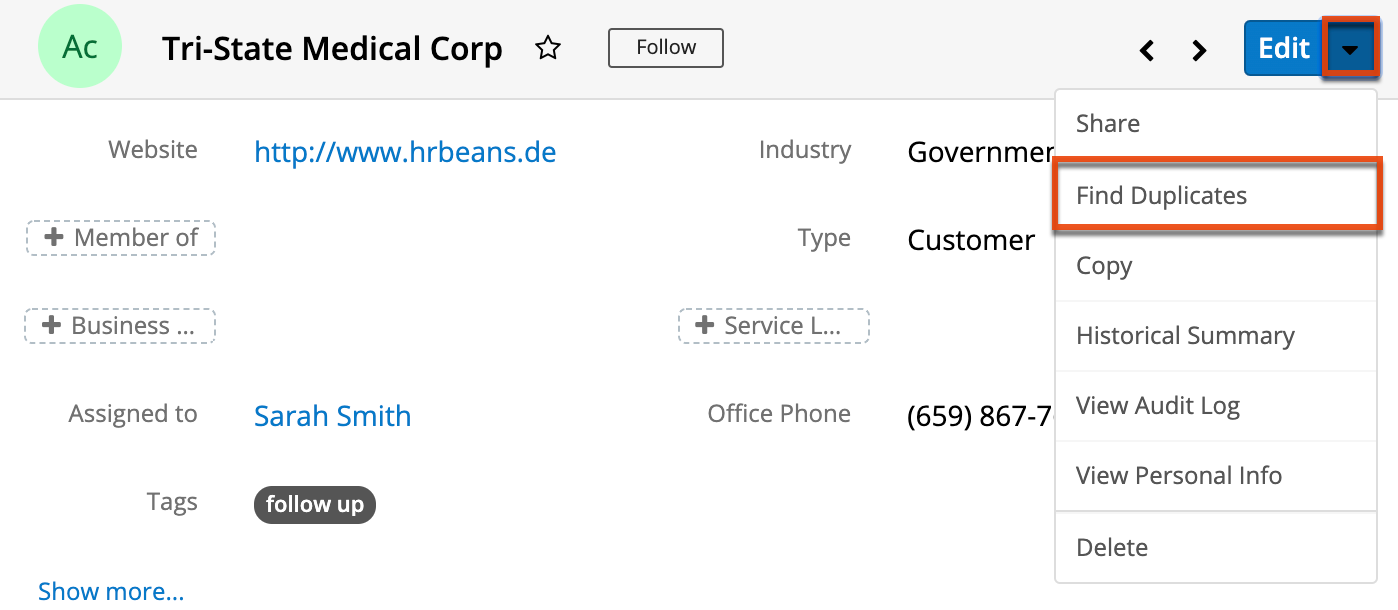
- Potential duplicate account records will be listed on the Find Duplicates page. Select the duplicate record(s) you wish to merge then click "Merge Duplicates".
- You can preview the duplicate record's details by clicking the Preview button to the far right of the record's row.
- You can search for specific records from the Accounts list view if you wish to check for more potential duplicates. For more information on performing a search, please refer to the List View Search section of this documentation.
- You can also click the three-dots menu above the Preview button to change the list of fields that display on the list view column headers.
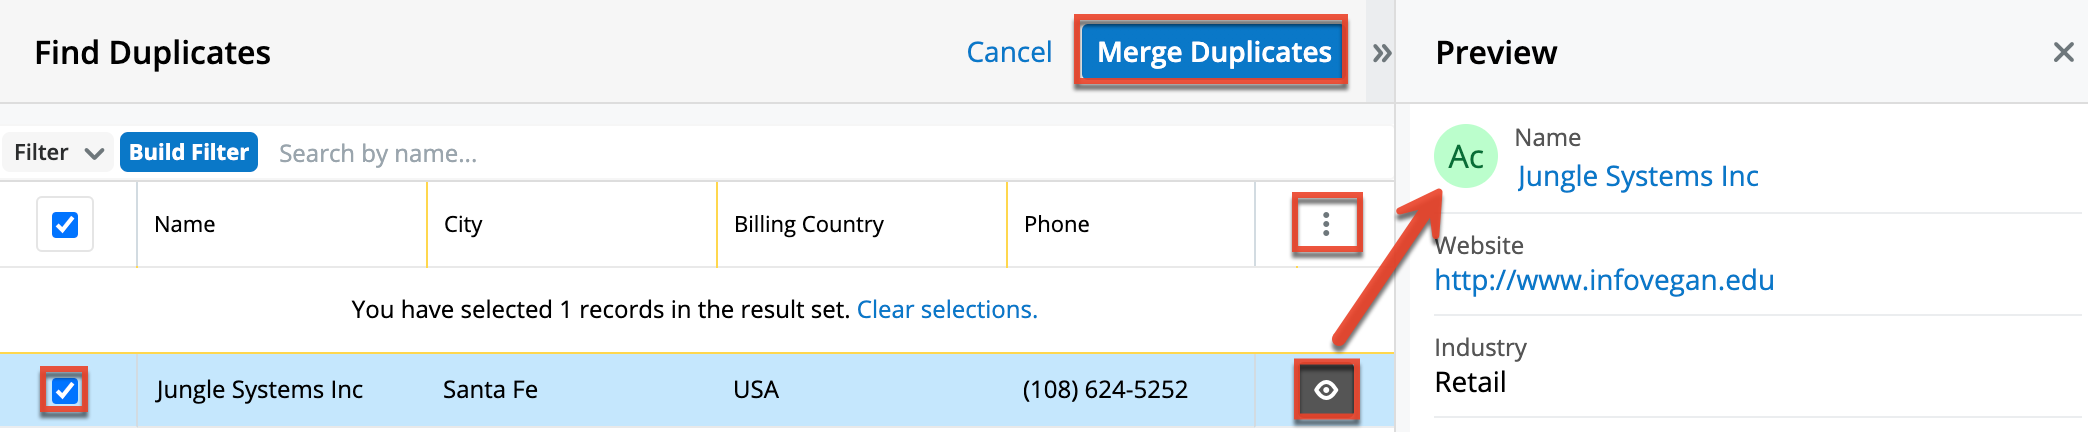
Once you click "Merge Duplicates", the merging process with the current record will begin. For instructions on performing the merge that follows, please refer to Steps 3-9 of the Merging via List View section of this documentation.
Merging Records
When duplicate records are identified in Sugar, you have the option to merge two or more into a single record. Once the merge is complete, the duplicate record(s) will be deleted, and the primary record will remain. Please note that all relationships belonging to the duplicate records will be merged to the primary record meaning that any calls, meetings, cases, etc. related to the duplicate record(s) will automatically be related to the resulting, merged record.
Note: Date Created, Date Modified, and Password field types are not supported when merging duplicate records in Sugar.
Merging via List View
List View Search may be used to identify duplicate records by, for example, searching for records with similar names. Once your search has identified duplicates, you can merge them directly from the module's list view.
The following steps cover merging accounts via the list view as an example:
- Use the list view's List View Search to identify duplicate accounts.
- Possible duplicates will be displayed in the list view. Select the duplicate record(s) that you wish to merge.
- Please note that up to five records may be merged at once in Sugar. An error message ("Invalid number of records passed. The valid range is from 2 to 5 records.") will appear if more than five records are selected when attempting to perform a merge.
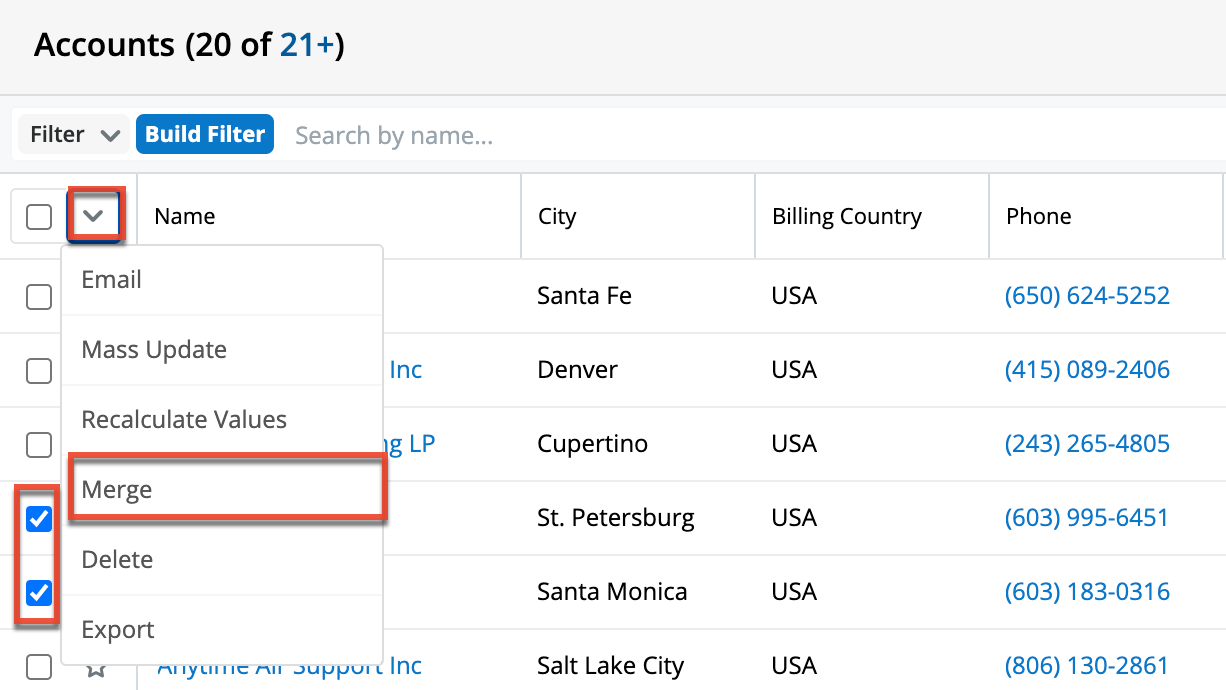
- Select "Merge" from the Actions menu to display the Merging Records page. The primary record's field values are displayed on the left while other record's values are in columns to the right. For convenience, fields with different values will appear at the top of the list. Saving the merged records will preserve only the field values marked with the radio button into a single record.
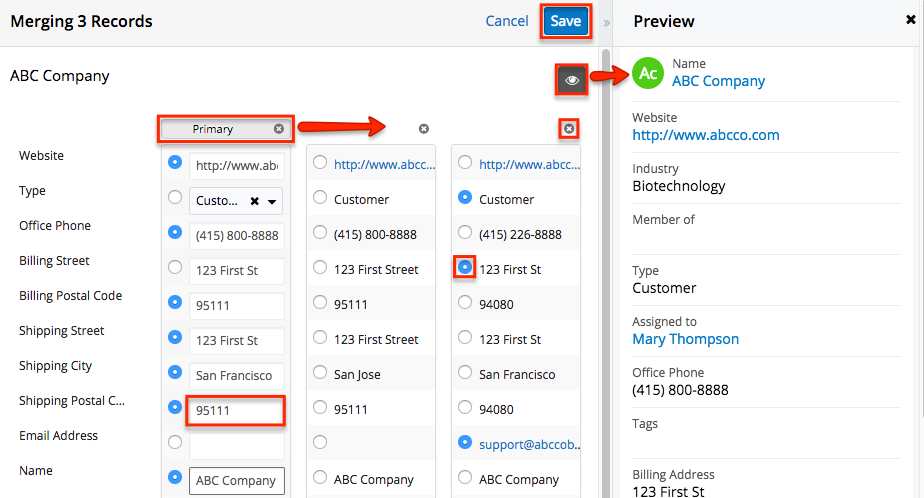
If 3 or more records are selected to be merged, an X icon will appear at the top right of each record. Clicking the "X" will remove the record from the merge process but will not delete the record. - To change which record is considered the primary, drag and drop the Primary label on the top of a different column.
- Review the field values in each column and click the radio button to the left of the value that should appear on the final record. You can also manually type or select a new value for any field as necessary.
- Note: Fields you do not have Edit access for cannot be edited on the merging records page.
- Preview what the final, merged record will contain as you work by clicking the Preview button (eye icon) to display the preview in the Intelligence Pane.
- Click "Save" once all fields you wish to appear on the single, merged record have their radio buttons selected.
- A pop-up message will display confirming that the duplicate record(s) should be deleted. Click "Confirm" to proceed.
Viewing Record Historical Summaries
For modules that are related to activity records (e.g., calls, meetings, emails, notes, and tasks), you can view quick details of the related activities via a record's Historical Summary option. From the record view, simply select "Historical Summary" in the Actions menu.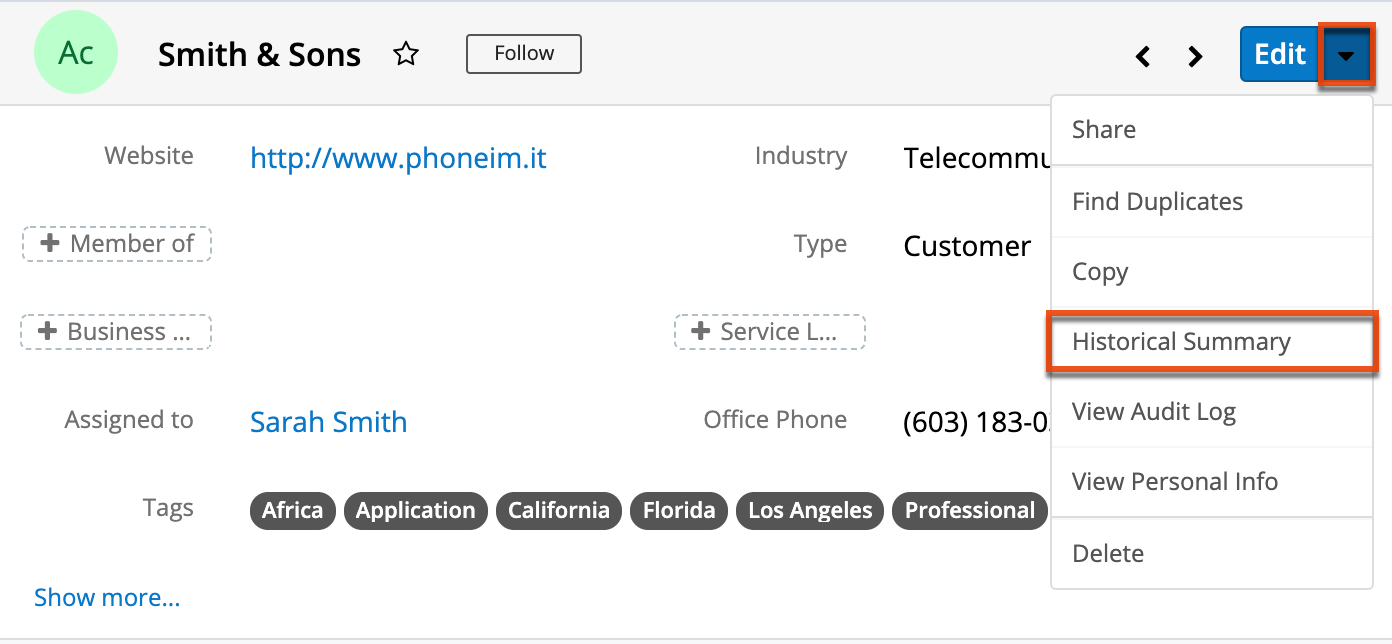
The Historical Summary shows a digest of the following activity records that are considered closed by virtue of their statuses:
| Record Type | Included Statuses |
| Calls |
Held, Canceled |
| Emails | Sent, Received, Archived |
| Meetings | Held, Canceled |
| Notes | All notes |
| Tasks | Completed, Deferred |
Note: Calls and meetings with a Canceled status will display a status of "Not Held" in the Historical Summary.
The Historical Summary page will display as a list view with each activity's type, subject, status, description, etc., and allow you to click the activity's name to view its full details. You can add additional fields by clicking the Column Selection icon to the far right of the list view column headers. You can also preview the activity record in the intelligence pane by clicking the Preview button to the far right of each record's row, providing key information as well as any activity stream information. For more information on activity streams, please refer to the Activity Streams documentation.
The Historical Summary list view provides the ability to reorder columns by dragging and dropping the title of the column to the desired location. The new column order is saved to the database so that the order will remain for a user upon subsequent visits to the module, even if the browser cache is cleared. You can reset the column order to the default view by clicking the Gear icon to the far right of the list view column headers and selecting "Reset default view". Please note that this option only appears if the current list view column order is different from the system's default column order.
Users can also easily adjust the size of columns in the Historical Summary list view per their viewing preference. Simply place your cursor on the column divider, and when the Left-and-Right arrow appears, click and drag the column to the desired size. The set column width will be preserved when you navigate away from the page. Sugar will render the preferred column size across sessions. You can reset the column width to the default size by clicking the Gear icon to the far right of the list view column headers and selecting "Reset default widths". Please note that this option only appears if at least one of the column widths in the Historical Summary list view is different from the default column width.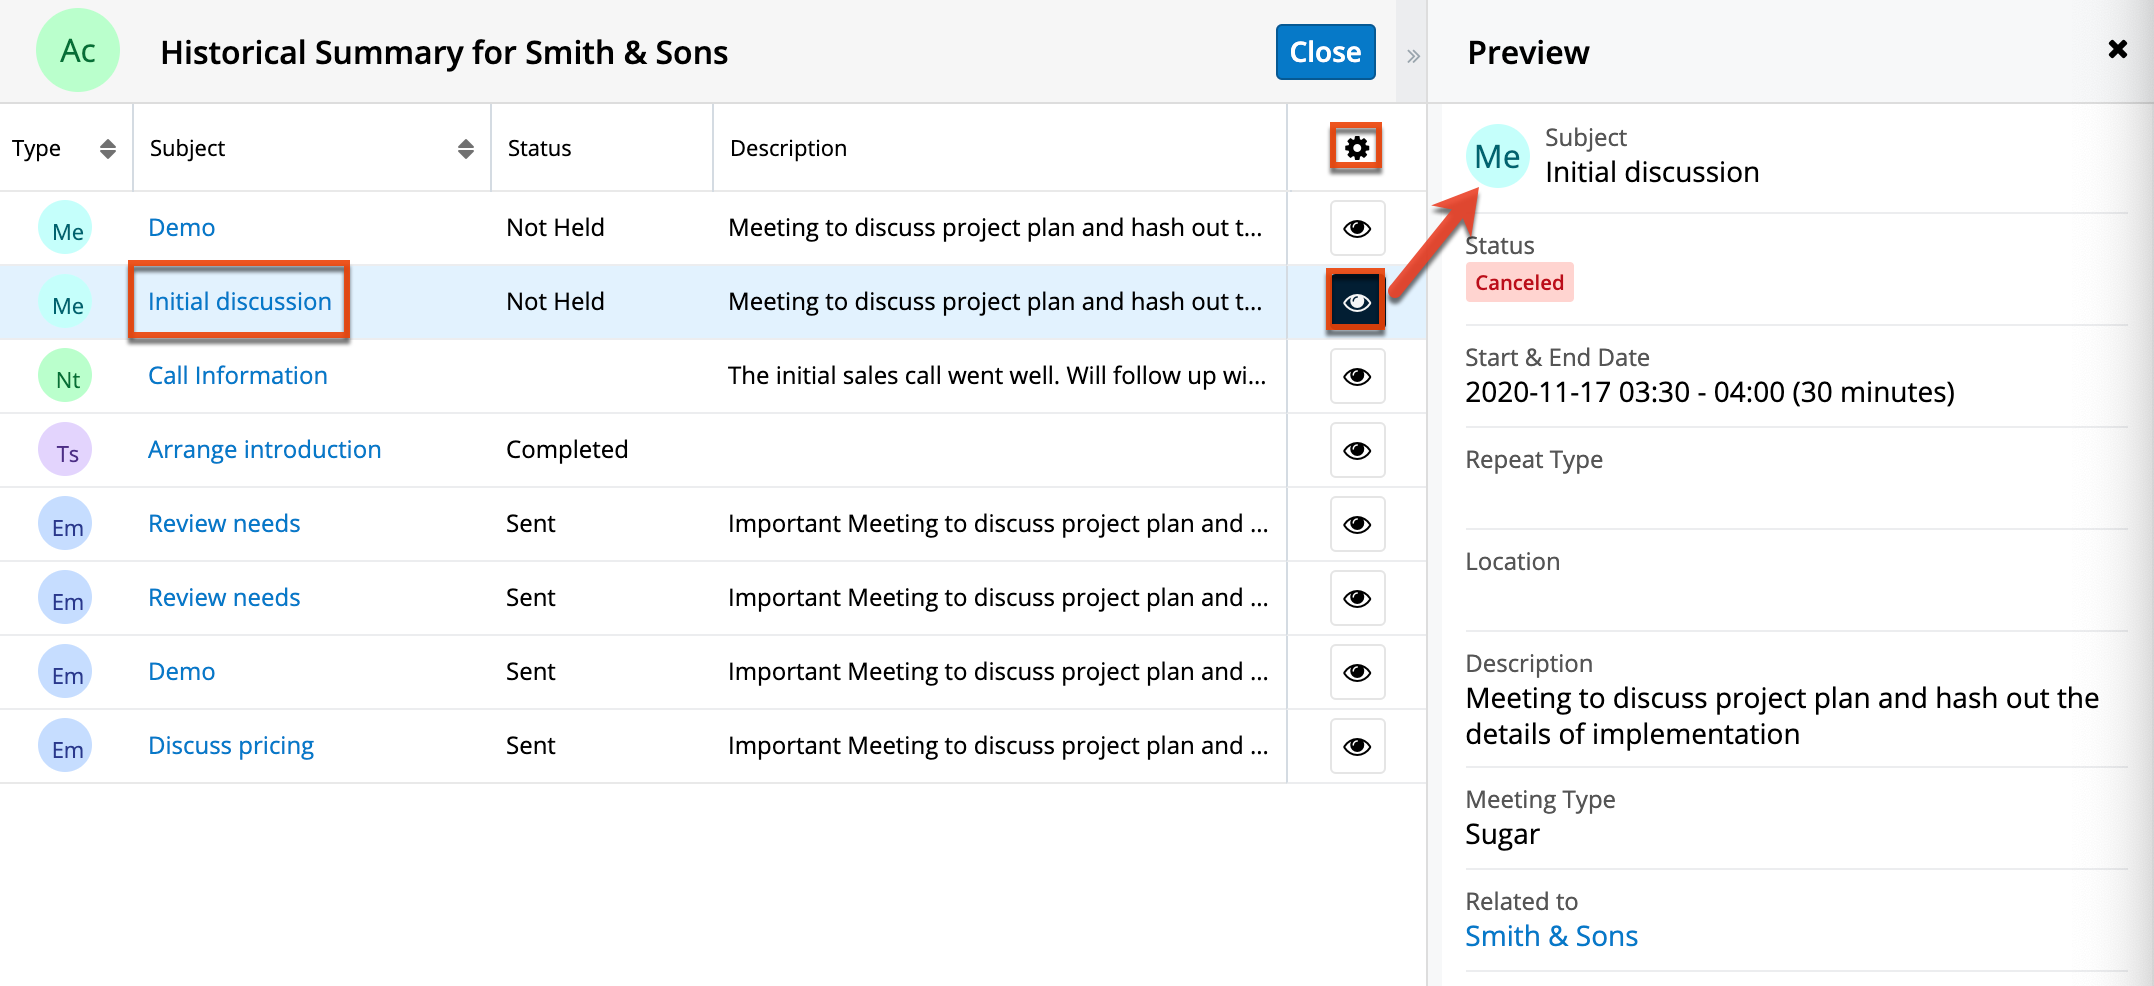
Viewing Record Audit Logs
Changes made to each record are tracked over time, and users are able to view the history of changes via each record's audit log. To access the audit log, simply navigate to the record view and select "View Audit Log" from the Actions menu. Please note that the audit log only tracks changes to fields that are marked as "Audit" via Admin > Studio. For more information on designating fields for audit, refer to the Studio documentation. The list of fields currently marked for audit for the module will appear at the bottom of each record's audit log page. 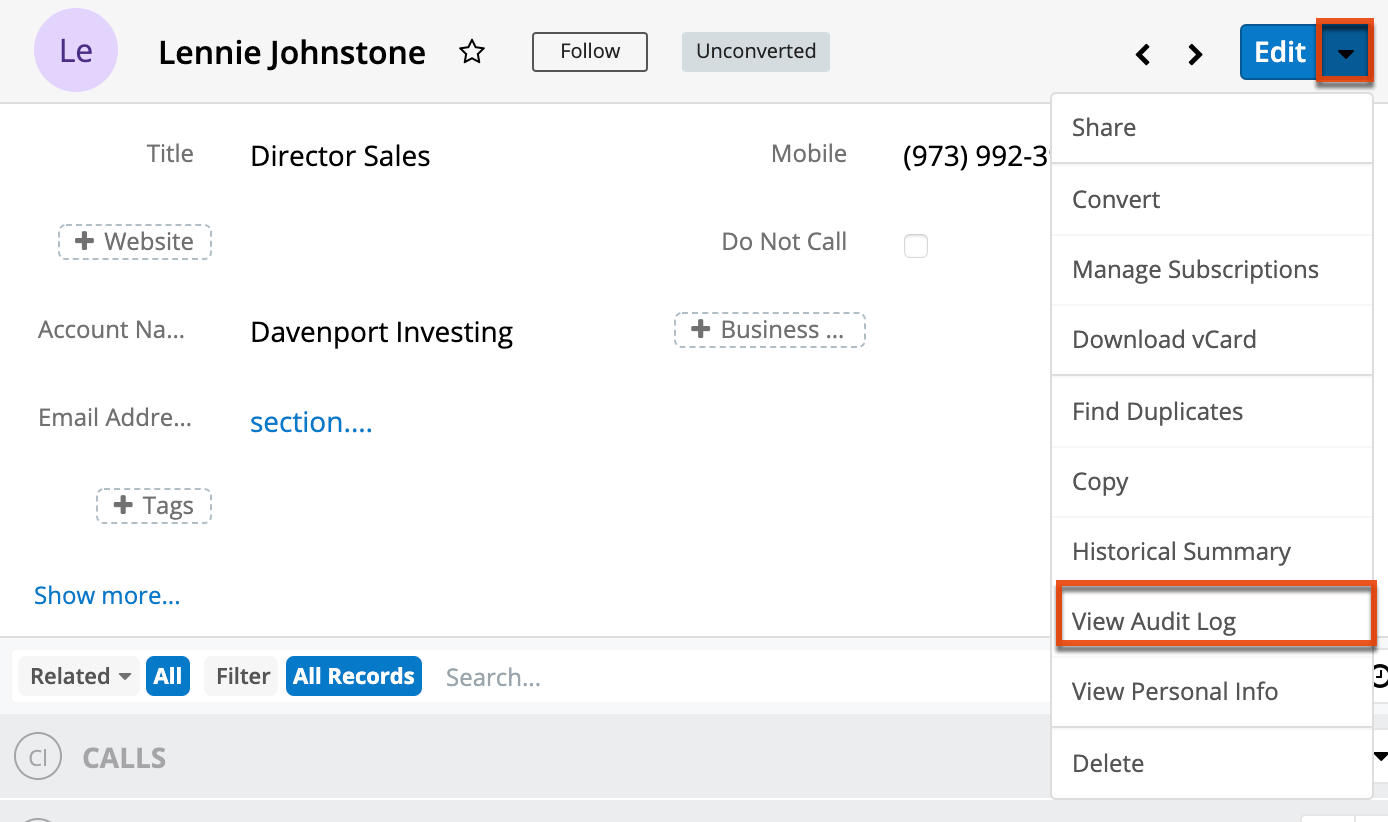
Once the audit log opens, the header will display the name of the current record to better identify which record's audit log the user is viewing. Please note that the header will just display "Audit Log" and not include the record's name if the user does not have access to the record's name or the record's name is blank. Below the header, the user can perform a search to retrieve log entries for specific fields (e.g., Office Phone), old values, or new values. 
The audit log contains the following fields:
| Field | Description |
| Field |
The name of the audited field that has a change in value. Note: Only fields marked as "Audit" in Admin > Studio will be displayed in the audit log. |
| Old Value | The old field value prior to the data change. |
| New Value | The new field value after the data change. |
| Changed By | The Sugar user who made the data change. |
| Source |
The source (e.g., Sugar user, Web to Lead form) from which each field change originated. Note: The field may be blank if the source is unknown. |
| Change Date | The date the field change occurred. |
Note: For instances that use SugarIdentity, administrators have the ability to log in as other users in their organization using the "Impersonate (Log in as)" option in SugarIdentity. If the administrator makes any changes to audited fields during the impersonation session, the audit log will capture the change as being made by the administrator on the user's behalf. The Source column will display the administrator's name next to a mask icon to indicate changes made by the admin while impersonating the user.
The rows of the audit log represent each time that an audited field is set or changed, starting with values specified during the record's creation. In addition, when any email address changes are captured in the audit log, the email audit icon appears to the right of the email address which provides users access to the email address audit log. For more information, refer to the Viewing Email Address Audit Logs section below.
In addition to the old and new values of each field change, the time and source of the change are recorded. When a user is directly responsible for the change, whether by editing in Sugar or via an authenticated service such as Sugar's Plug-in for Microsoft Outlook, the user will be specifically named. However, many non-user entities are also responsible for record changes. Potential source values are as follows:
- SugarBPM
- BWC UI
- Rest API
- SOAP or v4_1 and older REST API
- CLI
- Cron Job
- Logic Hook
- Sugar Workflow
- User
- Web to Lead
- Installer
Viewing Email Address Audit Logs
Email address audit log entries are generated for an email address whenever the "Opted Out" or "Invalid" flags are modified or when an opt-in link is generated. These changes are captured in the email address audit log which can be accessed by clicking the email audit icon to the right of the email address on the record audit log. 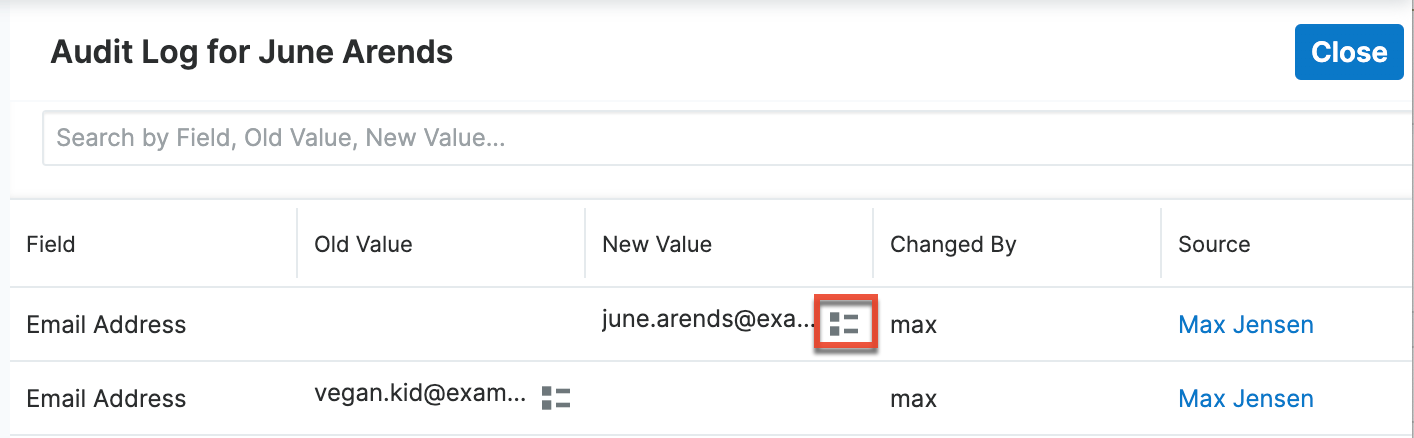
The email address audit log contains the same fields (e.g., Fields, New Value, Source) as the record audit log but will only display entries when there are changes to the Opted Out and/or Invalid options for the email address. Please note that the email address audit log will not display any data if an email address is not marked as "Opted Out" or "Invalid" when it is initially added to the record.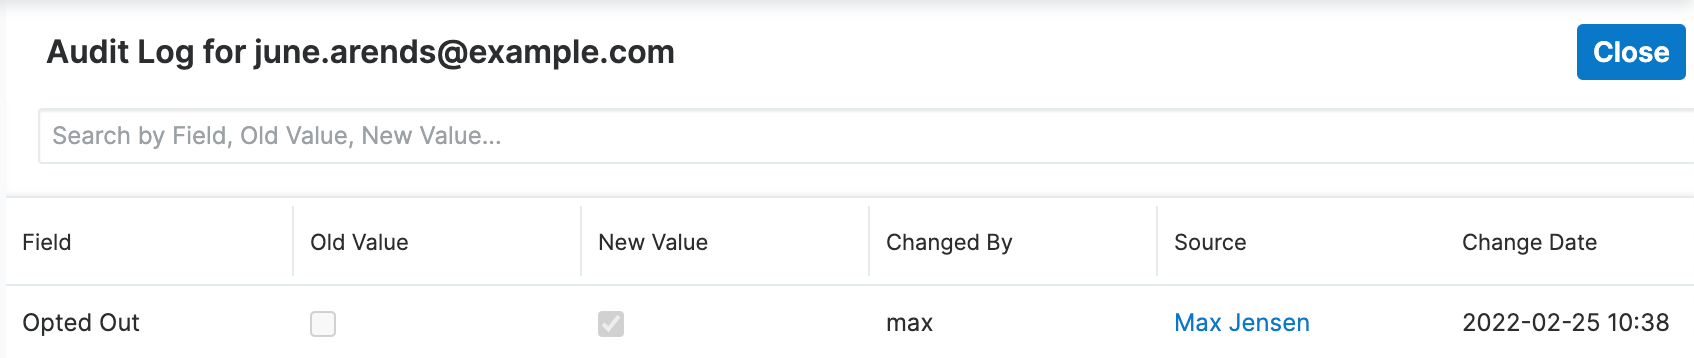
Viewing Personal Information
For organizations that prioritize data privacy, fields that contain personally identifying information for an individual are of particular importance. Admins can designate these fields as "Personal Information" via Admin > Studio. If your organization's data privacy procedures include providing individuals with a record of the data you have recorded about them, the View Personal Info option provides a valuable tool for condensing all of a record's personal information on one screen. For more information on using this option and servicing data privacy records of types "Send Personal Information Being Process" or "Export Information", refer to the Data Privacy Guide.
Note: For instances that use SugarIdentity, administrators have the ability to log in as other users in their organization using the "Impersonate (Log in as)" option in SugarIdentity. If the administrator makes any changes to the record's personal information fields (e.g., email address, phone), the Personal Info screen will capture the change as being made by the administrator on the user's behalf. The Source column will display the administrator's name next to a mask icon to indicate changes made by the admin while impersonating as the user.
Record PDFs
If you require a record's information outside of Sugar, you can download or email the information in PDF form. Administrators have the ability to build multiple PDF templates via Admin > PDF Manager for each module to ensure that the relevant record information is being included for your specific purpose. For more information on creating and managing PDF templates, please refer to the PDF Manager documentation. Please note that the Download PDF and Email PDF options will only appear in the Actions menu if there is an existing PDF template available for the module.
Note: If a user's email address is empty in their profile or if they have set their email client to "External Email Client", then the "Email PDF" option will be hidden for that user.
Downloading Record PDFs
Download record information as a PDF file via the desired record's record view by selecting "Download PDF" from the Actions menu. All PDF templates which your administrator has created and made available for the module will appear beneath the Download PDF option. Simply select one of the templates to generate the PDF file to view or save onto your local machine. 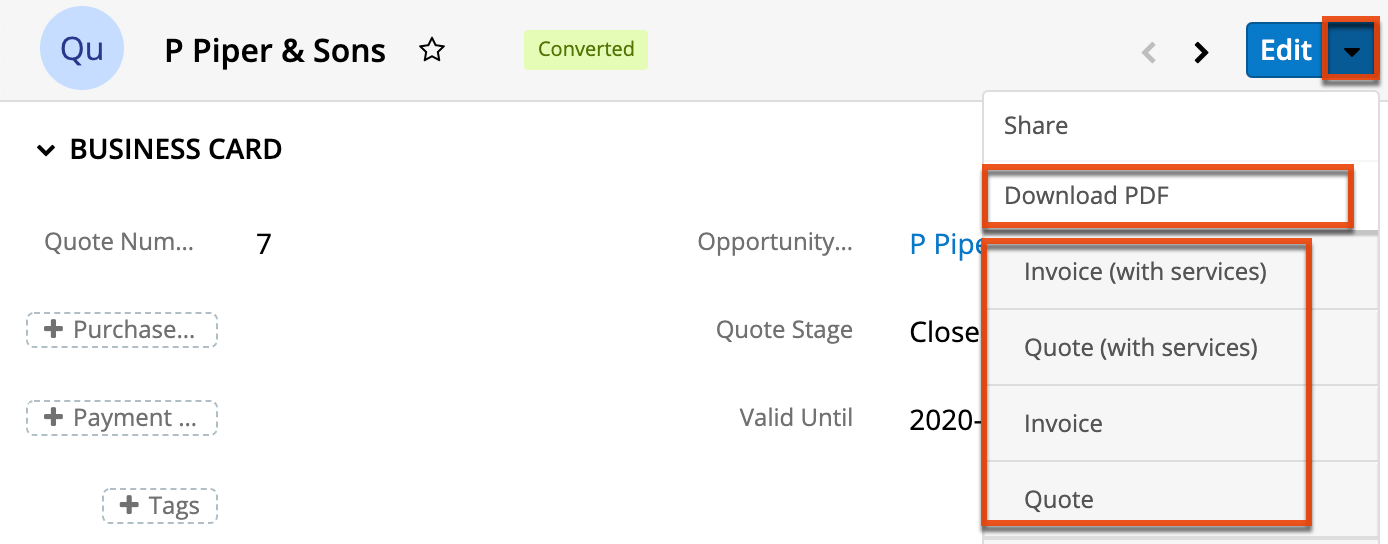
Emailing Record PDFs
Users also have the option to email record information as a PDF file using Sugar's email client. From the originating record's record view, click the Actions menu and select "Email PDF". All of the PDF templates that your administrator has created and made available for the module will appear beneath the Email PDF option in the Actions menu. 
Select one of the templates to create a draft in the Emails module. Sugar will deliver you to the record view for the email.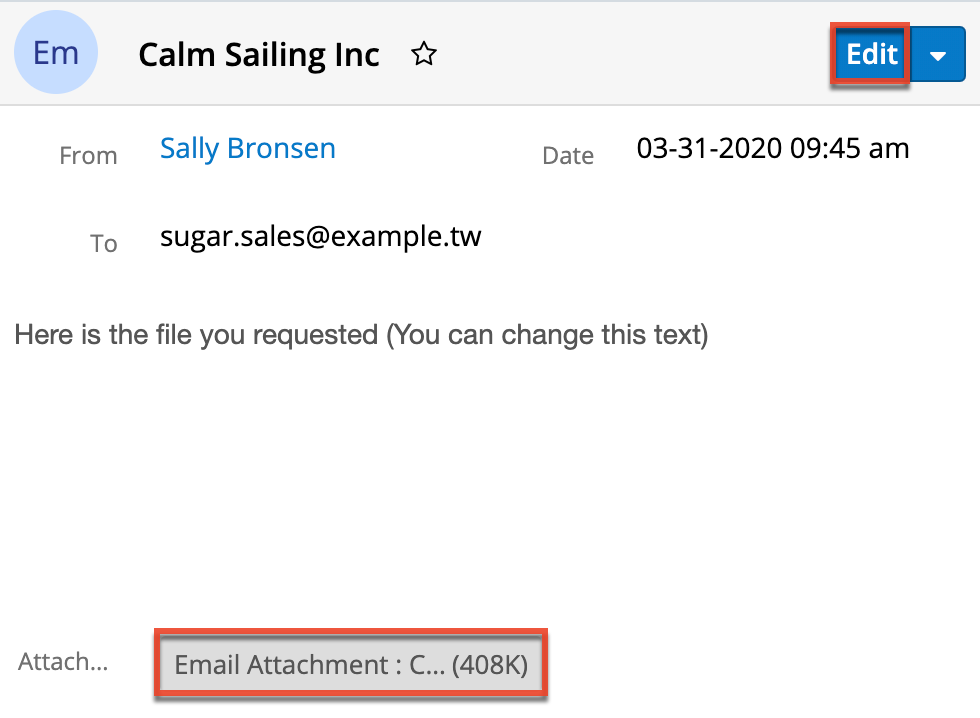
The draft will have the following information pre-populated:
- From: The logged-in user's outgoing default email account
- Date: The date the message is being sent
- To: The primary email address of the originating record (if available)
- Subject: The name of the originating record
- Body: "Here is the file you requested (You can change this text)"
- Attachment: The PDF file created from the originating record
- The file's name will appear as "Email Attachment : {originating_record_name}_{template_name}.pdf"; for example, "Email Attachment : Acme_25_units_Customer_invoice.pdf".
- Teams: The logged-in user's default team(s)
- Assigned To: The Sugar user assigned to the email record
- Related To: The originating record and its module
Click "Edit" on the draft email record to reveal the Send button or to update the fields as necessary and then click "Send". For more information on sending emails via the Emails module, please refer to the Emails documentation.
Favoriting Records
Each Sugar user has the option to designate their own favorite records which are important or will be viewed often so that they can easily be accessed via list view search or from the module tab. Once records are marked as favorites, select "My Favorites" from the Filter option next to the Search bar or select from your most recent favorites directly from the module tab.
Favoriting via List View
The following steps cover marking records as favorites via the Accounts list view as an example:
- Navigate to the Accounts list view by clicking the Accounts module tab.
- Use the List View Search to find the account records you wish to mark as favorites.
- Darken the star icon on the left of each desired account's row by clicking on the star one time.
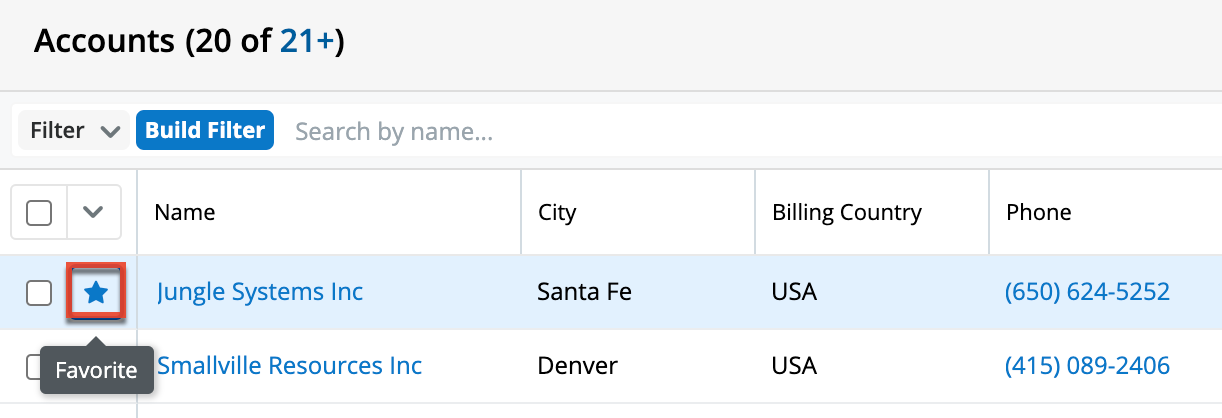
- To remove the account as a favorite, click the star again to revert it to white.
Favoriting via Record View
The following steps cover marking records as favorites via the Accounts record view as an example:
- Navigate to an account's record view.
- Click the star icon to the right of the account's name in the upper left of the record view to designate it as a favorite.
- To remove the account as a favorite, click the star again to revert it to white.

Favoriting via Subpanel
The following steps cover marking account records as favorites via the subpanel in related modules as an example:
- Navigate to a related module's record view.
- Click the star icon to the left of the desired record's row in the Contacts subpanel.
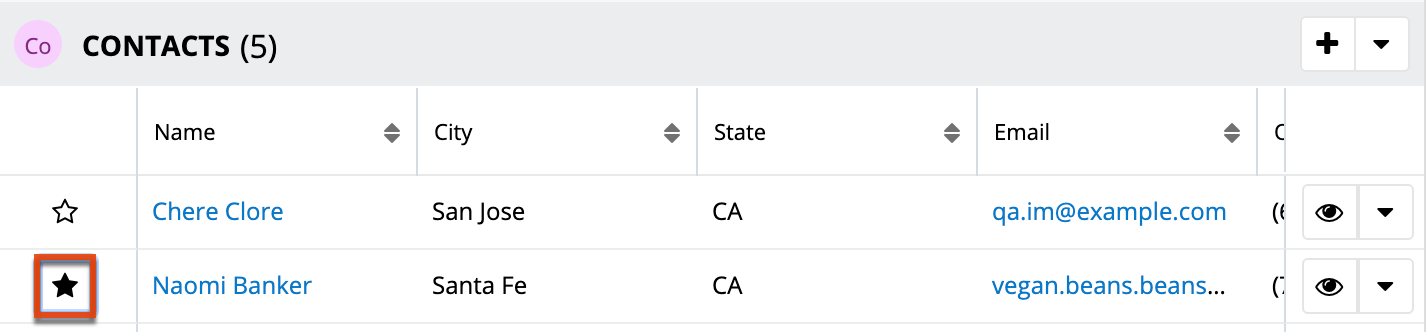
- To remove the contact as a favorite, click the star again to revert it to white.
Following Records
Users can also choose to follow individual records. This allows each user to personalize their activity stream by specifying which records' posts should appear on the activity streams displayed on their Home page and in module list views. Please note that you will automatically follow the records that you create as well as records that are assigned to you. You will not, however, automatically follow the records you import. Should a user lose access to a record in Sugar, they will automatically stop following that record. For more information about activity streams, please refer to the Activity Streams documentation. Please note that the Follow option in Sugar is not available if the activity stream functionality is disabled for your instance. For more information, refer to the System documentation in the Administration Guide.
Following via List View
The following steps cover marking an account to follow via the Accounts list view as an example:
- Navigate to the Accounts list view by clicking the Accounts module tab.
- Use the List View Search to find the Account records you wish to follow.
- Click the Record Actions menu to the far right of the records row and select "Follow".

- To stop following the account, click the Record Actions menu and select "Unfollow".
Following via Record View
The following steps cover marking an account to follow via the account's record view as an example:
- Navigate to an account's record view.
- Click on the Follow button to the right of the account's name to change its label to "Following".
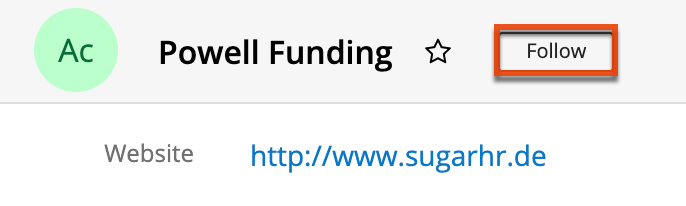
- To unfollow the account, click on the Following button to revert its label to "Follow".
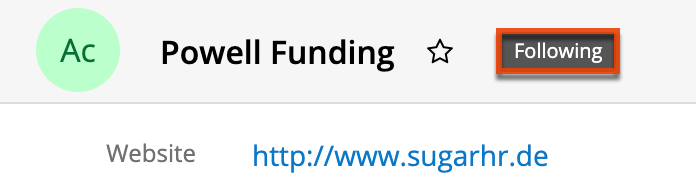
Sharing Records
Individual records can be shared with other users in your organization by sending an email including the record's direct link. In the desired record's record view, select "Share" from the Actions menu. A Compose Email window will open, and the email's text will include the URL of the record. Enter the recipient(s) email address in the To field then click "Send".
The recipient can simply click the link in the email to access the account record in Sugar. Please note that the user must be logged in to Sugar in order to access the record. Users will only be able to view the shared record as allowed by their team membership, user access type, and assigned roles. For more information on teams and roles, please refer to the Team Management and Role Management documentation.
Using the TinyMCE Text Editor
TinyMCE is a third-party WYSIWYG editing tool used by Sugar so that users can create content such as knowledge base articles and email messages with rich-text formatting elements. TinyMCE V4 is used in all Sugar modules with the exception of email templates within the Campaign wizard, which uses TinyMCE V3.
TinyMCE's rich-text editor framework presents the following familiar formatting options. This does not represent all tools that may be available in the editor. Please refer to the TinyMCE Documentation for more information.
| Element | Button(s) | Function |
| Source Code | Bypass the rich-text editor options and insert your own HTML code or view the HTML code of an existing template to make advanced changes. | |
| Bold, Italic, Underline, Strikethrough |  |
Use these basic font formatting options to easily add common styles to text in the message body. |
| Bullet List, Numbered List |  |
Transform paragraphs in the message body into a formatted list. |
| Align Left, Align Center, Align Right, Justify |  |
Set paragraph alignment. |
| Text Color, Background Color |  |
Choose a custom font color or highlight text with a background font color. |
|
Clear Formatting |
Clear any formatting. | |
| Insert/Edit Image, Insert/Edit Link |  |
Insert or edit an image or a link. |
| Font Sizes |  |
Choose a font size for the text. |
|
Paragraph |
 |
Choose a format for headers. |