Sugar Enterprise 13.0 Installation and Upgrade Guide
Overview
This documentation will go through the requirements and steps to install or upgrade an on-site Sugar instance (hosted on a local web server). The following instructions are intended for system administrators with access to the appropriate systems and knowledge of the technology being used.
Installing an On-Site Instance
Installing Sugar requires a web server running PHP and a database server. The following sections detail the requirements needed for installing Sugar on a local web server stack as well as the individual steps to install Sugar.
Installation Prerequisites
Sugar can run on a variety of stack configurations, but there are some general requirements that all configurations should meet to properly run Sugar. For more information regarding which platforms and database providers are supported by Sugar, please refer to the 13.0.x Supported Platforms documentation.
Please note that it is recommended to install your Sugar instance with SSL security using a signed certificate to enable secure HTTPS access.
PHP Requirements
In addition to having a supported version of PHP installed, Sugar also requires several specific PHP modules and settings. Verify that the following modules and extensions are installed in your PHP configuration by checking the php.ini file or by executing a http://us.php.net/manual/en/function.phpinfo.php output:
bcmathcurl
Note: We recommend using cURL 7.74.0 or later.gdwithFreeTypegmphashimapjsonmbstringopensslSimpleXMLsoapzipzlib
Sugar also requires one of the following extensions or settings to provide a source of CSPRNG for random tokens, in order of preference:
libsodiumextensionopen_basedir: If this setting is enabled, the following settings are recommended:- The use of
/dev/urandomshould be allowed. - Configure the temp directory to be used by the web server in
php.ini(system_temp_dir = "/<temp directory>"). - Add the path for this temp directory to the allowed
open_basedirpaths inphp.ini(open_basedir="/var/www/html/sugar:/<temp directory>"). - Optionally, configure the
upload_tmp_dirand append that path to the allowedopen_basedirpaths as well.
- The use of
com_dotnetextensionblowfish cyphersupport- OpenSSL 3.0 ships blowfish but it is disabled by default.
- edit openssl.cfg and make sure the following configuration is enabled
  [provider_sect]
default = default_sect
legacy = legacy_sect

[default_sect]
activate = 1

[legacy_sect]
activate = 1
The following are some directives and their recommended values to be set in the php.ini file of your PHP configuration:
| Directive | PHP Default | Recommended | Description |
date.timezone |
Set according to your needs | The timezone to use by default for date and time functions. View the list of possible time zones here: http://www.php.net/manual/en/timezones.php | |
display_errors |
1 | 0 | Determines if errors will be printed on the web page as part of the output or if they are hidden. |
fastcgi.logging |
1 | 0 | Determines if SAPI logging is on or off when using FastCGI. FastCGI logging should be disabled when running on IIS. |
max_execution_time |
30 | 120 | Determines the maximum amount of time in seconds that a script can run. This helps prevent the server being occupied by a long-running script. |
max_input_time |
-1 | 120 |
Determines the maximum amount of time in seconds that a script can analyze input data such as |
mbstring.func_overload |
0 | 0 |
Overloads a set of single-byte functions by the mbstring counterparts. If this setting is not set to "0" you may experience unexpected results when using mbstring functions. |
memory_limit |
128M | 1G |
Determines the maximum memory size in bytes that a script can be allocated. This helps prevent a script from using all of the available memory. |
post_max_size |
8M | 100M | Determines the maximum size in megabytes of post data allowed. This is primarily important for file uploads as if the file is larger than this value the upload will fail. This value should mirror the setting for upload_max_filesize and may be set to a larger value if your users routinely upload large files. |
session.use_cookies |
0 | 1 | Determines whether or not the session can use cookies |
session.cookie_httponly |
0 | 1 | Determines whether PHP session cookies will be marked HTTPOnly which is recommended for security reasons. |
session.cookie_lifetime |
0 | The default value is acceptable but can be adjusted according to your needs | Determines the lifetime of a PHP session in seconds. The value 0 specifies the session will be active until the browser is closed. |
session.gc_maxlifetime |
1440 | The default value is acceptable but can be adjusted according to your needs | Determines the number of seconds after which data in the session will potentially be removed. |
session.use_trans_sid |
0 | 0 | Determines whether transparent sid support is enabled or not. |
upload_max_filesize |
8M | 100M |
Determines the maximum size in megabytes of an uploaded file. This value should mirror the setting for * make sure you align this configuration with |
It is recommended to use memcached or Redis as the PHP session storage if your deployment involves more than one web server.
For more information regarding PHP directives and their function, please refer to www.php.net.
Database Requirements
Prior to installation, Sugar requires a supported database to already be running on your server. On top of a running database, there are some specific settings that need to be configured before Sugar can be installed. PHP needs to be configured with the proper drivers to communicate with the database of your choice.
Use the following steps to configure PHP to be able to access your database:
- Obtain the proper driver files corresponding to your database, server architecture, and PHP version.
Database Extension Driver Location MySQL mysqlihttp://us.php.net/manual/en/book.mysqli.php DB2 ibm_db2http://us.php.net/manual/en/book.ibm-db2.php Oracle oci8http://us.php.net/manual/en/book.oci8.php Microsoft SQL sqlsrvhttp://msdn.microsoft.com/en-us/library/cc296170.aspx - Place the driver files into PHP's
extension_dirfolder. - Add an extension line into your
php.inifile loading the driver file (e.g.,extension=php_mysqli.dll). - Restart your web server.
When running on Oracle, ensure that the character set is AL32UTF8 in NLS_LANG setting on the client machine for Search optimization. For example, AMERICAN_AMERICA.AL32UTF8 for a US-based user.
When installing on DB2, the database must first be created using the following commands:
#!/bin/sh
DBNAME=$1
: ${DBNAME:=sugarult}
export DB2DBDFT=$DBNAME # set $DBNAME as the default branch
db2 "FORCE APPLICATION ALL" # flush all connections
db2stop # stop DB2
db2start # start DB2
db2 "FORCE APPLICATION ALL" # flush all connections
db2 "DROP DATABASE $DBNAME" # drop the previously existing database if it exists
db2 "CREATE DATABASE $DBNAME USING CODESET UTF-8 TERRITORY US COLLATE USING UCA500R1_LEN_S2 PAGESIZE 32 K" # create the database from scratch and enable case-insensitive collation
db2 "CONNECT TO $DBNAME" # make a connection to update the parameters below
db2 "UPDATE database configuration for $DBNAME using DATABASE_MEMORY AUTOMATIC" #Prevent memory exceeding
db2 "UPDATE database configuration for $DBNAME using logfilsiz 2048" # default appeared to be 1024
db2set DB2_COMPATIBILITY_VECTOR=4008
db2 "CREATE BUFFERPOOL SUGARBP IMMEDIATE SIZE 1000 AUTOMATIC PAGESIZE 32 K"
db2 "CREATE LARGE TABLESPACE SUGARTS PAGESIZE 32 K MANAGED BY AUTOMATIC STORAGE EXTENTSIZE 32 OVERHEAD 10.5 PREFETCHSIZE 32 TRANSFERRATE 0.14 BUFFERPOOL SUGARBP"
db2 "CREATE USER TEMPORARY TABLESPACE SUGARXGTTTS IN DATABASE PARTITION GROUP IBMDEFAULTGROUP PAGESIZE 32K MANAGED BY AUTOMATIC STORAGE EXTENTSIZE 32 PREFETCHSIZE 32 BUFFERPOOL SUGARBP OVERHEAD 7.5 TRANSFERRATE 0.06 NO FILE SYSTEM CACHING"
db2 "FORCE APPLICATION ALL" # close all conections to restart DB2 below
db2stop
db2start
db2 "CONNECT TO $DBNAME"
When installing on DB2, the codepage must be adjusted using the following commands. If your DB2 server and web server are on different machines, this also needs to be run on your web server:
db2set DB2CODEPAGE=1208
db2stop
db2startNote: If you are running MySQL version 5.7.5 or greater, update the [mysqld] section of my.cnf as follows before restarting MySQL as the default values are not compatible with Sugar:
                                      # MySQL prior to 8
sql_mode = "STRICT_TRANS_TABLES,NO_ZERO_IN_DATE,NO_ZERO_DATE,ERROR_FOR_DIVISION_BY_ZERO,NO_AUTO_CREATE_USER,NO_ENGINE_SUBSTITUTION"

# MySQL 8
sql_mode = "STRICT_TRANS_TABLES,NO_ZERO_IN_DATE,NO_ZERO_DATE,ERROR_FOR_DIVISION_BY_ZERO,NO_ENGINE_SUBSTITUTION"
When running MySQL version 5.7, you must disable the ONLY_FULL_GROUP_BY setting to avoid potential errors in Sugar.
For more information regarding which database platforms and versions are supported by Sugar, please refer to the 13.0.x Supported Platforms documentation.
Since Sugar 13.0 supports stored procedures for MySQL, please be sure to export all of the database including the stored procedures when installing and backing up your Sugar instance.
Web Server Requirements
Sugar requires some specific configuration regarding the supported web server on which it is being installed. Sugar creates and maintains many files in the Sugar directories; therefore, Sugar requires some very specific file permissions settings in order to install. The user the web server is running under needs to have read and write permissions on many Sugar files. At a minimum, the following files and directories need to be writable from your web server:
./config.php./config_override.php./sugarcrm.log./cache/and all subdirectories and files./custom/and all subdirectories and files./data/and all subdirectories and files./modules/and all subdirectories and files
Please refer to the appropriate section below for additional requirements for your Linux, Windows, IIS, or Apache server.
Note: If you are planning to use a Real User Monitoring (RUM) agent, this may cause issues when fetching data from the REST APIs as additional data may be appended to JSON responses coming from the server causing errors.
Linux Server Installation Requirements
Sugar running on Linux expects the listed files and directories to be owned by the same user running the web server and to also be in the same group. Sugar would then require the following permissions:
- 775 for the directories listed above
- 664 for the
config.phpfile and all files in the directories listed above
To set the permissions on Linux you can execute the following commands modified to replace apache and apache with your web server user and group:
  chown apache:apache -R <Sugar Directory>
chmod 775 -R <Sugar Directory>
Windows Server Installation Requirements
Sugar running on Windows requires an updated certificate for the cURL library. Edit php.ini to add curl.cainfo=c:\php\cacert.pem, place this cacert.pem file in the c:\php\ directory on your server, and restart your web server.
Sugar running on Windows also requires fileinfo.dll to be enabled. Please refer to this documentation on the PHP site for more information.
IIS Server Installation Requirements
Sugar running on IIS requires the PUT and DELETE verbs to be enabled.
Sugar running on IIS also requires the IIS virtual user responsible for running Sugar to be added to the Sugar instance directory's file access control list and given full control. In most cases, "DefaultAppPool" should be added, but the specific virtual user running your Sugar instance may differ and should be confirmed first. Restart IIS after changing the permission. Please refer to this documentation on the IIS site for more information.
Sugar running on IIS must also have the URL Rewrite module installed in order for the web server to read the web.config file and generate the correct redirects. For more information on IIS URL Rewrite, please refer to the IIS site.
For IIS environments, Sugar recommends the following configurations for FastCGI:
- Activity Timeout: 3600
- Request Timeout: 3600
Apache Server Installation Requirements
Sugar running on the Apache web server requires a setting configured in the httpd.conf file. Modify the AllowOverride value for the Sugar installation directory to be set to All. Installation and upgrade will fail if AllowOverride is not configured in Apache.
Please note that mod_rewrite must also be enabled in Apache in order for Sugar to function properly.
It is recommended to configure the Apache modules mod_headers and mod_expires on your Sugar application server. While not strictly required to run Sugar, they can be used together by the Sugar application to ensure that HTTP Caching is applied properly on static resources such as image files which improve performance by reducing web traffic. For more information, please refer to the HTTP Caching documentation on the Google Developer site.
To prevent performance issues, also add compression offloading if you have a load balancer or mod_deflate if you do not have a load balancer. For more information on mod_deflate, please refer to the mod_deflate documentation on the Apache site.
Your web server can have timeout configurations that may interrupt PHP execution; Apache has a Timeout directive. For more information, please refer to the documentation for your specific web server.
Apache Server Installation Best Practices
When hosting Sugar on Apache servers, we recommend using Virtual Host (vhost) configurations. Vhosts allow administrators to exert greater control over the content being served and offer advantages over .htaccess files to manage and control content.
We recommend vhost configuration is setup to ensure that the Sugar application provided .htaccess file is the only one interpreted by Apache and no other .htaccess files are allowed. This ensures tight control over server settings and eliminates security risks caused by allowing or using additional .htaccess files within the Sugar filesystem.
You can restrict .htaccess usage by specifying a new <Directory> directive in your vhost configuration to deny access to .htaccess files where they are not expected. For example, you should exclude cache, upload, or any other directory that is used to store or extract files.
Elasticsearch Requirements
Elasticsearch is the built-in support engine for full-text search and is a required stack component when installing Sugar. The following resources are available for Elasticsearch:
- Installing and Administering Elasticsearch: Sugar's knowledge base article details how to install and configure Elasticsearch.
- Installing via Setup Wizard: Instructions for setting up Sugar to work with your Elasticsearch engine are available in this section.
- www.elasticsearch.org: The Elasticsearch website contains additional, general information on Elasticsearch.
Please note that only certain versions of Elasticsearch are supported by Sugar. For more information regarding the supported versions, please refer to the 13.0.x Supported Platforms documentation.
Once Sugar is installed, administrators will have the ability to schedule a full system index via Admin > Search as necessary. Please note that cron must be configured for the scheduler in order for the full system index to run properly in Sugar.
Sugar Hint Requirements
If you have a Sugar Hint license and your service region should be set as Europe or Asia/Pacific, you must set hint.hint_install_target_geo in the config.php or config_override.php file before installation. The default region is the United States. See the Core Settings page in the Developer Guide for details on this property.
Downloading Sugar
Use the following steps to download the required files to install Sugar:
- Navigate to the Download Manager and log in with the email address and password associated with your SugarCRM.com account.
- On the Downloads page, select the appropriate edition and version (e.g., "Enterprise" and "13.0.0") of Sugar from the dropdown.
Note: You will only be able to select editions of Sugar that are tied to your SugarCRM.com account. Also, there may be versions listed in the download manager which are no longer supported. You can verify which versions are currently supported by checking the Supported Versions page.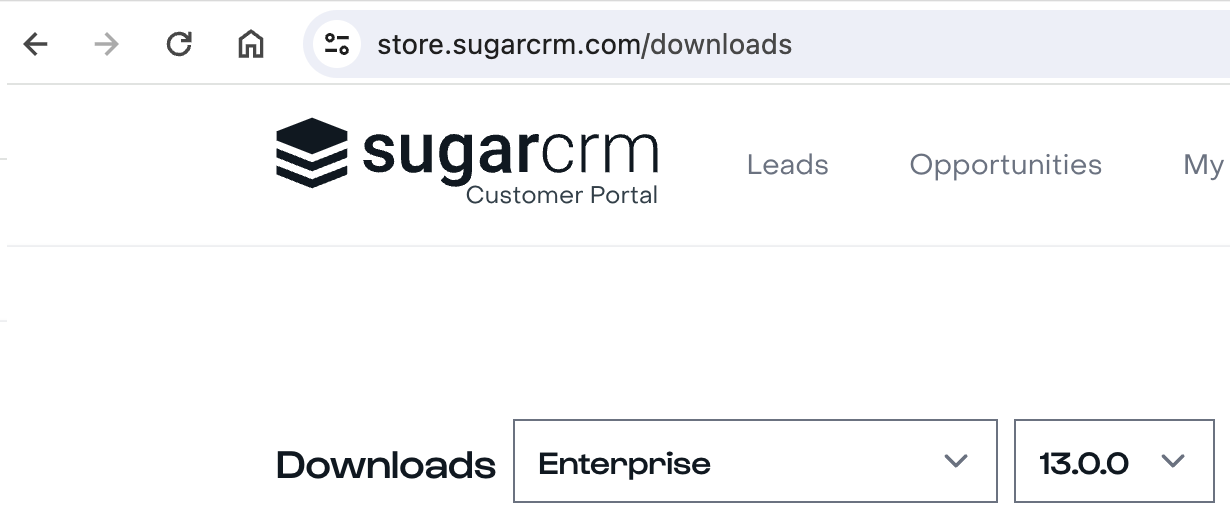
- If the selected edition and version combination has a compatible installer, it will be available as a zip file under an "Installer" heading. Download the zip file to your computer and proceed to installation.
Preparing Installation
After downloading the installer zip file for Sugar you will need to extract the contents of the zip file into the root directory of your web server. Use the following steps to prepare the files for installation:
- Transfer the installer zip file to the web server where Sugar is to be installed.
- Locate the web root directory on the web server. This directory is where files to be served will be located. The following are common locations for the web root directory but may differ depending on your server configuration:
- Linux/Apache:
/var/www/html/
- Linux/Apache:
- Extract the installer zip file's contents into the web root. This will create a directory in the web root indicating which edition and version of Sugar is in the contents (e.g., SugarEnt-Full-13.0.0).
- Rename this directory to match the intent of the install (e.g., sugarcrm, sugarcrm_dev, sugarcrm_test).
- Set the permissions on the files within the Sugar directory as described in the Web Server Requirements section above.
Installing via Setup Wizard
After preparing the installation files, you are ready to install Sugar. Use the following steps to install Sugar via the Setup Wizard.
Note: It is recommended that you install your Sugar instance with SSL security using a signed certificate to enable secure HTTPS access.
- Using a supported web browser, navigate to the primary URL for your Sugar directory:
http://{Your Web Server}/{Your Sugar Directory}(e.g., http://localhost/sugarcrm/). - The Setup Wizard will launch and bring you to the Welcome page.
- Select the primary language you wish to have the Setup Wizard use then click "Next" to proceed.

- Review the information on the following page to ensure all of the proper steps have been taken to perform a successful install. Click "Next" to continue.
- Review the License Subscription Agreement and select "I Accept". Click "Next" to continue.
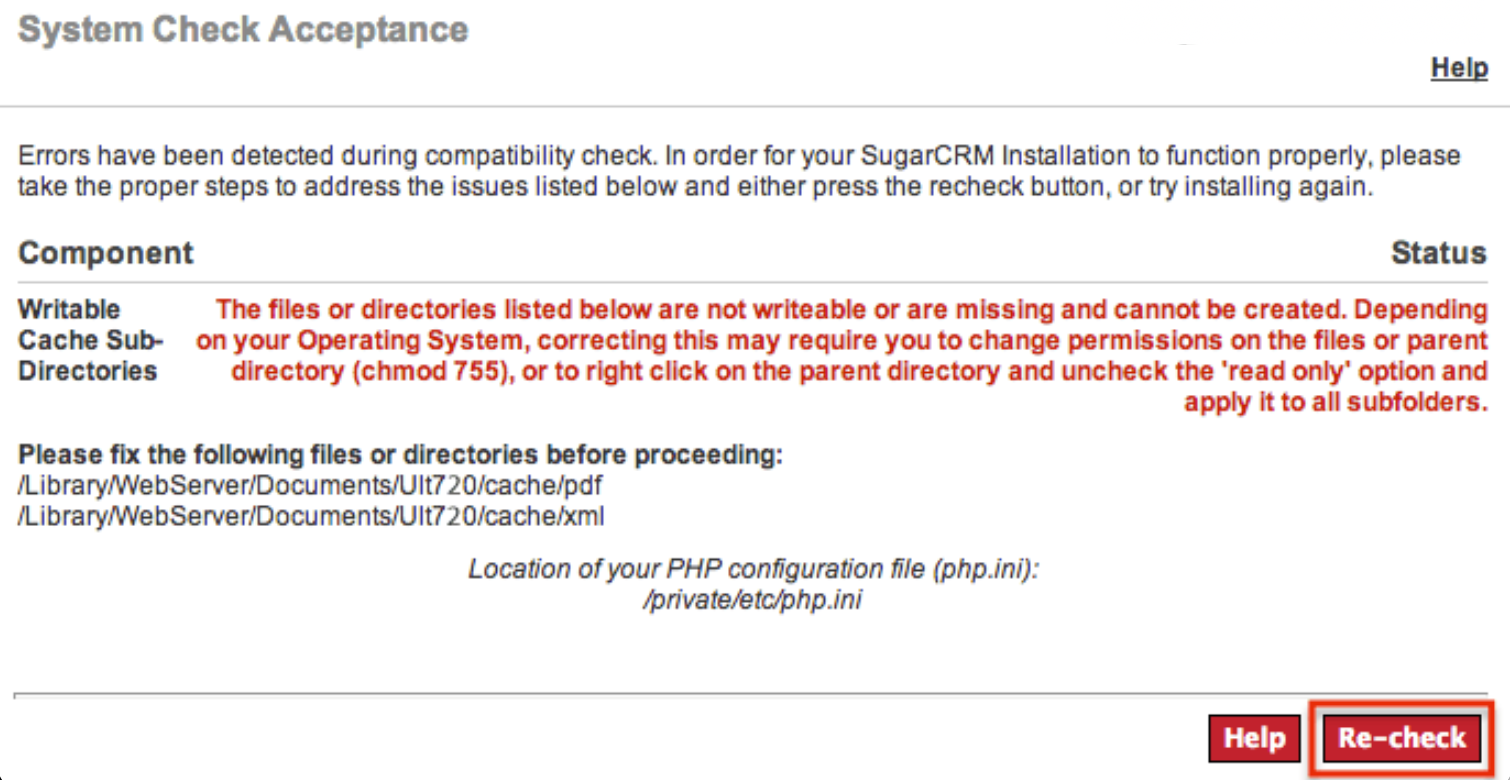
- The Setup Wizard will now check your server environment for compatibility. If your environment passes, the installation will continue. Otherwise, you will be prompted to correct any issues before proceeding. Once the issues have been resolved, click "Re-check" to perform the compatibility check again and continue with the installation.
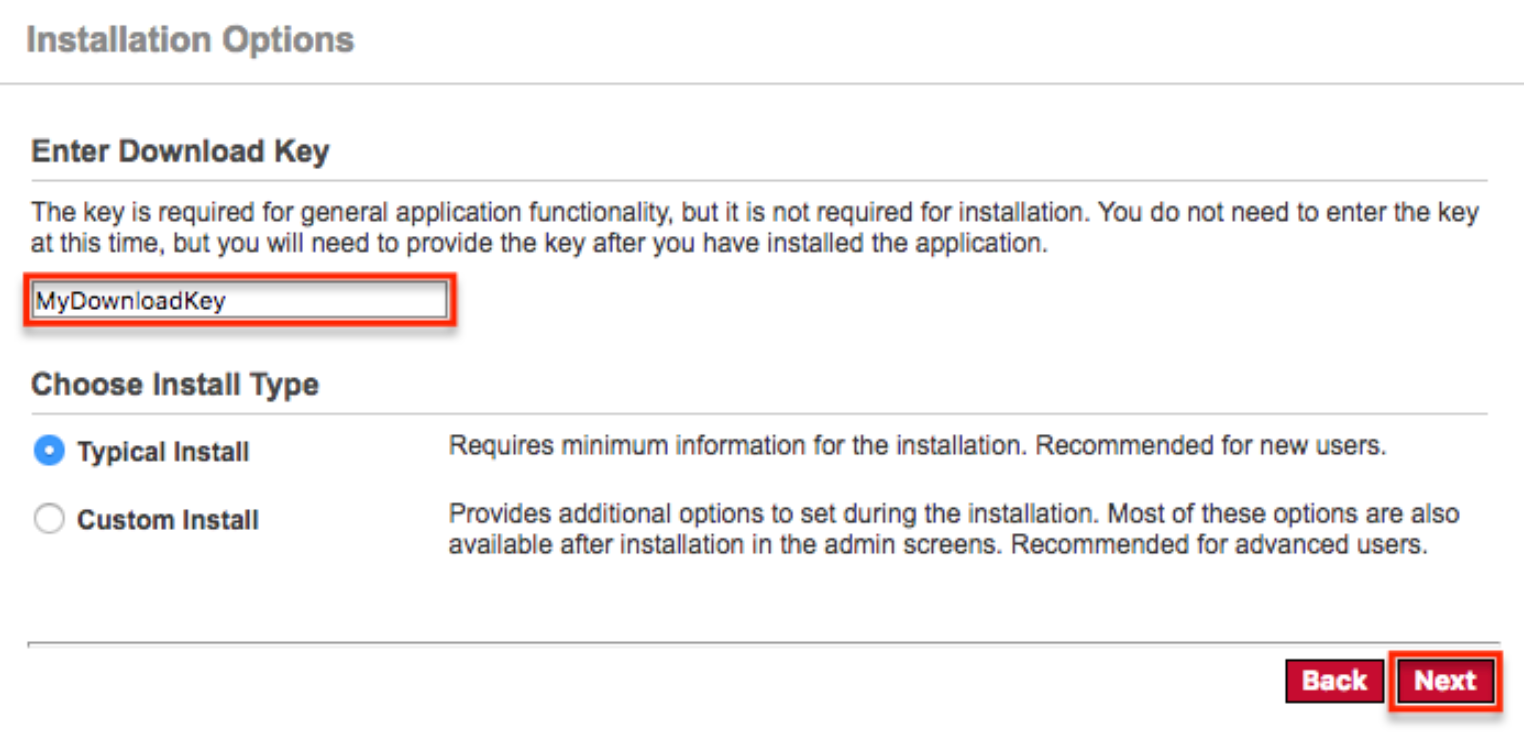
- On the Installation Options page, enter in your download key then select the install type. Click "Next".
- Typical Install: Provides minimal configuration options for a simple install.
- Custom Install: Provides additional configuration options such as Sugar URL, System Name, and Collation.
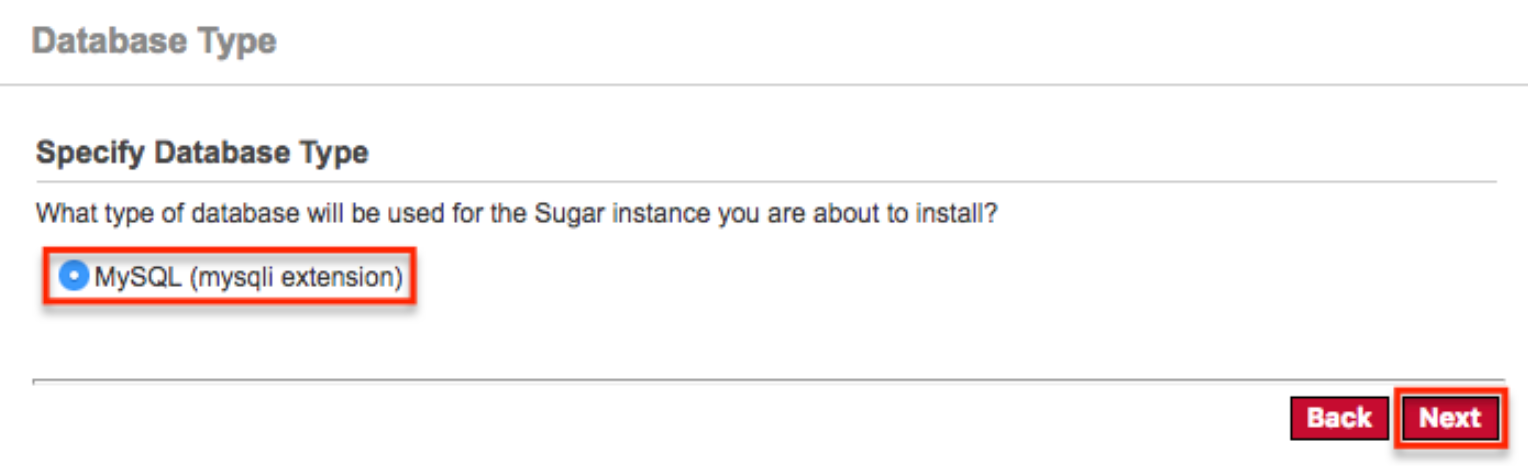
- On the Database Type page, select the database platform you wish to install your Sugar instance. The listed database types generate from the database drivers currently installed in PHP on the server. If you do not see your expected database engine, please check your PHP configuration and restart your web server to reflect any changes made in the configuration. Click "Next" to continue.
- On the Database Configuration page, enter appropriate values for the following fields then click "Next" to continue:
Note: All required fields are marked with a red asterisk and must be completed prior to continuing.
- Database Name: Name or designation of the database to be created and used with this installation of Sugar. If the database name entered is an existing database on the specified server, the existing database and its contents will be deleted and replaced with the Sugar database.
- Host Name: Name of the server or machine where the database will be created and used with this installation of Sugar.
- Database Administrator Username: Provide the user name of an administrative user who has proper permissions to create databases and tables on the specified database server.
- Database Admin Password: Provide the password of the specified administrative user.
- Sugar Database Username: Select an option from the dropdown to determine the database user Sugar will connect with.
- Enable SSL Connection: Select "Yes" to allow Sugar to connect to the database using SSL.
- Populate Database with Demo Data?: Select "Yes" to populate the database with demo records for testing Sugar.
- Search Engine Type: The Elasticsearch server is required to install Sugar and is selected by default.
- Same as Admin User: Sugar will use the already provided database user name and password to connect to the database.
- Provide existing user: Enter credentials for a different database user for Sugar to connect to the database.
- Define user to create: Enter credentials to create a new user for Sugar to connect to the database.
- Host: Enter the host name or IP address of the full-text search engine. Defaults to "localhost" assuming you are running the search engine on the same server as Sugar.
- Port: Enter the port number for communicating with the full-text search engine. Defaults to "9200", which is Elasticsearch's default.
- On the Site Configuration page, enter appropriate values for the following fields:
- Sugar Application Admin Name: The Sugar administrative user name that you will use to log in for the first time upon successful installation. Defaults to admin.
- Sugar Admin User Password: A password for the Sugar administrative user that you will use to log in for the first time upon successful installation.
- Re-enter Sugar Admin User Password: A confirmation of the provided password to ensure it was entered correctly.
- If you are performing a custom install instead of a typical install, the following fields will also need to be completed on the Site Configuration page:
- URL of Sugar Instance: Enter the URL used to access your Sugar instance. This value is important for various integrations to function properly and is generally desired to be a publicly accessible URL where possible.
- System Name: Enter the name of your Sugar instance to be displayed in the browser title bar.
- Collation Settings: Select the proper collation setting to use when creating the database tables. The collation determines the character set and default sorting options. Defaults to "utf8_general_ci".
- Click "Next" to continue.
Note: If you are performing a typical install, you will be taken directly to the Confirm Settings page (Step 14). If you are performing a custom install, the Site Security page (Step 13) will open first instead. - Select your desired security option(s) on the Site Security page then click "Next" to proceed to the Confirm Settings page.
- Automatically Check For Updates?: When selected, the system will periodically check for updates to Sugar versions.
- Use a Custom Session Directory for Sugar: When selected, you can provide a secure folder for storing Sugar session information. This can be done to prevent session data from being vulnerable on shared servers or from conflicting with other session data stored on the server for other applications.
- Use a Custom Log Directory: When selected, you can specify a directory to store the Sugar log. Regardless of where the log file is located, access to it through a web browser will be restricted via a .htaccess redirect.
- Provide Your Own Application ID: When selected, you can provide an application ID to override the auto-generated ID. This ID should always be unique when compared to any other instances hosted on the same server. This value is utilized by PHP caching engines (e.g., APC, Memcache) to distinguish the proper files to serve.
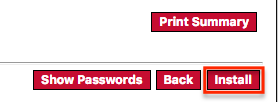
- Review and confirm your settings on the Confirm Settings page then click "Install" to begin the install process.
- Click the Back button in order to navigate back to a previous step of the setup wizard and modify any of the settings.
- Click the Show Passwords button if you wish to verify the "Sugar Database User Password" and the "Sugar Admin User Password" values on the page.
- Click the Print Summary button if you wish to print the summary of your configuration settings.
- The Perform Setup page will display the install results and indicate when the setup of Sugar is complete. Click "Next" to continue.
- If the Custom Install option was selected on Step 7, you will be given the option to install language packs. But you can also install language packs through the application at a later time. Click "Next" to continue.
- If you wish to register your information with SugarCRM, complete the fields on the following Registration page. If you wish to skip this step, click "Next".
The Sugar login page will now open and you can log in to your instance using the admin username and password provided during the setup.
Upgrading an On-Site Instance
To get the most out of Sugar we recommend being on the latest version. Newer versions of Sugar come with increased performance, bug fixes, and new features in general. Before upgrading Sugar it is highly recommended that the upgrade be run on a test or backup copy of your production system first. This will not only allow you to be familiar with the process but can also point out any potential issue(s) you may encounter when upgrading your production instance.
For customized Sugar instances, it is also recommended to review the Migration Guide for Sugar 13.0.
Upgrade Prerequisites
Before performing an upgrade, please ensure that the following requirements are met to ensure a successful upgrade:
- Only instances running 13.0.0, 13.0.1, 13.0.2, 13.0.3, or 13.0.4 are eligible for upgrade to the latest version 13.0.5.
Note: Both the Upgrade Wizard and Silent Upgrader are available for upgrading to 13.0.x. - Be sure that all platform components are updated in accordance with the 13.0.x Supported Platforms before upgrading.
- Install and properly configure a supported Elasticsearch version in accordance with the 13.0.x Supported Platforms before upgrading.
- Ensure that these PHP libraries and extensions are installed.
- If you are running on Windows, edit
php.inito addcurl.cainfo=c:\php\cacert.pem, place this cacert.pem file in thec:\php\directory on your server, and restart your web server. - Verify the PHP
post_max_sizeandupload_max_filesizesettings are sufficiently large for the upgrade files. Our recommendations are available in the PHP section above. - Verify that the user the web server is running under has read and write permissions to the Sugar directory as well as the
config.phpfile in the Sugar directory. - If you have made code-level changes to a file, verify the changes are upgrade-safe (i.e. are located in the custom directory) or they may be removed during the upgrade.
- If op-code caching is enabled in PHP, disable it to ensure cached code is not used during the upgrade. Op-code caching can be re-enabled after the upgrade is complete.
- In order to upgrade from Sugar 12.0.x to 13.0.x, the PHP version must be 8.0 before and during the upgrade. Once upgraded to Sugar 13.0.x, the PHP version can then be upgraded to 8.2.
- If you are using Zend Core 2.0, increase the values for
ConnectionTimeoutto 3000 seconds and RequestTimeout to 6000 seconds. - If you are running on Apache, set the
LimitRequestBodyvalue in thehttpd.conffile to 2GB. - If you have Sugar Hint installed and your service region should be set as Europe or Asia/Pacific, you must set
hint.hint_install_target_geoin the config.php or config_override.php file before upgrading. The default region is the United States. See the Core Settings page in the Developer Guide for details on this property.
Upgrading via Upgrade Wizard
The Upgrade Wizard allows administrators to quickly and easily upgrade their Sugar instance to a newer version. Please note that the Upgrade Wizard is only available to administrative users and can be accessed via Admin > Upgrade Wizard. Before running the upgrade in Sugar, please be sure to create a backup of your file directory and database.
First, ensure you have completed the upgrade prerequisites listed above.
The health check scanner will run as part of the upgrade process when upgrading to 13.0.x to ensure that your instance is suitable for upgrade. If any issues (red flags) are detected that are deemed incompatible for the upgrade, the health check will fail and you will not be able to proceed with the upgrade until the issues have been resolved. If you wish to evaluate your instance's readiness for an upgrade prior to performing the upgrade, please proceed through the first two sections below and exit the upgrader after completing the health check.
Note: If your database contains more than 10,000 records per table, we recommend Upgrading via Silent Upgrader instead of using the Upgrade Wizard. Manual upgrades by file replacements and running SQL upgrade statements are not supported.
The following sections walk through the steps required to perform an upgrade using the Upgrade Wizard:
- Complete the upgrade prerequisites.
- Perform a health check.
- Perform the upgrade.
Performing the Health Check
To evaluate whether your instance is suitable for upgrade to 13.0 without committing to the actual upgrade, please use the following steps. If you wish to complete the upgrade to 13.0 including the health check, please proceed to the Performing the Upgrade section below.
- Navigate to your available downloads using Steps 1 - 4 on the Downloading Sugar section to obtain the appropriate upgrade zip file.
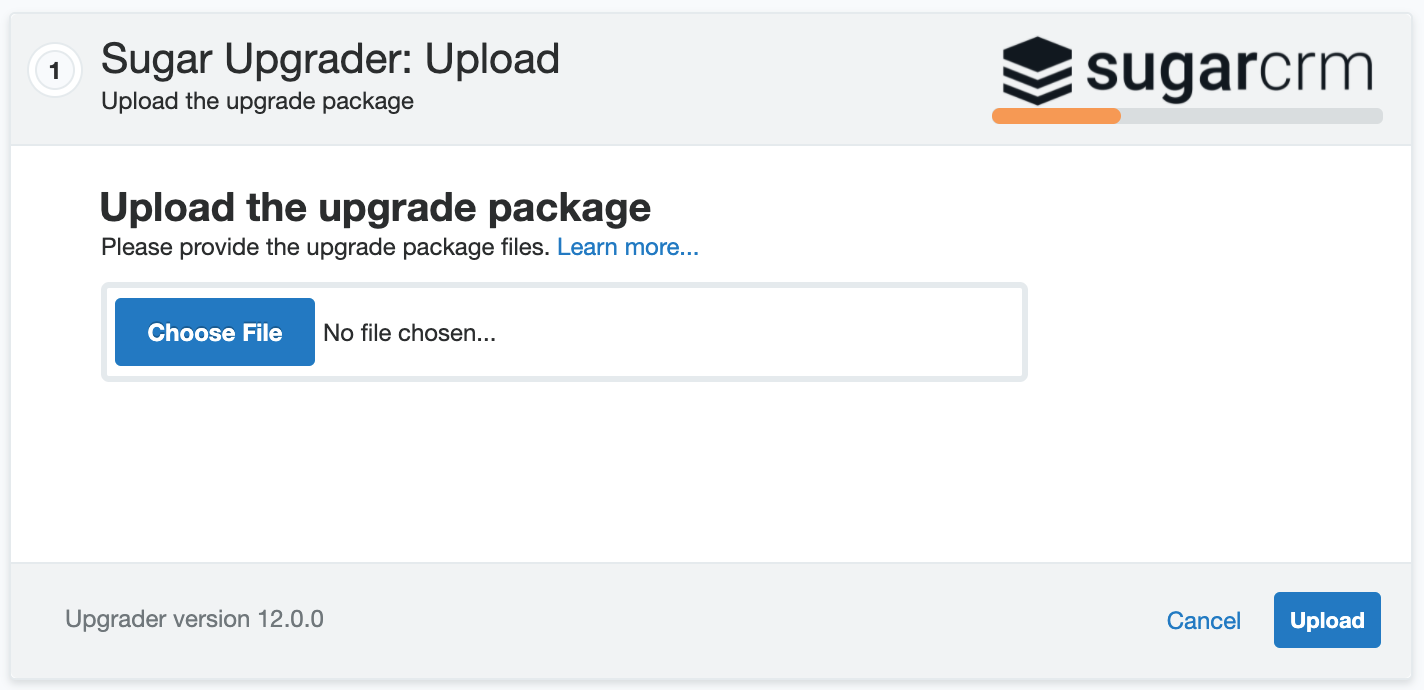
Note: The upgrade files can be found under the Upgrade Packages section and specify the "from" and "to" versions of Sugar in the file name. The from version must match your current version of Sugar in order to successfully perform the upgrade. For example, to upgrade a 12.0.3 instance of Sugar Enterprise to 13.0.0, you would need the SugarEnt-Upgrade-12.0.3-to-13.0.0.zip file. - Navigate to Admin > Upgrade Wizard.
- In Step 1 of the upgrade wizard, click the Choose File button and select the appropriate upgrade file from your local machine then click "Upload". The health check will now begin to run.
- Step 2 of the upgrade wizard will display the health check results marked by different colored icons.
- Green Checkmark: Health check passed. Any customizations detected in your instance marked with a green checkmark will be upgraded properly.
- Yellow Ellipsis: Health check passed. Outputs are generated which require attention. Should you choose to proceed with the upgrade, please keep in mind that customizations were found in your instance that may:
- Prevent certain modules from getting upgraded to Sugar's Sidecar user interface and will be available with the Legacy user interface.
- Be modified or disabled to facilitate the upgrade of certain modules to Sugar's Sidecar user interface.
- Red Exclamation Point: Health check failed. Any issues deemed incompatible for the upgrade will need to be resolved before proceeding with the upgrade. You can also click the Export Log button to view the log file and troubleshoot the issue.
Note: If any customizations have been made since the last successful health check, please be sure to run the health check again before performing the upgrade.
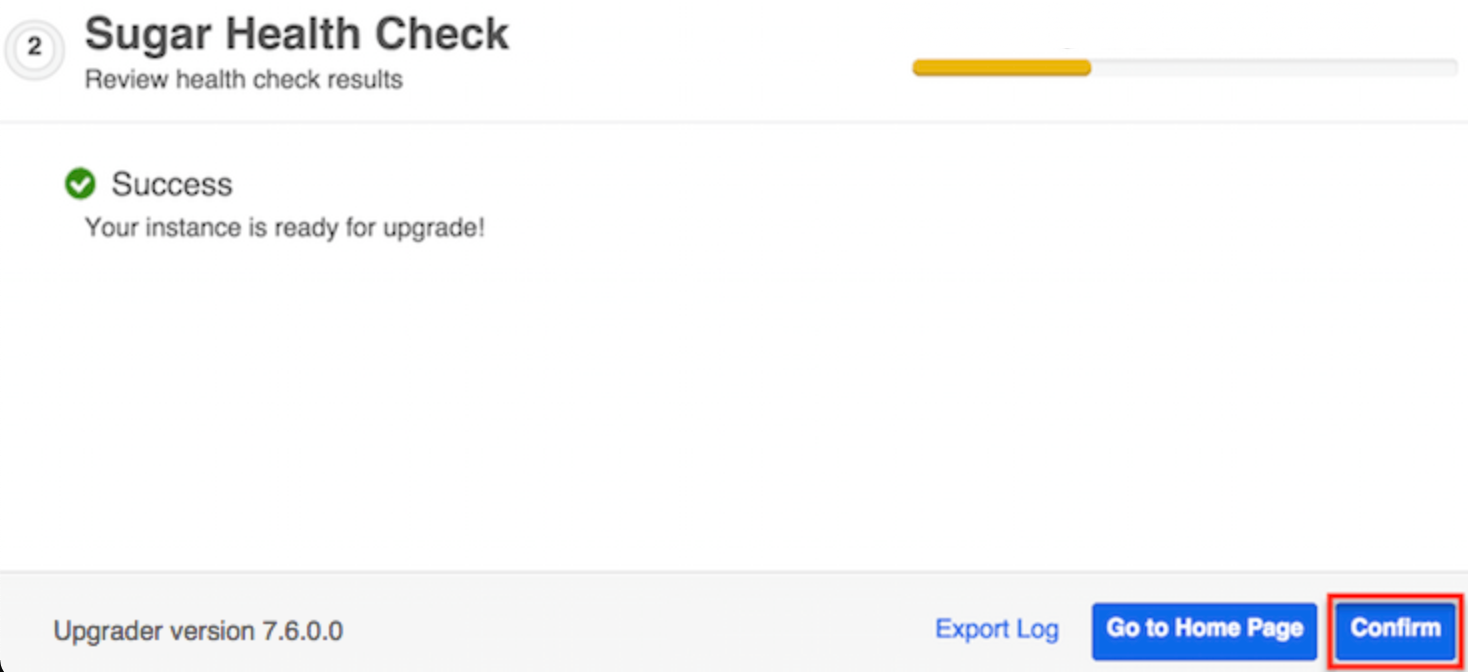
- Click the Go to Home Page button to exit the upgrade process and navigate to the Home page. If you wish to proceed with the upgrade now, click the Confirm button. Please note that the Confirm button will be disabled if any issues deemed incompatible for upgrade are detected.
Performing the Upgrade
After upgrading to Elasticsearch 8.4.3 and completing the other upgrade prerequisites and health check, use the following steps to perform an upgrade using the Upgrade Wizard.
Note: If you have just performed a health check, you can skip to Step 5.
- Navigate to your available downloads using Steps 1 - 4 on the Downloading Sugar section to obtain the appropriate upgrade zip file.
Note: The upgrade files can be found under the Upgrade Packages section and specify the "from" and "to" versions of Sugar in the file name. The from version must match your current version of Sugar in order to successfully perform the upgrade. For example, to upgrade a 12.0.3 instance of Sugar Enterprise to 13.0.0, you would need the SugarEnt-Upgrade-12.0.3-to-13.0.0.zip file. - Navigate to Admin > Upgrade Wizard.
- Click the Choose File button in the Sugar Upgrader screen to open a file selection window from your browser.
- Select the upgrade file from your local machine then click "Upload".
- The health check will be performed to ensure your instance is ready for an upgrade. If you performed the health check just prior to running the upgrade and resolved any issues (if applicable) to pass the health check, you should successfully pass the health check again. Click "Confirm" to proceed with the upgrade. Please note that the Confirm button will be disabled if any issues deemed incompatible for upgrade are detected.
- A progress bar will display on the following screen showing each step (Upload the upgrade package, Healthcheck, Pre-upgrade, Upgrade, etc.) being completed.

Once your instance has been upgraded, you can click the Export Log button to review the log file for the upgrade or click the button labeled "Go to Home Page" to log in to the Sugar instance.
Upgrading via Silent Upgrader
The Silent Upgrader is a command-line script that enables administrators to avoid some limitations of the server environment PHP and potentially the web server with settings that can put overly tight restrictions on the upload size or session timeouts. The Silent Upgrader either avoids the limitations or better controls the settings in its stand-alone execution environment.
First, complete the upgrade prerequisites listed above.
The health check scanner will run as part of the upgrade process to ensure that your instance is suitable for the actual upgrade. If any issues (red flags) are detected that are deemed incompatible for the upgrade, the health check will fail and you will not be able to proceed with the upgrade until the issues have been resolved. If you wish to evaluate your instance's readiness for an upgrade prior to performing the upgrade, please proceed through the first two sections below and exit the upgrader after completing the health check.
Please ensure that you are executing the Silent Upgrader scripts as the web server user. The Silent Upgrader script creates new files for the user logged in running the script. For example, for the root user, it creates files as user/group root. Since Apache cannot read this, you must ensure that the web server user has the permissions to read and write the script.
The following sections walk through the required steps to perform an upgrade using the Silent Upgrader:
- Complete the upgrade prerequisites.
- Download the files.
- Perform a health check.
- Perform the upgrade.
Downloading the Necessary Files
- Navigate to your available downloads using Steps 1 - 4 on the Downloading Sugar section to obtain the appropriate silent upgrade file.
Note: The silent upgrade files can be found under the Command-Line Upgrader section and will specify the "to" version of Sugar in the file name. This version must match your future, desired version of Sugar, not your current version. For example, to silent upgrade a 12.0.3 instance of Sugar to 13.0.0, you would need the silentUpgrade-PRO-13.0.0.zip file. Please note that the silent upgrade file includes the phrase "PRO" for all editions.
Note: The upgrade file must be placed in a path that does not include any spaces in the name or there will be errors when performing the upgrade. - Also, download to your server the appropriate upgrade package which specifies both the "to" and "from" versions. For example, to upgrade a 12.0.3 instance of Sugar Enterprise to 13.0.0, you would need the SugarEnt-Upgrade-12.0.3-to-13.0.0.zip file. Please note that these upgrade packages are edition specific.
Note: The upgrade file must be placed in a path that does not include any spaces in the name or there will be errors when performing the upgrade. - Unzip the silent upgrade file.
Note: The upgrade package downloaded in Step 2 may also be unzipped if desired prior to performing the upgrade.
Performing the Health Check
- From the command line of the web server, navigate to the directory containing the above files downloaded and extracted in the Downloading the Necessary Files section above:
Note: To invoke only the health check stage of the silent upgrade process, populate the parameters above with specific values for your situation:php CliUpgrader.php -z <upgradePackage> -l <logFile> -s <pathToSugar> -u <adminUser> -m <mask> -b <backup> -S <stage> -A <autoConfirm>- <upgradePackage>: The full file path to the upgrade package.
- <logFile>: The path to the log file to store the results of the silent upgrade. A relative path to the Sugar instance may be used.
- <pathToSugar>: The full file path to the instance being upgraded.
- <adminUser>: A valid Sugar administrative user name.
- <mask>: Script mask specifying which types of scripts to run. Supported types include: core, db, custom, all, and none. The default value is 'all'.
- <backup>: Determines whether a backup of deleted files will be made with a default of "1" (true). Changing the option to "0" will not create a backup while.
- <stage>: Instructs the upgrader to begin at a specific stage; "healthcheck" will cause only the health check portion to run while "continue" will cause it to start where it stopped on the previous run.
- <autoConfirm>: Determines whether the confirmation prompt to continue with upgrade is bypassed and allows upgrade to automatically proceed when health check passes with a green or yellow flag. The option defaults to "0" (false). Change the option to "1" to enable the autoconfirm and proceed directly to upgrading after the health check. Do not alter this option when attempting to only run the health check without also completing an upgrade.
/var/www/html/sugarcrmand the upgrade zip file and extracted files are all located at/home/users/<yourUserName>/sugarupgrade, use the following commands to perform a silent upgrade with the user "admin" and a log file of "silentUpgrade_1300.log":
cd /home/users/<yourUserName>/sugarupgrade/ php CliUpgrader.php -z /home/users/<yourUserName>/sugarupgrade/SugarEnt-Upgrade-12.0.3-to-13.0.0.zip -l ./silentUpgrade_1300.log -s /var/www/html/sugarcrm/ -u admin -S healthcheck - The health check's results will display whether the health check passed or failed for your instance.
- Green Flag: Health check passed without errors or warnings. Please refer to the log file if you wish to view details of the health check.
- Yellow Flag: Health check passed with errors or warnings. Please refer to the log file if you wish to view any errors or details of the health check. Should you choose to proceed with the upgrade, please keep in mind that customizations were found in your instance that may:
- Prevent certain modules from getting upgraded to Sugar's Sidecar user interface and will be available with the Legacy user interface.
- Be modified or disabled to facilitate the upgrade of certain modules to Sugar's Sidecar user interface.
- Red Flag: Health check failed. Issues deemed incompatible for upgrade must be resolved before proceeding with the upgrade. Please refer to the log file in order to view the errors and details of the health check.
Performing the Upgrade
After upgrading to Elasticsearch 8.4.3 and completing the other upgrade prerequisites and health check, use the following steps to perform an upgrade using the Silent Upgrader.
- From the command line of the web server, navigate to the directory containing the above files downloaded and extracted in the Downloading the Necessary Files section above:
Note: To invoke the silent upgrade process with all the necessary stages (including health check), populate the parameters above with specific values in your situation and exclude the "-S" parameter:php CliUpgrader.php -z <upgradePackage> -l <logFile> -s <pathToSugar> -u <adminUser> -m <mask> -b <backup> -S <stage> -A <autoConfirm>- <upgradePackage>: The full file path to the upgrade package.
- <logFile>: The path to the log file to store the results of the silent upgrade. A relative path to the Sugar instance may be used.
- <pathToSugar>: The full file path to the instance being upgraded.
- <adminUser>: A valid Sugar administrative user name.
- <mask>: Script mask specifying which types of scripts to run. Supported types include: core, db, custom, all, and none. The default value is 'all'.
- <backup>: Determines whether a backup of deleted files will be made with a default of "1" (true). Changing the option to "0" will not create a backup while.
- <stage>: Instructs the upgrader to begin at a specific stage; "healthcheck" will cause only the health check portion to run while "continue" will cause it to start where it stopped on the previous run.
- <autoConfirm>: Determines whether the confirmation prompt to continue with upgrade is bypassed and allows upgrade to automatically proceed when health check passes with a green or yellow flag. The option defaults to "0" (false). Change the option to "1" to enable the autoconfirm and proceed directly to upgrading after the health check. Do not alter this option when attempting to only run the health check without also completing an upgrade.
/var/www/html/sugarcrmand the upgrade zip file and extracted files are all located at/home/users/<yourUserName>/sugarupgrade, use the following commands to perform a silent upgrade with the user "admin" and a log file of "silentUpgrade_1300.log":
php CliUpgrader.php -z /home/users/<yourUserName>/sugarupgrade/SugarEnt-Upgrade-12.0.3-to-13.0.0.zip -l ./silentUpgrade_1300.log -s /var/www/html/sugarcrm/ -u admin - The Health Check scanner will automatically run to evaluate whether your instance is ready for upgrade. The results will display whether the health check passed or failed for your instance:
- Green Flag: Health check passed successfully and you can proceed with the upgrade. A message will display asking for confirmation (Yes or No) to proceed with the upgrade. Please refer to the log file if you wish to view details of the health check.
- Yellow Flag: Health check passed and you can proceed with the upgrade. A message will display asking for confirmation (Yes or No) to proceed with the upgrade. Please refer to the log file if you wish to view any errors or details of the health check. Should you choose to proceed with the upgrade despite warnings, keep in mind the following:
- Your instance may contain customizations that will prevent certain modules from getting converted to Sugar's Sidecar user interface, leaving them with the Legacy user interface.
- Your customizations may be modified or disabled to facilitate the upgrade.
- Red Flag: Health check failed and you cannot proceed with the upgrade. Issues deemed incompatible for upgrade must be resolved prior to upgrading. Please refer to the log file in order to view the errors and details of the health check.
- After the upgrade is completed successfully, fix ownership and permissions of Sugar's root directory:
chown apache:apache -R <Sugar root directory> chmod 755 -R <Sugar root directory> - Log in to Sugar and, as a final cleanup, navigate to Admin > Repair and perform "Quick Repair and Rebuild" and "Rebuild Relationships". For more information on the functions performed by the repair, please refer to the Repair documentation.
Your instance has now been upgraded to 13.0.
Uninstalling Sugar
Use the following steps to uninstall an instance of Sugar:
- Navigate to the web server where Sugar is installed and delete the Sugar root directory.
- Navigate to the Sugar database using a database management system or command line and delete the Sugar database from the server.
Note: It is highly recommended to create a backup of the file directory and database before deleting.
Advanced Configuration
After installing Sugar, there are some advanced configurations that you can take advantage of. During the installation, Sugar attempts to create a .htaccess file in the Sugar root directory. This file helps to ensure certain files are not accessible through a web browser. The contents of this file should contain:
                                      # BEGIN SUGARCRM RESTRICTIONS
RedirectMatch 403 (?i).*\.log$
RedirectMatch 403 (?i)/+not_imported_.*\.txt
RedirectMatch 403 (?i)/+(soap|cache|xtemplate|data|examples|include|log4php|metadata|modules)/+.*\.(php|tpl)
RedirectMatch 403 (?i)/+emailmandelivery\.php
RedirectMatch 403 (?i)/+upload/
RedirectMatch 403 (?i)/+custom/+blowfish
RedirectMatch 403 (?i)/+cache/+diagnostic
RedirectMatch 403 (?i)/+files\.md5$

# Fix mimetype for logo.svg (SP-1395)
AddType     image/svg+xml     .svg
AddType     application/json  .json
AddType     application/javascript  .js

<IfModule mod_rewrite.c>
    Options +FollowSymLinks
    RewriteEngine On
    # Replace <basepath> with the relative web root path to your instance
    RewriteBase /<basepath>
    RewriteCond %{REQUEST_FILENAME} !-d
    RewriteCond %{REQUEST_FILENAME} !-f
    RewriteRule ^rest/(.*)$ api/rest.php?__sugar_url=$1 [L,QSA]
    RewriteCond %{REQUEST_FILENAME} !-d
    RewriteCond %{REQUEST_FILENAME} !-f
    RewriteRule ^cache/api/metadata/lang_(.._..)_(.*)_public\.json$ api/rest.php/v10/lang/public/$1?platform=$2 [L,QSA]
    RewriteCond %{REQUEST_FILENAME} !-d
    RewriteCond %{REQUEST_FILENAME} !-f
    RewriteRule ^cache/api/metadata/lang_(.._..)_([^_]*)\.json$ api/rest.php/v10/lang/$1?platform=$2 [L,QSA]
    RewriteCond %{REQUEST_FILENAME} !-d
    RewriteCond %{REQUEST_FILENAME} !-f
    RewriteRule ^cache/Expressions/functions_cache(_debug)?.js$ api/rest.php/v10/ExpressionEngine/functions?debug=$1 [L,QSA]
</IfModule>

<FilesMatch "\.(jpg|png|gif|js|css|ico|woff|svg)$">
        <IfModule mod_headers.c>
                Header set ETag ""
                Header set Cache-Control "max-age=2592000"
                Header set Expires "01 Jan 2112 00:00:00 GMT"
        </IfModule>
</FilesMatch>

<IfModule mod_expires.c>
        ExpiresByType text/css "access plus 1 month"
        ExpiresByType text/javascript "access plus 1 month"
        ExpiresByType application/x-javascript "access plus 1 month"
        ExpiresByType image/gif "access plus 1 month"
        ExpiresByType image/jpg "access plus 1 month"
        ExpiresByType image/png "access plus 1 month"
</IfModule>

# END SUGARCRM RESTRICTIONS
To verify these restrictions are in place in your instance, attempt to navigate to the sugarcrm.log file through a supported web browser: http://{Server Location}/sugarcrm/sugarcrm.log. If the restrictions are properly in place, you will receive a #403 Forbidden error. If you do not receive this error, you are either missing the .htaccess file or your web server is not configured to allow a .htaccess file. For more information on enabling a .htaccess file for your web server, please refer to your web server provider's documentation.
Sugar comes with many different advanced configuration options such as:
- System Configuration
- Security Options
- Performance
- Disabling Automatic Searches
- Elastic Search Configuration
For more information regarding these topics and more configuration options, please refer to the Advanced Configuration Options documentation.