Opportunity Management
Overview
Sugar's Opportunities module allows you to track sales from start to finish. Each opportunity record relates to other important records such as quotes and contacts. Your Sugar instance may be configured to use stand-alone opportunities or opportunities with revenue line items. For more information about changing your opportunities model, please see the Opportunities Configuration documentation in the Administration Guide.
Please note that you will only be able to see opportunity records as allowed by your license type, team membership, assigned roles, and user access type. For more information, please refer to the referenced documentation in the Administration Guide.
For instructions concerning views and actions which are common across most Sugar modules, such as creating, editing, and deleting opportunities, please refer to the Working With Sugar Modules section of this page.
Scope
This documentation covers information and actions specific to the Opportunities module and contains the following three pages:
- Opportunity Management (current page): This page contains information related to the opportunities module that is common whether your instance is configured to use stand-alone opportunities or opportunities with revenue line items.
- Opportunities: This page contains specific information about how to use the stand-alone opportunities module.
- Opportunities with Revenue Line Items: This page contains specific information about how to use the opportunities module with revenue line items.
Introduction to Opportunities
Regardless of whether your instance is configured to use stand-alone opportunities or opportunities with revenue line items, you can track sales from start to finish, with each opportunity typically progressing through several sales stages until it is marked either "Closed Won" or "Closed Lost".
Stand-Alone Opportunities
When your instance uses stand-alone opportunities, all relevant sales data is contained in the opportunity record view. The following screenshot provides an example opportunity record. For detailed information about the opportunity module including a list of fields, sales stages, and tile view, please refer to the Opportunities page.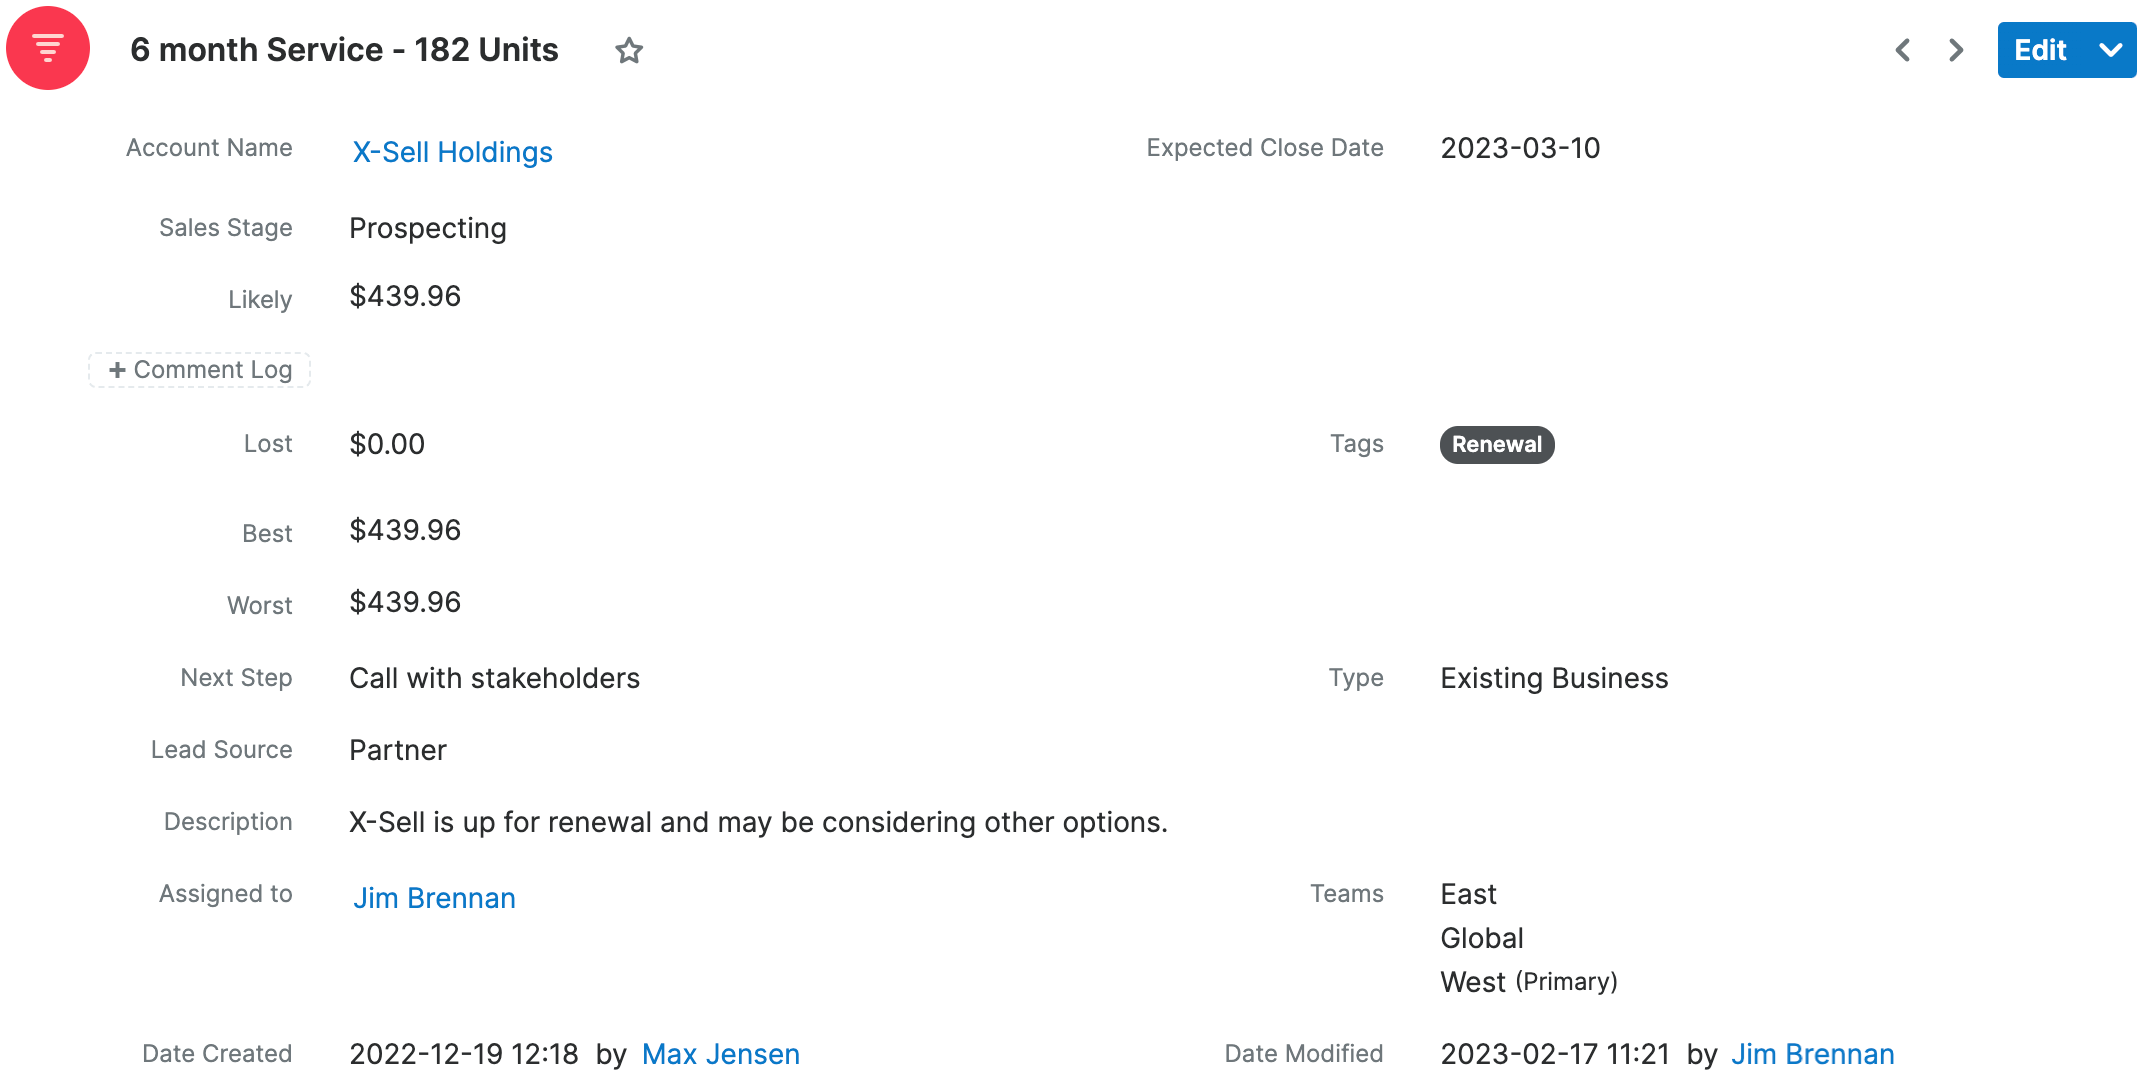
Opportunities with Revenue Line Items
When your instance uses opportunities with revenue line items, relevant sales data is contained in the opportunity record along with its related revenue line item records. The following screenshot provides an example of an opportunity with revenue line items. For information about the opportunities and revenue line items modules including a list of fields, sales stages, tile view, and details about how these modules work together, please refer to the Opportunities with Revenue Line Items page.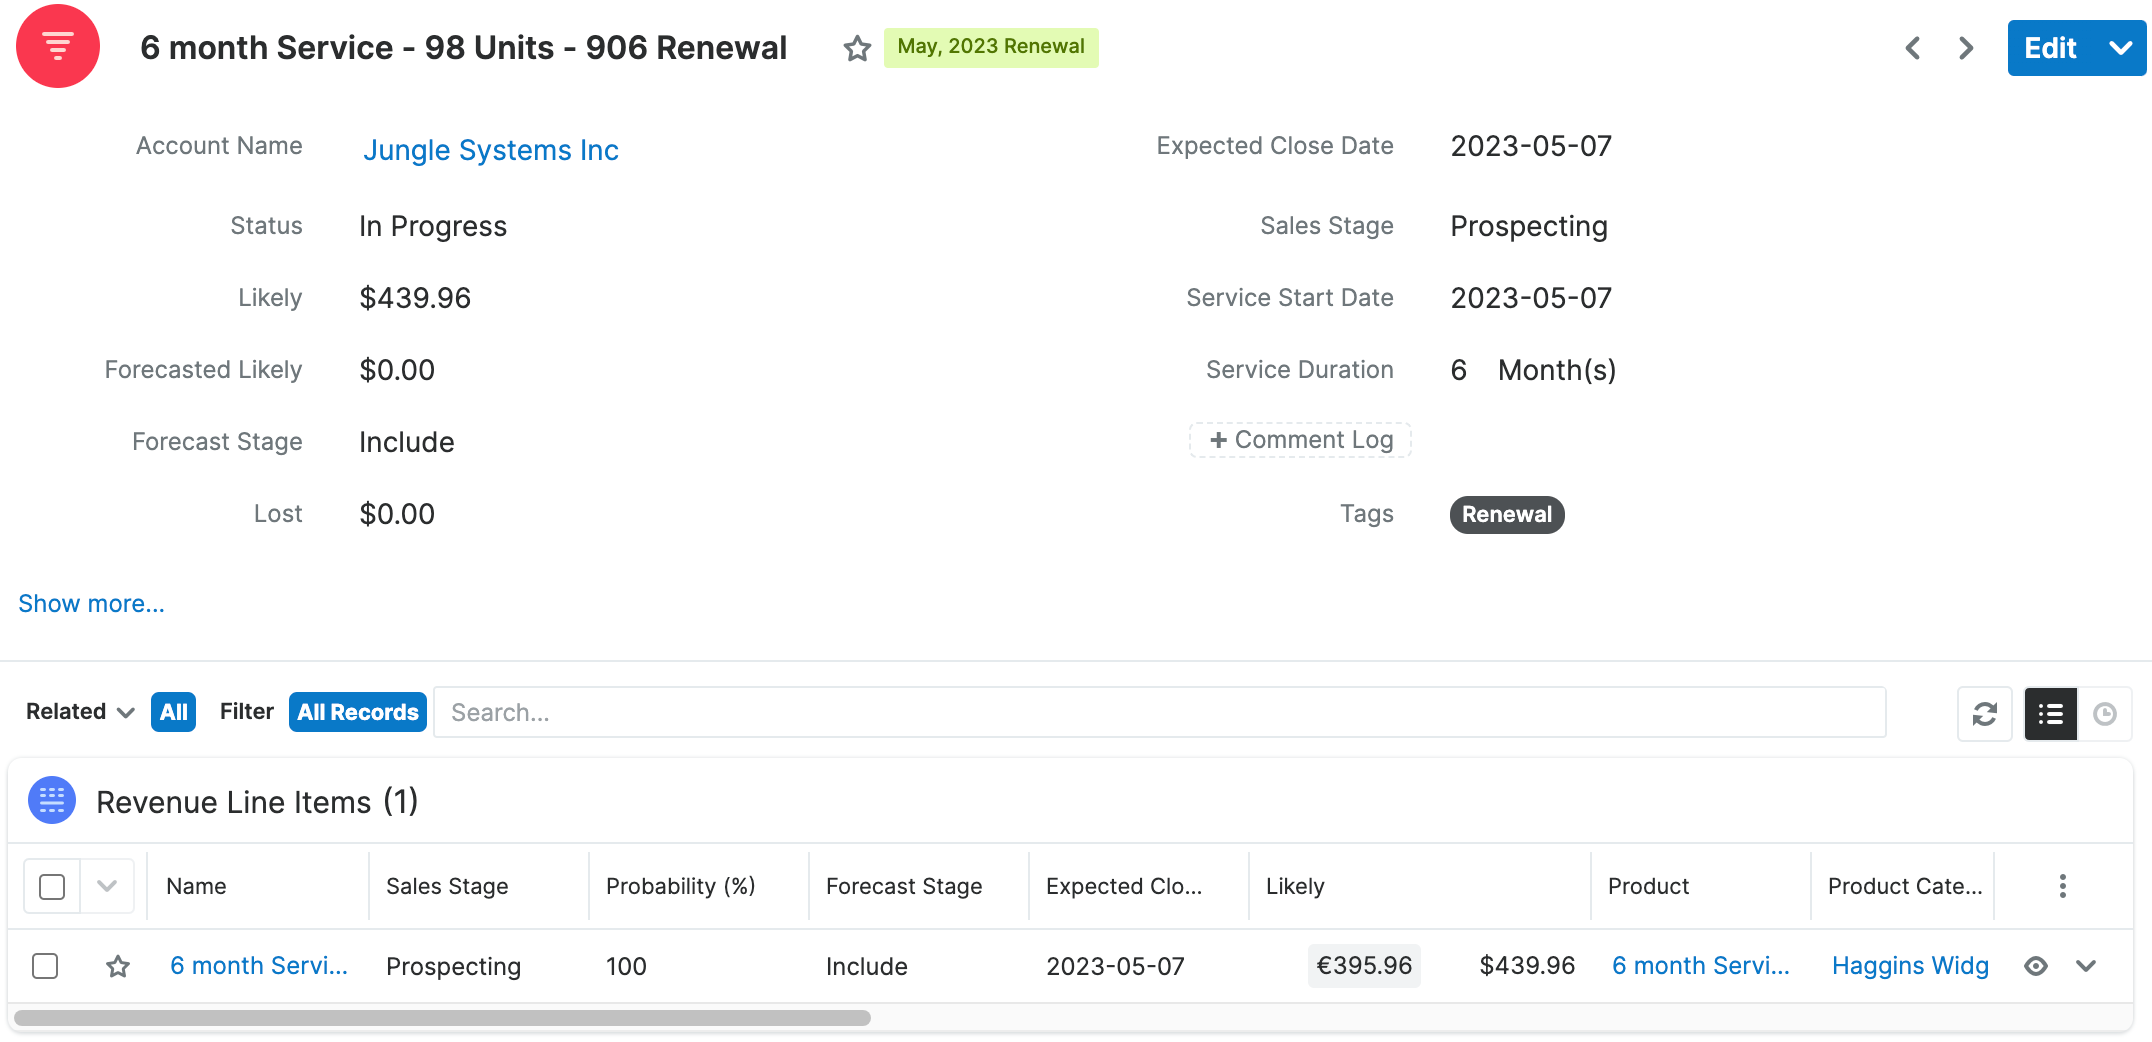
Common Modules and Capabilities
The remainder of this page contains sections that are applicable to the Opportunities module, regardless of which configuration your instance is using. Please refer to the sections listed for additional information:
- Product Catalog Dashlet
- Product Catalog Quick Picks Dashlet
- Emails and Opportunities
- Leads and Opportunities
- Forecasts and Opportunities
- Contacts and Opportunities
- Currencies and Opportunities
- Escalations and Opportunities
- Working With Sugar Modules
Product Catalog Dashlet
The Product Catalog dashlet provides users with a simple way to access the Product Catalog directly from the opportunity record and can be used to instantly add active products from the catalog as revenue line items. The Product Catalog dashlet is located next to the opportunity when creating a new opportunity and also on the Opportunities Record Dashboard on an opportunity's record view. For a detailed explanation of the various features and components of the Product Catalog dashlet, refer to the Dashboards and Dashlets documentation. For detailed steps on creating revenue line items via the Product Catalog dashlet, please refer to the Opportunities with Revenue Line Items documentation. 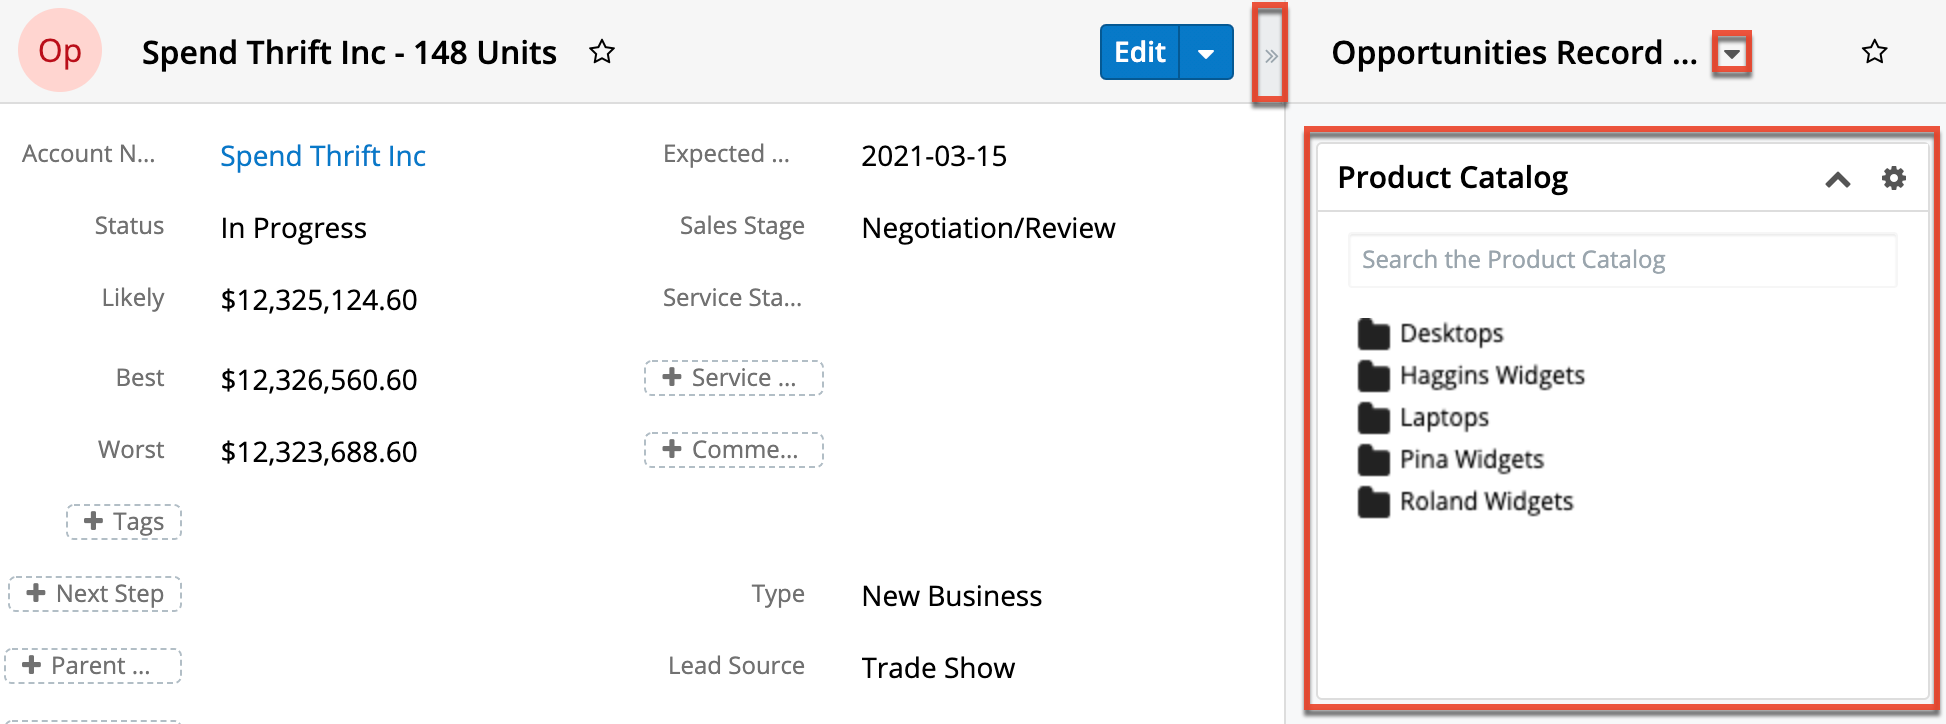
Product Catalog Quick Picks Dashlet
The Product Catalog Quick Picks dashlet provides easy access to product catalog records with a status of "Active" that you recently used or marked as favorites. The dashlet consists of two tabs (Recently Used, Favorites) and is located to the right of the page when creating a new opportunity, as well as in the Opportunities record view intelligence pane. For a detailed explanation of the various features and components of the Product Catalog Quick Picks dashlet, refer to the Dashboards and Dashlets documentation. For detailed steps on creating revenue line items via the Product Catalog Quick Picks dashlet, please refer to the Opportunities with Revenue Line Items documentation.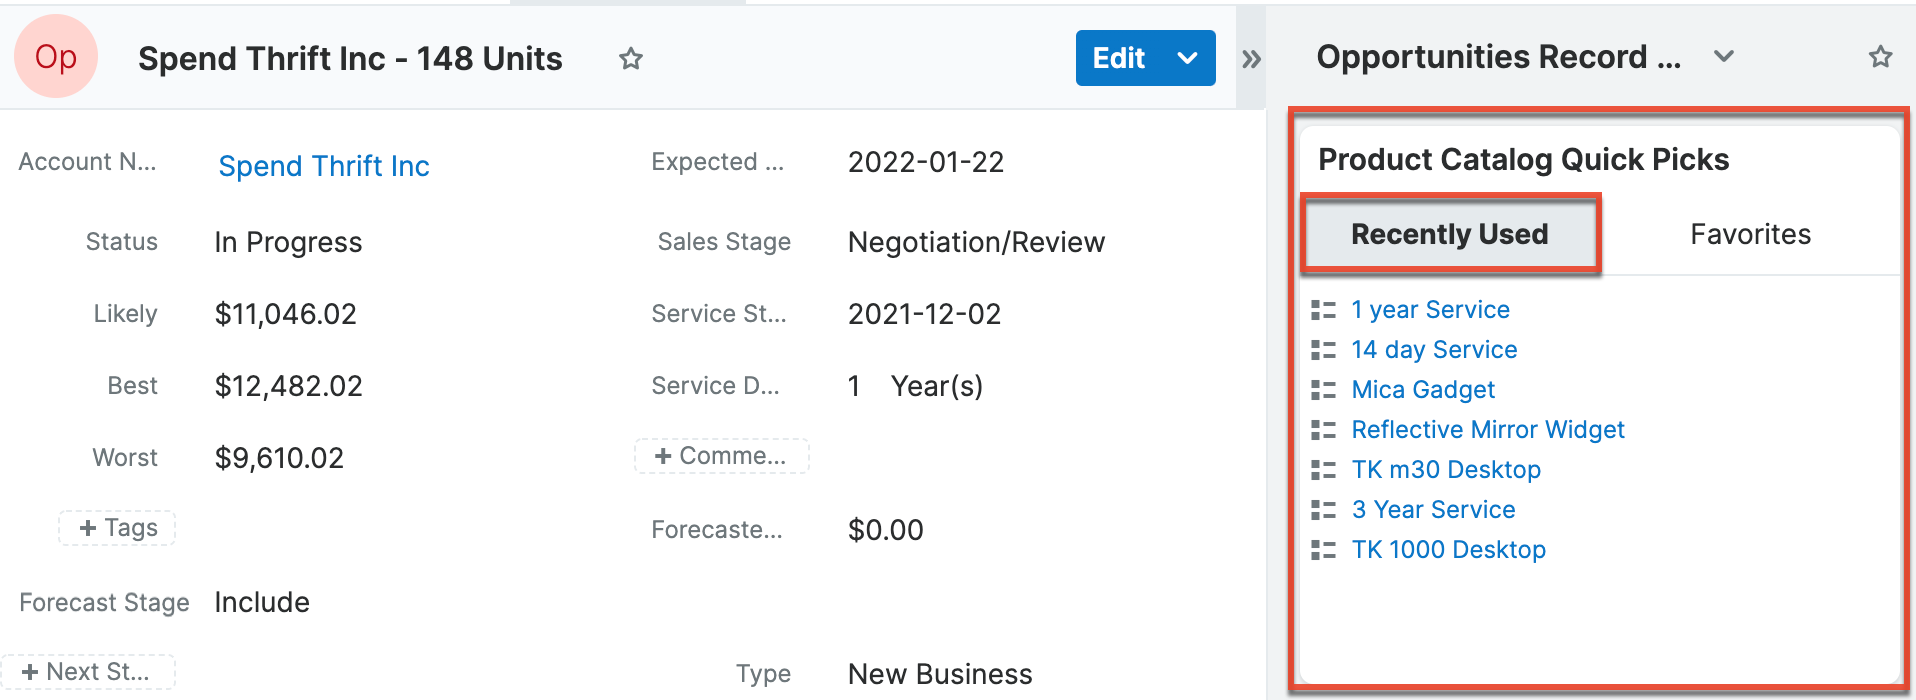
Importing Opportunities
The import function allows you to push multiple opportunity records into Sugar using a .csv file instead of creating them one by one. When an opportunity is imported into Sugar, at least one revenue line item must also be imported and related to the opportunity in order to populate the amounts (e.g., best, likely), Expected Close Date, Sales Stage, Service Start Date, and Service Duration fields on the opportunity record. When you are importing opportunity and revenue line items, please be sure to import your opportunities first, followed by your revenue line items. Each revenue line item row must include its parent opportunity's ID as well as values for its amount fields (i.e., Best, Likely, Worst). For more information on importing, please refer to the Import documentation.
Emails and Opportunities
Opportunities may be related to emails by being selected in the email's Related To field. These relationships allow the opportunity to display all relevant email correspondence in the Emails subpanel and History dashlet on an opportunity's record view. An opportunity's Emails subpanel and History dashlet may also display emails belonging to the contacts related to the opportunity.
For more information on working with emails in Sugar, please refer to the Emails documentation.
Emails Subpanel
The Emails subpanel in the Opportunities module displays emails that are associated with the opportunity record in a variety of ways:
- Related to the opportunity: If the opportunity is selected in the email's Related To field, the email and opportunity are explicitly related, and the email will appear in the opportunity's Emails subpanel and History dashlet. Instructions for using this flex relate field are available in the Emails documentation.
- Related to the opportunity's related contacts: If the email is related, either explicitly or implicitly, to a contact record that is related to the opportunity, the email will appear in the opportunity's Emails subpanel and History dashlet.
- Note: Administrators can enable or disable an opportunity from displaying related contact's emails via Admin > Related Contacts Emails. For more information, please refer to the Email documentation in the Administration Guide.
For more information on working with subpanels, please refer to the User Interface documentation.
Leads and Opportunities
Once a lead has been evaluated and qualified, it can be converted into an opportunity in addition to a contact and account. Depending on how your administrator has configured the Lead Conversion layout, it may be possible or even required to create an opportunity or relate to an existing opportunity during lead conversion. For more information on opportunities and lead conversion, please refer to the Leads documentation. For more information on lead conversion layouts, please refer to the Studio documentation.
Creating via Lead Conversion
Sugar enables you to create a new opportunity record during the lead conversion process. For more information about lead conversion, please refer to the Leads documentation.
Use the following steps to create an opportunity during lead conversion:
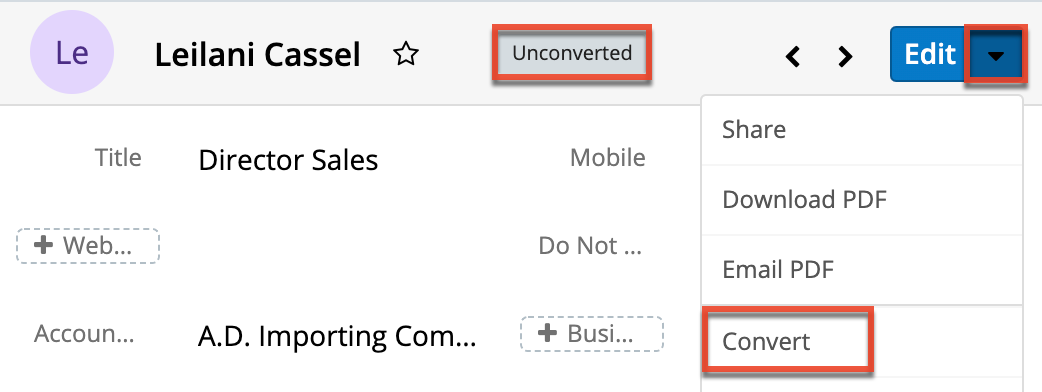
- Navigate to a Leads record view.
- Select "Convert" from the Actions menu or click the Unconverted button to initiate the lead conversion process.
- Note: Sugar will automatically perform a duplicate check for the modules (e.g., Contacts) on the Convert Lead page.
- If there are no duplicate records found for the required modules (Contacts, Accounts) in lead conversion, the new records will be automatically marked for creation on the Convert Lead page and associated to the lead. The panel will be collapsed as well, but you can click the header to open the panel and view the record's details.
- Note: If there are duplicate records detected for a module, you can either select an existing record or create a new record. For more information, please refer to the Leads documentation.
- Once the Contact and Account panels are completed, you can proceed to the Opportunity panel to create an opportunity record.
- Enter the relevant information on the displayed record view then click "Create Opportunity". Please note that some opportunity fields will not be editable as they are based on the revenue line item you entered.
- Note: Some opportunity fields (e.g., Expected Close Date) will not be editable as they are based on the related revenue line item(s).
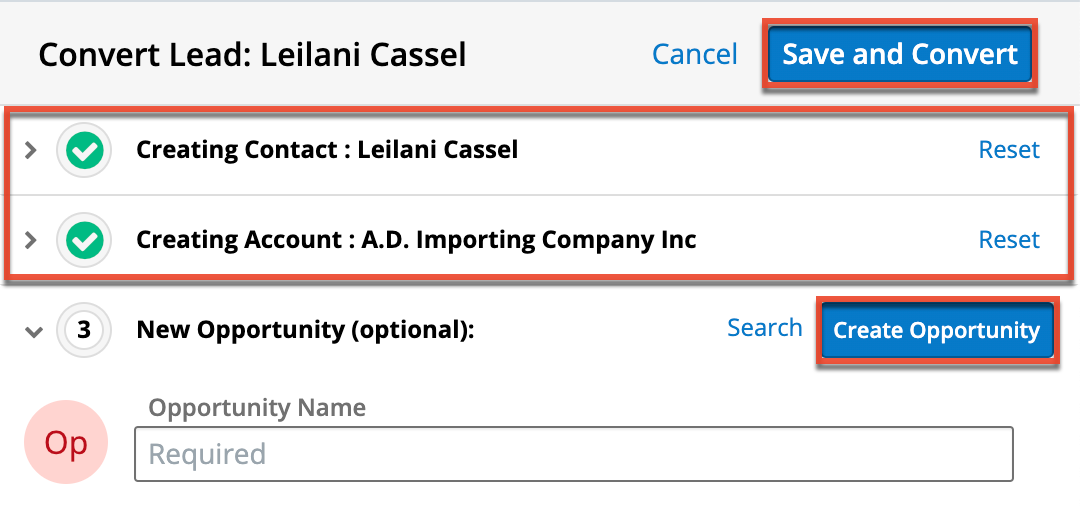
- Once all the appropriate panels are complete, click "Save and Convert" to convert the lead.
Once the lead has been converted successfully, the lead's record view will display the Converted badge in the header and show the converted contact, account, and opportunity below the record's detail. You can click the Preview icon to the far right of each record's row to view the details of the converted opportunity and other records.
Forecasts and Opportunities
Sugar's Forecasts module incorporates opportunity records to build forecasting worksheets and predict sales. Forecasts are based on the monetary value of the opportunities in Sugar. Users can work towards sales quotas at the individual, team, and sales organization level. Before users can access the Forecasts module to begin building forecasting worksheets, a user with administrator access must configure the Forecasts module with the organization's desired Time Periods, Ranges, and Scenarios. For more information on setting up the Forecasts module, please refer to the Forecast Configuration documentation in the Administration Guide.
In the Opportunity Review tab of the Forecasts module, you will see your assigned opportunities for the currently selected time period. Sales managers will see all opportunities belonging to their team members and themselves. You can work directly with your opportunity records by inline editing their values from the Forecasts module or by using the focus drawer to view and update more details on each record. Use the standard list view filters and the provided metric boxes to filter down the list to the records you would like to review. For more information on editing and managing forecasts, please refer to the Forecasts page. To understand more about working with list views, see the User Interface page.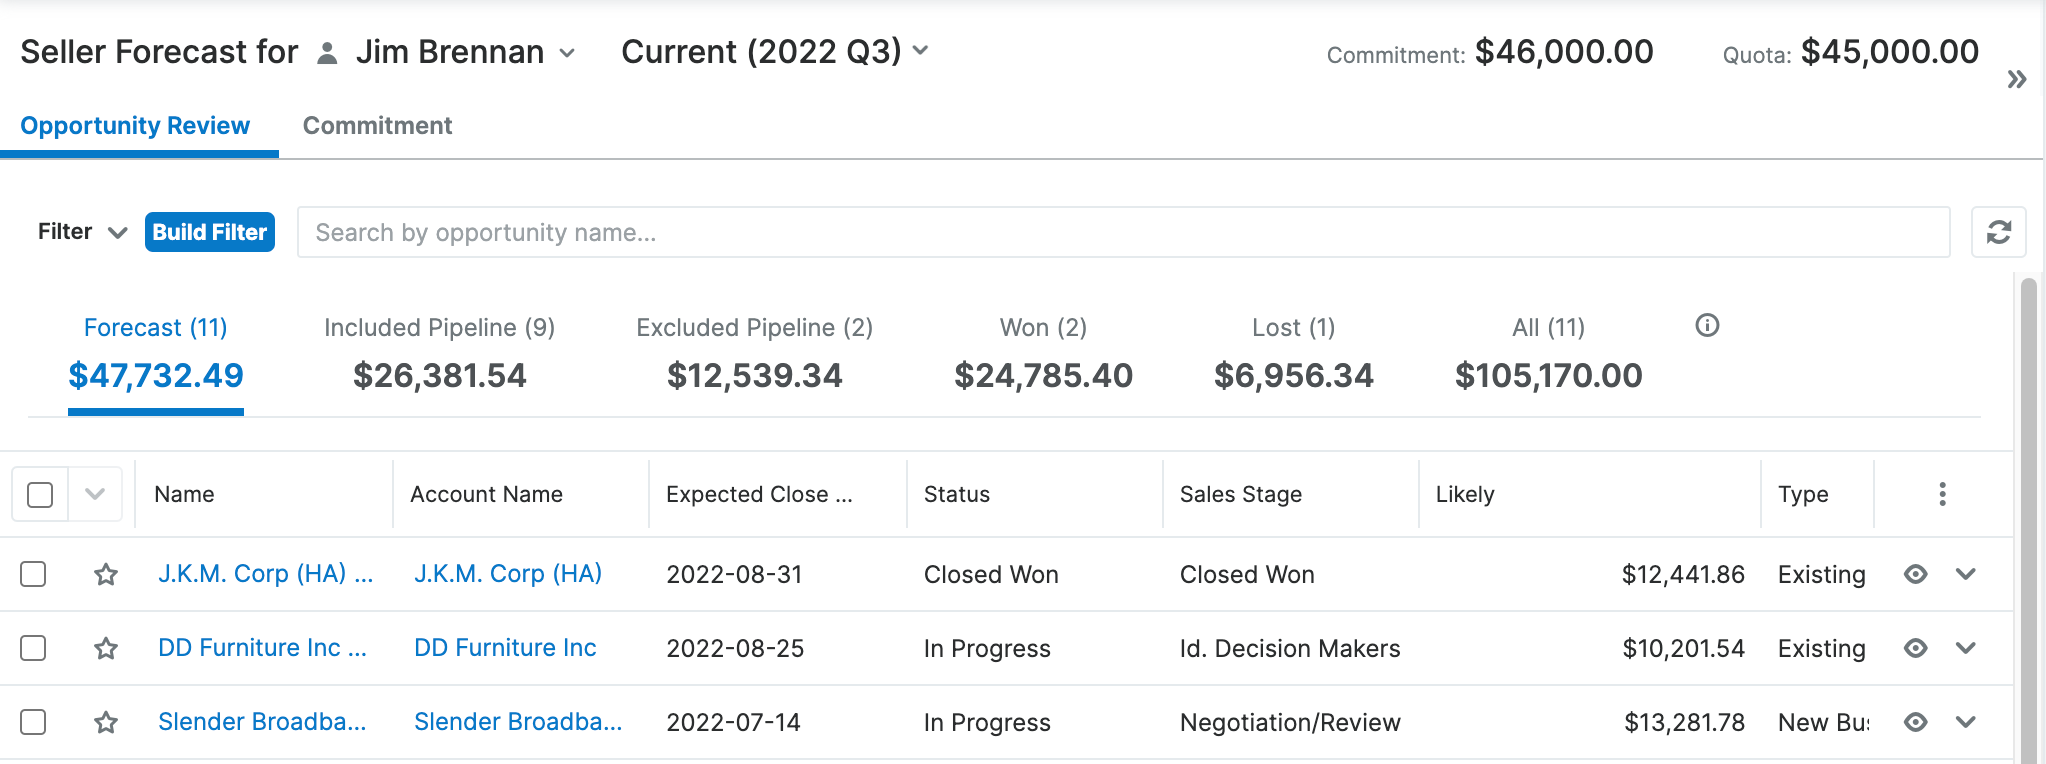
Contacts and Opportunities
Each opportunity can relate to one or more contacts that are displayed in a subpanel on the Opportunities record view. The Contacts subpanel allows users to select an opportunity-specific role (e.g., Primary Decision Maker, Business Evaluator) for each related contact to help you classify how each individual will ultimately factor into the buying decision for the current opportunity.
To select a role, simply choose "Edit" from the Actions menu on the far right of the record's row in the Contacts subpanel. The record's row will open within the subpanel allowing you to edit the individual fields. Select the appropriate role for the contact then click "Save".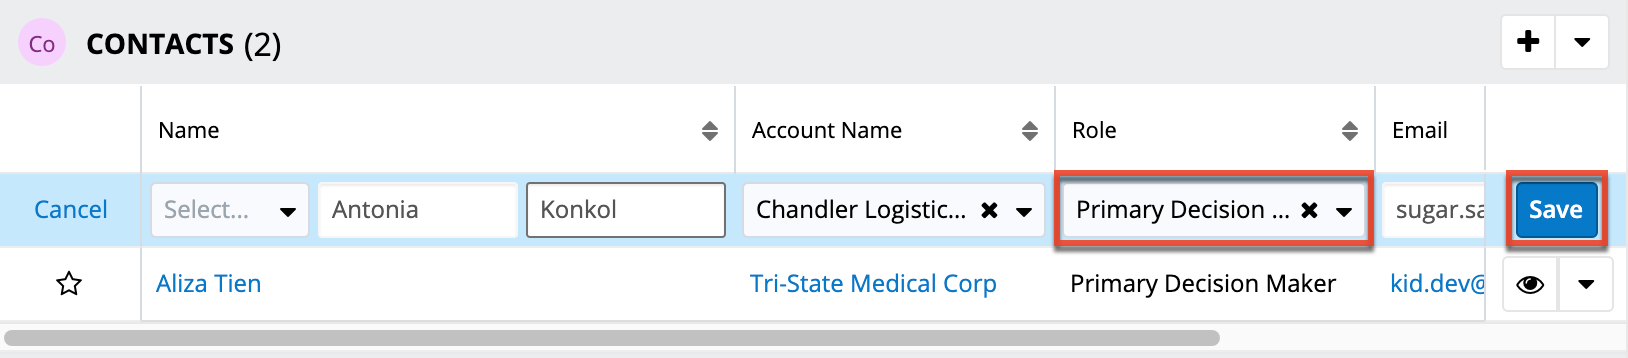
The selected role will be displayed adjacent to the contact for only the current opportunity.
Currencies and Opportunities
Sugar allows your organization to perform business around the world by supporting multiple currencies. Administrators must first add desired currencies and exchange rates to Sugar via Admin > Currencies. They also have the ability to set the instance's default currency via Admin > Locale. This is typically the currency of the country where the majority of business is conducted. For more information, please refer to the System documentation in the Administration Guide.
Users can specify their own preferred currency in their user profiles. If they choose to also enable the Show Preferred Currency option in their profiles, currency fields throughout Sugar will display in their chosen currency. For more information, please refer to the Getting Started documentation. Finally, each opportunity record has a Currency field where you will specify the currency being used.
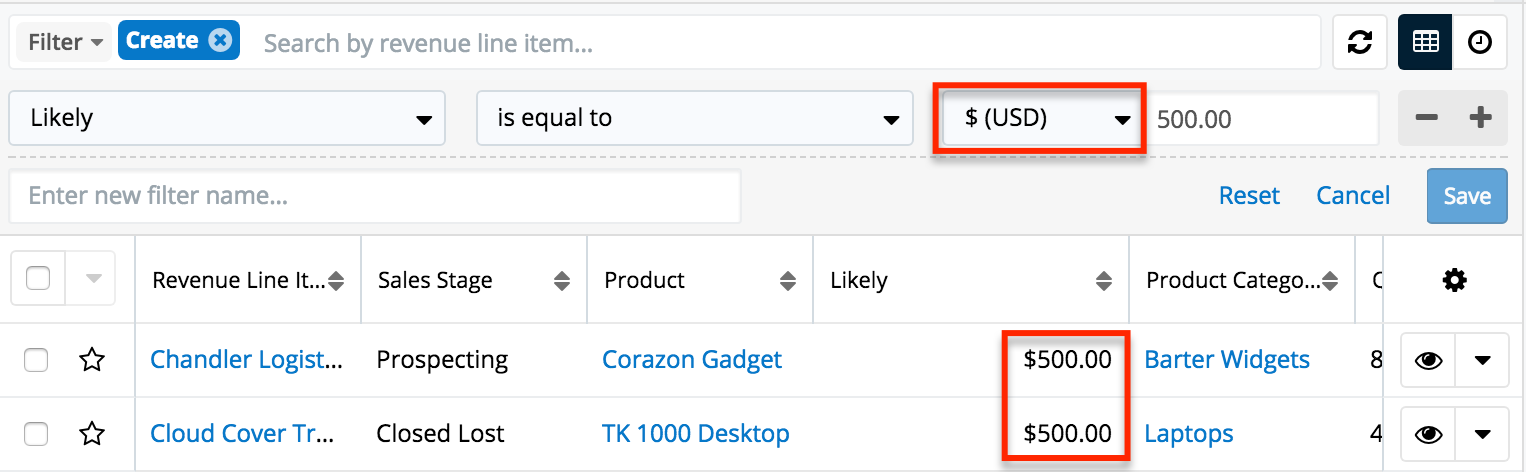
Filtering on Currency Fields
Currency fields are filtered according to the record's set currency rather than being standardized to the user's preferred or system default currency. In the list view, filtering opportunities by a currency field allows you to specify the filter's currency. Only records matching both the chosen currency and amount range will be returned. For example, if you filter based on a Likely value that equals 500 in US Dollars, then the search result will return all opportunities with a Likely value of $500 but will exclude values of €500 or other currency values which are equivalent to $500.
Note: By contrast, when filtering values in the Reports module, any record matching the specified amount or range will be returned regardless of the record's currency. For example, if one revenue line item's Likely value is $500 in US Dollars and another's is €500 in Euros, filtering a report for a Likely value of exactly 500 will return both records in the report.
Updating Currency Rates
When saving an opportunity in a currency that differs from the system-defined default currency, Sugar will store the conversion rate for that currency at the record level. This conversion rate is used to calculate the converted Likely, Best, and Worst amounts when the field is set to use the system default currency (as opposed to the user's preferred currency which is explained below). To keep amounts historically accurate, the conversion rate will only update on an opportunity provided the sales stage is not set to "Closed Won" or "Closed Lost". If the opportunity is in any other sales stage, the conversion rate will update under the following scenarios:
- The opportunity undergoes a save event (e.g., mass update, manual save) and the record's currency has a different conversion rate defined in Admin > Currencies than is currently saved in the opportunity.
- An administrator updates the currency exchange rate under Admin > Currencies. This will trigger a scheduled job that updates all opportunities saved with that currency to the new rate.
When the viewing user's profile has the Show Preferred Currency option selected, the converted Likely, Best, and Worst amounts display in the user's preferred currency. In this case, the conversion rate used to calculate the converted amounts is drawn directly from the conversion rate at the system level rather than any conversion rate stored on the record. This means that the value will always use the current conversion rate regardless of the opportunity's sales stage. For this reason, the converted amount fields should not be considered historically accurate for closed opportunities when it is using the user's preferred currency. For information about setting a user's Preferred Currency and Show Preferred Currency options, please refer to the Getting Started documentation.
For more information about currency exchange rates, please refer to the System documentation in the Administration Guide.
Escalations and Opportunities
The Escalations module is used to track the escalation of a specific record, such as an opportunity. Use the Escalate option in the opportunity's record view Actions menu to create an escalation for the opportunity. As long as the opportunity has at least one open escalation, the Escalated field is displayed as a red badge with the text "Escalated" at the top of record view and the preview. It can also be displayed in the Record View dashlet and list view.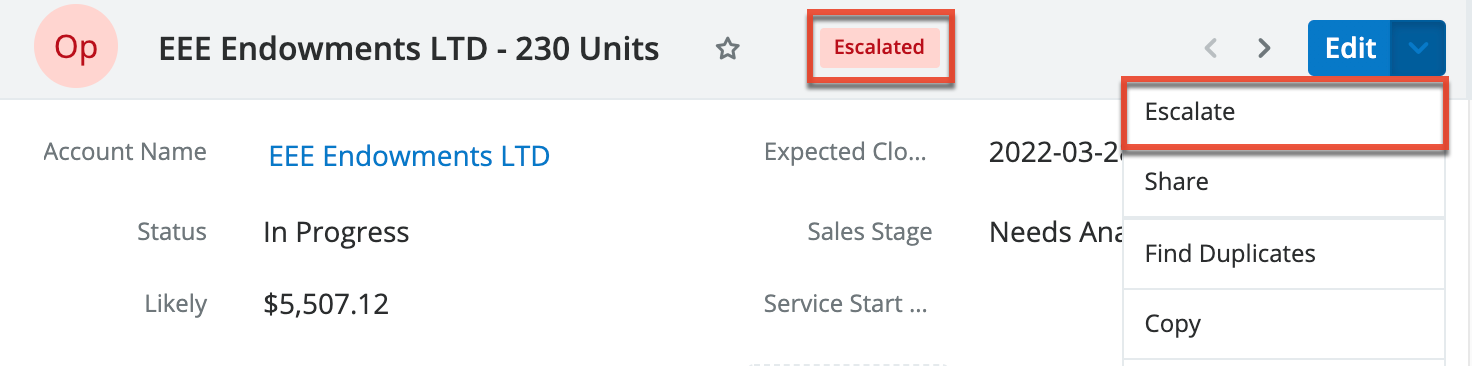
Escalating an opportunity adds the opportunity's account to the Accounts subpanel on the escalation automatically when the escalation is saved, which means that that escalation will also appear in the account's Other Related Escalations subpanel automatically. Note that if the escalation is then updated to target a different record with a related account, the new account is added but the previous account is not removed. See the Escalations page for more details on how escalations work.
Working With Sugar Modules
The Opportunities and Revenue Line Items modules use Sugar's Sidecar user interface. The following sections detail menus, views, and actions common to Sidecar modules and contain links to additional information within the page or links to the User Interface documentation.
Opportunities and Revenue Line Items Menus
The Opportunities and Revenue Line Items modules contain various options and functionality which are available via menus in the module tab, list view, and record view. The following sections present each menu type, using the Opportunities module as an example, and its options with links to more information about each option in the User Interface documentation.
Module Tab Menu
Click the Opportunities module tab in the navigation bar to access the module list view. You may also click the three-dots menu in the module tab to display the Actions, Recently Viewed, and Favorites menus. The Actions menu allows you to perform important operations within the module. The Recently Viewed menu displays the list of records you most recently viewed. The Favorites menu displays the list of records you most recently marked as favorites.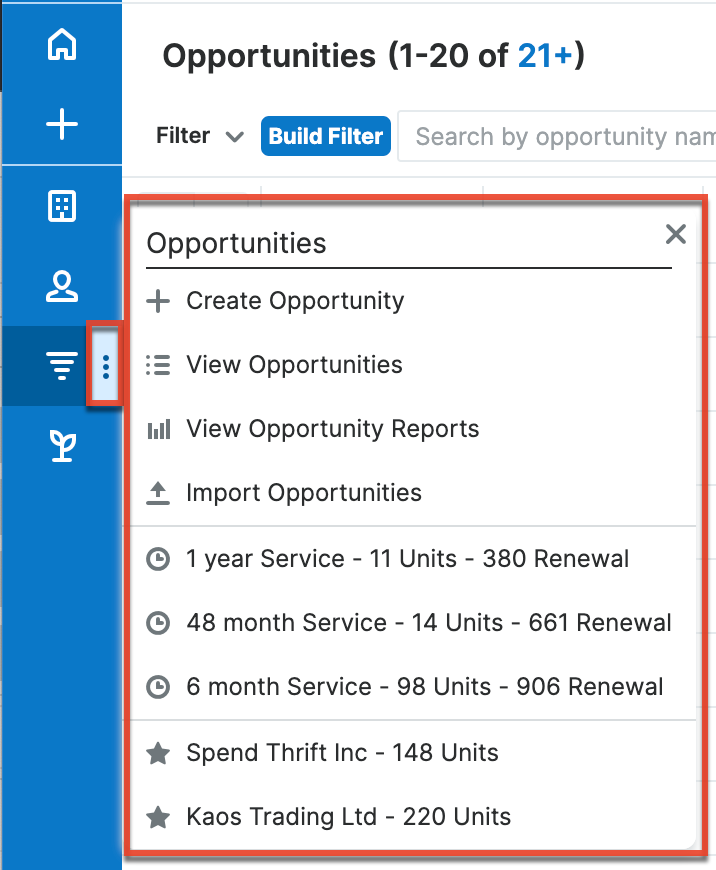
The module tab's Actions menu allows you to perform the following operations:
| Menu Item | Description |
| Create Opportunity | Opens the record view layout to create a new opportunity. |
| View Opportunities | Opens the list view layout to search and display opportunities. |
| View Opportunity Reports | Displays existing reports based on the Opportunities module. |
| Import Opportunities | Opens the import wizard to create or update opportunities using external data. |
For more information on module tab menus including reasons a module may not be included in the menu, see the User Interface documentation.
List View Menus
The Opportunities list view displays all opportunity records and allows for searching and filtering to locate specific opportunities. You can view the basic details of each record within the field columns of the list view or click an opportunity's name to open the record view. To access a module's list view, simply click the module's tab in the navigation bar.
List View Mass Actions Menu
The Mass Actions menu to the right of the checkbox option in the list header allows you to perform mass actions on all currently selected records. You can use the checkbox on each record's row to select individual opportunity records or click the checkbox in the list header to select all records displayed in the current set of list view results.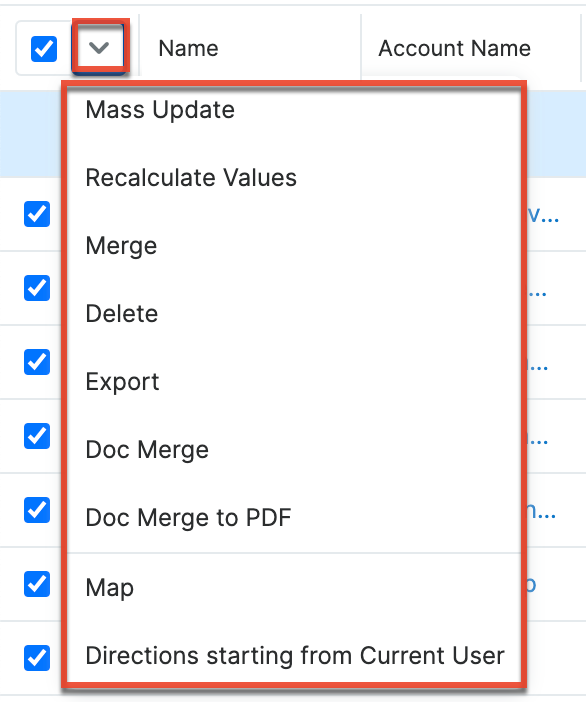
The Mass Actions menu allows you to perform the following operations:
| Menu Item | Description |
| Mass Update | Mass update two or more opportunities at a time. |
| Recalculate Values | Visible only if the module contains fields using Sugar Logic and only to System Administrators or users with Developer-level role access, this option will refresh the selected records' calculated values. |
| Merge | Merge two or more duplicate opportunities. |
| Delete | Delete one or more opportunities at a time. |
| Export | Export one or more opportunities to a CSV file. |
| Doc Merge | Select or create a DOCX template to merge record data into documents that will be accessible in the Doc Merge widget. |
| Doc Merge to PDF | Select or create a DOCX, XLSX, or PPTX template to merge record data into PDF documents that will be accessible in the Doc Merge widget. |
| Map | For instances with Sugar Maps enabled, display this record or the selected records on a map. |
| Directions starting from Current User | For instances with Sugar Maps enabled, plot driving directions on a map from your address to this record or all selected records. |
List View Record Actions Menu
The Record Actions menu to the far right of each record's row allows you to perform actions on the individual opportunity directly from the list view.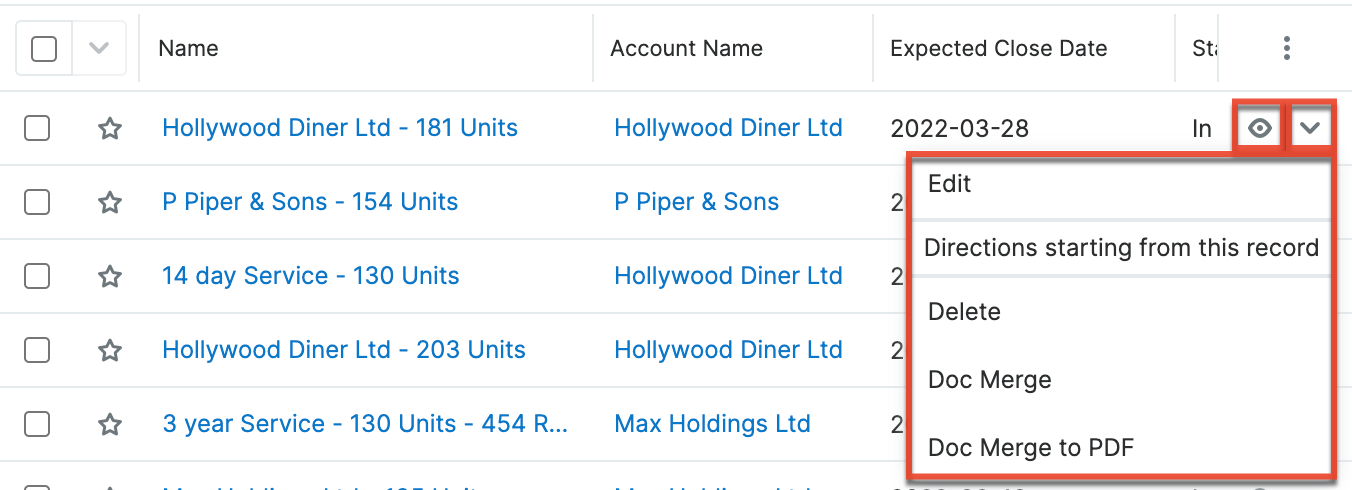
The list view's Record Actions menu allows you to perform the following operations:
| Menu Item | Description |
| Preview (Eye icon) | Preview this opportunity in the intelligence pane. |
| Edit | Edit this opportunity. |
| Follow | (Available if Activity Streams are enabled) Follow changes to this contact in your activity stream. |
| Directions starting from this record | For instances with Sugar Maps enabled, plot driving directions on a map from this record to another record or records. |
| Delete | Delete this opportunity. |
| Doc Merge | Select or create a DOCX template to merge record data into documents that will be accessible in the Doc Merge widget. |
| Doc Merge to PDF | Select or create a DOCX, XLSX, or PPTX template to merge record data into PDF documents that will be accessible in the Doc Merge widget. |
Record View Actions Menu
The Opportunities record view displays a single opportunity in full detail including its fields, subpanels of related records, and activity stream. To access an opportunity's record view, simply click a hyperlinked opportunity name from anywhere within Sugar. The record view's Actions menu appears on the top right of the page and allows you to perform various operations on the current record.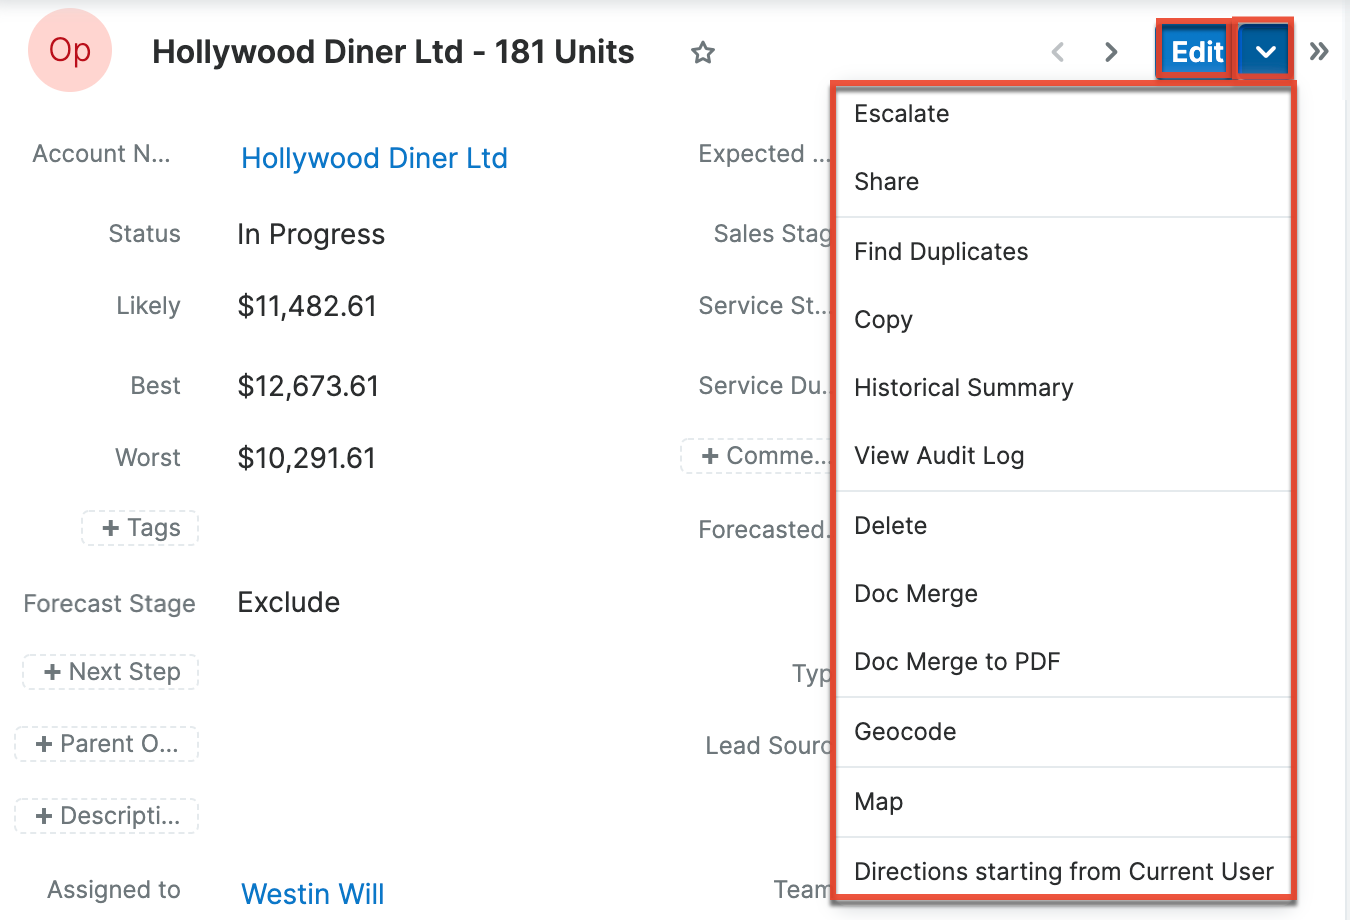
The Actions menu allows you to perform the following operations:
| Menu Item | Description |
| Edit | Edit this opportunity. |
| Escalate | Create an escalation record related to the current record. |
| Share | Share a link to this opportunity via email. Note: To send emails through Sugar, users must first configure a default user email account via Emails > Email Settings. |
| Download PDF |
Download the opportunity information as a PDF file.
|
| Email PDF |
Email the opportunity information as a PDF attachment.
Note: To send emails through Sugar, users must first configure a default user email account via Emails > Email Settings. |
| Find Duplicates | Locate potential duplicates of this opportunity. |
| Copy | Duplicate this opportunity. |
| Historical Summary | View a historical summary of activities (e.g., calls, meetings) related to this opportunity. |
| View Audit Log | View a record of changes to this opportunity. |
| Delete | Delete this opportunity. |
| Doc Merge | Select or create a DOCX template to merge record data into documents that will be accessible in the Doc Merge widget. |
| Doc Merge to PDF | Select or create a DOCX, XLSX, or PPTX template to merge record data into PDF documents that will be accessible in the Doc Merge widget. |
| Geocode | For instances with Sugar Maps enabled, manually set this record's location on a map. |
| Map | For instances with Sugar Maps enabled, display this record or the selected records on a map. |
| Directions starting from Current User | For instances with Sugar Maps enabled, plot driving directions on a map from your address to this record or all selected records. |
Common Views and Actions
In the table below, the left column contains links to the User Interface page covering topics that are applicable to all Sidecar modules. The right column has links to sections of the current page that cover topics specific to opportunities.
| General Instructions for Working With Sugar Modules | Opportunities-Specific Instructions |
| Use the links below to navigate to the User Interface page which covers topics generic to many Sugar modules. | When Opportunities-specific help exists for each topic, use the links below to navigate to sections of the current page. |
| Creating Records |
For information on importing opportunities with revenue line items, please refer to the Importing Opportunities section of this page. |
| Viewing Records | |
| Searching for Records | |
| List View | List View Mass Actions Menu List View Record Actions Menu |
| Record View | Record View Actions Menu |
| Intelligence Pane | |
| Editing Records | |
| Deleting Records | For data integrity purposes, an opportunity related to a revenue line item with a "Closed Won" or "Closed Lost" status may not be deleted. In addition, revenue line items in these statuses may not be deleted. If revenue line items are not enabled for your instance, an opportunity may be deleted only if its Status field is not set to "Closed Won" or "Closed Lost". Closed opportunities may not be deleted. |
| Emailing Records | Emails and Opportunities |
| Exporting Records | |
| Recalculating Calculated Values | |
| Finding Duplicate Records | |
| Merging Records | |
| Viewing Record Historical Summaries | |
| Viewing Record Audit Logs | |
| Record PDFs | |
| Favoriting Records | |
| Following Records | |
| Sharing Records |